This plugin will help you generate a PDF of the desired data so that you can share it with other users of your platform and save the created file in the database quickly and easily.
Applying the plugin to your bubble app is simple. You only need to place the plugin element on your page and call in the workflow the action Generate pdf from HTML server-side.
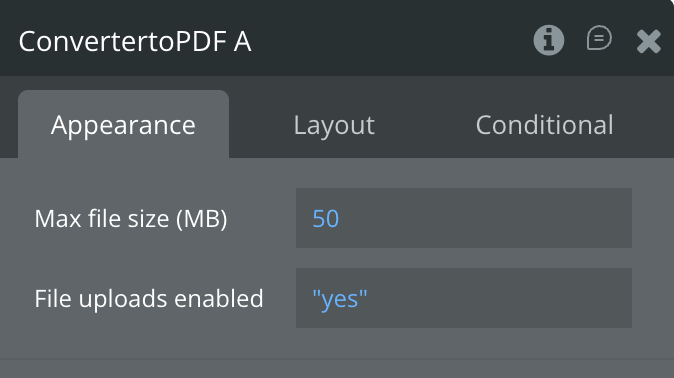
File uploads enabled - if you want the generated files to be saved in AWS please set this file with "YES".
Tutorials
How To Easily Convert Page to PDF in Bubble.io with Plugin from Zeroqode
How to Create & Send PDFs via Email in Bubble
How to Generate PDFs from Dynamic Data in Bubble
How to setup
Step 1 – Install the Plugin
Go to the Plugin Tab
Open your Bubble Editor.
Navigate to the Plugins tab on the left panel.
Add Plugins
Once in the Plugins tab, click the Add Plugins button.
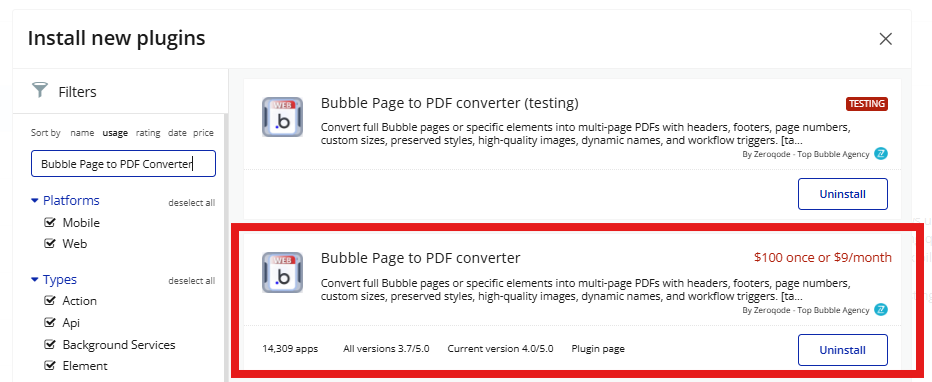
Search for the Plugin
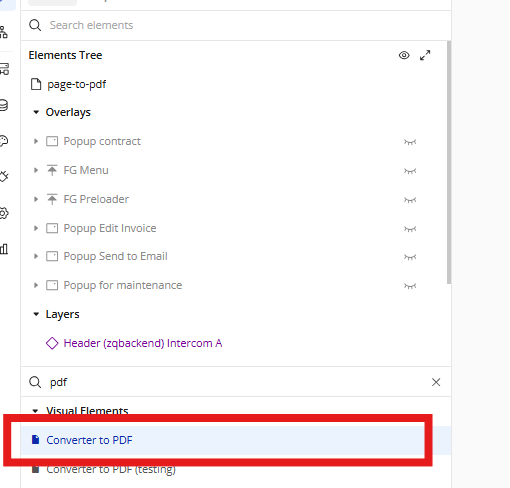
Use the search bar to type Bubble Page to PDF Converter.
Locate the plugin in the search results.
Install/Buy
Click Buy and follow the purchase instructions.
Payment Information
Fill in your payment details and make payment
Charges will be added to your Bubble billing account.
Remember, if you unsubscribe from the plugin shortly after installation, charges will be prorated based on the days used.
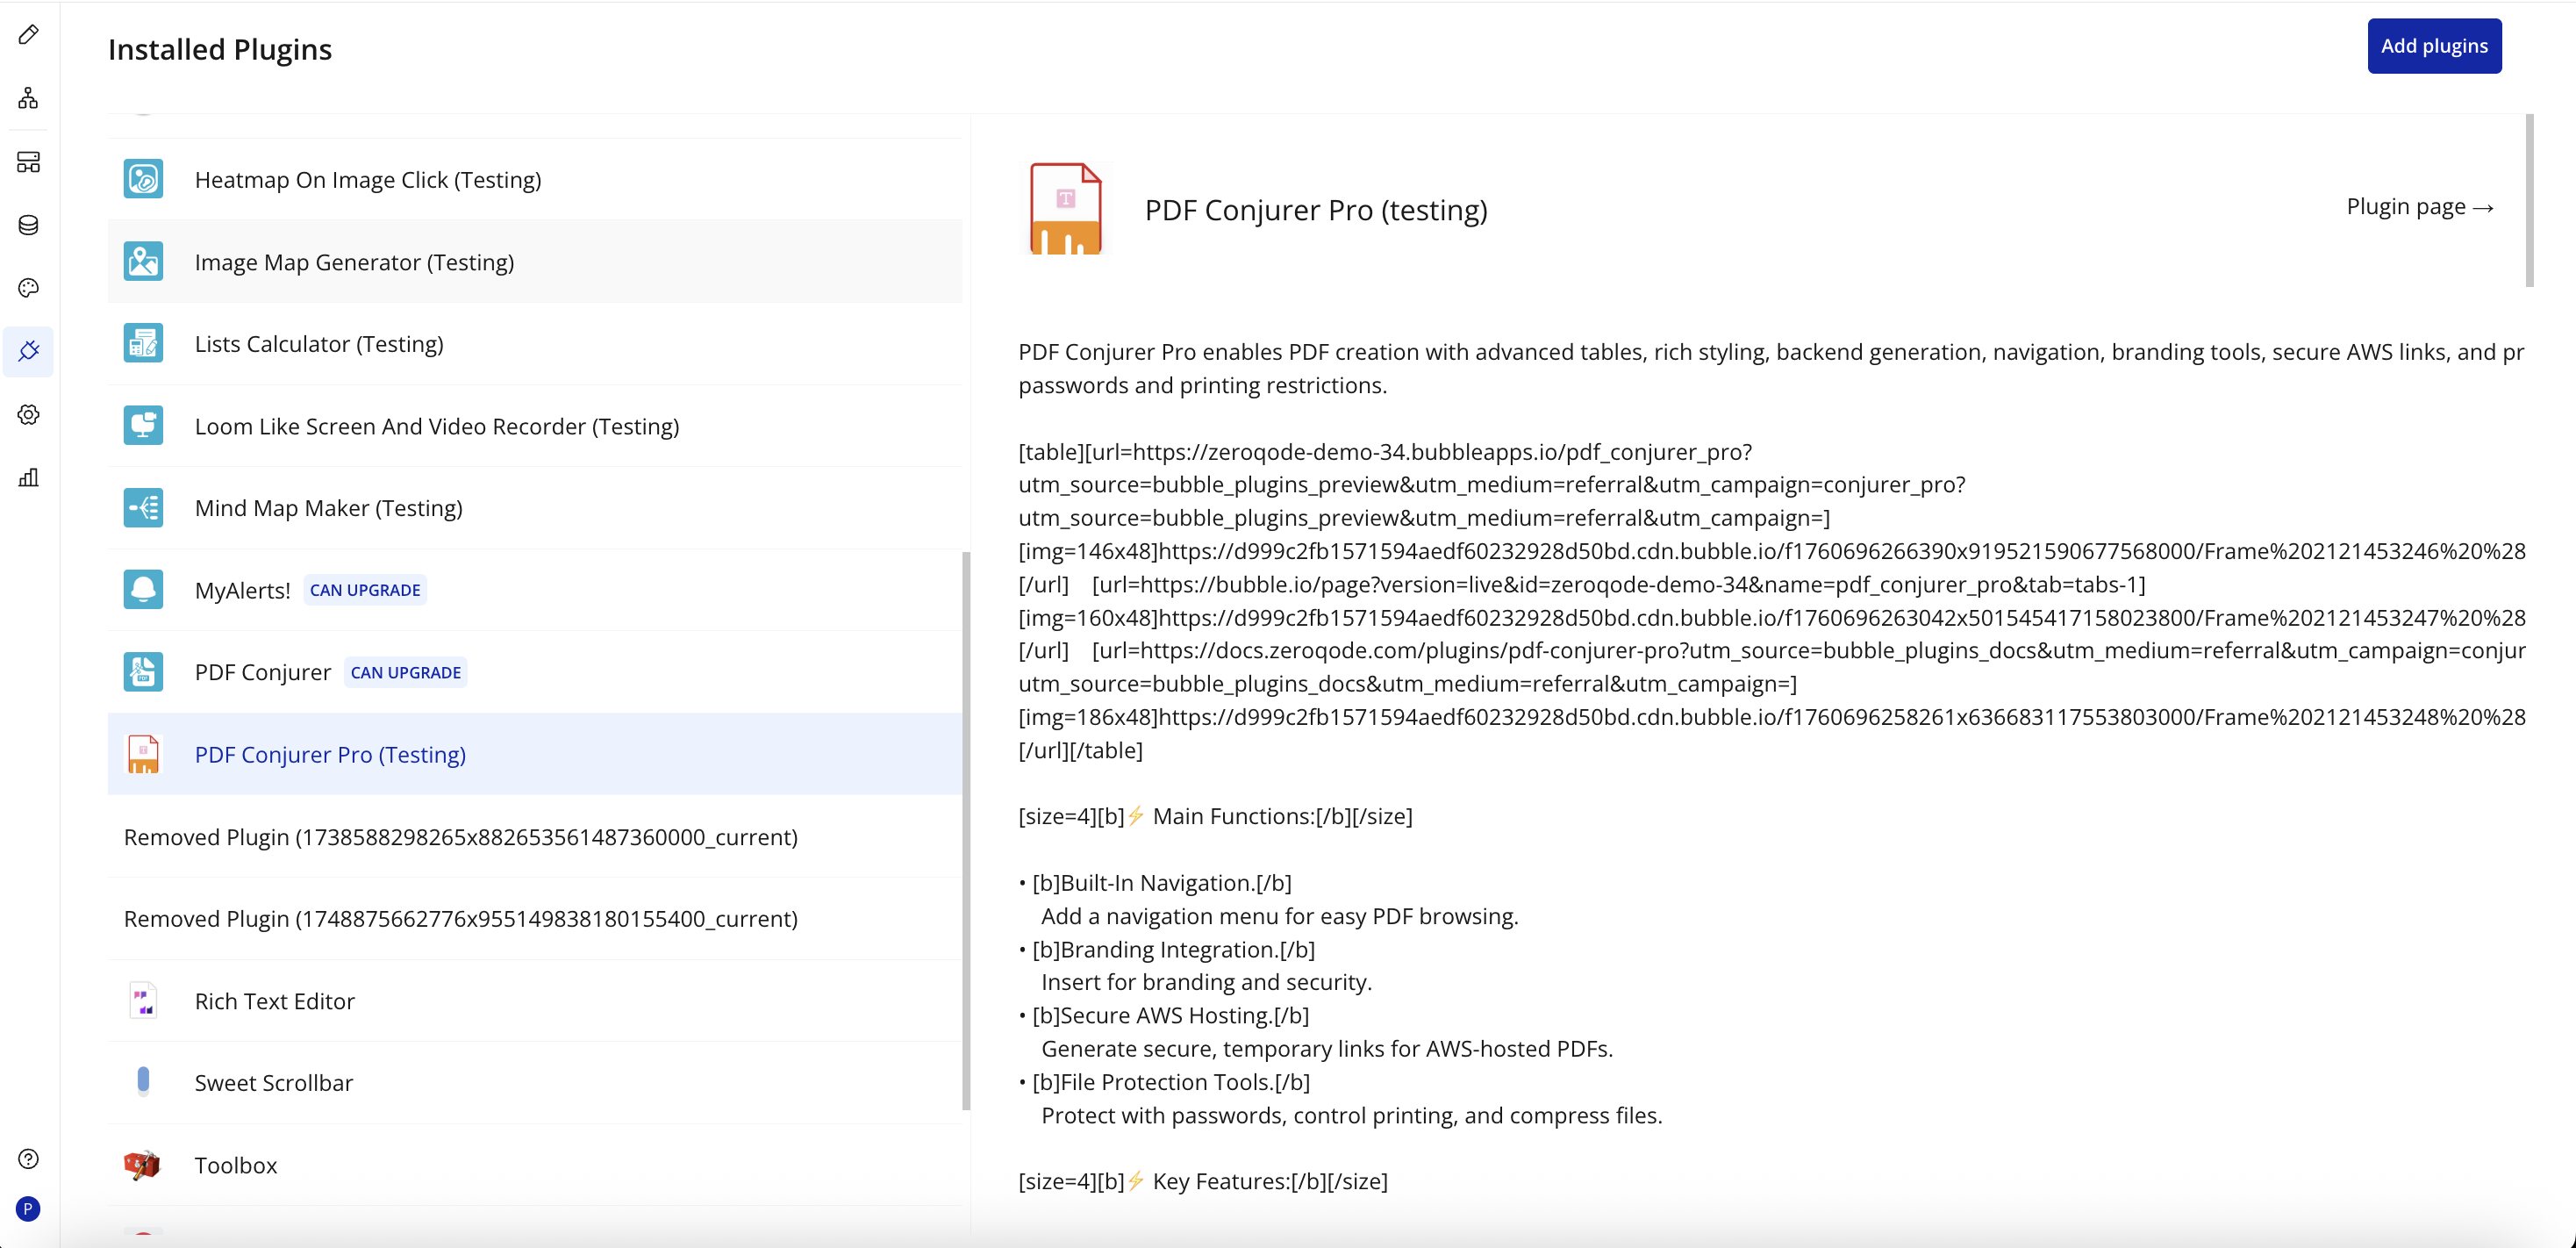
Plugin Installed
Once installed, the plugin will appear under the Installed Plugins list in your Bubble Editor.
Step 2 – Add the Plugin Element to Your Page
Open the Design tab in your Bubble editor.
Search for the Converter to PDF element in the Elements panel.
Drag and drop the element onto your page.
Step 3 – Configure Properties
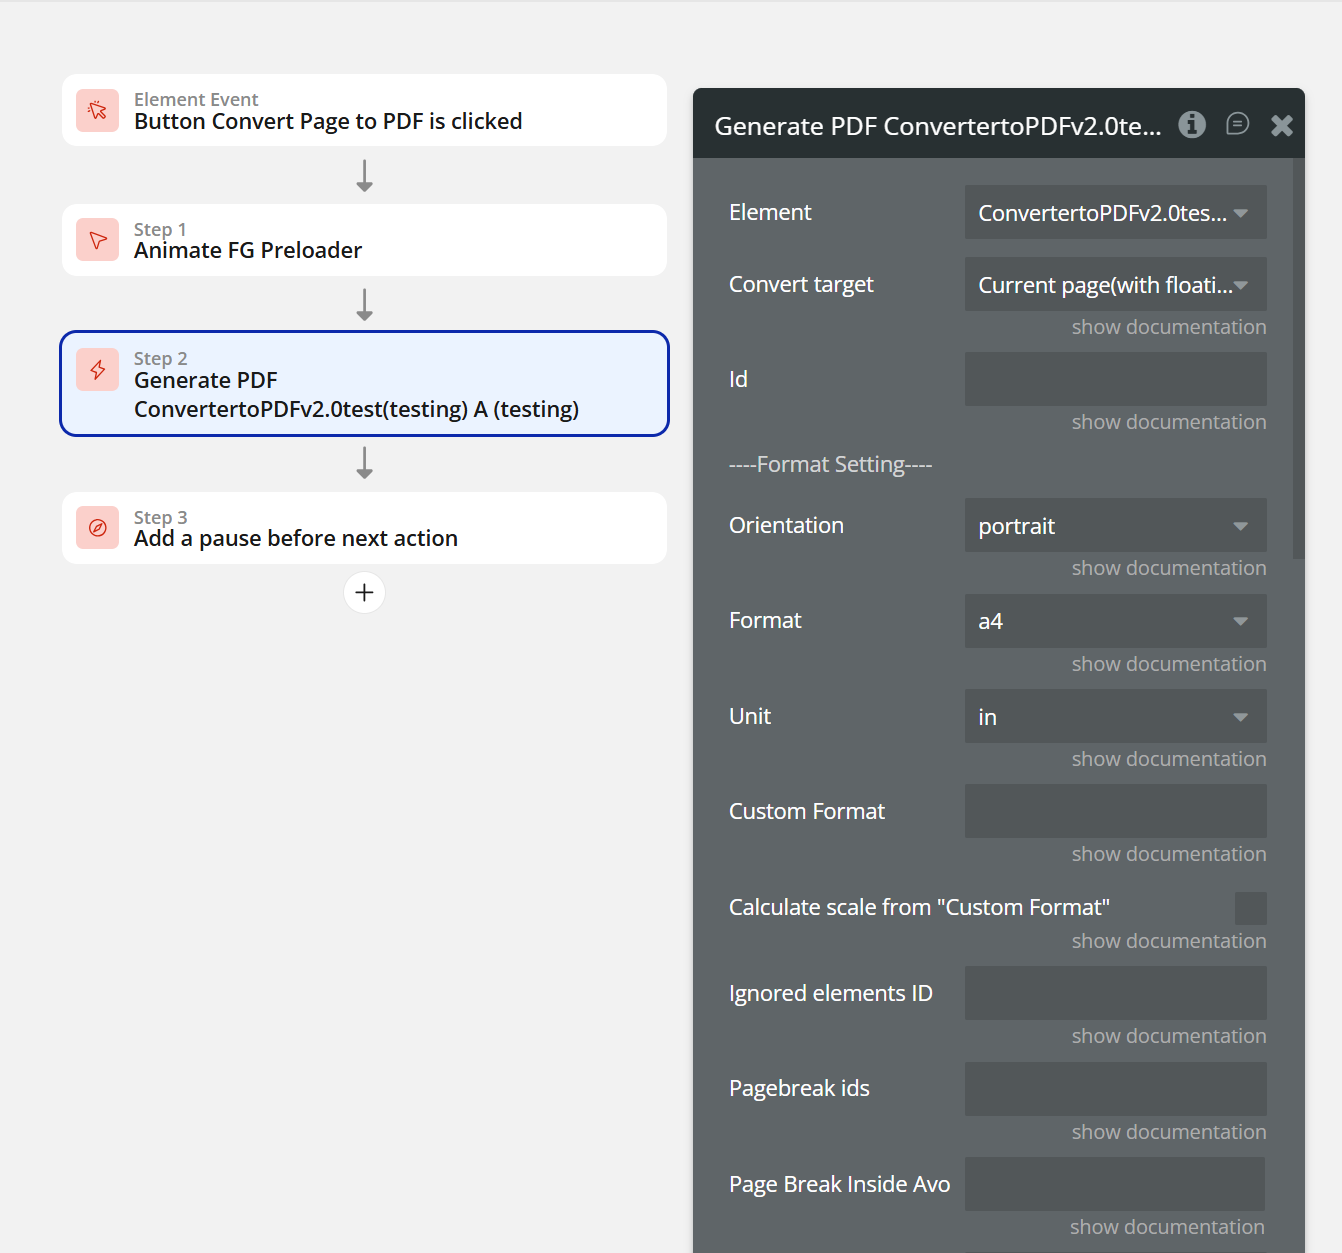
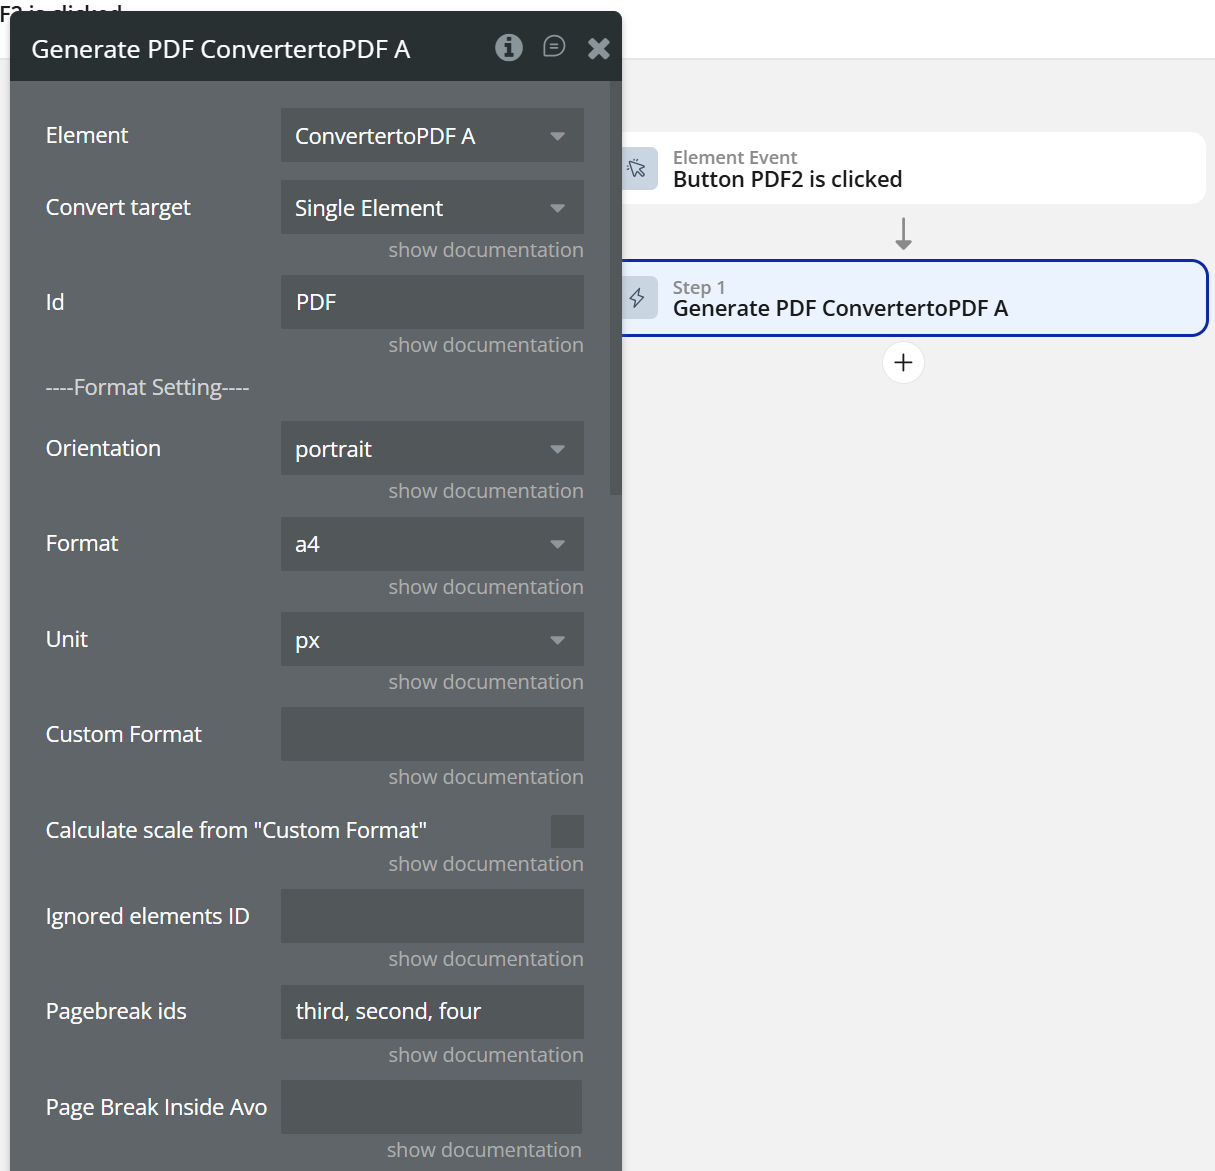
Select the element and configure workflows to start creating PDFs using 'Generate PDF ConvertertoPDFv2.0'.
To generate a PDF using the ConvertertoPDFv2.0 plugin, follow these steps: First, place the converter element on the page. Then, trigger the 'Generate PDF ConvertertoPDFv2.0' action within your workflow. Finally, specify the unique ID of the element you wish to print in the action settings. This will capture the designated container and convert it into a document.
Plugin Element - Converter to PDF
Converter to PDF is a powerful and easy-to-use plugin that allows you to convert Bubble pages, elements, and dynamic content into high-quality PDF documents.
Whether you need invoices, reports, contracts, or downloadable documents, this plugin helps you generate professional PDFs directly from your Bubble app—without writing custom code.
With flexible configuration options, you can control layout, content, and styling to ensure the final PDF matches your design requirements. The plugin is ideal for apps that require document generation, data export, or printable views, while keeping performance and reliability in mind.
Perfect for no-code builders who want a fast, reliable, and scalable PDF solution inside Bubble.
☝
The plugin relies on browser-based rendering. Certain elements (maps, WebGL, iframes) may not render correctly in PDFs.
Fields
Setting Name
Description
Type
Max file size (MB)
Defines the maximum allowed size (in megabytes) for generated or uploaded PDF files. If the file exceeds this limit, the operation will fail.
Number
File uploads enabled
Enables or disables the ability to upload generated PDF files (e.g. to Bubble File Manager or S3-compatible storage). Set to "yes" to allow uploads.
Text / Yes-No
Element Actions
Generate PDF
The Generate PDF action converts the selected Bubble page or a specific element into a PDF document using the settings configured on the plugin element.
This action captures the rendered content, applies all defined layout, pagination, header/footer, and style options, and then generates a PDF file that can be automatically downloaded, saved to the Bubble File Manager, or attached to a database item.
Property Name
Description
Type
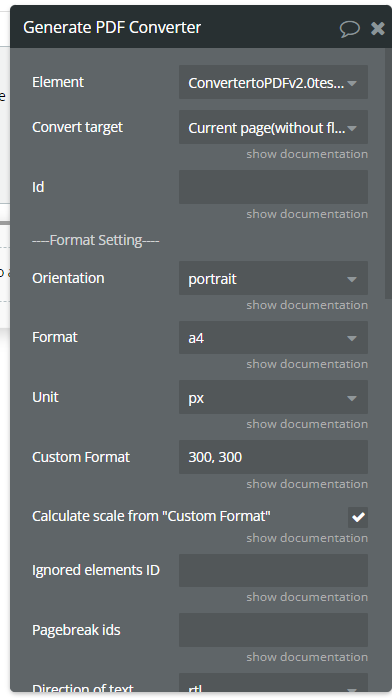
Element
The plugin element that performs the PDF conversion action.
—
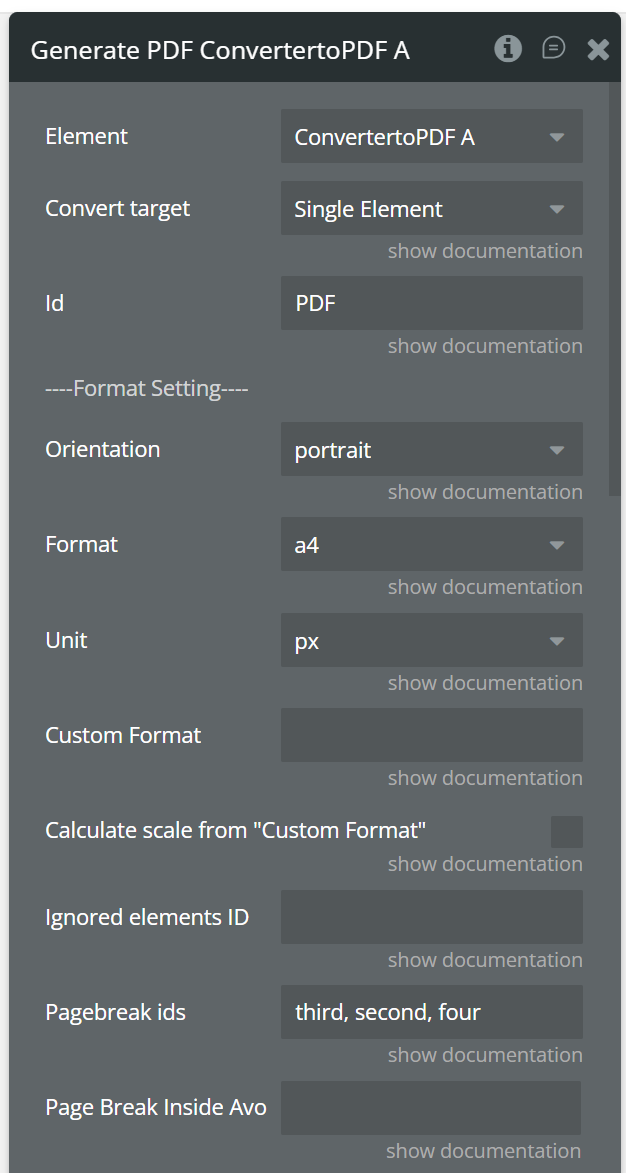
Convert Target
Defines whether to export the entire page or only a single element with a specific ID.
Dropdown
Element ID
Used only if Convert Target is set to a single element. Enter the target element’s ID.
Text
Orientation
Defines the PDF page orientation: portrait or landscape.
Dropdown
Format
Generated page size. Choose a standard format or select Custom Format.
Dropdown
Units
Units of measurement used with Custom Format (e.g. px, mm, in).
Dropdown
Custom Format
Used only if Format = Custom. Set width and height separated by a comma (example: 1300,840).
Text
Calculate scale from Custom Format
Automatically calculates a scale transformation to resize the content to fit the custom format.
Yes / No
Ignored Elements ID
List of element IDs that will be ignored when generating the PDF.
Text
Pagebreak IDs
Element IDs that should be printed on separate pages (one element per page).
Text
Page Break Inside Avoid
Prevents specified elements from being split across pages. Does not work with the old responsive layout. If the element is still cut, it means the element is too large to fit on a single page.
Text
Styles for Print
Allows defining different styles for screen and print rendering.
Yes / No
Direction of Text
Text direction: use rtl for right-to-left languages (Arabic, Hebrew) and ltr for left-to-right languages.
Dropdown
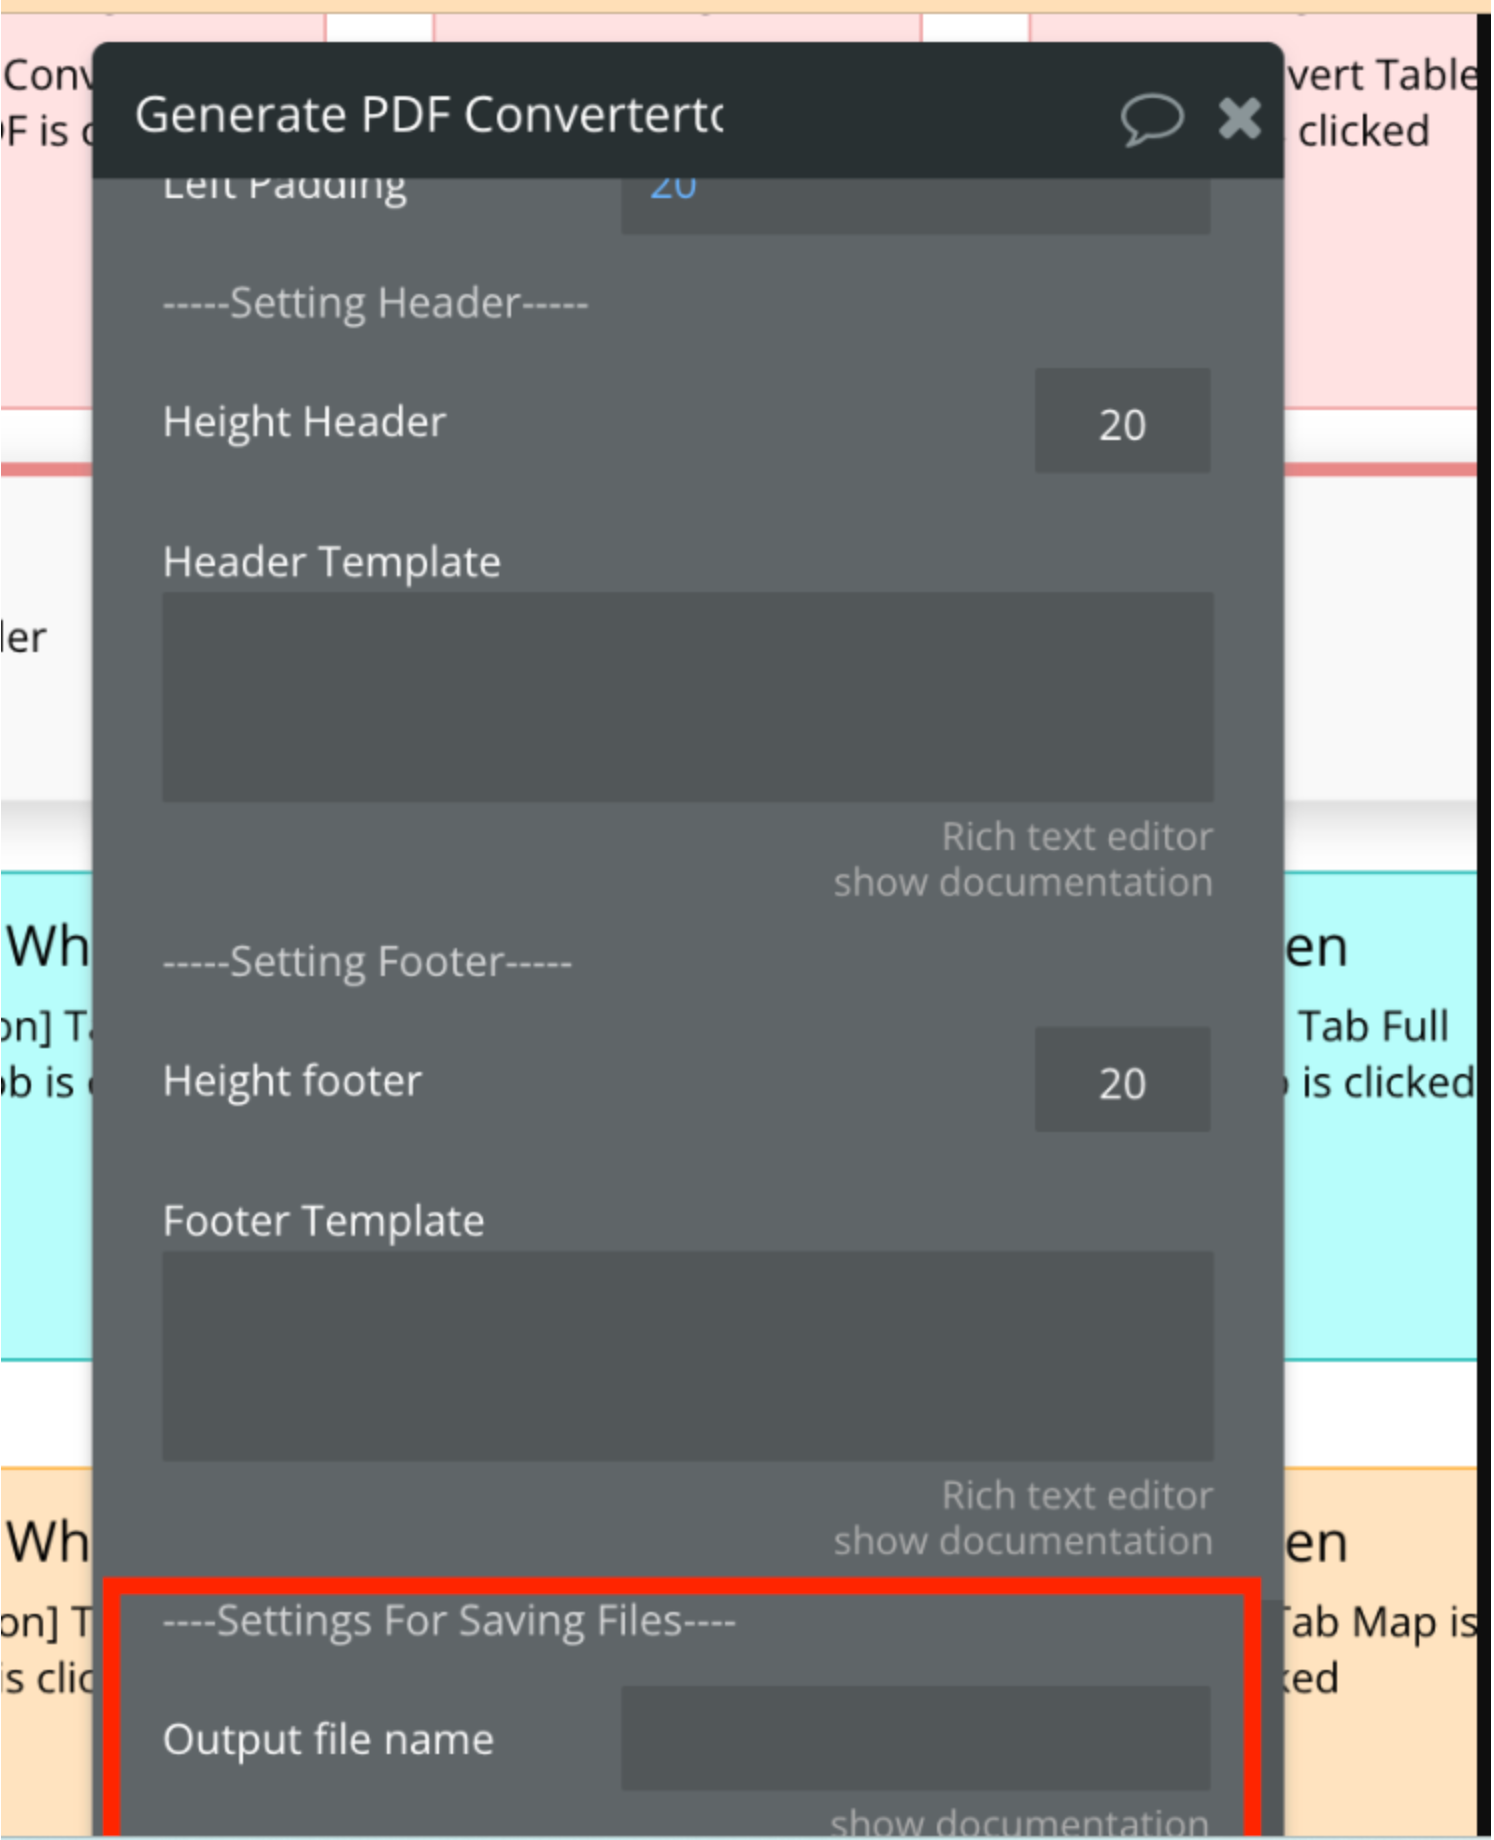
Top Padding
Top padding of the PDF page.
Number
Bottom Padding
Bottom padding of the PDF page.
Number
Left Padding
Left padding of the PDF page.
Number
Right Padding
Right padding of the PDF page.
Number
Header Height
Height of the PDF header section.
Number
Header Template
HTML template for the print header. Supports special classes: date, title, url, pageNumber, totalPages.
Text
Footer Height
Height of the PDF footer section.
Number
Footer Template
HTML template for the print footer. Supports the same special classes as the header.
Text
Output File Name
Custom name for the generated PDF file.
Text
Upload File to AWS
When enabled, the generated PDF is saved to the Bubble File Manager.
Yes / No
Attach To Type
Data type to which the generated file will be attached.
Type
Auto Save to PDF after Converting
Automatically downloads the PDF to the user’s device after conversion.
Yes / No
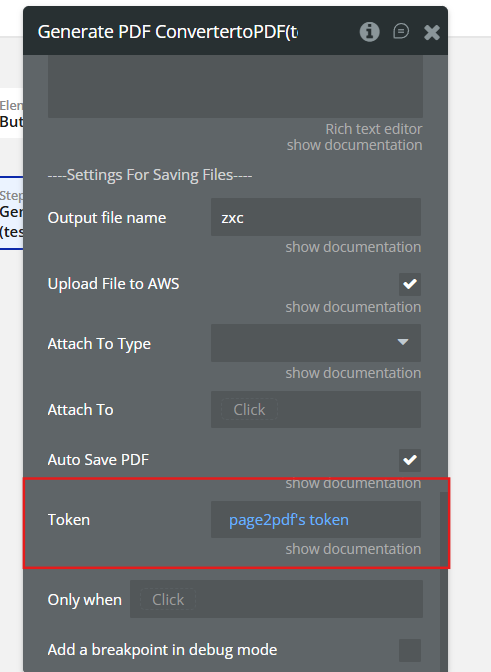
Token
Security token generated by the plugin action Get Token. This token is used to hide sensitive keys and allows access to private files when generating PDFs from protected resources.
Resetting states - it is an action that will reset the states of the 'Convert to PDF' element.
💡
This plugin does not support processing 3D elements in Canvas. Using it for 3D objects or elements may result in limited functionality or unexpected errors. We recommend using dedicated solutions for rendering and manipulating 3D objects.
Element Events
Event Name
Description
Uploading to AWS is finished
Triggered when the generated PDF file has been successfully uploaded to the configured S3-compatible cloud storage.
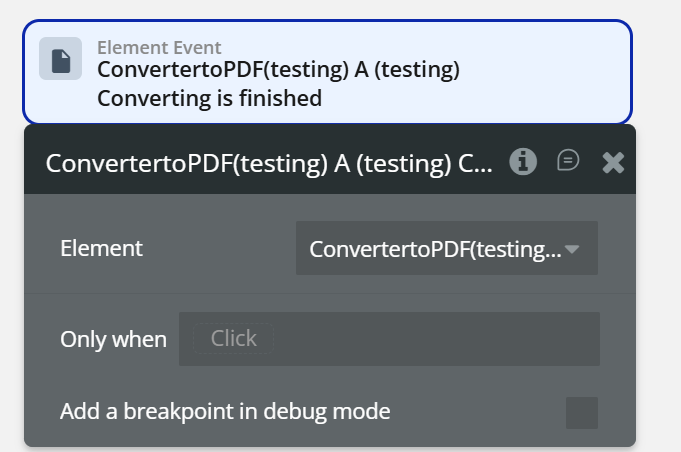
Converting is finished
Triggered when the PDF conversion process is completed and the file is ready for further actions (download, upload, or attach).
Pre-signed URL is ready
Triggered when the pre-signed URL has been generated and is available for secure access to the uploaded PDF file.
Element States
State Name
Description
Type
Converting is finished
Indicates whether the PDF conversion process has been completed successfully.
Yes / No
Output File URL
Public or temporary URL of the generated PDF file, available after the conversion is finished.
Text
Uploading to File Manager is finished
Indicates that the generated PDF file has been successfully saved to the Bubble File Manager.
Yes / No
Pre-signed URL
A temporary, signed URL that allows secure access to the generated PDF file. This URL can be used to enable the Save to bucket action and upload the file to Amazon S3 or any other S3-compatible cloud storage. The link has a limited expiration time.
Text
Plugin Action
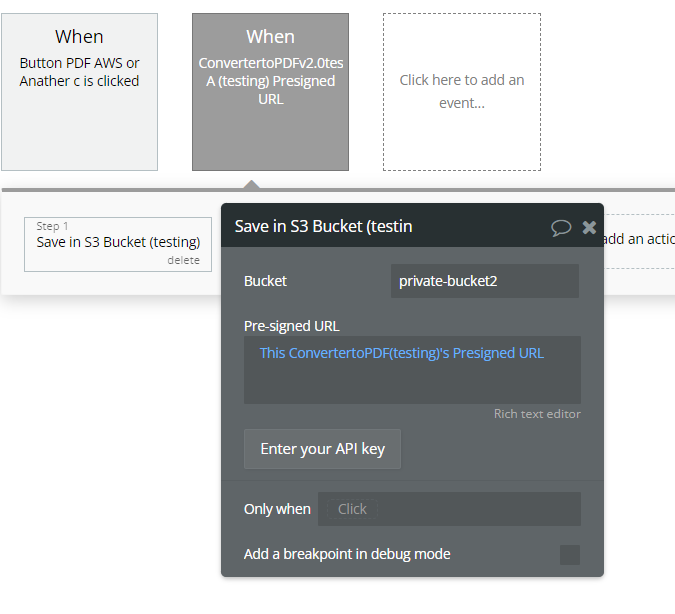
Save in S3 Bucket
The Save in S3 Bucket action allows you to upload the generated PDF file to an S3-compatible cloud storage service (AWS S3, Wasabi, Backblaze, DigitalOcean Spaces, etc.).
⚠️ To use this action, Access Keys must be configured in the Plugin Settings.
Setting the Access Keys
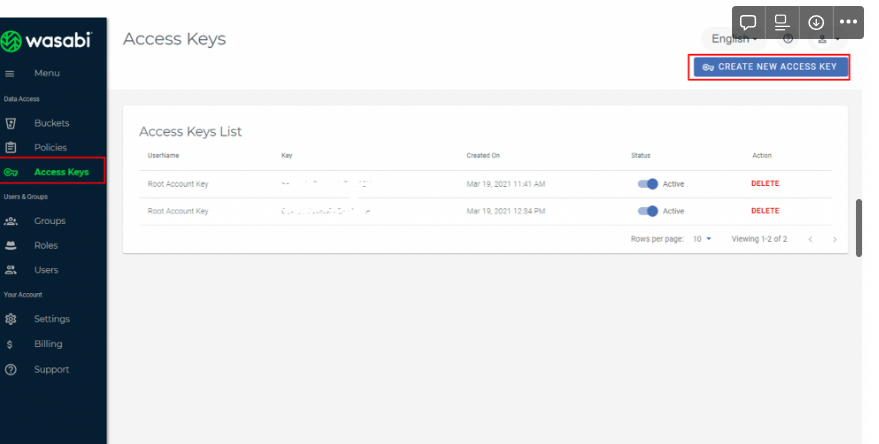
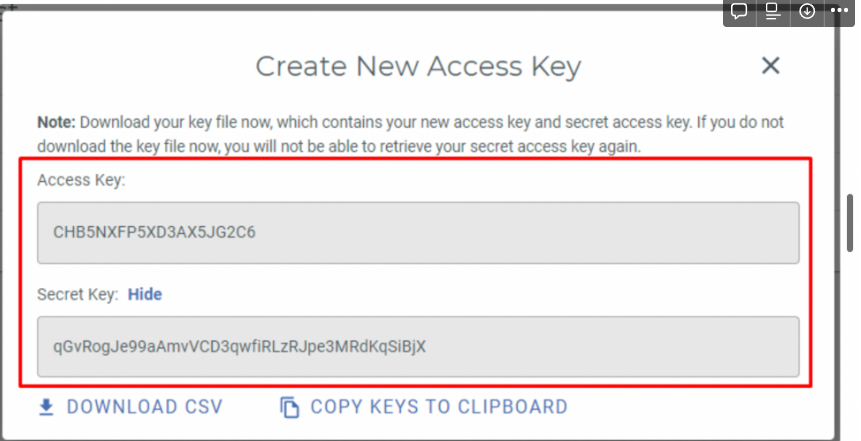
Step 1: Create a Cloud Storage Account
Create an account with a cloud storage provider that is compatible with the AWS SDK
Paste it into the Endpoint field in the plugin settings
CORS Configuration (Required)
To allow the browser to upload files directly to your S3 bucket, you must configure CORS in your cloud storage dashboard.
⚠️ This step must be done manually in your cloud provider settings.
Open your bucket settings
Locate the CORS configuration
Allow:
GET
PUT
POST
Allow your Bubble app domain (.bubbleapps.io or custom domain)
Bucket name
Pre-signed URL - the link you receive in the pre-signed URL state
Bucket & File Access
Bucket Name
The name of the bucket where the PDF will be stored.
Pre-signed URL
The plugin generates a temporary pre-signed URL, exposed via the plugin state, which allows secure access to the uploaded PDF file.
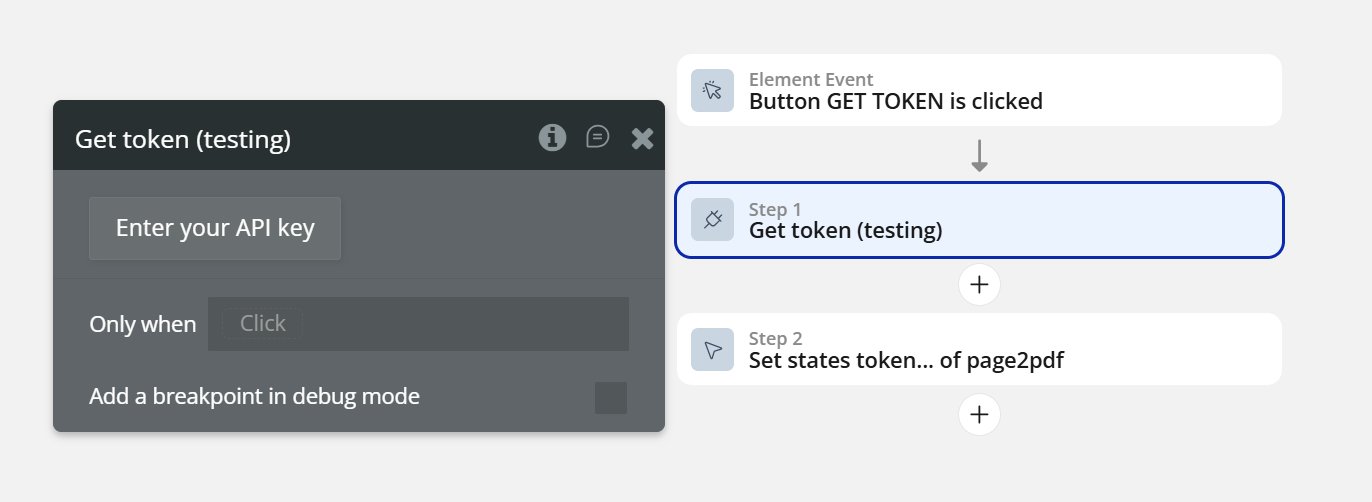
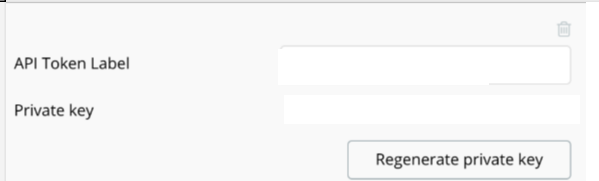
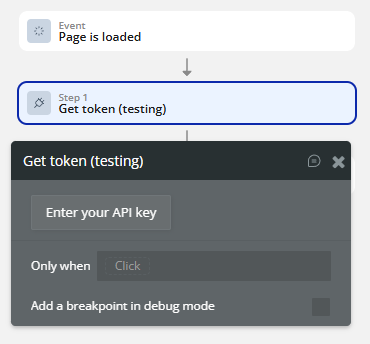
Get Token
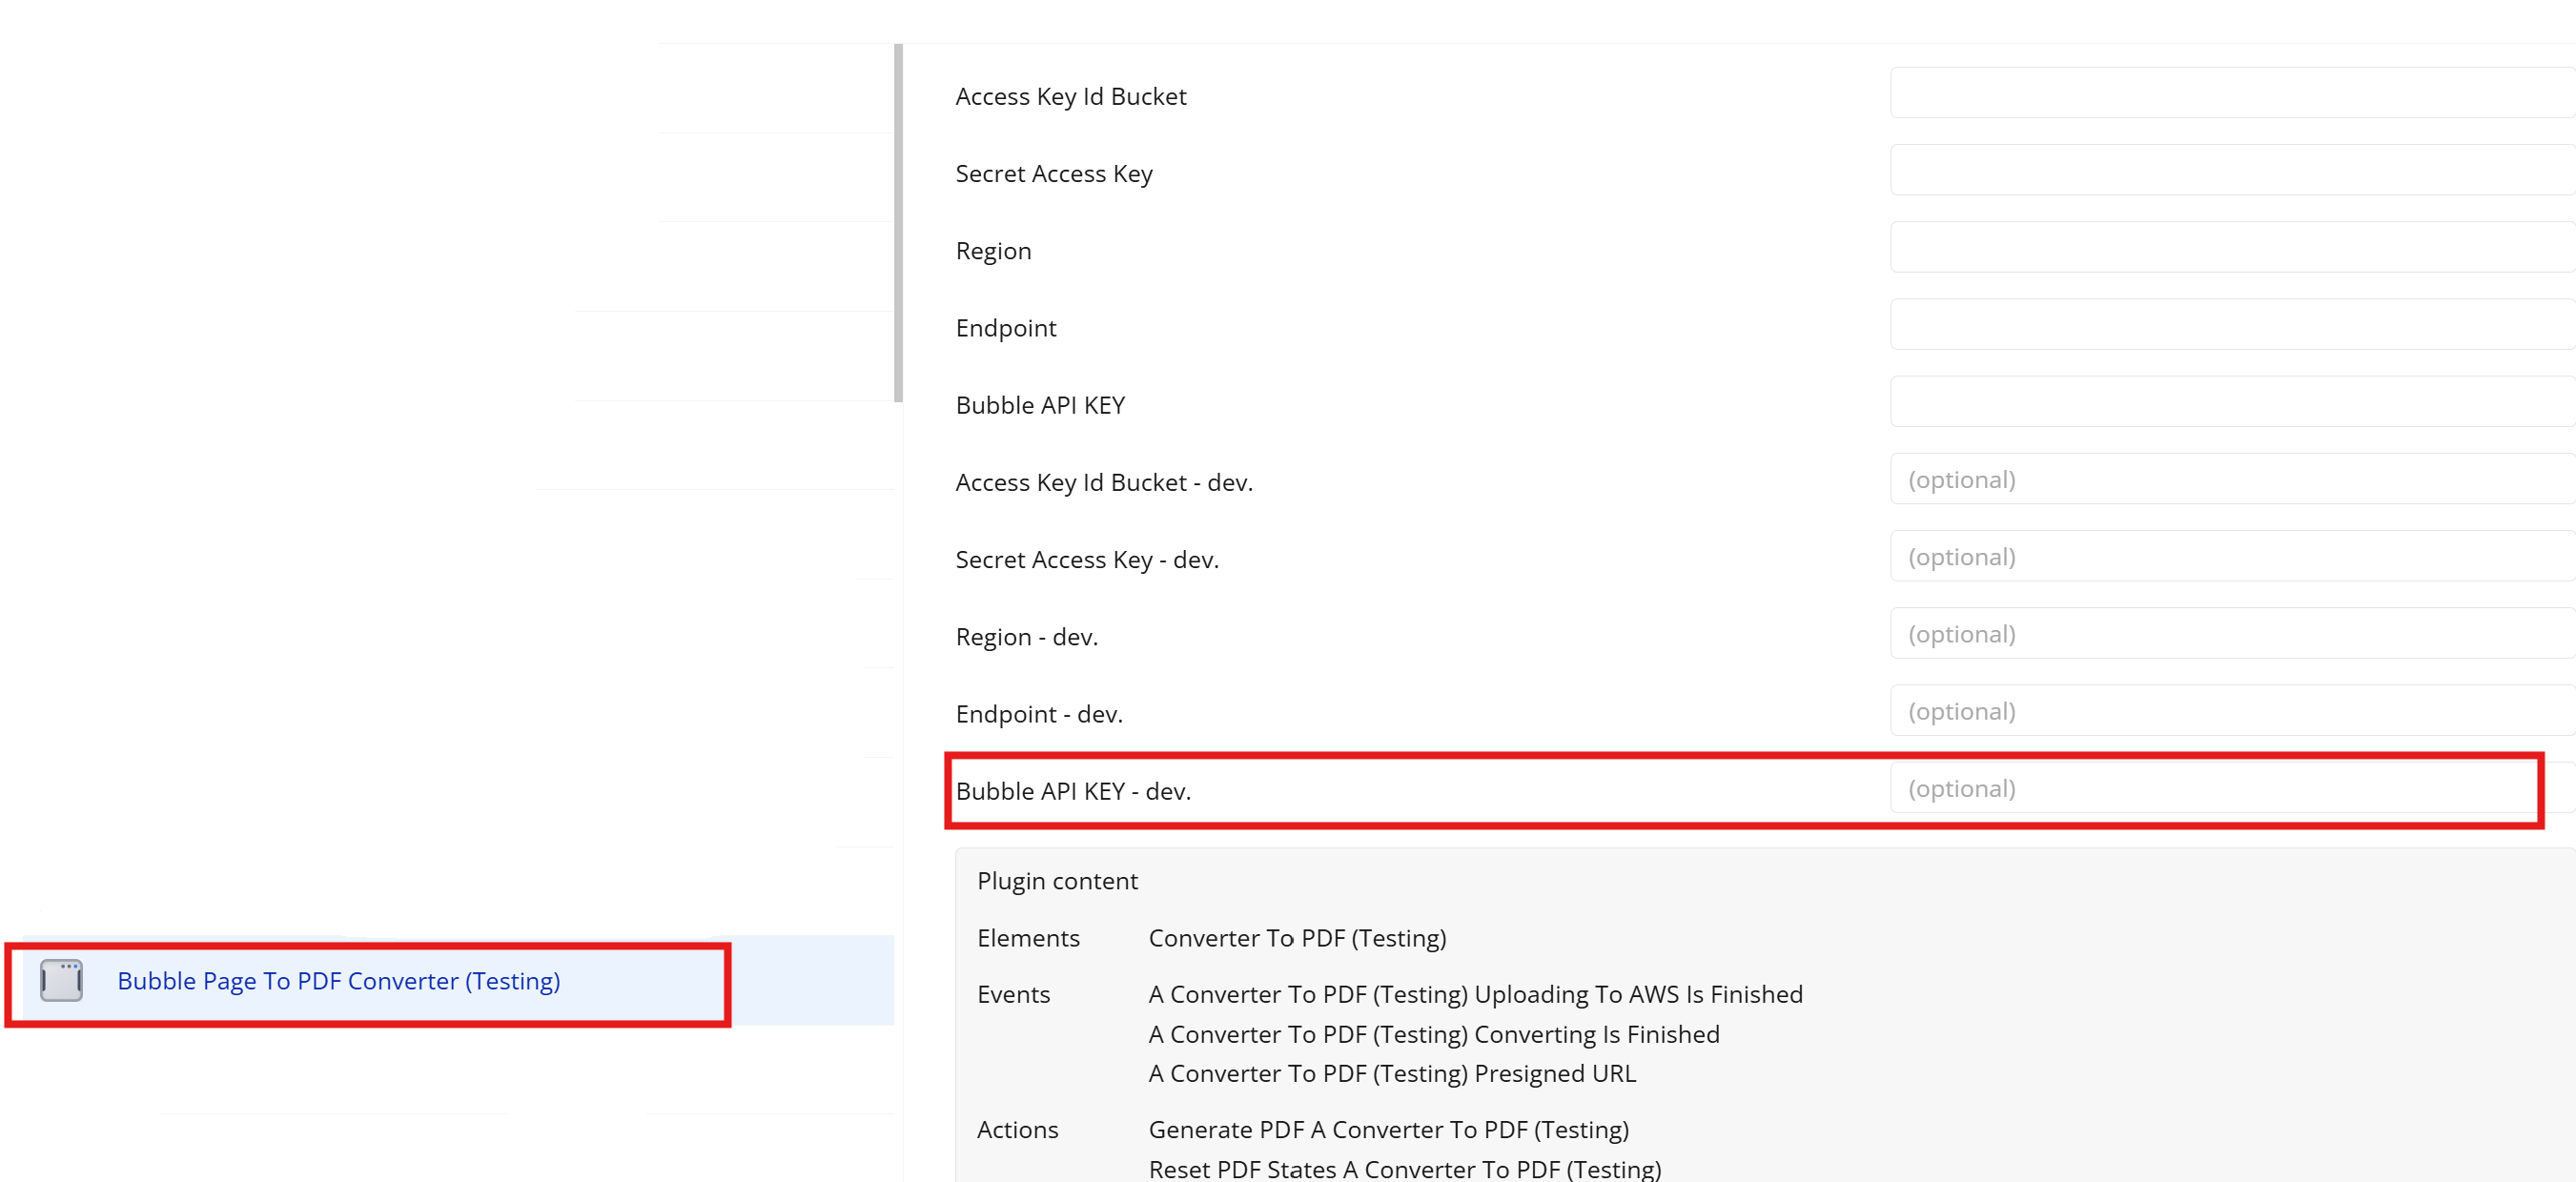
The Get Token action generates a temporary authorization token used to securely reference private files without exposing the Bubble API key, enabling the printing of private images.
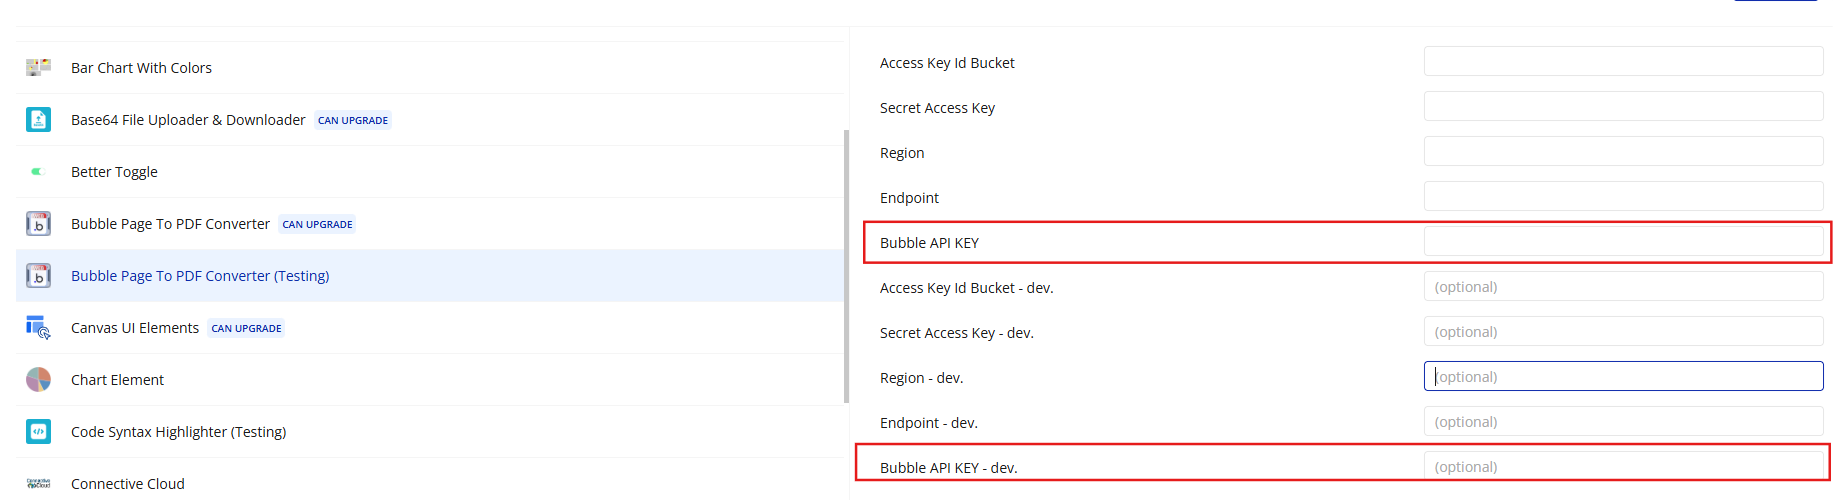
For this action, click on “Enter your API Key”. You will be redirected to the plugin settings under the Plugins tab, where you will find the “Bubble API Key” field. Please enter your Bubble API key there.
Returns:
Title
Description
Type
Key
The encrypted token that can be used to access files or send secure requests.
Text
Workflow example
Below are common workflow examples showing how to use the Page to PDF Converter plugin in real scenarios.
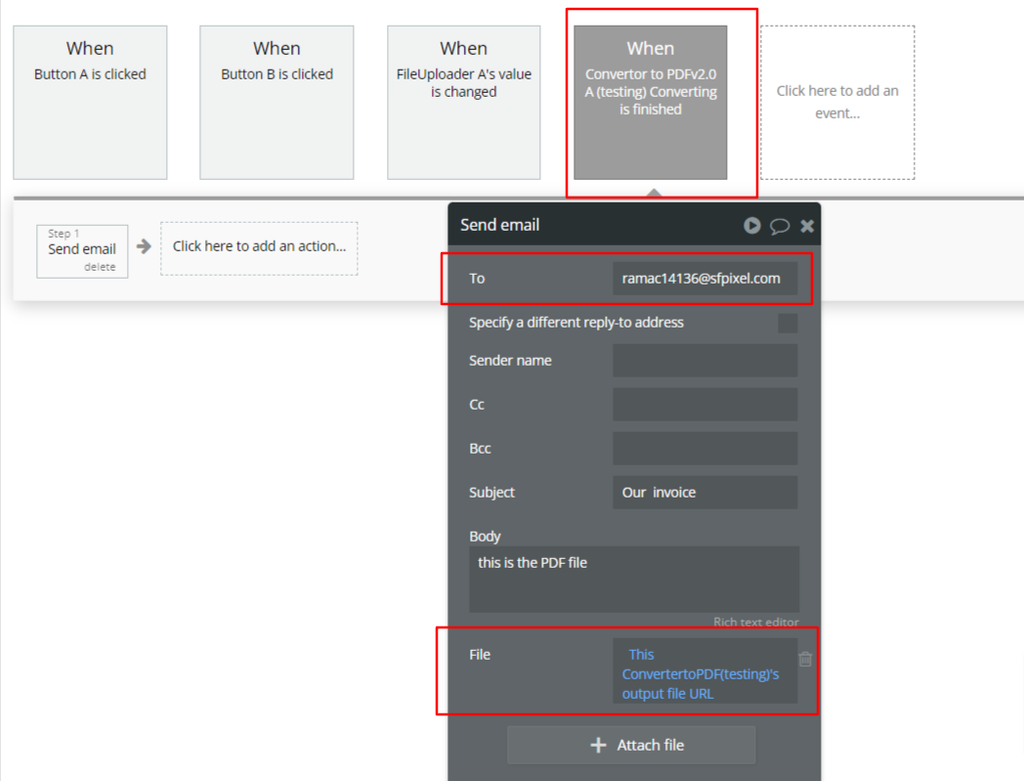
Send Generated PDF via Email
Generate a PDF and send it as an email attachment once the conversion is finished.
This workflow shows how to generate a PDF and send it by email only after the conversion is completed.
Step 1 – Trigger PDF Generation
Open the Workflow tab in Bubble.
Add a new workflow:
When Button is clicked
Add an action:
Plugin → Page to PDF Converter → Generate PDF
At this step, the plugin starts converting the page into a PDF file.
Step 2 – Wait for PDF Conversion to Finish
Create a new workflow event - Converting is finished
☝
This event guarantees that the PDF file is fully generated before using it.
Step 3 – Send the Email with PDF Attached
Inside the Converting is finished event, add an action:
Email → Send email
Configure the email action:
To: recipient email address
Subject: example: Our invoice
Body: example: This is the generated PDF file.
File: → This ConverterToPDF's Output File URL
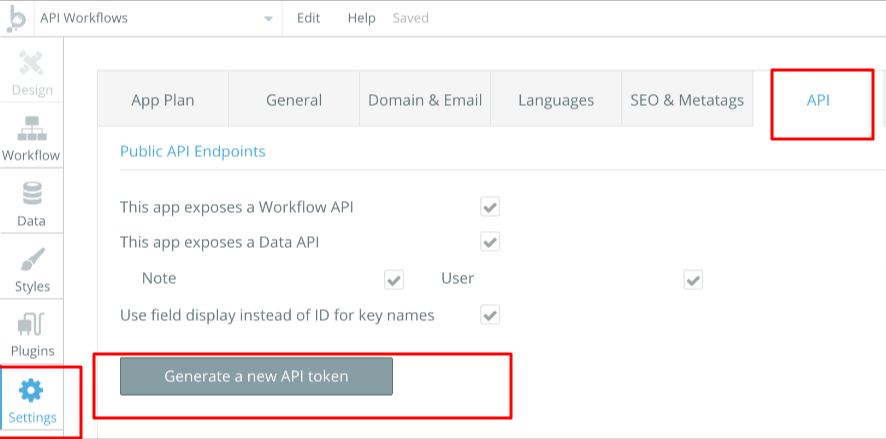
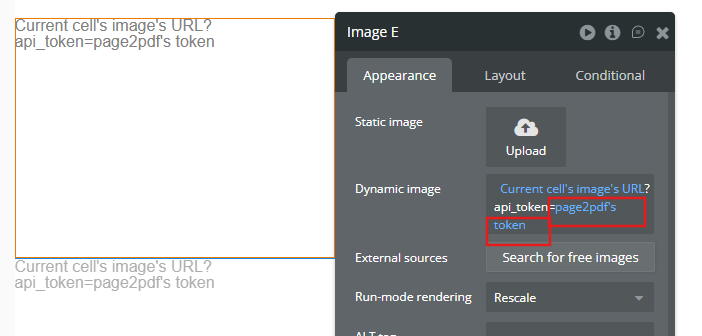
How to set a private image so that the plugin can print it
Go to app settings and select the "API" tab.
Here you will find the "Generate a new API token" button. Generate the token and return to the private image.
After you have generated your settings inside the plugin’s setting setting.
Add the “Get Token” Action.
Save the result (the value from the key field) into a custom state to use later in the workflow.
Add the Token to the “Generate PDF” Action.
In the Generate PDF action, fill in the Token field with the value stored in your state (for example, token_state).
Update Your Image Links - In the HTML content used to generate the PDF, make sure that all private image URLs use the encrypted token instead of your original key.
javascript
https://bubble.io/file.png?api_key=[token_state]
How do you add a custom font in the footer/header?
To add a custom font in the header or footer, please include a simple link in the HTML for the footer and header, following the HTML documentation for font integration.
Include the link in the HTML for the header or footer
The plugin allows you to define a custom HTML header that will appear at the top of every PDF page. The header supports special predefined classes that are automatically populated during PDF generation.
Supported Header Variables
You can use the following built-in classes inside the Header Template field:
To safely save or process a PDF file after it is generated, you must rely on the plugin event, not on time-based delays.
The plugin provides a dedicated trigger that guarantees the PDF conversion is fully completed before any follow-up actions are executed.
Example Workflow:
Step 1 – Generate the PDF
When Button is clicked → Action: “Generate PDF ConvertertoPDF”
This action starts the PDF conversion process.
Step 2 – Save the Generated File
WhenConverter to PDF v2.0 – Converting is finished
→ Action: Create new item in a thing
Save one of the following to the database:
Output File URL (Text field)
Security & File Retention Policy
This section explains how PDF files are generated, stored, and handled by the Bubble Page-to-PDF Converter plugin, as well as the security measures in place to protect user data.
File Generation Process
Each time a Bubble page is converted to PDF:
The page is processed in a secure, server-side environment
The PDF is generated on demand, per triggered action
The resulting file is created temporarily to allow download or workflow usage
⚠️ The PDF is not generated in the end user’s browser.
File Storage & Retention
Generated PDF files are stored temporarily
Files are automatically deleted within a maximum of 24 hours
Zeroqode does not retain files long-term
No manual cleanup is required
This approach minimizes data exposure and reduces storage-related security risks.
Temporary Download Links
Download links are time-limited
Each file URL expires automatically after a short period (minutes)
Once expired, the file can no longer be accessed
This mechanism prevents unauthorized access, even if a link is shared accidentally.
Security Measures
All file processing happens exclusively server-side
API keys and credentials are stored securely on the server
Keys are never exposed in client-side code
All connections are secured via HTTPS
File contents are not analyzed, indexed, or reused.
Data Privacy
Generated files belong exclusively to the end user
Zeroqode does not access file contents beyond technical processing
No data is shared with third parties
Logs do not contain PDF file contents
The plugin is designed to be privacy-friendly and GDPR-aligned.
Developer Notes
For long-term storage, save the generated PDF to:
Bubble File Manager
An external storage service (e.g. AWS S3)
Treat generated URLs as temporary
Avoid using PDF links in public or permanent contexts
Troubleshooting & Tips
Error: TypeError: cannot read properties of null (reading 'replaceAll')
This is a common error related to string processing during PDF generation.
Most Common Cause:
The Output file name field is missing or empty when the action is executed.
Solution:
Always provide a value in the Output file name field.
If the filename is dynamic, ensure it resolves to a valid text value at runtime.
Avoid using empty states or null values as the file name.
📷 Screenshot:
Error: TypeError: Cannot read properties of undefined (reading 'width')
This error occurs when the plugin tries to generate a PDF from a specific element, but the target element cannot be found on the page.
Most Common Cause:
The Element ID provided in the plugin settings is incorrect.
The specified element does not exist on the current page.
There is a typo, extra space, or case mismatch in the Element ID.
Solution:
Verify that the Element ID is spelled exactly as in the Bubble editor.
Make sure the element exists on the page where the PDF is generated.
Confirm that Convert Target is set correctly (Page vs Single Element).
Avoid using dynamic or empty values for Element ID.
Table renders only first 10 rows:
Bubble Table element has got lazy loading, the table loads rows when user scroll down. The plugin renders only visible elements.