
✅
Link to plugin page: https://zeroqode.com/plugin/xero-accounting-1546872666890x498865460961869800
Demo to preview the settings
✅
Live Demo: https://zeroqode-demo-14.bubbleapps.io/xero
Introduction
Xero is a leading online accounting and reporting tool and this plugin allows you to authenticate your app users with their Xero accounts and then read and write data.
Prerequisites
In order to interact with the plugin you'll need to get the API credentials client Key and Client Secret.
Create your development account at: https://developer.xero.com/
Check API Calls limits here - https://developer.xero.com/documentation/oauth2/limits

How to setup
I. Setup Xero Development application
- First, you will want to head over to your Xero Developers Console,
- Create an account (or log in with an existing one) & Create a new 'Public App'.
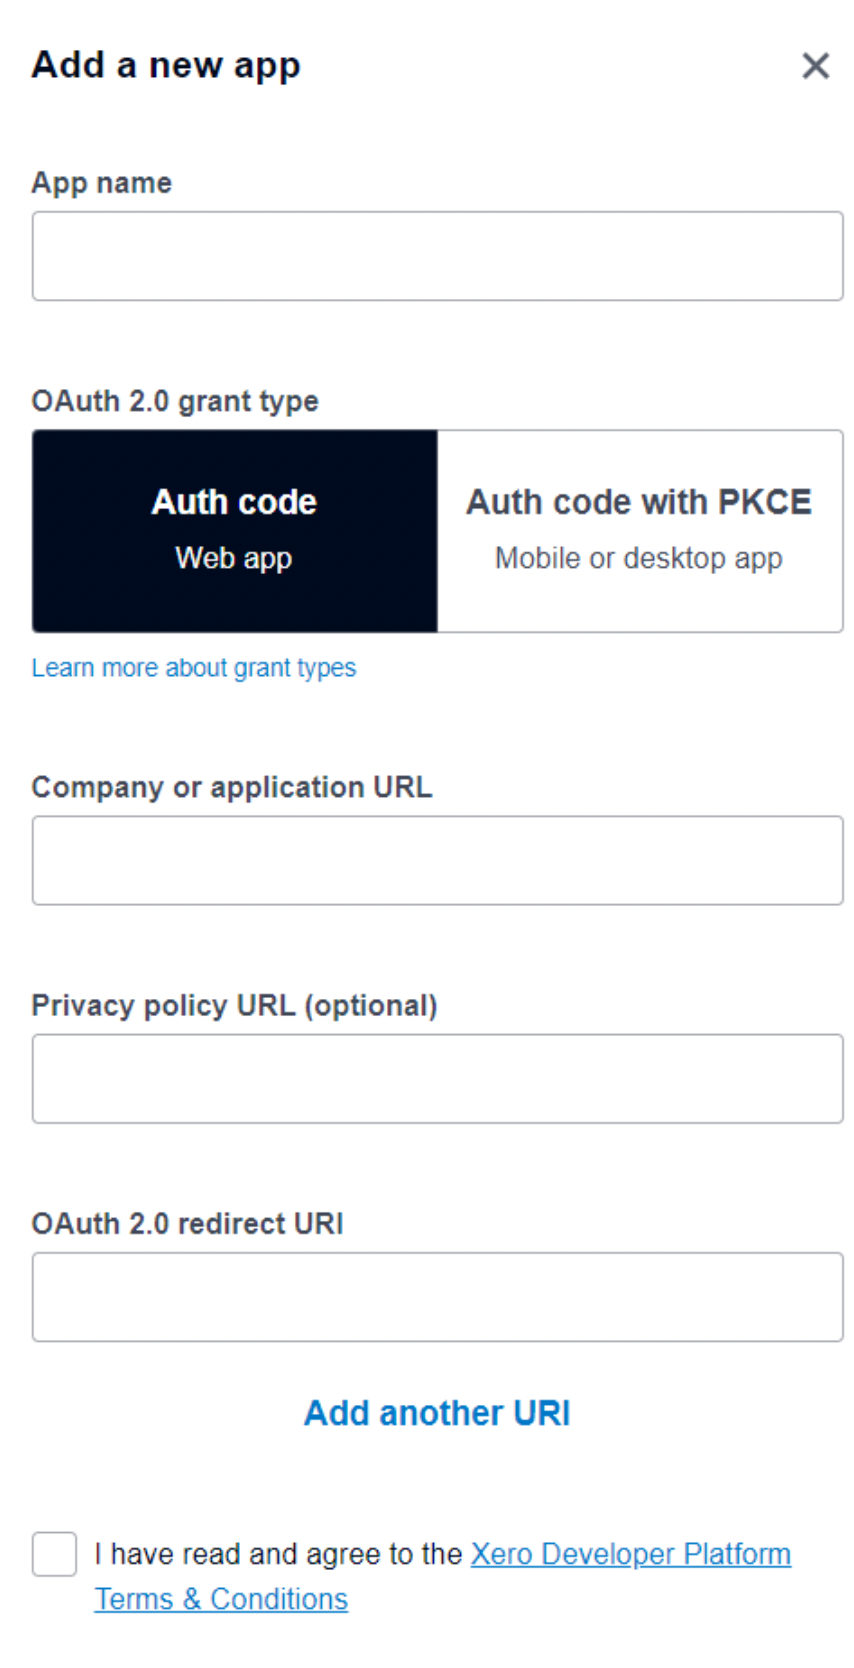
Fill in the details of your company and the redirect URI , accept Xero's TOS and Create the App.
☝
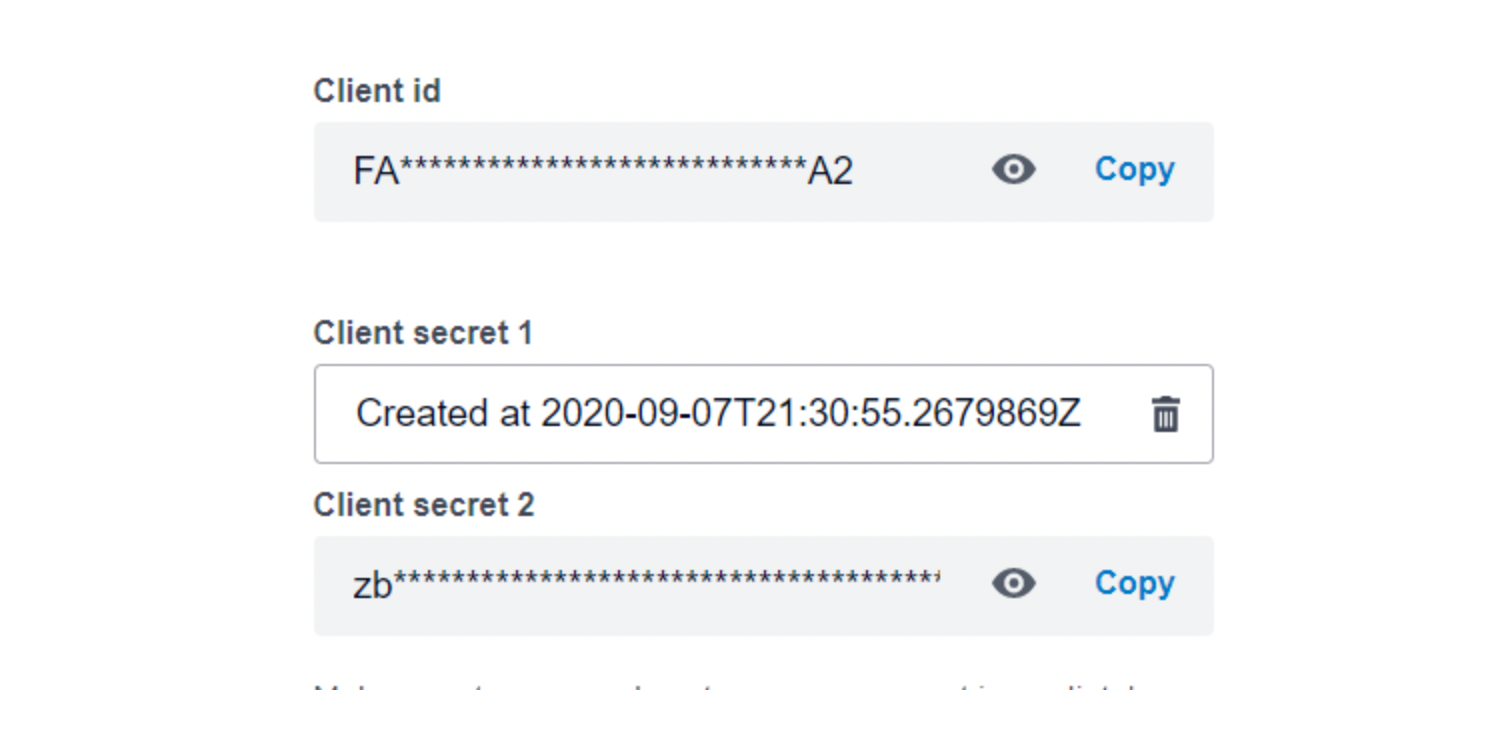
Note: Make sure to copy and paste your secret immediately. You won't be able to see it again.
- Once done you will have the required 'Consumer Key' (Client ID) & 'Consumer Secret' (Client Secret) to provide in the Xero bubble plugin settings.
II. Setup Xero plugin on Bubble side
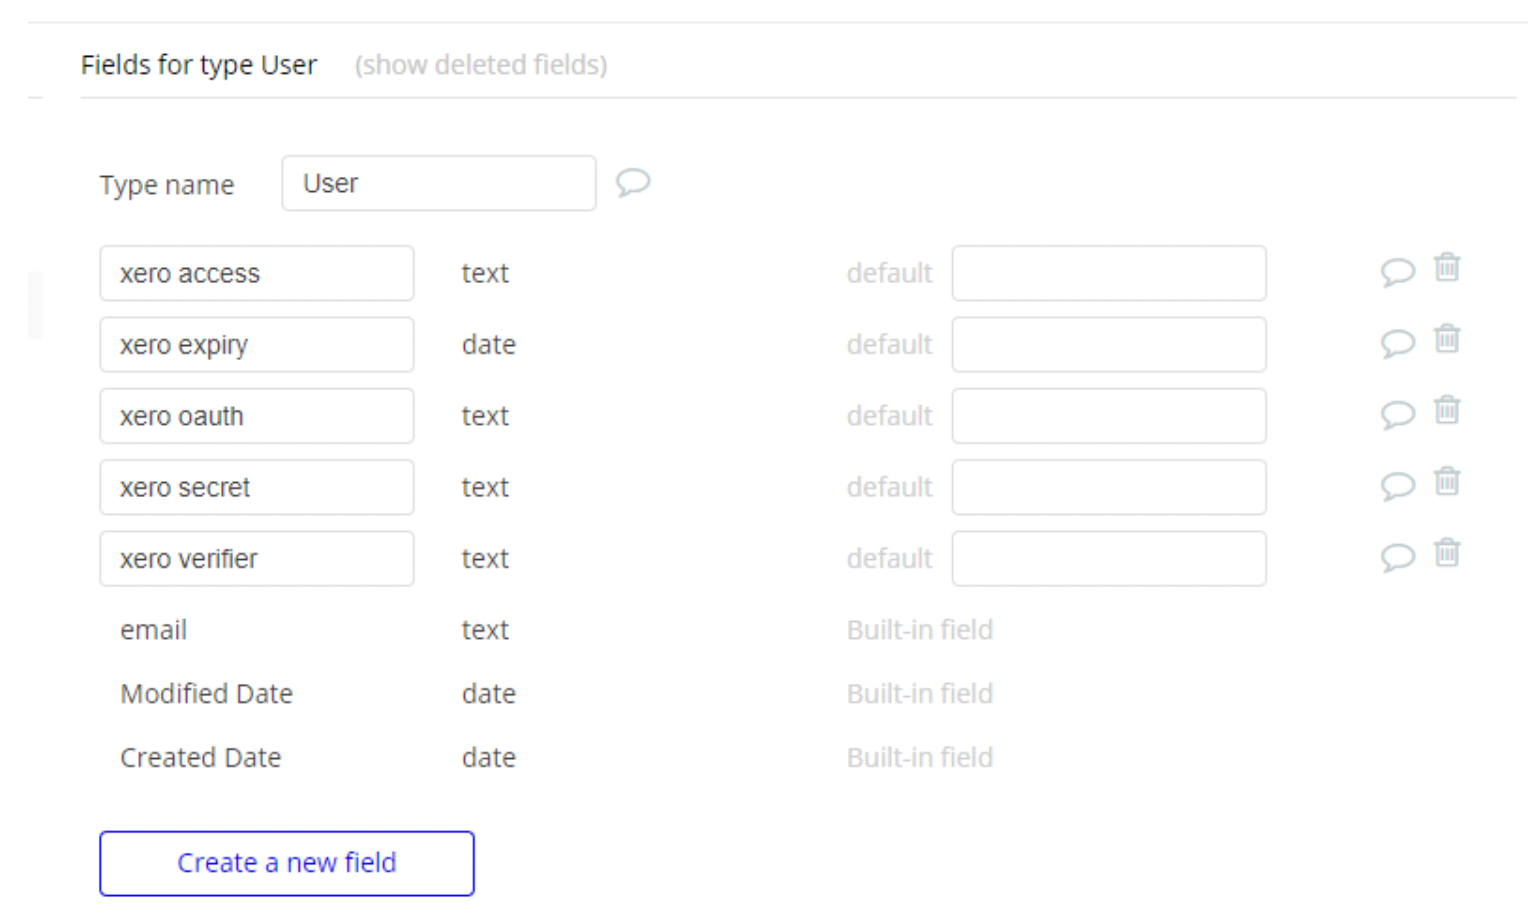
- In your Bubble app, select the data tab and then open the 'User' data tab. We need to add a few fields here so that the authorization process is easier to manage. The fields are case-sensitive & need to be created exactly as shown below including the type of field:
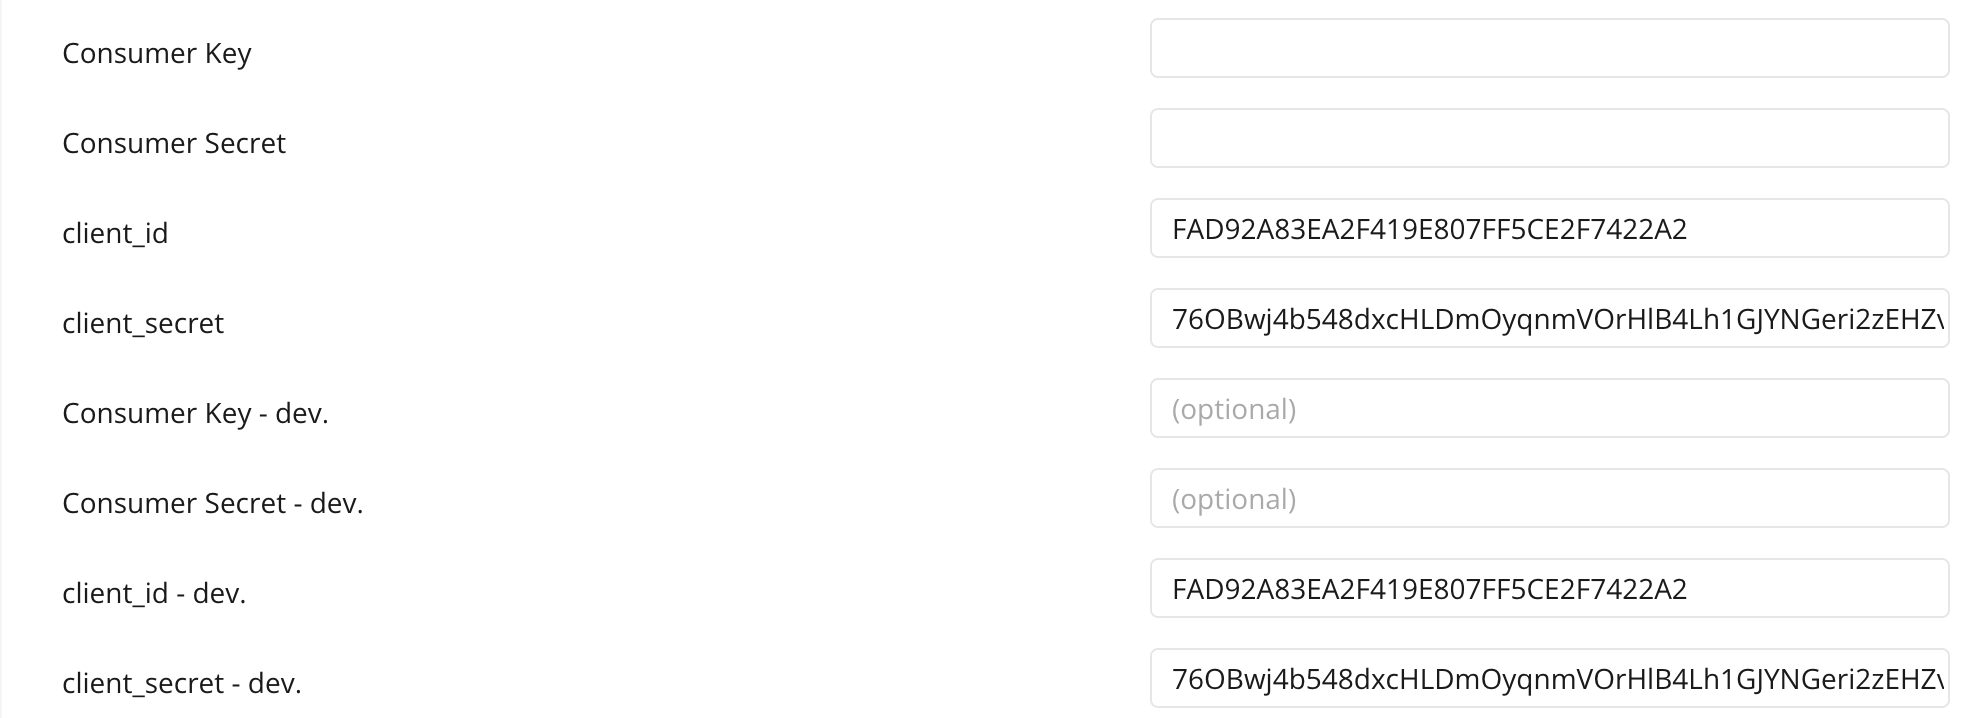
- Add the Client Secret and Client ID alongside the redirect URI which you've set in the Xero app dashboard to the Plugin Settings tab:
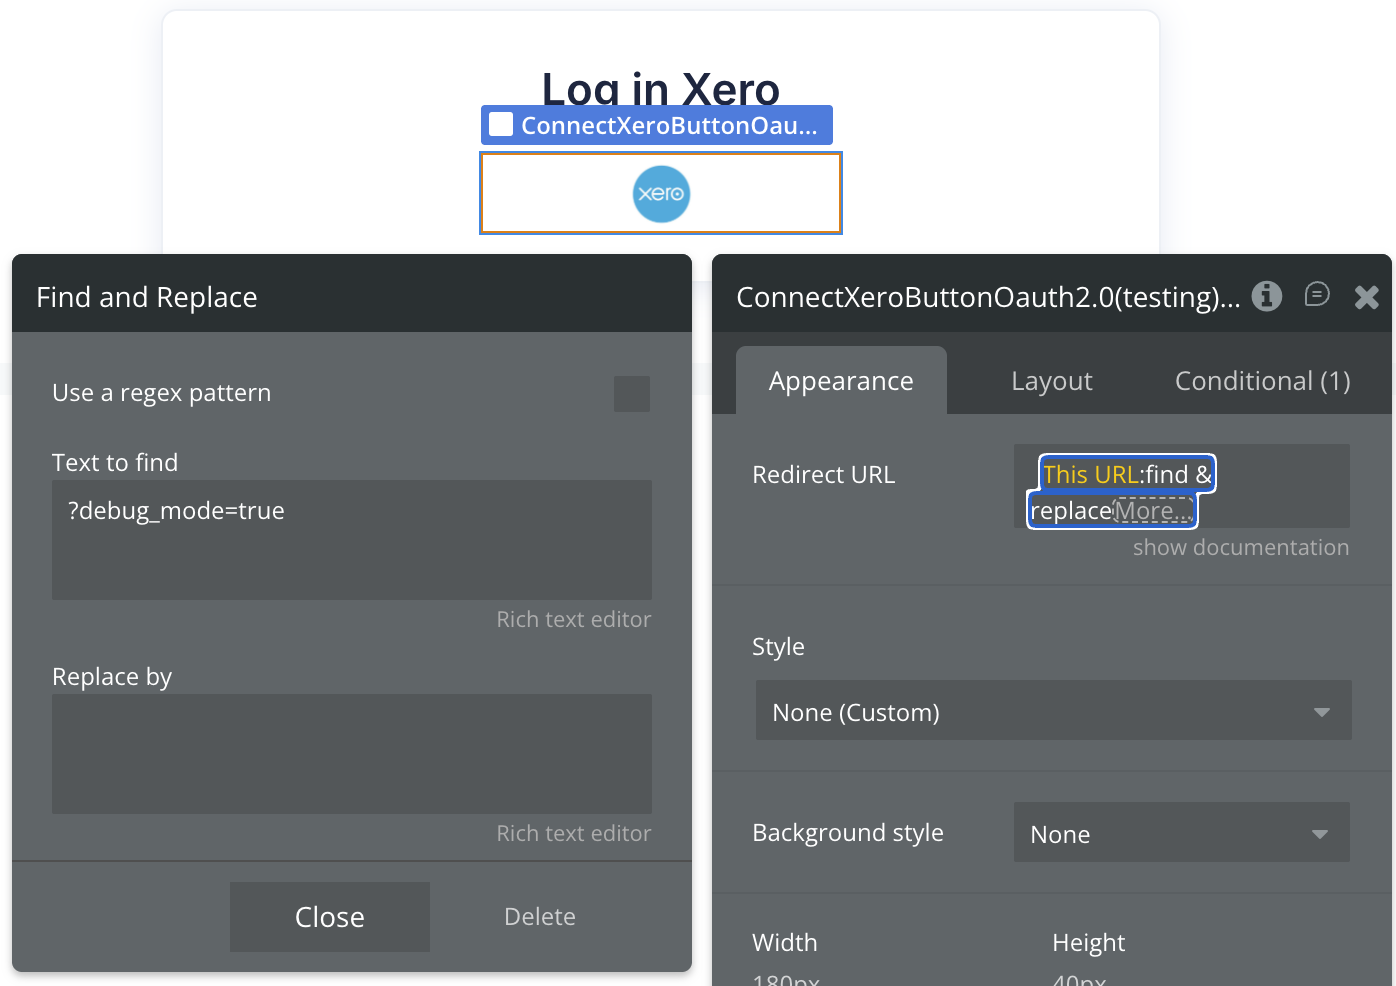
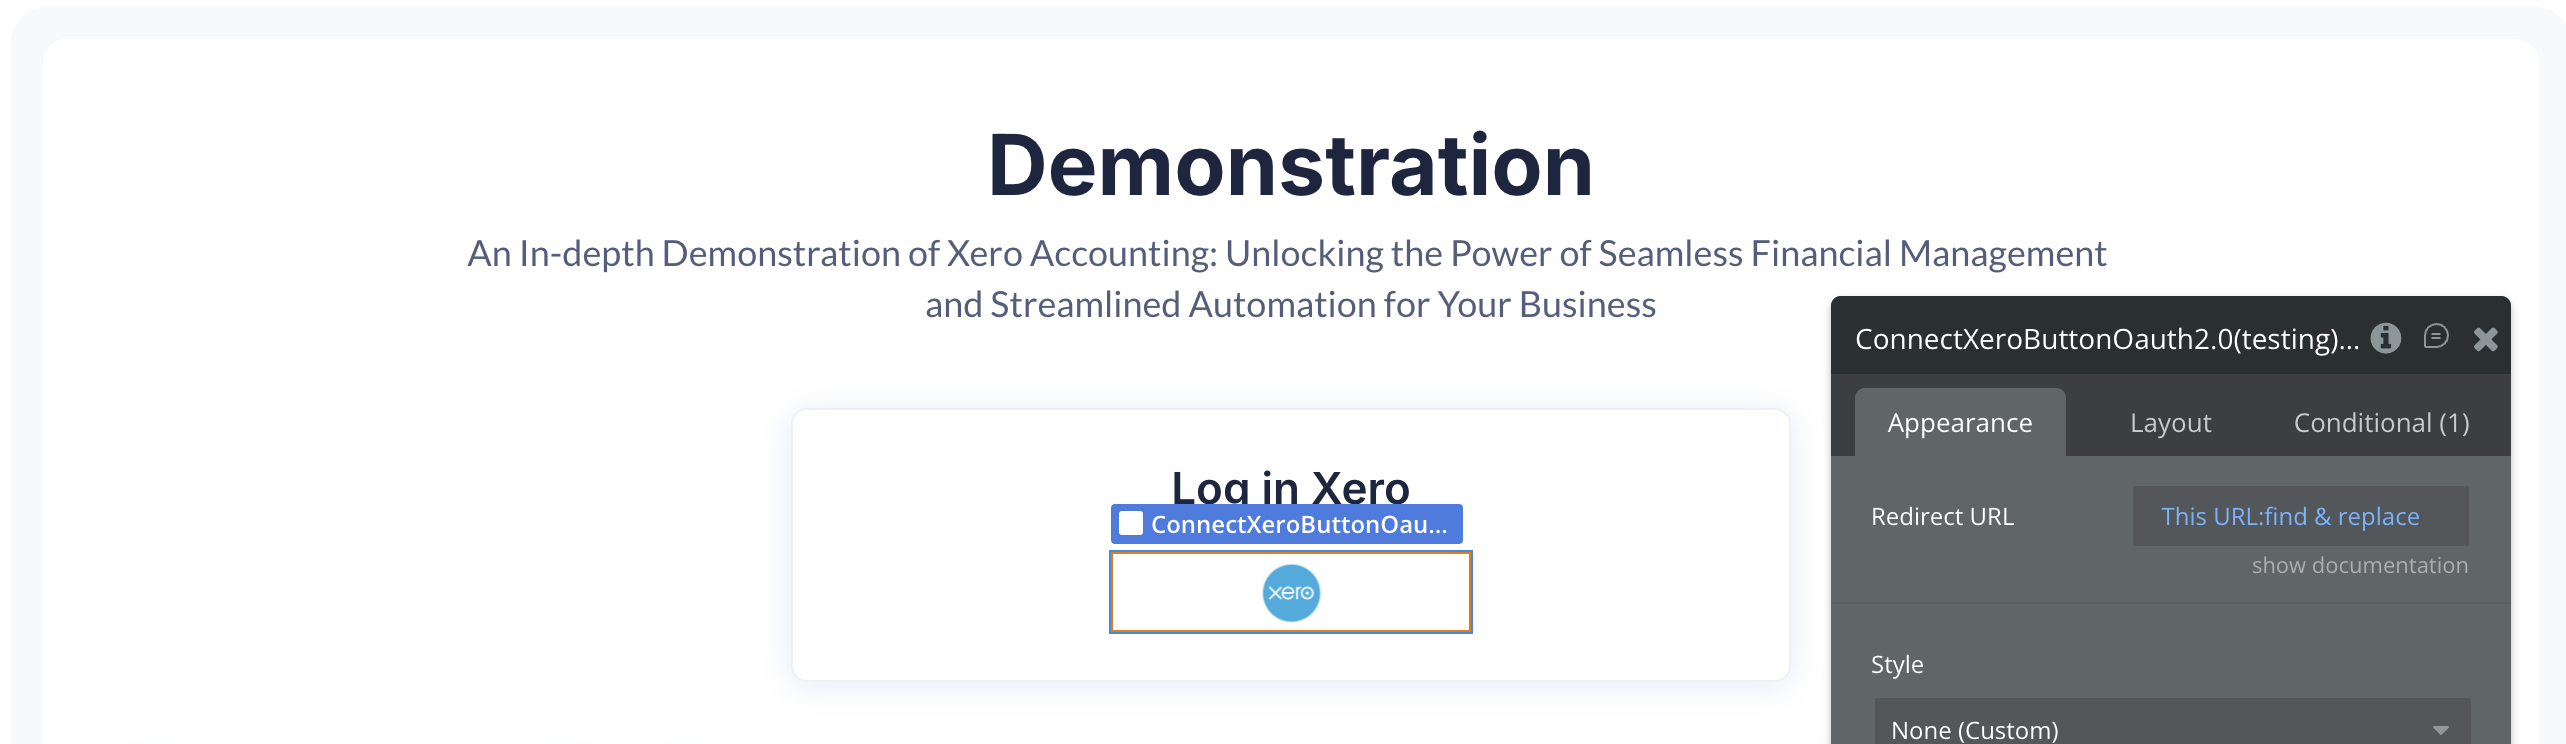
- Create the authorization workflow by placing Plugin Element Connect Xero Button Oauth 2.0 on the page editor. Set the Redirect URL field to the same URL you configured in the Xero Developer Portal.
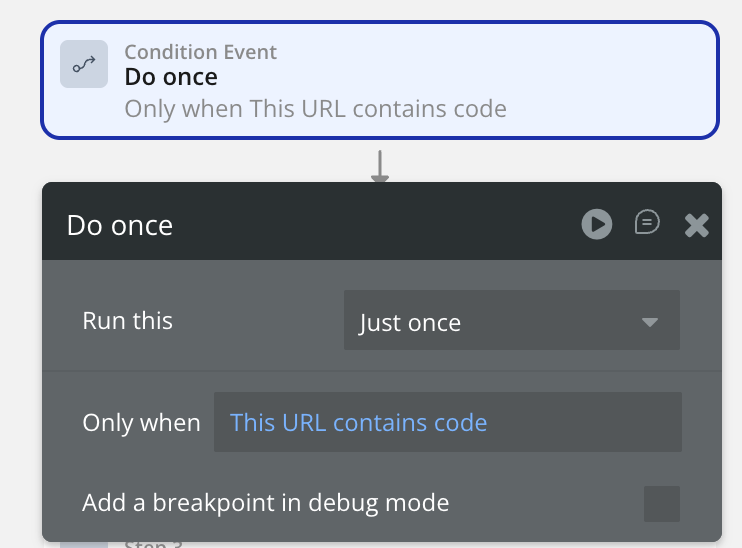
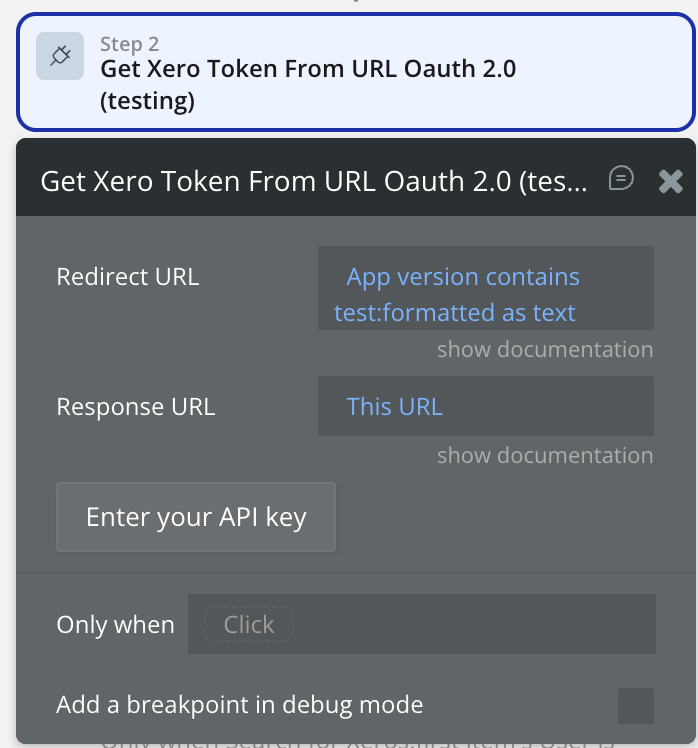
- The workflow to complete the authorization between the user & Xero is fairly easy, set an event when the URL contains a token from Xero and add the action Get Xero Token From URL Oauth 2.0 and this action it is necessary only to get value from the page URL.
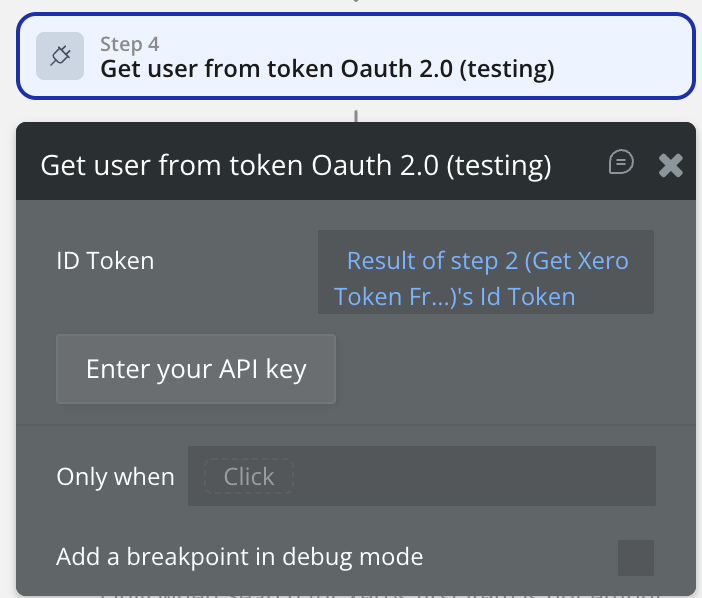
- To get the user information use action Get user from token Oauth 2.0 which will return Email, Given Name, and Family Name. And in order to retrieve these values provide the Token ID from the previous step
Plugin Element Proprieties
The plugin contains Connect XeroButtonOauth 2 visual element which should be used on the page.

This element renders the official Xero SSO sign-in button. It uses the Xero platform SSO script and automatically initializes the OAuth 2.0 flow when clicked.
Fields:
Title | Description | Type |
Redirect URL | The URL that Xero will use for returning the answer on the authentication process. This URL should be in your Xero account’s “Redirect URIs” list. | Text |
PLUGIN ACTIONS DETAILED
Xero: Remove OAuth URL Parameters - This action should be used for removing OAuth parameters after redirecting from the grant access screen.
Create/Edit Xero Data - This action should be used to create or edit Xero data.
Fields:
Title | Description | Type |
Xero Endpoint | The Xero endpoint includes the object id if needed. | string |
Bubble Endpoint URL | Bubble Endpoint URL that is created in the backend workflow. eg. https://yourapp.bubbleapps.io/api/1.1/wf/invoices or when initializing, https://yourapp.bubbleapps.io/version-test/api/1.1/wf/invoices/initialize | string |
Method | The Method required by the endpoint you calling. | Dropdown |
JSON Body | The JSON body you want to post to the endpoint. | string |
Returns:
Title | Description | Type |
Status | Obtained status code after request. | string |
Get Xero Token From URL Oauth 2.0 - This action should be used to obtain an access token from Xero.
Fields:
Title | Description | Type |
Response URL | Page URL obtained from Xero after grant access screen. | string |
Returns:
Title | Description | Type |
Access Token | An API access token that can be used to access the Xero account data. | string |
Token Type | Token Type is Bearer. | string |
Id Token | The token containing user identity details (only returned if OpenID Connect
scopes are requested). | string |
Refresh Token | The token used to refresh the access token once it has expired (only returned if the offline_access
the scope is requested) | string |
Expires At | The date until the access token is valid. | number |
Session State | Represents a session token. | string |
Scope | The list of access scopes that were granted to the application and are associated with the access token. | string |
Get user from token Oauth 2.0 - This action should be used to obtain user data from Xero.
Fields:
Title | Description | Type |
ID Token | The ID Token Obtained from above action. | string |
Returns:
Title | Description | Type |
Xero user id | The User Id from the Xero account. | string |
Email | The User email from the Xero account. | string |
Given Name | The User is given the name from the Xero account. | string |
Family Name | The User's family name is from the Xero account. | string |
Xero: Refresh Token - This action should be used to obtain a refresh token from Xero.
Fields:
Title | Description | Type |
Refresh Token | The token used to refresh the access token once it has expired (only returned if the offline_access
the scope is requested) | string |
Returns:
Title | Description | Type |
Id Token | The token containing user identity details (only returned if OpenID Connect
scopes are requested). | string |
Access Token | The token used to call the API. | string |
Expires In | The amount of seconds until the access token expires. | datetime |
Refresh Token | The token used to refresh the access token once it has expired (only returned if the offline_access
the scope is requested). | string |
API Calls
Plugin Data Calls
- Get Bank Transactions - This method can retrieve one or many bank transactions.
Fields:
Title | Description | Type |
Authorization | Add the keyword "Bearer" and Access token. | string |
Xero-tenant-id | The Tenant Id. | string |
Returns:
Title | Description | Type |
BankTransactions[] | A list of BankTransactions. | list |
BankTransactions[].Contact | Information about Contact. | object |
Contact.ContactID | Xero identifier (unique within organisations). | string |
Contact.Name | Full name of the contact. | string |
BankTransactions[].DateString | Date of the transaction - YYYY-MM-DD. | string |
BankTransactions[].Date | Date of transaction. | datetime |
BankTransactions[].Status | The Bank Transaction Status Code. Available values: AUTHORISED, DELETED. | string |
BankTransactions[].LineAmountTypes | The LineAmount Type. Available values: Exclusive, Inclusive, NoTax. | string |
BankTransactions[].LineItems[] | The LineItems element can contain any number of individual LineItem sub-elements. | list |
LineItems[].Description | The description of the line item. | string |
LineItems[].UnitAmount | Lineitem unit amount. By default, unit amount will be rounded to two decimal places. You can opt-in to use four decimal places by adding the query string parameter unitdp=4 to your query. See the Rounding in Xero
guide for more information. | string |
LineItems[].TaxType | Used as an override if the default Tax Code for the selected AccountCode is not correct. | string |
LineItems[].TaxAmount | LineItem tax amount. | string |
LineItems[].LineAmount | The total of the line including discount. | string |
LineItems[].AccountCode | Customer defined alpha numeric account code e.g 200 or SALES. | string |
LineItems[].Quantity | LineItem Quantity. | string |
LineItems[].LineItemID | The Xero generated identifier for a LineItem. | string |
BankTransactions[].SubTotal | Total of bank transactions excluding taxes. | string |
BankTransactions[].TotalTax | Total tax on bank transactions. | string |
BankTransactions[].Total | Total of bank transaction tax inclusive. | string |
BankTransactions[].UpdatedDateUTC | Last modified date UTC format. | datetime |
BankTransactions[].CurrencyCode | The currency that bank transaction has been raised in (see Currencies
). Setting currency is only supported on overpayments. | string |
BankTransactions[].BankTransactionID | Xero generated identifier for bank transaction (unique within organisations). | string |
BankTransactions[].BankAccount | Bank account for transactions. | object |
BankAccount.AccountID | BankAccount identifier. | string |
BankAccount.Code | BankAccount code (this value may not always be present for a bank account). | string |
BankAccount.Name | BankAccount name. | string |
BankTransactions[].BatchPayment | Present if the transaction is part of a batch. See Batch Payments
for more details. | object |
BatchPayment.Account | Information about Account. | object |
Account.AccountID | ID of the account used to make the payment. This account needs to be either an account of type BANK or have enabled payments to this account switched on | string |
BatchPayment.BatchPaymentID | The Xero generated identifier for the bank transaction (read-only and unique within organisations). | string |
BatchPayment.Date | Date the payment is being made. | datetime |
BatchPayment.Type | PAYBATCH for bill payments or RECBATCH for sales invoice payments (read-only). | string |
BatchPayment.Status | AUTHORISED or DELETED. New batch payments will have a status of AUTHORISED. | string |
BatchPayment.TotalAmount | The total of the payments that make up the batch (read-only). | string |
BatchPayment.UpdatedDateUTC | UTC timestamp of the last update to the payment. | datetime |
BatchPayment.IsReconciled | Boolean that tells you if the batch payment has been reconciled (read-only). | string |
BankTransactions[].Type | The bank transaction type. | string |
BankTransactions[].Reference | Reference for the transaction. Only supported for SPEND and RECEIVE transactions. | string |
BankTransactions[].IsReconciled | Boolean to show if the transaction is reconciled. | string |
- Get Bank Transfers - Allows you to retrieve any bank transfers.
Fields:
Title | Description | Type |
Authorization | Add the keyword "Bearer" and Access token. | string |
Xero-tenant-id | The Tenant Id. | string |
Returns:
Title | Description | Type |
BankTransfers[] | A list of BankTransfers. | list |
BankTransfers[].BankTransferID | The identifier of the Bank Transfer (unique to organsiations). | string |
BankTransfers[].CreatedDateUTCString | UTC timestamp of the creation date of bank transfer YYYY-MM-DD. | string |
BankTransfers[].CreatedDateUTC | UTC timestamp of the creation date of bank transfer. | datetime |
BankTransfers[].DateString | The date of the Transfer YYYY-MM-DD. | string |
BankTransfers[].Date | The date of the Transfer. | datetime |
BankTransfers[].FromBankAccount | Information about From Bank Account. | object |
FromBankAccount.AccountID | The ID of the Bank Account. | string |
FromBankAccount.Name | The Name Bank Account. | string |
BankTransfers[].ToBankAccount | Information about To Bank Account. | object |
ToBankAccount.AccountID | The ID of the Bank Account. | string |
ToBankAccount.Name | The Name Bank Account. | string |
BankTransfers[].Amount | The amount being transferred. | string |
BankTransfers[].FromBankTransactionID | The Bank Transaction ID for the source account. | string |
BankTransfers[].ToBankTransactionID | The Bank Transaction ID for the destination account. | string |
- Get Batch Payments - Use this method to retrieve batch payments.
Fields:
Title | Description | Type |
Authorization | Add the keyword "Bearer" and Access token. | string |
Xero-tenant-id | The Tenant Id. | string |
Returns:
Title | Description | Type |
BatchPayments[] | A list of BatchPayments. | list |
BatchPayments[].Account | Information about Account. | object |
Account.AccountID | ID of the account used to make the payment. This account needs to be either an account of type BANK or have enabled payments to this account switched on | string |
BatchPayments[].Reference | (NZ Only) Optional references for the batch payment transaction. It will also show the batch payment transaction in the bank reconciliation Find & Match screen. Depending on your individual bank, the detail may also show on the bank statement you import into Xero. Max length =12. | string |
BatchPayments[].BatchPaymentID | The Xero generated identifier for the bank transaction (read-only and unique within organisations). | string |
BatchPayments[].DateString | Date the payment is being made (YYYY-MM-DD) e.g. 2018-09-06. | string |
BatchPayments[].Date | Date the payment is being made. | datetime |
BatchPayments[].Payments | The collection of one or more payments that make up the batch. | object |
Payments.Invoice | Information about Invoice. | object |
Invoice.InvoiceID | The ID of the Invoice
the payment was made against. | string |
Invoice.HasErrors | Boolean that tells you if the batch payment has errors. | string |
Invoice.IsDiscounted | Boolean that tells you if the batch payment is discounted. | string |
Payments.PaymentID | The Xero generated a unique identifier for the payment (read-only). | string |
Payments.Reference | (TNZ Only) The information to appear on the supplier's bank account and bank statement. | string |
Payments.Amount | The amount being paid. | string |
BatchPayments[].Type | PAYBATCH for bill payments or RECBATCH for sales invoice payments (read-only). | string |
BatchPayments[].Status | AUTHORISED or DELETED. New batch payments will have a status of AUTHORISED. | string |
BatchPayments[].TotalAmount | The total of the payments that make up the batch (read-only). | string |
BatchPayments[].UpdatedDateUTC | UTC timestamp of last update to the payment. | datetime |
BatchPayments[].IsReconciled | Boolean that tells you if the batch payment has been reconciled (read-only). | string |
- Get Invoice Reminders - Use this method to check if invoice reminders are enabled.
Fields:
Title | Description | Type |
Authorization | Add the keyword "Bearer" and Access token. | string |
Xero-tenant-id | The Tenant Id. | string |
Returns:
Title | Description | Type |
InvoiceReminders[] | A list of InvoiceReminders. | list |
InvoiceReminders[].Enabled | Returns true/false to indicate if invoice reminders are enabled for a Xero organisation. | string |
- Get Invoices - Use this method to retrieve one or many invoices.
Fields:
Title | Description | Type |
Authorization | Add the keyword "Bearer" and Access token. | string |
Xero-tenant-id | The Tenant Id. | string |
Returns:
Title | Description | Type |
Invoices[] | A list of Invoices. | list |
Invoices[].Type | The Invoice type. | string |
Invoices[].Contact | Information about Contact. | object |
Contact.ContactID | Xero identifier (unique within organisations). | string |
Contact.ContactStatus | Current status of a contact - see contact status types. | string |
Contact.Name | Full name of contact/organisation. | string |
Contact.Addresses[] | Store certain address types for a contact - see address types. | list |
Addresses[].AddressType | The Address type. | string |
Addresses[].AddressLine1 | The Address Line 1. | string |
Addresses[].AddressLine2 | The Address Line 2. | string |
Addresses[].City | The Address city. | string |
Addresses[].PostalCode | The Address postal code. | string |
Contact.Phones[] | Store certain phone types for a contact - see phone types. | list |
Phones[].PhoneType | The phone type. | string |
Contact.UpdatedDateUTC | UTC timestamp of the last update to contact. | datetime |
Contact.IsSupplier | true or false – Boolean that describes if a contact that has any AP invoices entered against them. | string |
Contact.IsCustomer | true or false – Boolean that describes if a contact has any AR invoices entered against them. | string |
Invoices[].Date | Date the invoice was issued. | datetime |
Invoices[].DueDate | Date the invoice is due. | datetime |
Invoices[].DateString | Date invoice was issued - YYYY-MM-DD. | string |
Invoices[].DueDateString | Date invoice is due - YYYY-MM-DD. | string |
Invoices[].Status | When creating new invoices or modifying existing invoices you can optionally specify a "Status" element. New invoices can have either one of the following three status codes: DRAFT, SUBMITTED, AUTHORISED. | string |
Invoices[].LineAmountTypes | The LineAmount Type. Available values: Exclusive, Inclusive, NoTax. | string |
Invoices[].LineItems[] | The LineItems element can contain any number of individual LineItem sub-elements. | list |
LineItems[].Description | The description of the line item. | string |
LineItems[].Quantity | LineItem Quantity. | string |
LineItems[].UnitAmount | Lineitem unit amount. By default, unit amount will be rounded to two decimal places. You can opt-in to use four decimal places by adding the querystring parameter unitdp=4 to your query. See the Rounding in Xero
guide for more information. | string |
LineItems[].TaxType | Used as an override if the default Tax Code for the selected AccountCode is not correct. | string |
LineItems[].TaxAmount | LineItem tax amount. | string |
LineItems[].LineAmount | The total of the line including discount. | string |
LineItems[].AccountCode | Customer defined alpha numeric account code e.g 200 or SALES. | string |
LineItems[].Tracking[] | Any LineItem can have a maximum of 2 TrackingCategory elements. | list |
Tracking[].TrackingCategoryID | Xero assigned unique ID for the category. | string |
Tracking[].Name | Name of the tracking category. | string |
Tracking[].Option | Name of the option. | string |
LineItems[].LineItemID | The Xero generated identifier for a LineItem. | string |
Invoices[].SubTotal | Total of invoice excluding taxes. | string |
Invoices[].TotalTax | Total tax on invoice. | string |
Invoices[].Total | Total of Invoice tax inclusive (i.e. SubTotal + TotalTax). | string |
Invoices[].UpdatedDateUTC | Last modified date UTC format. | datetime |
Invoices[].CurrencyCode | The currency that the invoice has been raised in (see Currencies). | string |
Invoices[].InvoiceID | Xero generated identifier for invoices (unique within organisations). | string |
Invoices[].InvoiceNumber | ACCREC - Unique alpha numeric code identifying invoice (printable ASCII characters only)ACCPAY - non-unique alpha numeric code identifying invoice (printable ASCII characters only). This value will also display as Reference in the UI. | string |
Invoices[].Payments[] | Payments for invoices. | list |
Payments[].Date | Date the payment is being made. | datetime |
Payments[].Amount | The amount of the payment. Must be less than or equal to the outstanding amount owing on the invoice e.g. 200.00. | string |
Payments[].PaymentID | Xero generated identifier for payment (unique within organisations). | string |
Invoices[].AmountDue | Amount remaining to be paid on invoice. | string |
Invoices[].AmountPaid | Sum of payments received for invoice. | string |
Invoices[].AmountCredited | string |
- Get Repeating Invoices - Use this method to retrieve either one or many repeating invoices
Fields:
Title | Description | Type |
Authorization | Add the keyword "Bearer" and Access token. | string |
Xero-tenant-id | The Tenant Id. | string |
Returns:
Title | Description | Type |
RepeatingInvoices[] | A list of RepeatingInvoices. | list |
RepeatingInvoices[].Schedule | Information about Schedule. | object |
Schedule.Period | Integer used with the unit e.g. 1 (every 1 week), 2 (every 2 months). | number |
Schedule.Unit | One of the following : WEEKLY or MONTHLY. | string |
Schedule.DueDate | Integer used with due date type e.g 20 (of following month), 31 (of current month). | number |
Schedule.DueDateType | The Due Date type. | string |
Schedule.StartDate | Date the first invoice of the current version of the repeating schedule was generated (changes when repeating invoice is edited). | datetime |
Schedule.NextScheduledDate | The calendar date of the next invoice in the schedule to be generated. | datetime |
RepeatingInvoices[].RepeatingInvoiceID | Xero generated identifier for repeating invoice template (unique within organisations). | string |
RepeatingInvoices[].Type | The Invoice type. | string |
RepeatingInvoices[].Reference | ACCREC only - additional reference number. | string |
RepeatingInvoices[].HasAttachments | Boolean to indicate if an invoice has an attachment. | yes/no |
RepeatingInvoices[].ID | Xero generated identifier for repeating invoice template (unique within organisations). | string |
RepeatingInvoices[].Contact | Information about Contact. | object |
Contact.ContactID | Xero identifier (unique within organisations). | string |
Contact.Name | Full name of contact/organisation. | string |
Contact.HasValidationErrors | Boolean to indicate if contact has validation errors. | yes/no |
RepeatingInvoices[].Status | One of the following : DRAFT or AUTHORISED - See Invoice Status Codes. | string |
RepeatingInvoices[].LineAmountTypes | Line amounts are exclusive of tax by default if you don't specify this element. See Line Amount Types. | string |
RepeatingInvoices[].LineItems[] | The LineItems element can contain any number of individual LineItem sub-elements. | list |
LineItems[].Description | The description of the line item. | string |
LineItems[].UnitAmount | Lineitem unit amount. By default, unit amount will be rounded to two decimal places. You can opt in to use four decimal places by adding the querystring parameter unitdp=4 to your query. See the Rounding in Xero
guide for more information. | number |
LineItems[].TaxType | Used as an override if the default Tax Code for the selected AccountCode is not correct. | string |
LineItems[].TaxAmount | LineItem tax amount. | number |
LineItems[].LineAmount | The total of the line including discount. | number |
LineItems[].AccountCode | Customer defined alpha numeric account code e.g 200 or SALES. | string |
LineItems[].Quantity | LineItem Quantity. | number |
LineItems[].LineItemID | The Xero generated identifier for a LineItem. | string |
RepeatingInvoices[].SubTotal | Total of invoice excluding taxes. | number |
RepeatingInvoices[].TotalTax | Total tax on invoice. | number |
RepeatingInvoices[].Total | Total of Invoice tax inclusive (i.e. SubTotal + TotalTax). | number |
RepeatingInvoices[].CurrencyCode | The currency that invoice has been raised in (see Currencies). | string |
- Get Organisation - Returns information about a Xero organisation
Fields:
Title | Description | Type |
Authorization | Add the keyword "Bearer" and Access token. | string |
Xero-tenant-id | The Tenant Id. | string |
Returns:
Title | Description | Type |
Organisations[] | A list of Organisations. | list |
Organisations[].APIKey | Display a unique key used for Xero-to-Xero transactions. | string |
Organisations[].Name | Display the name of the organisation shown in Xero. | string |
Organisations[].LegalName | Organisation name shown on Reports. | string |
Organisations[].PaysTax | Boolean to describe if organisation is registered with a local tax authority i.e. true, false. | yes/no |
Organisations[].Version | The Organisation version. | string |
Organisations[].OrganisationType | The Organisation type. | string |
Organisations[].BaseCurrency | Default currency for the organisation. See ISO 4217 Currency Codes. | string |
Organisations[].CountryCode | Country code for the organisation. See ISO 3166-2 Country Codes. | string |
Organisations[].IsDemoCompany | Boolean to describe if the organisation is a demo company. | yes/no |
Organisations[].OrganisationStatus | Will be set to ACTIVE if you can connect to the organisation via the Xero API. | string |
Organisations[].TaxNumber | Shown if set. Displays in the Xero UI as Tax File Number (AU), GST Number (NZ), VAT Number (UK) and Tax ID Number (US & Global). | string |
Organisations[].FinancialYearEndDay | Calendar day e.g. 0-31. | number |
Organisations[].FinancialYearEndMonth | Calendar Month e.g. 1-12. | number |
Organisations[].SalesTaxBasis | The accounting basis used for tax returns. See Sales Tax Basis. | string |
Organisations[].SalesTaxPeriod | The frequency with which tax returns are processed. See Sales Tax Period. | string |
Organisations[].PeriodLockDate | Shown if set. See lock dates | datetime |
Organisations[].CreatedDateUTC | Timestamp when the organisation was created in Xero. | datetime |
Organisations[].OrganisationEntityType | The Organisation type. | string |
Organisations[].Timezone | string | |
Organisations[].ShortCode | A unique identifier for the organisation. Used in a number of potential use cases such as deep linking. | string |
Organisations[].OrganisationID | The Xero generated unique identifier for the organisation. | string |
Organisations[].Edition | BUSINESS or PARTNER. Partner edition organisations are sold exclusively through accounting partners and have restricted functionality (e.g. no access to invoicing). | string |
Organisations[].Class | Organisation Classes describe which plan the Xero organisation is on (e.g. DEMO, TRIAL, PREMIUM). | string |
Organisations[].Addresses[] | Address details for organisation. | list |
Addresses[].AddressType | The Address type. | string |
Addresses[].AddressLine1 | The Address Line 1. | string |
Addresses[].AddressLine2 | The Address Line 2. | string |
Addresses[].City | The Address is the city. | string |
Addresses[].PostalCode | The Address postal code. | string |
Addresses[].Country | The Address country. | string |
Addresses[].AttentionTo | The Address attention to. | string |
Organisations[].ExternalLinks[] | Organisation profile links for popular services such as Facebook, Twitter, GooglePlus and LinkedIn. You can also add a link to your website here. Shown if Organisation settings are updated in Xero. | list |
ExternalLinks[].LinkType | Link type. | string |
ExternalLinks[].Url | URL for service e.g. http://twitter.com/xeroapi. | string |
Organisations[].PaymentTerms | Default payment terms for the organisation if set. | object |
PaymentTerms.Bills | Default payment terms for bills (accounts payable). | object |
Bills.Day | Day of Month (0-31). | number |
Bills.Type | The type of payment term - see Payment Terms. | string |
PaymentTerms.Sales | Default payment terms for sales invoices (accounts receivable). | object |
Sales.Day | Day of Month (0-31). | number |
Sales.Type | The type of payment term - see Payment Terms. | string |
- Get Employee - Use this method to retrieve one employee.
Fields:
Title | Description | Type |
EmployeeID | The Xero generated unique identifier for the Employee. | string |
Authorization | Add the keyword "Bearer" and Access token. | string |
Xero-tenant-id | The Tenant Id. | string |
Returns:
Title | Description | Type |
Id | The Xero identifier for an operation. | string |
Status | The operation status. | string |
ProviderName | The operation provider name. | string |
DateTimeUTC | The create operation date. | datetime |
Employees[] | The operation Employees. | list |
Employees[].EmployeeID | Xero identifier (unique within organisations). | string |
Employees[].Status | Current status of an employee - see contact status types. | string |
Employees[].FirstName | First name of an employee. | string |
Employees[].LastName | Last name of an employee. | string |
Employees[].ExternalLink | Link to an external resource, for example, an employee record in an external system. | object |
ExternalLink.Url | Link to an external resource. | string |
ExternalLink.Description | Description of URL. | string |
Employees[].UpdatedDateUTC | Last modified date UTC format. | datetime |
- Get Employees - Use this method to retrieve one or many employees.
Fields:
Title | Description | Type |
Authorization | Add the keyword "Bearer" and Access token. | string |
Xero-tenant-id | The Tenant Id. | string |
Returns:
Title | Description | Type |
Employees[] | A list of Employees. | list |
Employees[].EmployeeID | Xero identifier (unique within organisations). | string |
Employees[].Status | Current status of an employee - see contact status types. | string |
Employees[].FirstName | First name of an employee. | string |
Employees[].LastName | Last name of an employee. | string |
Employees[].ExternalLink | Link to an external resource, for example, an employee record in an external system. | object |
ExternalLink.Url | Link to an external resource. | string |
ExternalLink.Description | Description of URL. | string |
Employees[].UpdatedDateUTC | Last modified date UTC format. | datetime |
- New Get Payments - Retrieves either one or many payments for invoices and credit notes.
Fields:
Title | Description | Type |
Authorization | Add the keyword "Bearer" and Access token. | string |
Xero-tenant-id | The Tenant Id. | string |
Returns:
Title | Description | Type |
Payments[] | A list of Payments. | list |
Payments[].PaymentID | Xero generated an identifier for payment (unique within organisations). | string |
Payments[].BatchPaymentID | The Xero generated identifier for the bank transaction (read-only and unique within organisations). | string |
Payments[].BatchPayment | Details of the Batch the payment was part of. | object |
BatchPayment.Account | The Account the payment was made from. | object |
Account.AccountID | ID of the account used to make the payment. This account needs to be either an account of type BANK or have enabled payments to this account switched on | string |
BatchPayment.BatchPaymentID | The Xero generated identifier for the bank transaction (read-only and unique within organisations). | string |
BatchPayment.Date | Date the payment is being made. | datetime |
BatchPayment.Type | PAYBATCH for bill payments or RECBATCH for sales invoice payments (read-only). | string |
BatchPayment.Status | AUTHORISED or DELETED. New batch payments will have a status of AUTHORISED. | string |
BatchPayment.TotalAmount | The total of the payments that make up the batch (read-only). | string |
BatchPayment.UpdatedDateUTC | UTC timestamp of the last update to the payment. | datetime |
BatchPayment.IsReconciled | Boolean that tells you if the batch payment has been reconciled (read-only). | string |
Payments[].Date | Date the payment is being made. | datetime |
Payments[].BankAmount | The amount being paid. | number |
Payments[].Amount | The amount being paid. | number |
Payments[].Reference | (TNZ Only) The information to appear on the supplier's bank account and bank statement. | string |
Payments[].CurrencyRate | The exchange rate when payment is received. Only used for non-base currency invoices and credit notes e.g. 0.7500. | number |
Payments[].PaymentType | Payment type. | string |
Payments[].Status | The status of the payment. | string |
Payments[].UpdatedDateUTC | UTC timestamp of the last update to the payment. | datetime |
Payments[].HasAccount | Boolean to indicate if a payment has an account. | yes/no |
Payments[].IsReconciled | Boolean that tells you if the payment has been reconciled (read-only). | yes/no |
Payments[].Account | The Account the payment was made from. | object |
Account.AccountID | ID of the account you are using to make the payment. | string |
Account.Code | Code of account you are using to make the payment e.g. 001. | string |
Payments[].Invoice | The Invoice the payment was made against. | object |
Invoice.Type | The Invoice type. | string |
Invoice.InvoiceID | Xero generated identifiers for invoices (unique within organisations). | string |
Invoice.InvoiceNumber | ACCREC - Unique alpha numeric code identifying invoice (printable ASCII characters only)ACCPAY - non-unique alpha numeric code identifying invoice (printable ASCII characters only). This value will also display as Reference in the UI. | string |
Invoice.Contact | Information about Contact. | object |
Contact.ContactID | Xero identifier (unique within organisations). | string |
Contact.Name | Full name of contact/organisation. | string |
- New GET Items - Use this method to retrieve either one or many items.
Fields:
Title | Description | Type |
Authorization | Add the keyword "Bearer" and Access token. | string |
Xero-tenant-id | The Tenant Id. | string |
Returns:
Title | Description | Type |
Items[] | A list of Items. | list |
Items[].ItemID | Xero generated an identifier for an item (unique within organisations). | string |
Items[].Code | User-defined item code. | string |
Items[].Description | The sales description of the item. | string |
Items[].UpdatedDateUTC | Last modified date in UTC format. | datetime |
Items[].PurchaseDetails | The PurchaseDetails element can contain a number of individual sub-elements. | object |
PurchaseDetails.UnitPrice | Unit Price of the item. By default, UnitPrice is returned to two decimal places. You can use 4 decimal places by adding the unitdp=4
querystring parameter to your request. | number |
PurchaseDetails.AccountCode | Default account code to be used for purchased/sale. Not applicable to the purchase details of tracked items. | string |
Items[].SalesDetails | The SalesDetails element can contain a number of individual sub-elements. | object |
SalesDetails.UnitPrice | Unit Price of the item. By default UnitPrice is returned to two decimal places. You can use 4 decimal places by adding the unitdp=4
querystring parameter to your request. | number |
SalesDetails.AccountCode | Default account code to be used for purchased/sale. Not applicable to the purchase details of tracked items. | string |
- New Get Tracking Categories - Elements for Tracking Categories.
Fields:
Title | Description | Type |
Authorization | Add the keyword "Bearer" and Access token. | string |
Xero-tenant-id | The Tenant Id. | string |
Returns:
Title | Description | Type |
TrackingCategories[] | A list of TrackingCategories. | list |
TrackingCategories[].Name | The name of the tracking category e.g. Department, Region (max length = 100). | string |
TrackingCategories[].Status | The status of a tracking category. | string |
TrackingCategories[].TrackingCategoryID | The Xero identifier for a tracking category
e.g. 297c2dc5-cc47-4afd-8ec8-74990b8761e9 (unique within organisations). | string |
TrackingCategories[].Options[] | The Tracking options. | list |
Options[].TrackingOptionID | The Xero identifier for a tracking option
e.g. ae777a87-5ef3-4fa0-a4f0-d10e1f13073a (unique within organisations). | string |
Options[].Name | The name of the tracking option e.g. Marketing, East (max length = 100). | string |
Options[].Status | The status of a tracking option. | string |
- New Get Users - Returns the users for a Xero organisation.
Fields:
Title | Description | Type |
Authorization | Add the keyword "Bearer" and Access token. | string |
Xero-tenant-id | The Tenant Id. | string |
Returns:
Title | Description | Type |
Users[] | A list of Users. | list |
Users[].UserID | Xero identifier. | string |
Users[].EmailAddress | Email address of the user. | string |
Users[].FirstName | First name of the user. | string |
Users[].LastName | Last name of the user. | string |
Users[].UpdatedDateUTC | Timestamp of last change to the user. | datetime |
Users[].IsSubscriber | Boolean to indicate if a user is the subscriber. | yes/no |
Users[].OrganisationRole | User role. | string |
- New Get Accounts - Allows you to retrieve the full chart of accounts.
Fields:
Title | Description | Type |
Authorization | Add the keyword "Bearer" and Access token. | string |
Xero-tenant-id | The Tenant Id. | string |
Returns:
Title | Description | Type |
Accounts[] | A list of Accounts. | list |
Accounts[].AccountID | Xero identifier (unique within organisations). | string |
Accounts[].Code | Customer defined alpha numeric account code e.g 200 or SALES. | string |
Accounts[].Name | Name of account. | string |
Accounts[].Type | The Account type. | string |
Accounts[].TaxType | The Account tax type. | string |
Accounts[].EnablePaymentsToAccount | Boolean - describes whether account can have payments applied to it. | yes/no |
Accounts[].BankAccountNumber | For bank accounts only (Account Type BANK). | string |
Accounts[].BankAccountType | For bank accounts only. | string |
Accounts[].CurrencyCode | For bank accounts only. | string |
Accounts[].Description | Description of the Account. Valid for all types of accounts except bank accounts. | string |
- Get All Contacts - Allows you to retrieve all contacts.
Fields:
Title | Description | Type |
Authorization | Add the keyword "Bearer" and Access token. | string |
Xero-tenant-id | The Tenant Id. | string |
Returns:
Title | Description | Type |
Id | The Xero identifier for an operation. | string |
Status | The operation status. | string |
ProviderName | The operation provider name. | string |
DateTimeUTC | The updated operation date. | datetime |
Contacts[] | A list of Contacts. | list |
Contacts[].ContactID | Xero identifier (unique within organisations). | string |
Contacts[].AccountNumber | A user-defined account number. This can be updated via the API and the Xero UI. | string |
Contacts[].ContactStatus | Current status of a contact. | string |
Contacts[].Name | Full name of contact/organisation. | string |
Contacts[].FirstName | First name of the contact person. | string |
Contacts[].LastName | Last name of the contact person. | string |
Contacts[].EmailAddress | Email address of contact person. | string |
Contacts[].Addresses[] | Store certain address types for a contact. | list |
Addresses[].AddressType | The Address type. | string |
Addresses[].City | The Address is the city. | string |
Addresses[].Region | The Address region. | string |
Addresses[].PostalCode | The Address postal code. | string |
Addresses[].Country | The Address country. | string |
Contacts[].Phones[] | Store certain phone types for a contact. | list |
Phones[].PhoneType | The phone type. | string |
Phones[].PhoneNumber | The phone number. | string |
Phones[].PhoneAreaCode | The phone area code. | string |
Phones[].PhoneCountryCode | The phone country code. | string |
Contacts[].UpdatedDateUTC | UTC timestamp of the last update to contact. | datetime |
Contacts[].IsSupplier | Boolean that describes if a contact that has any AP invoices entered against them. | yes/no |
Contacts[].IsCustomer | Boolean that describes if a contact has any AR invoices entered against them. | yes/no |
Contacts[].HasAttachments | Boolean to indicate if an invoice has an attachment. | yes/no |
Contacts[].HasValidationErrors | Boolean to indicate if the contact has validation errors. | yes/no |
Contacts[].BankAccountDetails | Bank account number of the contact. | string |
Contacts[].DefaultCurrency | The default currency for raising invoices against contact. | string |
Plugin Action Calls
- Get Tenants Id - Check the tenants you’re authorized to access.
Fields:
Title | Description | Type |
Authorization | Add the keyword "Bearer" and Access token. | string |
Returns:
This call returns a Tenant. For a detailed description of this response, please check Check the tenants you’re authorized to access.
- Create Tracking Categories - Create tracking categories and options.
Fields:
Title | Description | Type |
Authorization | Add the keyword "Bearer" and Access token. | string |
Xero-tenant-id | The Tenant Id. | string |
Name | The name of the tracking category e.g. Department, Region (max length = 100). | string |
Returns:
Title | Description | Type |
Id | The Xero identifier for an operation. | string |
Status | The operation status. | string |
ProviderName | The operation provider name. | string |
DateTimeUTC | The create operation date. | datetime |
TrackingCategories[] | The operation Tracking Categories. | list |
TrackingCategories[].Name | The name of the tracking category e.g. Department, Region (max length = 100). | string |
TrackingCategories[].Status | The status of a tracking category. | string |
TrackingCategories[].TrackingCategoryID | The Xero identifier for a tracking category. | string |
- Update TrackingCategories - Update tracking categories and options.
Fields:
Title | Description | Type |
TrackingCategoryID | The Xero identifier for a tracking category. | string |
Authorization | Add the keyword "Bearer" and Access token. | string |
Xero-tenant-id | The Tenant Id. | string |
Name | The name of the tracking category e.g. Department, Region (max length = 100). | string |
Returns:
Title | Description | Type |
Id | The Xero identifier for an operation. | string |
Status | The operation status. | string |
ProviderName | The operation provider name. | string |
DateTimeUTC | The updated operation date. | datetime |
TrackingCategories[] | The operation Tracking Categories. | list |
TrackingCategories[].Name | The name of the tracking category e.g. Department, Region (max length = 100). | string |
TrackingCategories[].Status | The status of a tracking category. | string |
TrackingCategories[].TrackingCategoryID | The Xero identifier for a tracking category. | string |
- Create TaxRates - Create new tax rates.
Fields:
Title | Description | Type |
Authorization | Add the keyword "Bearer" and Access token. | string |
Xero-tenant-id | The Tenant Id. | string |
TaxName | Name of the tax rate. | string |
Name_TaxComponents | Name of Tax Component. | string |
Rate_TaxComponents | Tax Rate (up to 4dp). | string |
isCompound_TaxComponents | Boolean to describe if the tax rate is compounded. Learn more. | string |
isNonRecoverable_TaxComponents | Boolean to describe if the tax rate is non-recoverable. This element will default to false if not provided. Non-recoverable rates are only applicable to Canadian organisations. Learn more. | string |
Returns:
Title | Description | Type |
Id | The Xero identifier for an operation. | string |
Status | The operation status. | string |
ProviderName | The operation provider name. | string |
DateTimeUTC | The create operation date. | datetime |
TaxRates[] | The operation Tax Rates. | list |
TaxRates[].Name | Name of the tax rate. | string |
TaxRates[].TaxType | Tax rate type. | string |
TaxRates[].CanApplyToAssets | Boolean to describe if tax rate can be used for asset accounts. | yes/no |
TaxRates[].CanApplyToEquity | Boolean to describe if tax rate can be used for equity accounts. | yes/no |
TaxRates[].CanApplyToExpenses | Boolean to describe if tax rate can be used for expense accounts. | yes/no |
TaxRates[].CanApplyToLiabilities | Boolean to describe if tax rate can be used for liability accounts. | yes/no |
TaxRates[].CanApplyToRevenue | Boolean to describe if tax rate can be used for revenue accounts. | yes/no |
TaxRates[].DisplayTaxRate | Tax Rate (decimal to 4dp) e.g 12.5000. | number |
TaxRates[].EffectiveRate | Effective Tax Rate (decimal to 4dp) e.g 12.5000. | number |
TaxRates[].Status | Tax rate status. | string |
TaxRates[].TaxComponents[] | List of Tax Components. | list |
TaxComponents[].Name | Name of Tax Component. | yes/no |
TaxComponents[].Rate | Tax Rate (up to 4dp). | number |
TaxComponents[].IsCompound | Boolean to describe if the tax rate is compounded. Learn more. | yes/no |
TaxComponents[].IsNonRecoverable | Boolean to describe if the tax rate is non-recoverable. This element will default to false if not provided. Non-recoverable rates are only applicable to Canadian organisations. Learn more. | yes/no |
- Update Accounts - Use this method to update account details.
Fields:
Title | Description | Type |
Authorization | Add the keyword "Bearer" and Access token. | string |
Xero-tenant-id | The Tenant Id. | string |
Code | Customer defined alpha numeric account code e.g 200 or SALES (max length = 10). | string |
Name | Name of account (max length = 150). | string |
Type | Account type. | string |
Returns:
Title | Description | Type |
Id | The Xero identifier for an operation. | string |
Status | The operation status. | string |
ProviderName | The operation provider name. | string |
DateTimeUTC | The create operation date. | datetime |
Accounts[] | The operation Accounts. | list |
Accounts[].AccountID | Xero identifier (unique within organisations). | string |
Accounts[].Code | Customer-defined alpha numeric account code e.g 200 or SALES. | string |
Accounts[].Name | Name of account. | string |
Accounts[].Status | Accounts with a status of ACTIVE can be updated to ARCHIVED. See Account Status Codes. | string |
Accounts[].Type | Account type. | string |
Accounts[].TaxType | Tax type of account. | string |
Accounts[].Class | Account class type | string |
Accounts[].EnablePaymentsToAccount | Boolean - describes whether the account can have payments applied to it. | yes/no |
Accounts[].ShowInExpenseClaims | Boolean - describes whether the account code is available for use with expense claims. | yes/no |
Accounts[].ReportingCode | Shown if set. | string |
Accounts[].ReportingCodeName | Shown if set. | string |
Accounts[].UpdatedDateUTC | Last modified date UTC format. | datetime |
Accounts[].AddToWatchlist | Boolean that determines if this account is shown in the Xero dashboard watchlist widget. | yes/no |
- DELETE Accounts - Non-system accounts and accounts not used on transactions can be deleted.
Fields:
Title | Description | Type |
AccountsID | Xero identifier (unique within organisations). | string |
Authorization | Add the keyword "Bearer" and Access token. | string |
Xero-tenant-id | The Tenant Id. | string |
Returns:
Title | Description | Type |
Id | The Xero identifier for an operation. | string |
Status | The operation status. | string |
ProviderName | The operation provider name. | string |
DateTimeUTC | The create operation date. | datetime |
Accounts[] | The operation Accounts. | list |
Accounts[].AccountID | Xero identifier (unique within organisations). | string |
Accounts[].Code | Customer defined alpha numeric account code e.g 200 or SALES. | string |
Accounts[].Name | Name of account. | string |
Accounts[].Status | Accounts with a status of ACTIVE can be updated to ARCHIVED. See Account Status Codes. | string |
Accounts[].Type | Account type. | string |
Accounts[].TaxType | Tax type of account. | string |
Accounts[].Class | Account class type | string |
Accounts[].EnablePaymentsToAccount | Boolean - describes whether the account can have payments applied to it. | yes/no |
Accounts[].ShowInExpenseClaims | Boolean - describes whether the account code is available for use with expense claims. | yes/no |
Accounts[].ReportingCode | Shown if set. | string |
Accounts[].ReportingCodeName | Shown if set. | string |
Accounts[].UpdatedDateUTC | Last modified date UTC format. | datetime |
Accounts[].AddToWatchlist | Boolean that determines if this account is shown in the Xero dashboard watchlist widget. | yes/no |
- ADD Employee - Use this method to create one or more employee records.
Fields:
Title | Description | Type |
Authorization | Add the keyword "Bearer" and Access token. | string |
Xero-tenant-id | The Tenant Id. | string |
FirstName | First name of an employee (max length = 255). | string |
LastName | Last name of an employee (max length = 255). | string |
URL | Link to an external resource, for example, an employee record in an external system. You can specify the URL element. | string |
Returns:
Title | Description | Type |
Id | The Xero identifier for an operation. | string |
Status | The operation status. | string |
ProviderName | The operation provider name. | string |
DateTimeUTC | The create operation date. | datetime |
Employees[] | The operation Employees. | list |
Employees[].EmployeeID | Xero identifier (unique within organisations). | string |
Employees[].Status | Current status of an employee - see contact status types. | string |
Employees[].FirstName | First name of an employee. | string |
Employees[].LastName | Last name of an employee. | string |
Employees[].ExternalLink | Link to an external resource, for example, an employee record in an external system. | object |
ExternalLink.Url | Link to an external resource. | string |
ExternalLink.Description | Description of URL. | string |
Employees[].UpdatedDateUTC | Last modified date UTC format. | datetime |
- Create Invoice - Create new Invoice.
Fields:
Title | Description | Type |
Authorization | Add the keyword "Bearer" and Access token. | string |
Xero-tenant-id | The Tenant Id. | string |
ContactID | The Contact ID. | string |
Quantity | The line item quantity. | string |
UnitAmount | The line item unit amount. | string |
AccountCode | The line item account code. | string |
Status | The Invoice status. | string |
Date | The Invoice date. Example: 2023-01-09T00:00:00 | string |
Description | The line item description. | string |
DueDate | The Invoice due date. Example: 2023-01-09T00:00:00 | string |
Returns:
Title | Description | Type |
Id | The Xero identifier for an operation. | string |
Status | The operation status. | string |
ProviderName | The operation provider name. | string |
DateTimeUTC | The create operation date. | datetime |
Invoices[] | A list of Invoices. | list |
Invoices[].Type | The Invoice type. | string |
Invoices[].InvoiceID | Xero generated identifiers for invoices (unique within organisations). | string |
Invoices[].InvoiceNumber | ACCREC - Unique alpha numeric code identifying invoice (printable ASCII characters only)ACCPAY - non-unique alpha numeric code identifying invoice (printable ASCII characters only). This value will also display as a Reference in the UI. | string |
Invoices[].Reference | ACCREC only - additional reference number. | string |
Invoices[].AmountDue | Amount remaining to be paid on invoice. | number |
Invoices[].AmountPaid | Sum of payments received for the invoice. | number |
Invoices[].SentToContact | Boolean to indicate whether the invoice in the Xero app displays as "sent”. | yes/no |
Invoices[].CurrencyRate | The currency rate for a multicurrency invoice. | number |
Invoices[].IsDiscounted | Boolean that tells you if the batch payment is discounted. | yes/no |
Invoices[].HasErrors | Boolean that tells you if the batch payment has errors. | yes/no |
Invoices[].Contact | Information about Contact. | object |
Contact.ContactID | Xero identifier (unique within organisations). | string |
Contact.AccountNumber | A user-defined account number. This can be updated via the API and the Xero UI. | string |
Contact.ContactStatus | Current status of a contact - see contact status types. | string |
Contact.Name | Full name of contact/organisation. | string |
Contact.FirstName | First name of the contact person. | string |
Contact.LastName | Last name of the contact person. | string |
Contact.EmailAddress | Email address of contact person. | string |
Contact.Addresses[] | Store certain address types for a contact. | list |
Addresses[].AddressType | The Address type. | string |
Contact.Phones[] | Store certain phone types for a contact. | list |
Phones[].PhoneType | The phone type. | string |
Contact.UpdatedDateUTC | UTC timestamp of the last update to contact. | datetime |
Contact.IsSupplier | Boolean that describes if a contact that has any AP invoices entered against them. | yes/no |
Contact.IsCustomer | Boolean that describes if a contact has any AR invoices entered against them. | yes/no |
Contact.HasValidationErrors | Boolean to indicate if the contact has validation errors. | yes/no |
Invoices[].DateString | Date invoice was issued - YYYY-MM-DD. | string |
Invoices[].Date | Date the invoice was issued. | datetime |
Invoices[].BrandingThemeID | Xero identifier (unique within organisations). | string |
Invoices[].Status | When creating new invoices or modifying existing invoices you can optionally specify a "Status" element. New invoices can have either one of the following three status codes: DRAFT, SUBMITTED, AUTHORISED. | string |
Invoices[].LineAmountTypes | The LineAmount Type. Available values: Exclusive, Inclusive, NoTax. | string |
Invoices[].LineItems[] | The LineItems element can contain any number of individual LineItem sub-elements. | list |
LineItems[].Description | The description of the line item. | string |
LineItems[].UnitAmount | Lineitem unit amount. By default, unit amount will be rounded to two decimal places. You can opt-in to use four decimal places by adding the querystring parameter unitdp=4 to your query. See the Rounding in Xero
guide for more information. | number |
LineItems[].TaxType | Used as an override if the default Tax Code for the selected AccountCode is not correct. | string |
LineItems[].TaxAmount | LineItem tax amount. | number |
LineItems[].LineAmount | The total of the line including discount. | number |
LineItems[].AccountCode | Customer defined alpha numeric account code e.g 200 or SALES. | string |
LineItems[].Quantity | LineItem Quantity. | number |
LineItems[].LineItemID | The Xero generated identifier for a LineItem. | string |
Invoices[].SubTotal | Total of invoice excluding taxes. | number |
Invoices[].TotalTax | Total tax on the invoice. | number |
Invoices[].Total | Total of Invoice tax inclusive (i.e. SubTotal + TotalTax). | number |
Invoices[].UpdatedDateUTC | Last modified date UTC format. | datetime |
Invoices[].CurrencyCode | The currency that the invoice has been raised in (see Currencies). | string |
- Delete Tracking Categories - Delete existing Tracking Categories.
Fields:
Title | Description | Type |
TrackingCategoryID | Xero assigned unique ID for the category. | string |
Authorization | Add the keyword "Bearer" and Access token. | string |
Xero-tenant-id | The Tenant Id. | string |
Returns:
Title | Description | Type |
Id | The Xero identifier for an operation. | string |
Status | The operation status. | string |
ProviderName | The operation provider name. | string |
DateTimeUTC | The create operation date. | datetime |
TrackingCategories[] | A list of TrackingCategories. | list |
TrackingCategories[].Name | The name of the tracking category e.g. Department, Region (max length = 100). | string |
TrackingCategories[].Status | The status of a tracking category. | string |
TrackingCategories[].TrackingCategoryID | The Xero identifier for a tracking category
e.g. 297c2dc5-cc47-4afd-8ec8-74990b8761e9 (unique within organisations). | string |
- Create Contact - Create new contact record.
Fields:
Title | Description | Type |
Authorization | Add the keyword "Bearer" and Access token. | string |
Xero-tenant-id | The Tenant Id. | string |
Name | (required) Full name of contact. (max length = 255) | string |
FirstName | (optional) First name of contact person. (max length = 255) | string |
LastName | (optional) Last name of contact person. (max length = 255) | string |
ContactNumber | (optional) This field is read only on the Xero contact screen, used to identify contacts in external systems (max length = 50). If the Contact Number is used, this is displayed as Contact Code in the Contacts UI in Xero. | string |
CompanyNumber | (optional) Company registration number. Max 50 char. | string |
EmailAddress | (required) Email address of contact person. (max length = 255) | string |
AccountNumber | (optional) A user defined account number. (max length = 50) | string |
AddressType | (optional) Address type can be POBOX, STREET or DELIVERY. | string |
AddressLine1 | (optional) Address line 1. (max length = 500) | string |
City | (optional) City. (max length = 255) | string |
Region | (optional) Region. (max length = 255) | string |
PostalCode | (optional) Postal code. (max length = 50) | string |
Country | (optional) Country. Are accepted just letter (A-Z, a-z). (max length = 50) | string |
PhoneType | (optional) Phone type can be DEFAULT, DDI, MOBILE or FAX. | string |
PhoneCountryCode | (optional) Phone country code. (max length = 20) | string |
PhoneAreaCode | (optional) Phone area code. (max length = 10) | string |
PhoneNumber | (optional) Phone number. (max length = 50) | string |
BankAccountDetails | (optional) Bank account number of contact. | string |
TaxNumber | (optional) Tax number of contact – this is also known as the ABN (Australia), GST Number (New Zealand), VAT Number (UK) or Tax ID Number (US and global) in the Xero UI depending on which regionalized version of Xero you are using. (max length = 50) | string |
AccountsReceivableTaxType | (required) Default tax type used for contact on AR invoices. | string |
AccountsPayableTaxType | (required) Default tax type used for contact on AP invoices. | string |
DefaultCurrency | (required) Default currency for raising invoices against contact. Need to coincide with Xero organization currency. | string |
Returns:
Title | Description | Type |
Id | The Xero identifier for an operation. | string |
Status | The operation status. | string |
ProviderName | The operation provider name. | string |
DateTimeUTC | The create operation date. | datetime |
Contacts[] | A list of Contacts. | list |
Contacts[].ContactID | Xero identifier. | string |
Contacts[].ContactNumber | This field is read only on the Xero contact screen, used to identify contacts in external systems (max length = 50). If the Contact Number is used, this is displayed as Contact Code in the Contacts UI in Xero. | string |
Contacts[].AccountNumber | A user defined account number. | string |
Contacts[].ContactStatus | Current status of a contact can be ACTIVE, ARCHIVED or GDPRREQUEST. | string |
Contacts[].Name | Full name of contact. | string |
Contacts[].FirstName | First name of contact person. | string |
Contacts[].LastName | Last name of contact person. | string |
Contacts[].EmailAddress | Email address of contact person. | string |
Contacts[].BankAccountDetails | Bank account number of contact. | string |
Contacts[].TaxNumber | Tax number of contact – this is also known as the ABN (Australia), GST Number (New Zealand), VAT Number (UK) or Tax ID Number (US and global) in the Xero UI depending on which regionalized version of Xero you are using. (max length = 50) | string |
Contacts[].AccountsReceivableTaxType | Default tax type used for contact on AR invoices. | string |
Contacts[].AccountsPayableTaxType | Default tax type used for contact on AP invoices. | string |
Contacts[].Addresses[] | Store certain address types for a contact. | list |
Addresses[].AddressType | Address type can be POBOX, STREET or DELIVERY. | string |
Addresses[].City | City. | string |
Addresses[].Region | Region. | string |
Addresses[].PostalCode | Postal code. | string |
Addresses[].Country | Country. | string |
Addresses[].AddressLine1 | Address line 1. | string |
Contacts[].Phones[] | Store certain phone types for a contact | list |
Phones[].PhoneType | Phone type can be DEFAULT, DDI, MOBILE or FAX. | string |
Phones[].PhoneNumber | Phone number. | string |
Phones[].PhoneAreaCode | Phone area code. | string |
Phones[].PhoneCountryCode | Phone country code. | string |
Contacts[].UpdatedDateUTC | The last time when the contact was updated. | datetime |
Contacts[].IsSupplier | Describes if a contact that has any AP invoices entered against them. | yes/no |
Contacts[].IsCustomer | Describes if a contact has any AR invoices entered against them. | yes/no |
Contacts[].DefaultCurrency | Default currency for raising invoices against contact. Need to coincide with Xero organization currency. | string |
BatchPayments.BankAccountNumber | Bank account number of contact. | string |
Contacts[].HasValidationErrors | Describes if a contact has validation errors. | yes/no |
For more details, check the Xero documentation.
- Update Contact - Update a contact record.
Fields:
Title | Description | Type |
Authorization | Add the keyword "Bearer" and Access token. | string |
Xero-tenant-id | The Tenant Id. | string |
ContactID | (required) Xero identifier. | string |
Name | (required) Full name of contact. (max length = 255) | string |
FirstName | (optional) First name of contact person. (max length = 255) | string |
LastName | (optional) Last name of contact person. (max length = 255) | string |
ContactNumber | (optional) This field is read only on the Xero contact screen, used to identify contacts in external systems (max length = 50). If the Contact Number is used, this is displayed as Contact Code in the Contacts UI in Xero. | string |
CompanyNumber | (optional) Company registration number. Max 50 char. | string |
EmailAddress | (required) Email address of contact person. (max length = 255) | string |
AccountNumber | (optional) A user defined account number. (max length = 50) | string |
ContactStatus | (required) Current status of a contact can be ACTIVE, ARCHIVED or GDPRREQUEST. For keeping previous value fill the field with previous value. | string |
AddressType | (optional) Address type can be POBOX, STREET or DELIVERY. | string |
AddressLine1 | (optional) Address line 1. (max length = 500) | string |
City | (optional) City. (max length = 255) | string |
Region | (optional) Region. (max length = 255) | string |
PostalCode | (optional) Postal code. (max length = 50) | string |
Country | (optional) Country. Are accepted just letter (A-Z, a-z). (max length = 50) | string |
PhoneType | (optional) Phone type can be DEFAULT, DDI, MOBILE or FAX. | string |
PhoneCountryCode | (optional) Phone country code. (max length = 20) | string |
PhoneAreaCode | (optional) Phone area code. (max length = 10) | string |
PhoneNumber | (optional) Phone number. (max length = 50) | string |
BankAccountDetails | (optional) Bank account number of contact. | string |
TaxNumber | (optional) Tax number of contact – this is also known as the ABN (Australia), GST Number (New Zealand), VAT Number (UK) or Tax ID Number (US and global) in the Xero UI depending on which regionalized version of Xero you are using. (max length = 50) | string |
AccountsReceivableTaxType | (required) Default tax type used for contact on AR invoices. | string |
AccountsPayableTaxType | (required) Default tax type used for contact on AP invoices. | string |
DefaultCurrency | (required) Default currency for raising invoices against contact. Need to coincide with Xero organization currency. | string |
Returns:
Title | Description | Type |
Id | The Xero identifier for an operation. | string |
Status | The operation status. | string |
ProviderName | The operation provider name. | string |
DateTimeUTC | The create operation date. | datetime |
Contacts[] | A list of Contacts. | list |
Contacts[].ContactID | Xero identifier. | string |
Contacts[].ContactNumber | This field is read only on the Xero contact screen, used to identify contacts in external systems (max length = 50). If the Contact Number is used, this is displayed as Contact Code in the Contacts UI in Xero. | string |
Contacts[].AccountNumber | A user defined account number. | string |
Contacts[].ContactStatus | Current status of a contact can be ACTIVE, ARCHIVED or GDPRREQUEST. | string |
Contacts[].Name | Full name of contact. | string |
Contacts[].FirstName | First name of contact person. | string |
Contacts[].LastName | Last name of contact person. | string |
Contacts[].EmailAddress | Email address of contact person. | string |
Contacts[].BankAccountDetails | Bank account number of contact. | string |
Contacts[].TaxNumber | Tax number of contact – this is also known as the ABN (Australia), GST Number (New Zealand), VAT Number (UK) or Tax ID Number (US and global) in the Xero UI depending on which regionalized version of Xero you are using. (max length = 50) | string |
Contacts[].AccountsReceivableTaxType | Default tax type used for contact on AR invoices. | string |
Contacts[].AccountsPayableTaxType | Default tax type used for contact on AP invoices. | string |
Contacts[].Addresses[] | Store certain address types for a contact. | list |
Addresses[].AddressType | Address type can be POBOX, STREET or DELIVERY. | string |
Addresses[].City | City. | string |
Addresses[].Region | Region. | string |
Addresses[].PostalCode | Postal code. | string |
Addresses[].Country | Country. | string |
Addresses[].AddressLine1 | Address line 1. | string |
Contacts[].Phones[] | Store certain phone types for a contact | list |
Phones[].PhoneType | Phone type can be DEFAULT, DDI, MOBILE or FAX. | string |
Phones[].PhoneNumber | Phone number. | string |
Phones[].PhoneAreaCode | Phone area code. | string |
Phones[].PhoneCountryCode | Phone country code. | string |
Contacts[].UpdatedDateUTC | The last time when the contact was updated. | datetime |
Contacts[].IsSupplier | Describes if a contact that has any AP invoices entered against them. | yes/no |
Contacts[].IsCustomer | Describes if a contact has any AR invoices entered against them. | yes/no |
Contacts[].DefaultCurrency | Default currency for raising invoices against contact. Need to coincide with Xero organization currency. | string |
BatchPayments.BankAccountNumber | Bank account number of contact. | string |
Contacts[].HasValidationErrors | Describes if a contact has validation errors. | yes/no |
For more details, check the Xero documentation.
Workflow example
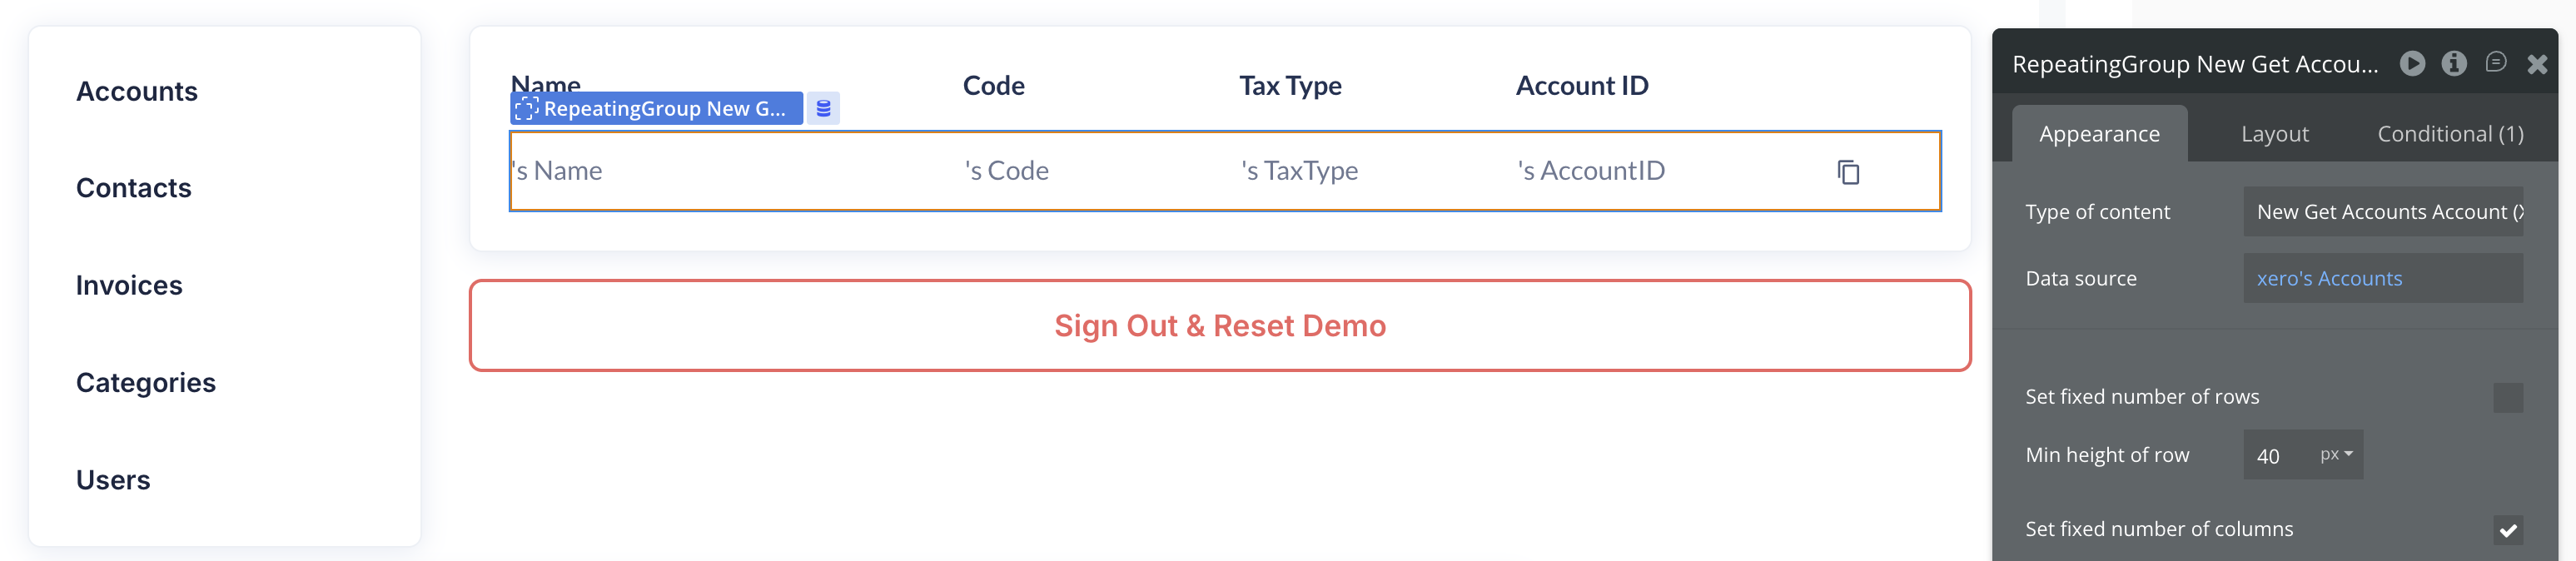
In this workflow,, we will show you how to retrieve and display, Accounts, Employees and Users values on Bubble via action when a Button is clicked.
- Place an element Button on the page
- Add an action on the button clicked, Refresh Token

- Next we make changes to user fields
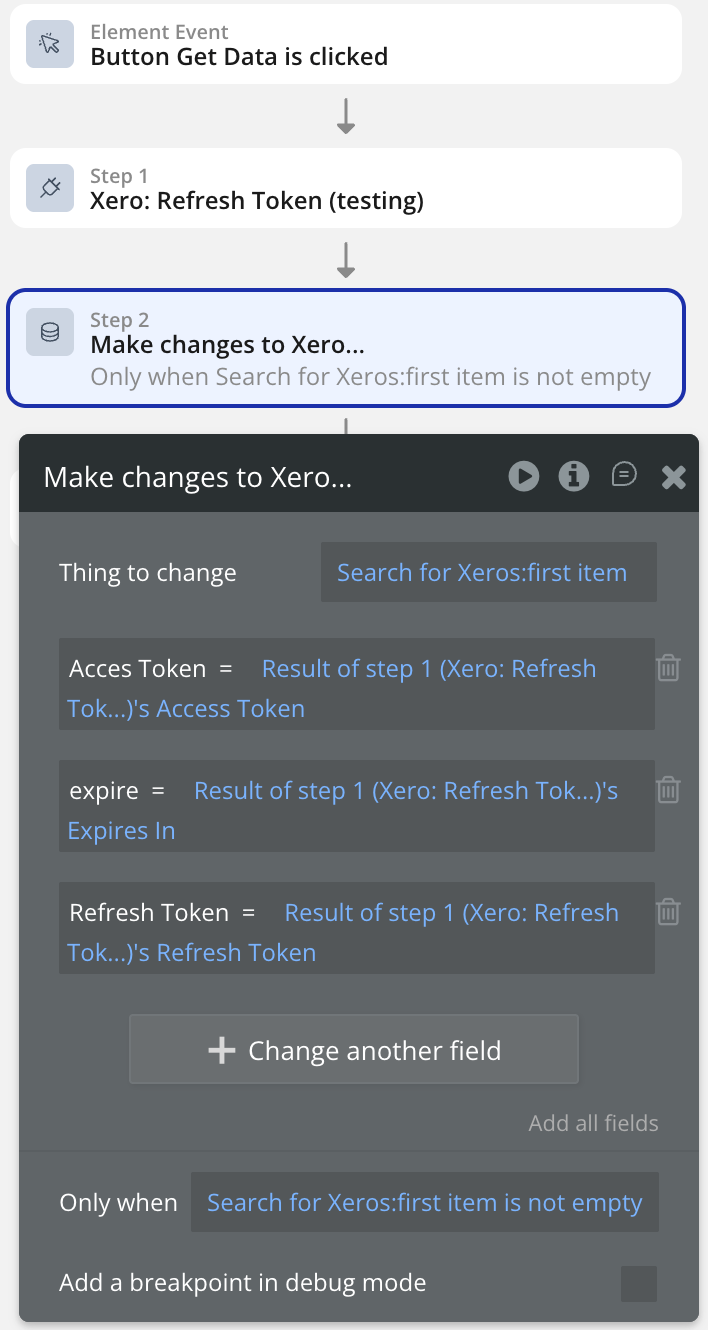
- In last step we save the values in custom states retrieved from Xero
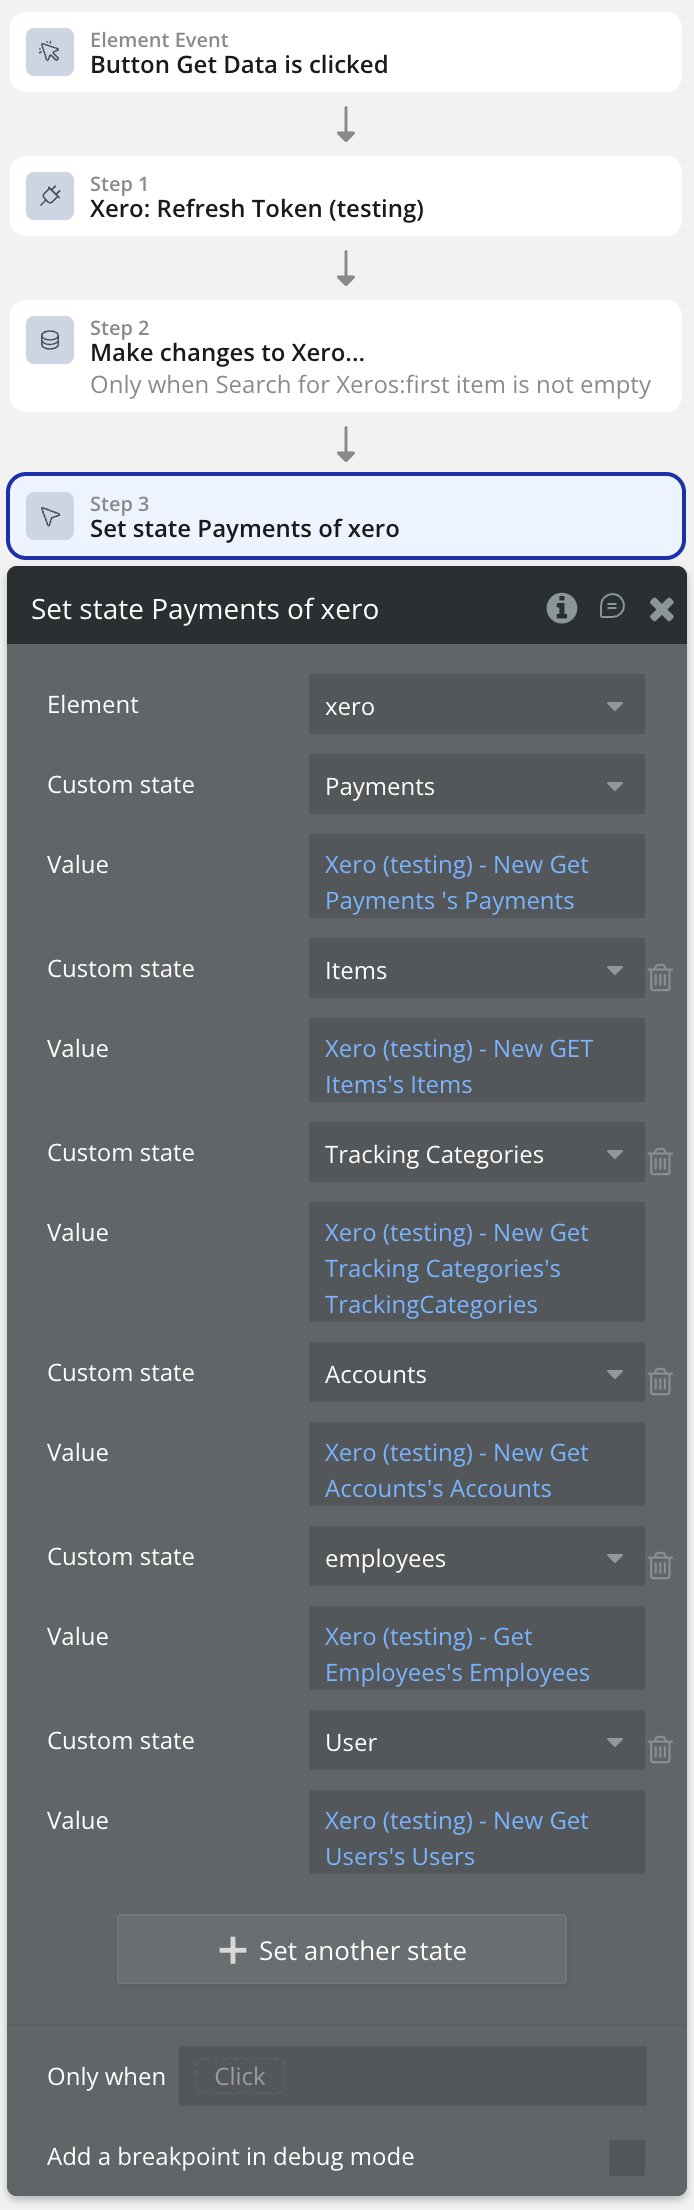
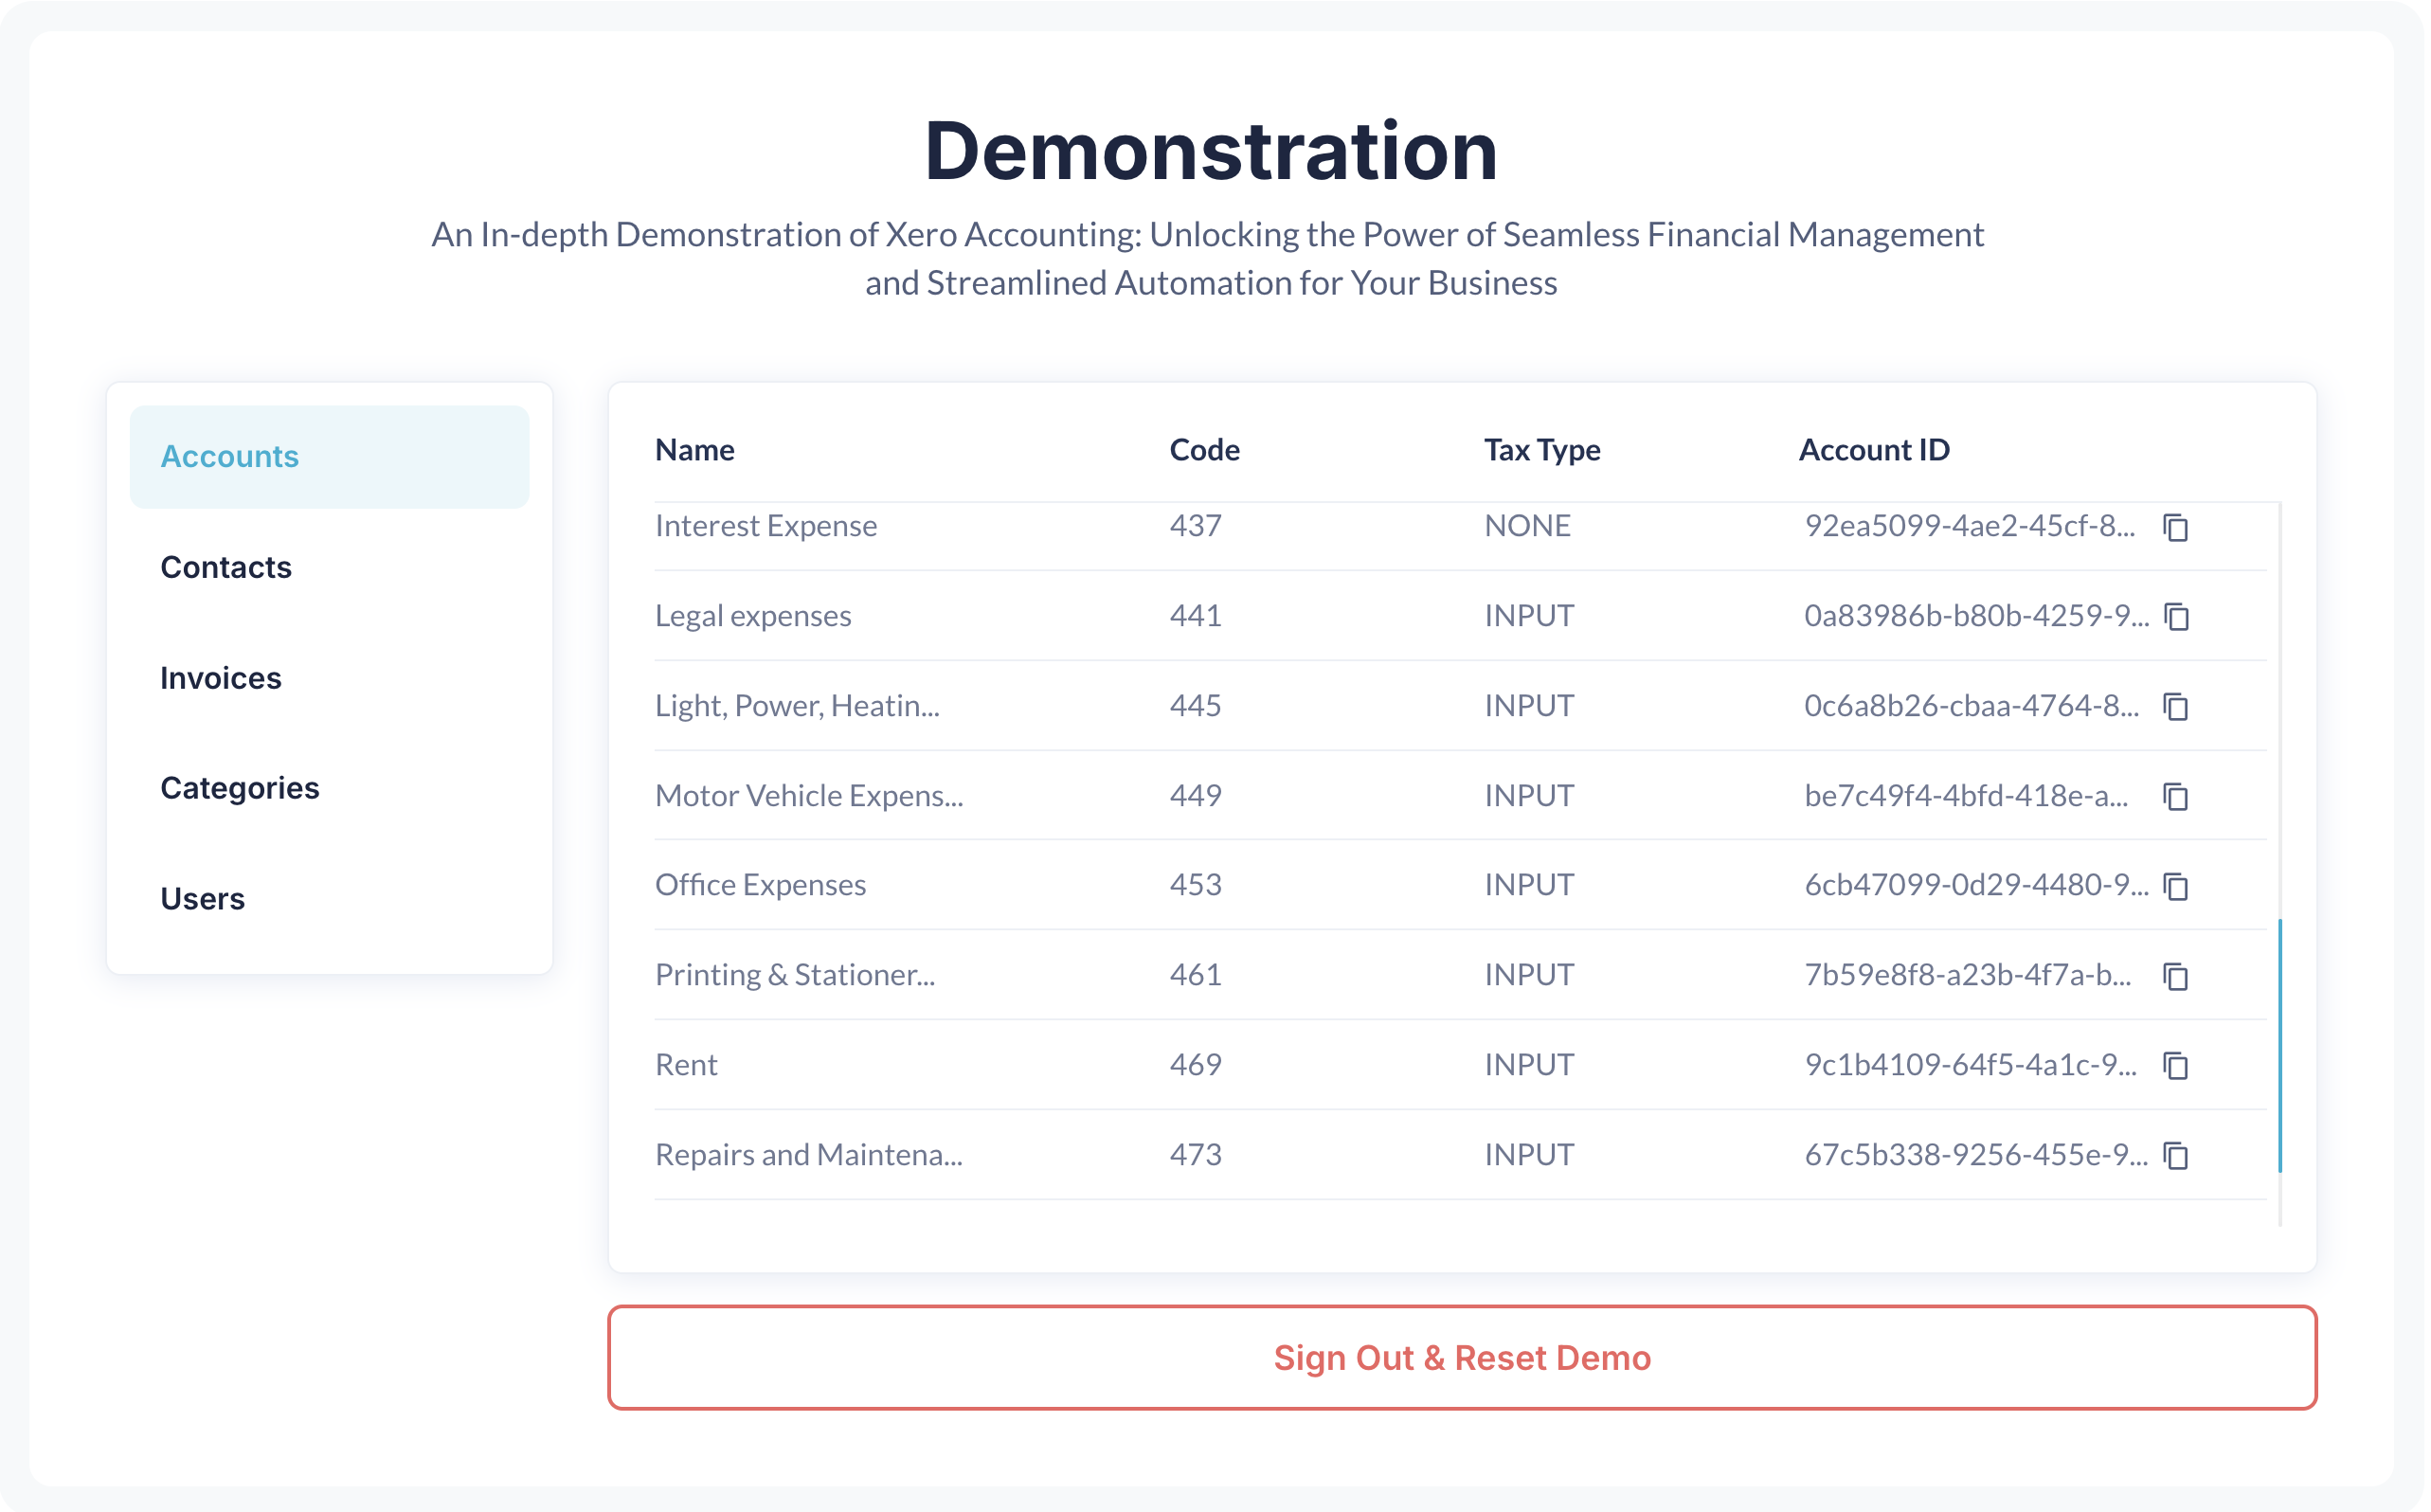
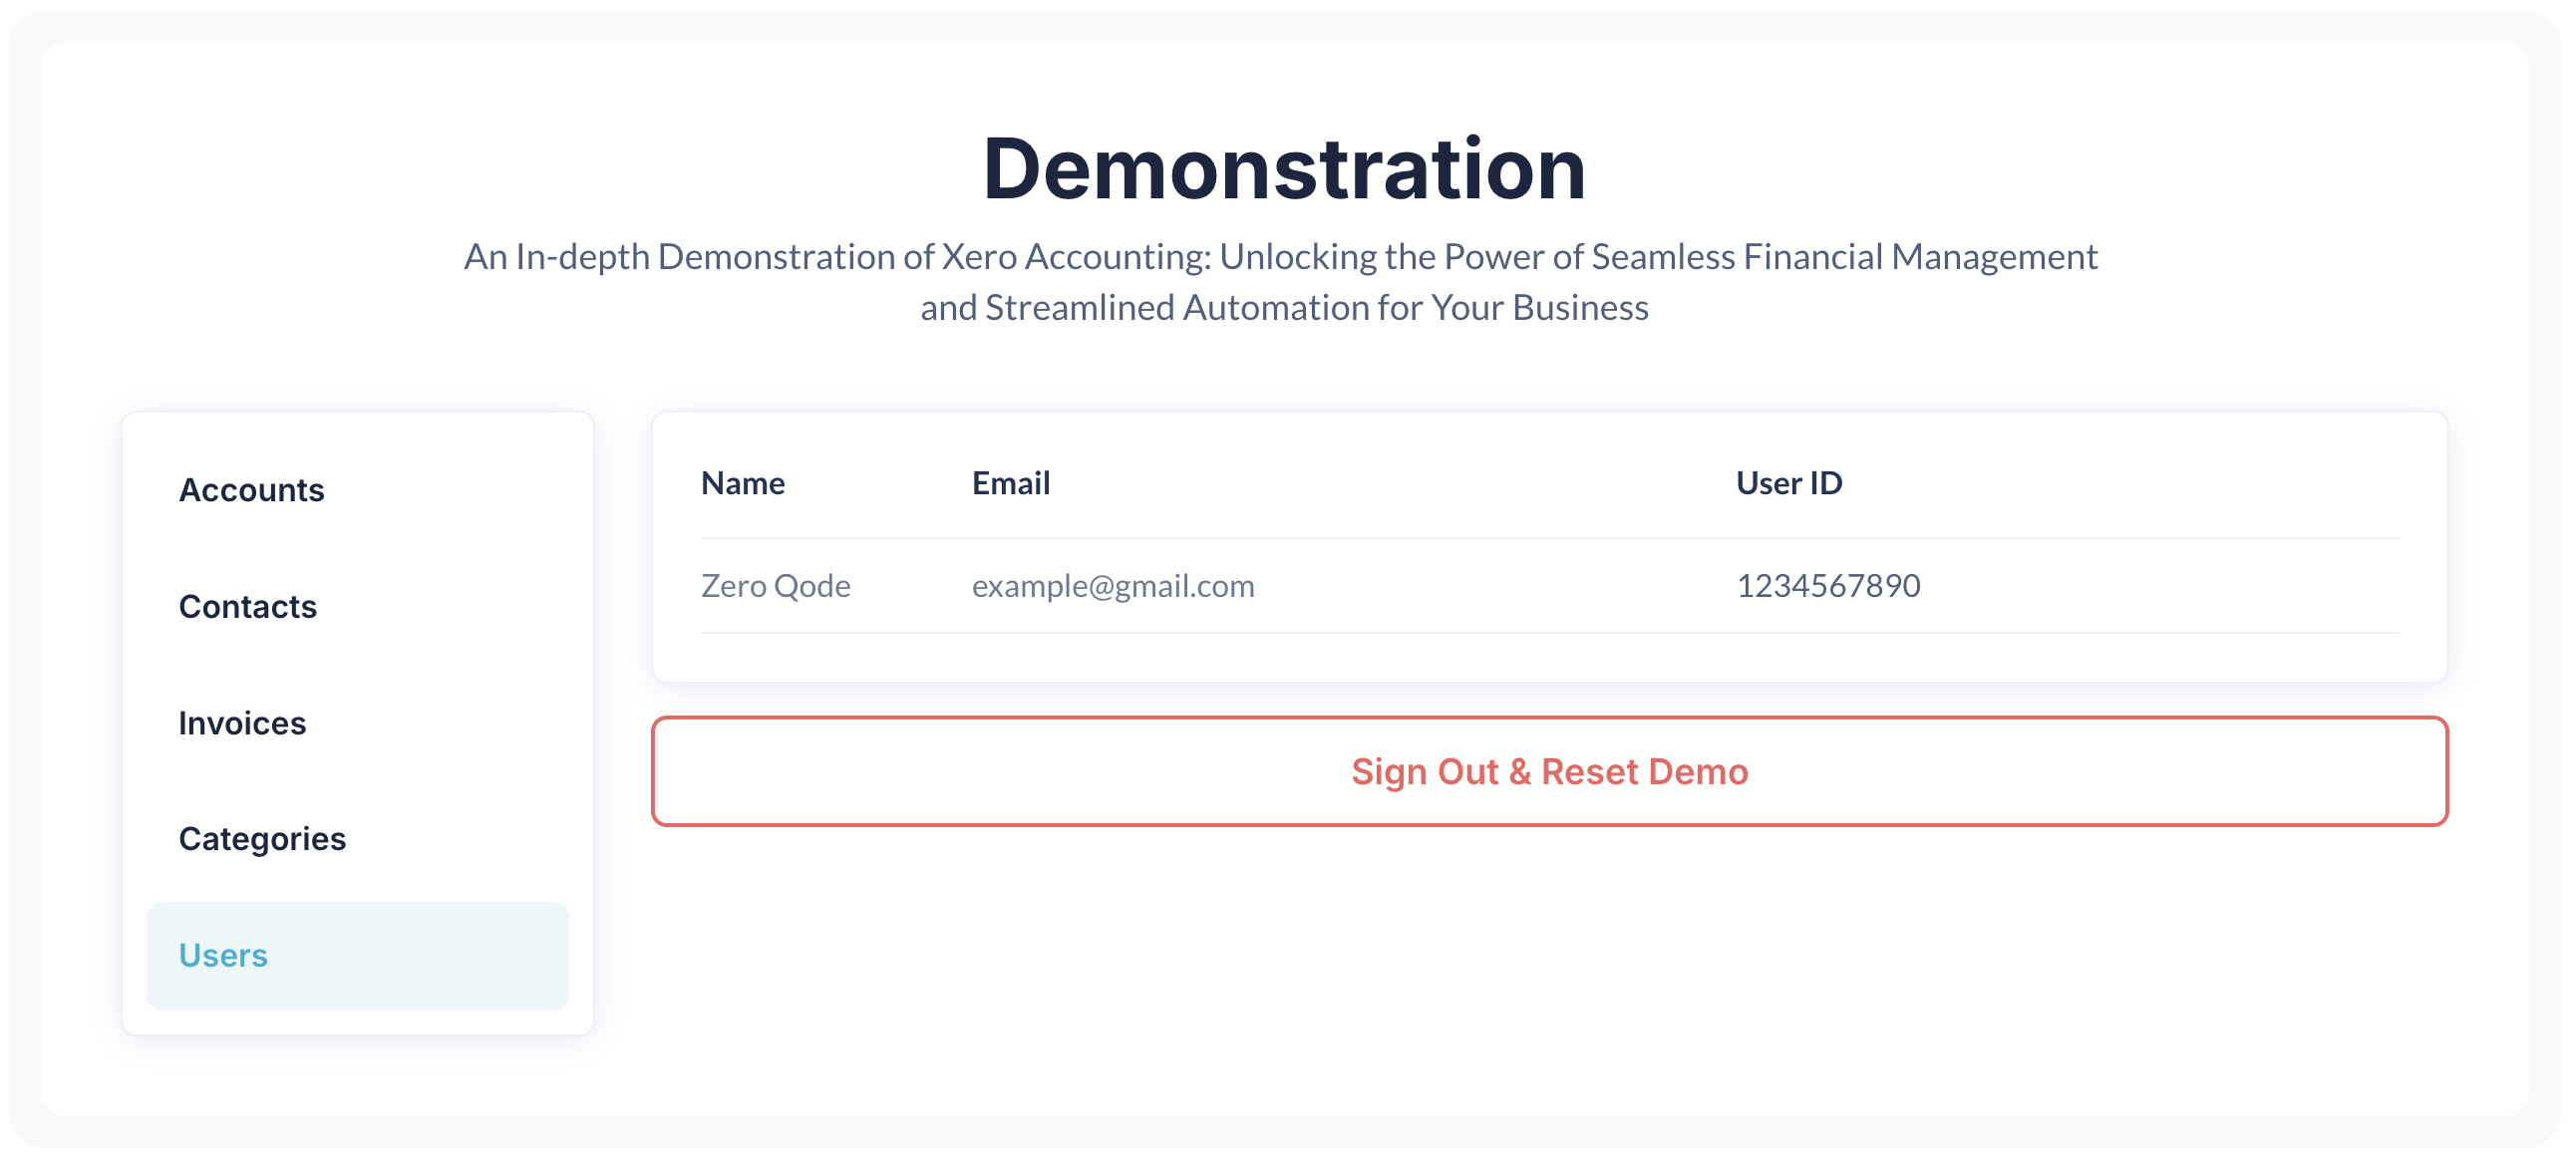
- The retrieved values on front-end, (ex Accounts and Users)
- Configure Repeating Group for Accounts:
- Configure Repeating Group for Users:


Changelogs
Update 08.06.26 - Version 1.34.0
- Updated OAuth scopes to support Xero apps created after March 2, 2026.
Xero deprecated the broad
accounting.transactionsOAuth scope for all apps created after March 2, 2026. The plugin now requests the equivalent granular scopes:accounting.invoices,accounting.banktransactions, andaccounting.payments. If your Xero app was created before March 2, 2026, this change has no impact on existing connected users.
Update 27.02.26 - Version 1.33.0
- Minor update (fixed preview).
Update 20.06.25 - Version 1.32.0
- Bubble Plugin Page Update (Logo).
Update 30.04.25 - Version 1.31.0
- Minor update (Marketing update).
Update 27.04.25 - Version 1.30.0
- Minor update (Marketing update).
Update 27.01.25 - Version 1.29.0
- Security Update.
Update 25.07.24 - Version 1.28.0
- Minor update.
Update 24.06.24 - Version 1.27.0
- Updated demo/service links.
Update 25.03.24 - Version 1.26.0
- Create invoice - reference field added.
Update 09.11.23 - Version 1.25.0
- Updated "Create Contact" action fields..
Update 19.10.23 - Version 1.24.0
- Updated description.
Update 27.09.23 - Version 1.23.0
- Updated documentation.
Update 18.09.23 - Version 1.22.0
- minor updates.
Update 13.09.23 - Version 1.21.0
- minor updates.
Update 06.09.23 - Version 1.20.0
- Obfuscation.
Update 05.09.23 - Version 1.19.0
- Upgraded to node18 & added "Redirect URL" to element/action.
Update 18.08.23 - Version 1.18.0
- Added "Update Invoice" action and minor updates. (added the "LineItems" field to the "Create Invoice" action and updated the "Get Invoices" call - added "#hash" parameter).
Update 24.07.23 - Version 1.17.0
- Added "Refresh Token (API Call)" action.
Update 11.07.23 - Version 1.16.0
- updated description.
Update 09.06.23 - Version 1.15.0
- Added "page" parameter for "Get Invoices" call & changed type for "Expires In" state of "Refresh Token" action.
Update 18.04.23 - Version 1.14.0
- Added "Create Contact" & "Update Contact" actions..
Update 23.02.23 - Version 1.13.0
- deleted the icons.
Update 22.02.23 - Version 1.12.0
- updated the description.
Update 10.01.23 - Version 1.11.0
- Added "Date", "DueDate", "Status", "AccountCode" fields for "Create Invoice" action.
Update 03.01.23 - Version 1.10.0
- Removed deprecated elements and actions.
Update 28.12.22 - Version 1.9.0
- Added "accounting.contacts" scope for authentication.
Update 23.12.22 - Version 1.8.0
- Added Get All Contacts, Create Invoice, Deleted Tracking Categories calls & updated "Create" api calls..
Update 19.12.22 - Version 1.7.0
- Changed data type to date in all API Calls & added 3 new Calls.
Update 14.07.21 - Version 1.6.0
- Updated icon.
Update 09.02.21 - Version 1.5.0
- Updated icon.
Update 18.11.20 - Version 1.4.0
- Migrated plugin from Oauth1.0 to Oauth 2.0 authorization.
Update 05.02.20 - Version 1.3.0
- udpated description.
Update 21.11.19 - Version 1.2.0
- Added pagination with optional field. .
Update 21.10.19 - Version 1.1.0
- Fixed request timeout bug for Get Data Requests .
Update 10.01.19 - Version 1.0.0
- Initial Release.