Link to plugin page: https://zeroqode.com/plugin/quickbooks-authenticate-1545877666625x794445319480279000
Demo to preview the settings
Introduction
This Quickbooks plugin version makes it possible for a user to use 1 company account and stay authenticated for 100days at a time.
Prerequisites
You will need a developer account with Quickbooks in order to interact with the Plugin: https://developer.intuit.com/app/developer/qbo/docs/get-started
How to setup
- Sign up to the Quickbooks Developer Website.
- Once you are logged in, click 'Dashboard'.

- In Dashboard you will find all your apps

- Click on 'Create an app' to create an application.
- Select the platform you want to develop for (by default will be only one type "Quickbooks online and payments")
- Insert a new app name and select scopes from the dropdown for it. (Depending on your requirements the scopes can vary)

- Provide a name to your app and click "Create app"
Navigate to the 'Keys' tab, in BOTH 'Redirect URI' sections add your app's redirect URL.
Your Redirect URL in most cases will be, https://_your-app_.bubbleapps.io/api/1.1/oauth_redirect
- Navigate to the 'Dashboard' tab, find Resources section, and click on OAuth Playground, see in the image below.

- Select your app form the list.
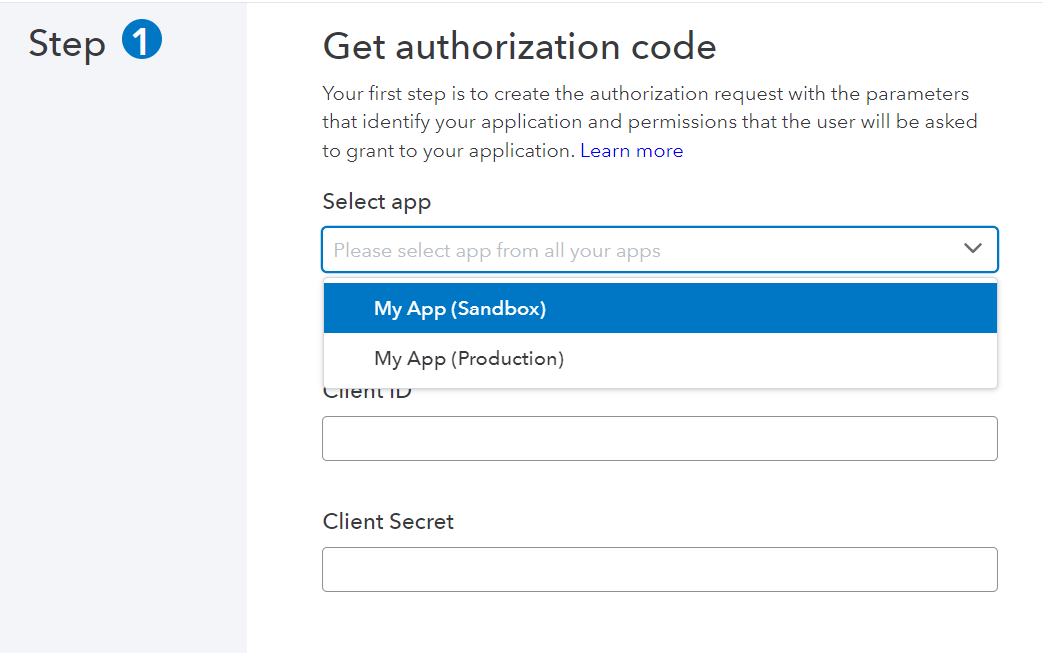
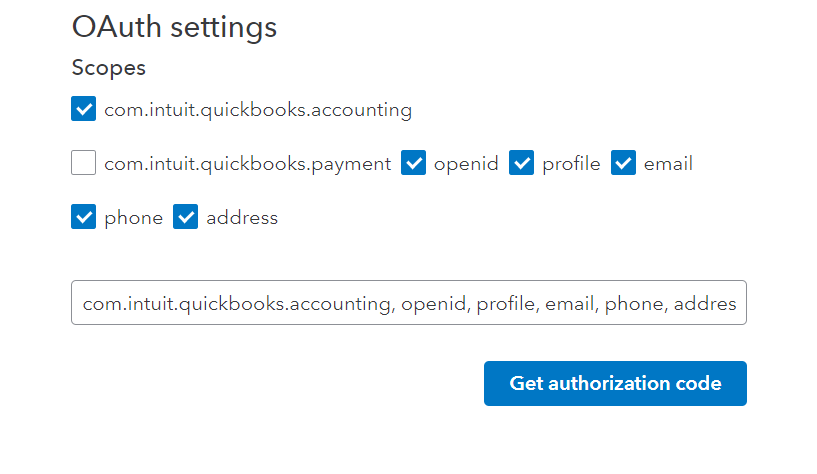
- Select all scopes that you need, then click on the "Get authorization code" button.
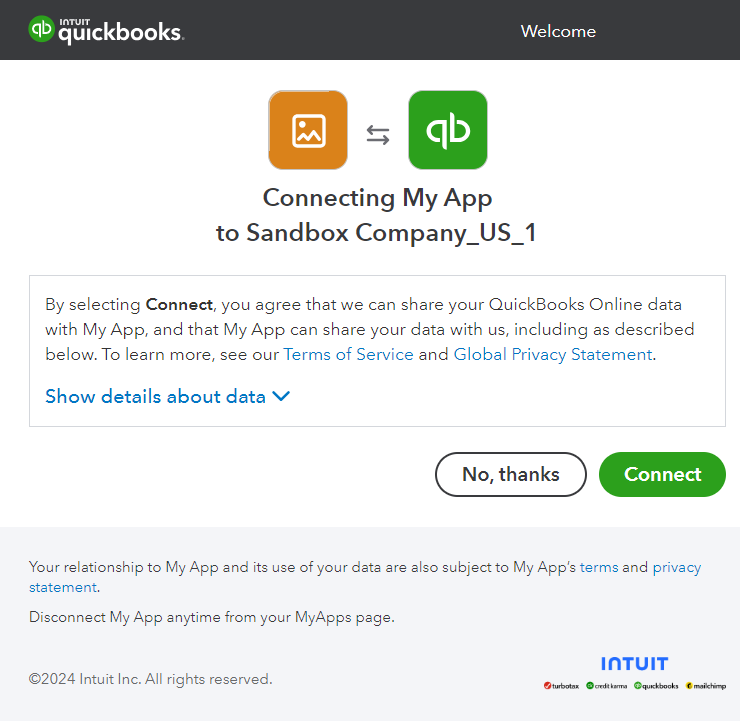
- Next will be opened a new page where you will be asked to Authorize Intuit to securely share your data, click Connect.
- You will be redirected back, after that click the "Get tokens" button.
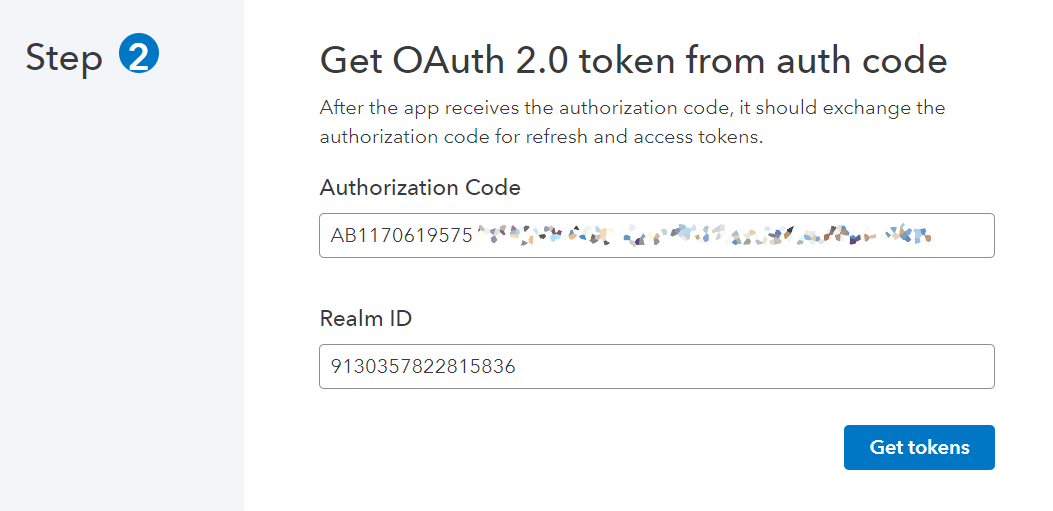
- On the right side will be shown results, select all "Authorziation" keys from there, together with "Basic" word, see in the example below.
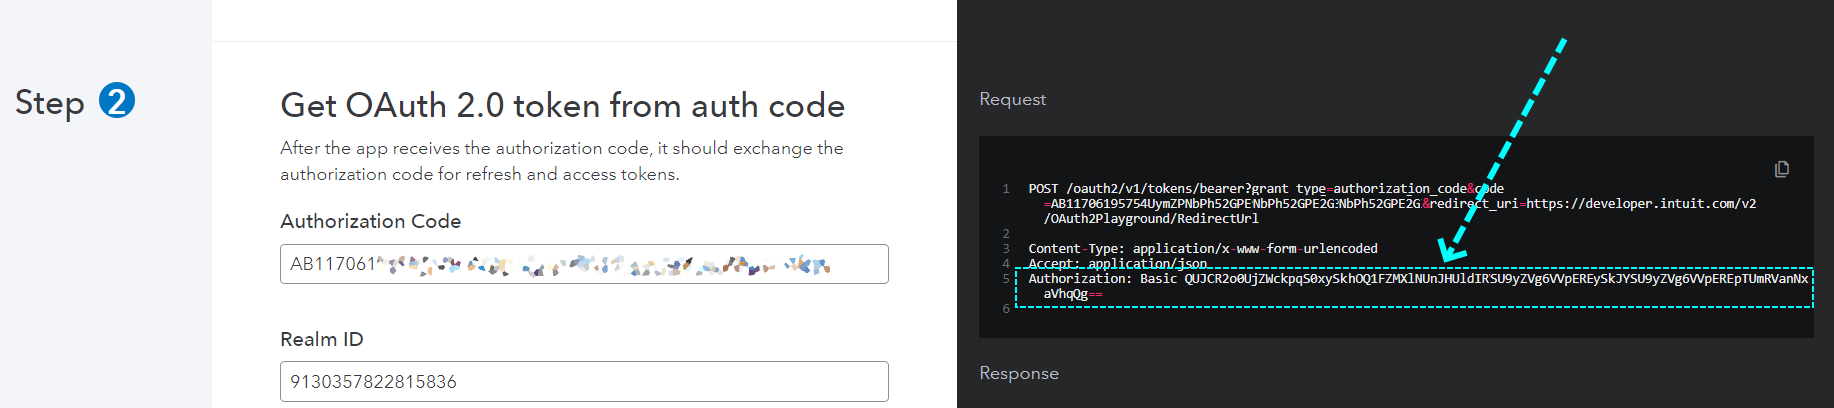
Authorization key example:
Basic UTBIenl2UVNrSDdrdzhINnFrbU9sMHVtWEhvS09hYjRmd2Njc21scEF1VHluLEVjOHE6dFhwLlZOazdpUWx4oAjRsTuIyNfCMHd1V25Fd1BublJJZ2l0ZXFkQw==- Place your Authorization key into the plugin's settings in your app in first field.

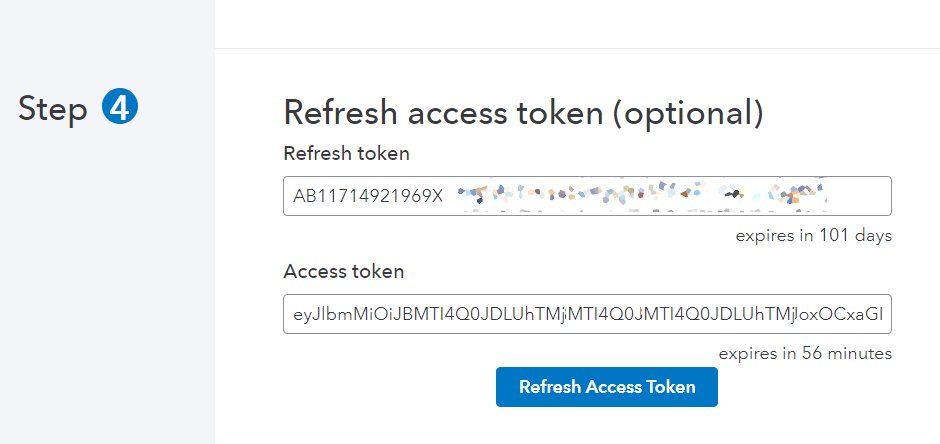
- On the same page open section 4, "Refresh access token", and copy the refresh token.
- In your Bubble app, go to Data and create new type, call it how you want, (ex: Quickooks Tokens) and added new entry called Old refresh token, where you paste your Refresh Token.
This is how it looks like:

We have to do it just once.
- Now create an event in workflow, for example when page is loaded, to GET NEW ACCESS TOKEN, and save results in a custom state, then save REFRESH TOKEN in your data.
Example:


Now you don't have to worry about your refresh token, it will be renewed automatically.
Plugin Element
QuickBooks Converter
Element convert response from Report’s API Calls to rows
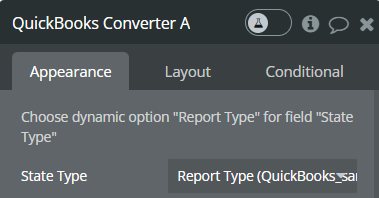
Title | Description |
State Type | Choose “Report Type” |
Exposed states
Title | Description | Type |
Header Titles | Contain heater titles | List of text |
Body Rows | Contain body rows | List of text |
Header and Body Rows | Contain heater and body rows | List of text |
Error type | API Call’s error type | Text |
Error message | API Call’s error messages | Text |
Element Actions
- Convert to rows - Action converts report API response to rows, that can be used in tables.
Title | Description | Type |
Data | Provide response from any report’s API call. | API Response |
Plugin Data / Action Calls
Data Calls
- QuickBooks - Company Details
- QuickBooks - Get General Ledger
- QuickBooks - Read Account
- QuickBooks - Read Tax Agency
- QuickBooks - Read Tax Code
- QuickBooks - Read Tax Rate
- QuickBooks - Read Payment
- QuickBooks - Read Journal Entry
- QuickBooks - Read Changed Data List
- QuickBooks - Get Preferences
- QuickBooks - Read Transfer
- QuickBooks - Read Vendor Credit
- QuickBooks - Read Item
- QuickBooks - Read Purchase Order
- QuickBooks - Read Estimate
- QuickBooks - Read a Class
- QuickBooks - Read Attachable
- QuickBooks - Read Employee
- QuickBooks - Read Customer
- QuickBooks - Read Deposit
- QuickBooks - Query Transfer
- QuickBooks - Query Employee
- QuickBooks - Query Customer
- QuickBooks - Query Attachable
- QuickBooks - Query Sales Receipt
- QuickBooks - Query Item
- QuickBooks - Query Vendor Credit
- QuickBooks - Query an account
- QuickBooks - Query Estimate
- QuickBooks - Query Journal Entry
- QuickBooks - Query Payment
- QuickBooks - Query Purchase Order
- QuickBooks - Query Invoice
- QuickBooks - Query Taxcode
- QuickBooks - Query Deposit
- QuickBooks - Read Payment Method
- QuickBooks - Read Accounts
- QuickBooks - Get list of Transactions
- QuickBooks - Profit and loss detail report
- QuickBooks - Sales by customer report
- QuickBooks - Profit and loss report
- QuickBooks - Ar aging detail report
Action Calls
- QuickBooks - Create Account
- QuickBooks - Create Attachable
- QuickBooks - Create Deposit
- QuickBooks - Create Purchase Order
- QuickBooks - Create Account Class
- QuickBooks - Create Customer
- QuickBooks - Create Vendor Credit
- QuickBooks - Create Transfer
- QuickBooks - Create Payment
- QuickBooks - Create Credit Card Account
- QuickBooks - Pay Bill
- QuickBooks - Create Bill
- QuickBooks - Create Tax Agency
- QuickBooks - Create Tax Rate
- QuickBooks - Create Journal Entry
- QuickBooks - Create Item
- QuickBooks - Create Employee
- QuickBooks - Create Vendor
- QuickBooks - Create Estimate
- QuickBooks - Read Vendor
- QuickBooks - Update Account
- QuickBooks - Update Vendor
- QuickBooks - Update Transfer
- QuickBooks - Update Attachable
- QuickBooks - Update Journal Entry
- QuickBooks - Update Preferences
- QuickBooks - Update Employee
- QuickBooks - Update a Class
- QuickBooks - Update Vendor Credit
- QuickBooks - Update Item
- QuickBooks - Update Estimate
- QuickBooks - Create Payment Method
- QuickBooks - Update Purchase Order
- QuickBooks - Update Customer
- QuickBooks - Update Deposit
- QuickBooks - Update Payment Method
- QuickBooks - Delete Something
- QuickBooks - Create a purchase
- QuickBooks - Delete a purchase
- QuickBooks - Read a purchase
- QuickBooks - Full update a purchase
- QuickBooks - Get an invoice as PDF
- QuickBooks - Create sales receipt
- Convert to rows a QuickBooks Converter
- Refresh Access Token (this)
- Initial auth code exchange (this)
Workflow example
Let's take Company Details:
- Insert company id which is "Realm ID" , you can get on the same page where you got refresh token, find it on section 2 or 3, see example below:
2. Next we need to get access token, for that, in Authorization field select from API provider, "GET NEW ACCESS TOKEN" and select access_token after.You will notice the word "Bearer" there, leave it there and insert access token after it !
Example: