✅
Demo to preview the settings
✅
Introduction
Use a variety of API calls to send Emails, view Calendar information, update/view Contacts, and more all with our plugin.
Prerequisites
- You must have the Azure Portal account.
How to set up
Register your app with Microsoft Azure at https://portal.azure.com/
Use the received keys in plugin settings to get the access code, access token and refresh token.

Outlook: Get AuthCode
Connecting to the Outlook and receiving the authentication code in the URL parameter.
Fields:
Title | Type | Description |
App key | string | The Application (client) ID that the Microsoft Entra admin center – App registrations experience assigned to your app. |
Redirect URL | string | The redirect_uri of your app, where authentication responses can be sent and received by your app. It must exactly match one of the redirect URIs you registered in the portal |
scope | string | A space-separated list of scopes that you want the user to consent to. For the /authorize leg of the request, this parameter can cover multiple resources. This value allows your app to get consent for multiple web APIs you want to call. |
The authentication code is returned to the URL parameters:

Outlook: Auth
Getting an access token.
Fields:
Title | Type | Description |
Auth code | string | The Application (client) ID that the Microsoft Entra admin center – App registrations experience assigned to your app. |
Client id | string | The redirect_uri of your app, where authentication responses can be sent and received by your app. It must exactly match one of the redirect URIs you registered in the portal |
Client secret | string | A space-separated list of scopes that you want the user to consent to. For the /authorize leg of the request, this parameter can cover multiple resources. This value allows your app to get consent for multiple web APIs you want to call. |
Redirect url | string | The redirect_uri of your app, where authentication responses can be sent and received by your app. It must exactly match one of the redirect URIs you registered in the portal |
Returns:
Title | Type | Description |
access_token | string | The requested access token. |
error | string | An error code string that you can use to classify types of errors that occur, and to react to errors. |
refresh_token | string | The app can use this token to acquire other access tokens after the current access token expires. |
expires_on | number | The amount of time that an access token is valid (in seconds). |
Outlook: Renew Access Token
Updates the access token after its expiration date.
Fields:
Title | Type | Description |
Refresh token | string | The refresh_token that you acquired in the second leg of the flow. |
Client id | string | The redirect_uri of your app, where authentication responses can be sent and received by your app. It must exactly match one of the redirect URIs you registered in the portal |
Client secret | string | A space-separated list of scopes that you want the user to consent to. For the /authorize leg of the request, this parameter can cover multiple resources. This value allows your app to get consent for multiple web APIs you want to call. |
Redirect url | string | The redirect_uri of your app, where authentication responses can be sent and received by your app. It must exactly match one of the redirect URIs you registered in the portal |
Access token | string | Access token. |
Scope | string | A space-separated list of scopes. |
Expires on | number | The amount of time that an access token is valid (in seconds). |
Returns:
Title | Type | Description |
Access token | string | The requested access token. |
Error | string | An error code string that you can use to classify types of errors that occur, and to react to errors. |
Refresh token | string | The app can use this token to acquire other access tokens after the current access token expires. |
Expires on | number | The amount of time that an access token is valid (in seconds). |
Outlook: Send email with attachments
🔗
Microsoft documentation: https://learn.microsoft.com/en-us/graph/api/user-sendmail?tabs=http&view=graph-rest-1.0
Set up your API call
In this example, we'll be making on quick API call to Outlook to Send an Email With Attachments. Like our other demos, we'll use a blue "Send" button to do this.
Start by creating a form to collect the necessary parameters.
If you need one file - use “File Uploader” element by bubble to attach the file.
When you need multiple files use “Multi File Uploader - Dropzone” free plugin by bubble.
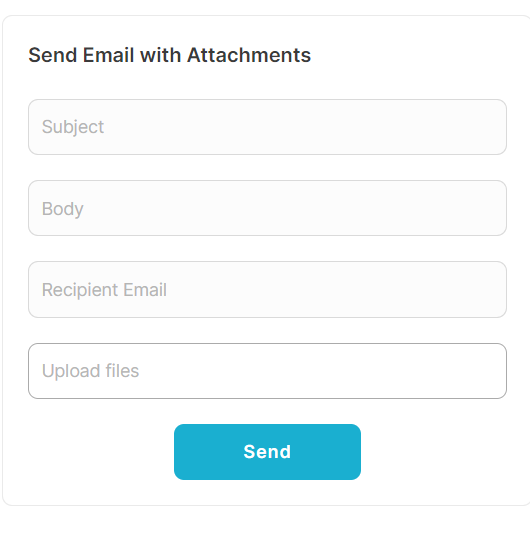
Now map the inputs to their corresponding parameters and paths. More information on which paths and/or parameters are required is covered at the end of this article.
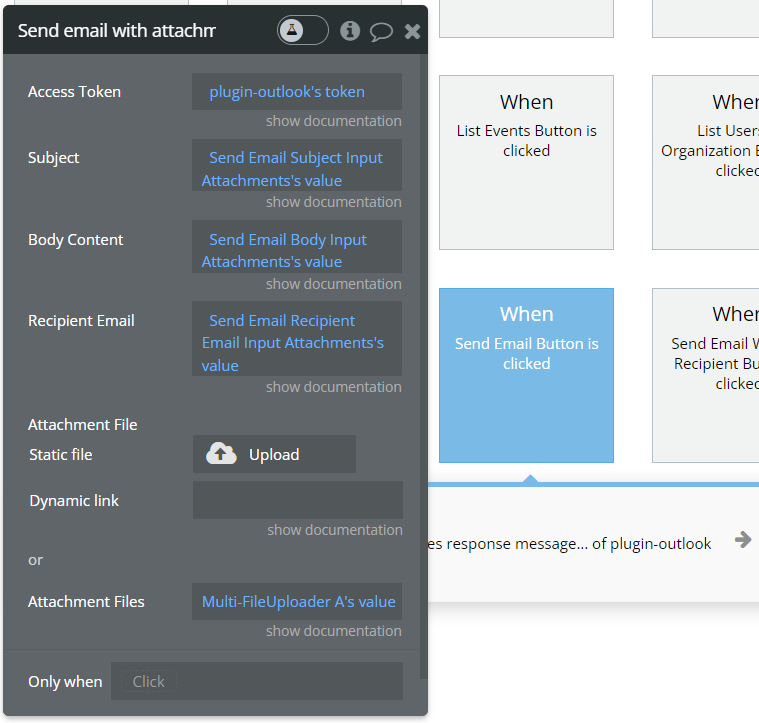
Review the items below to understand what values are optional or required to complete the API call.
Available Parameters
Access Token - A string representing the access token required to authenticate the user's request to send an email.
Subject - A text that provides a brief overview or summary of the email's content.
Body Content - A text representing the main content or body of the email to be sent. This can include the main message or information that the sender wants to communicate to the recipient.
Recipient Email - The email address of the recipient to whom the email will be sent.
Attachment File - Keep this input empty if you want to attach multiple files with “Multi File Uploader - Dropzone” free plugin by bubble.
If you need to attach one file fill this input with bubble “File Uploader” element file value URL.
Attachment Files - Keep this input empty if you want to attach one file in “Attachment File” input.
If you need to attach multiple files fill this input with bubble “Multi File Uploader - Dropzone” free plugin input value.
List Email Messages - Data Call
🔗
Microsoft documentation: https://learn.microsoft.com/en-us/graph/api/user-list-messages?tabs=http&view=graph-rest-1.0
Set up your data source
In this example, we'll use a repeating group to display our data. Since we're using buttons to trigger our API calls, we'll leave the data source blank and use a Display list in RG action to send the results to the repeating group.
- Type of content = List Email Messages value (Outlook)
- Data source = leave blank
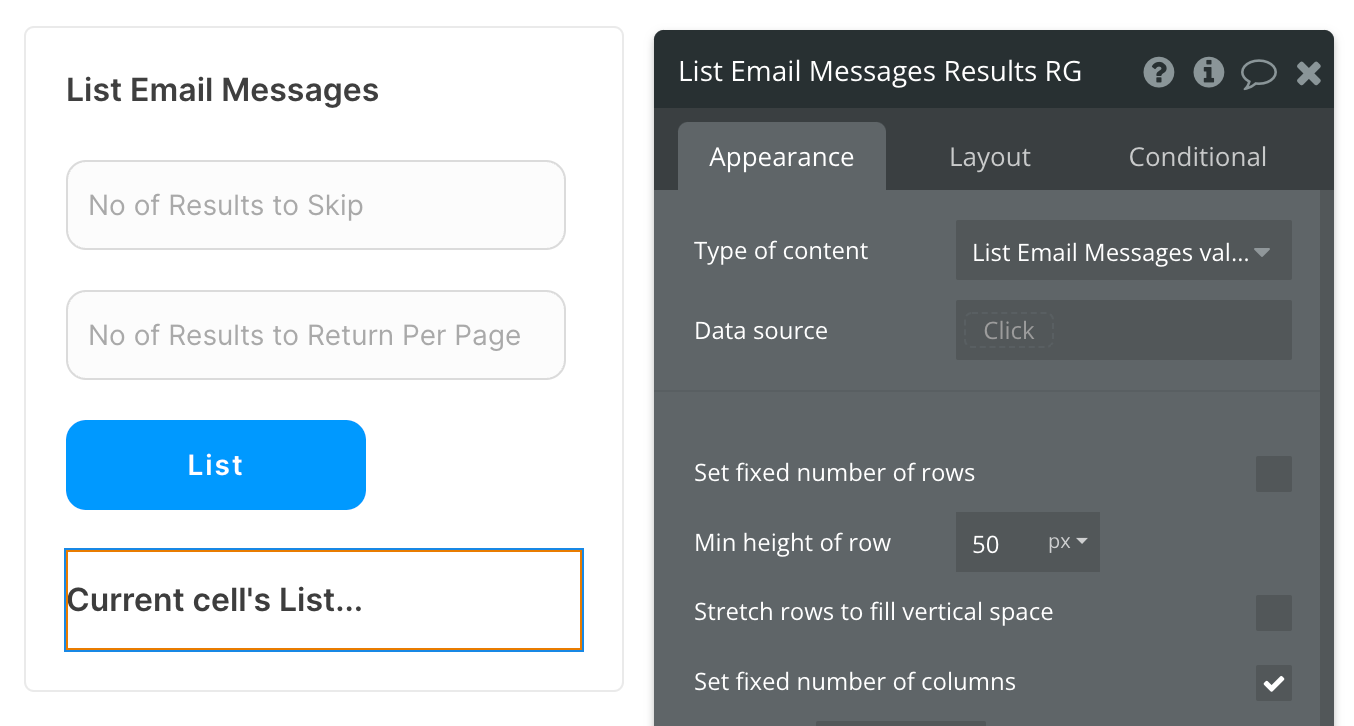
There are many fields that can be displayed for each email message, so be sure to review all options when selecting the text element inside your repeating group cell.
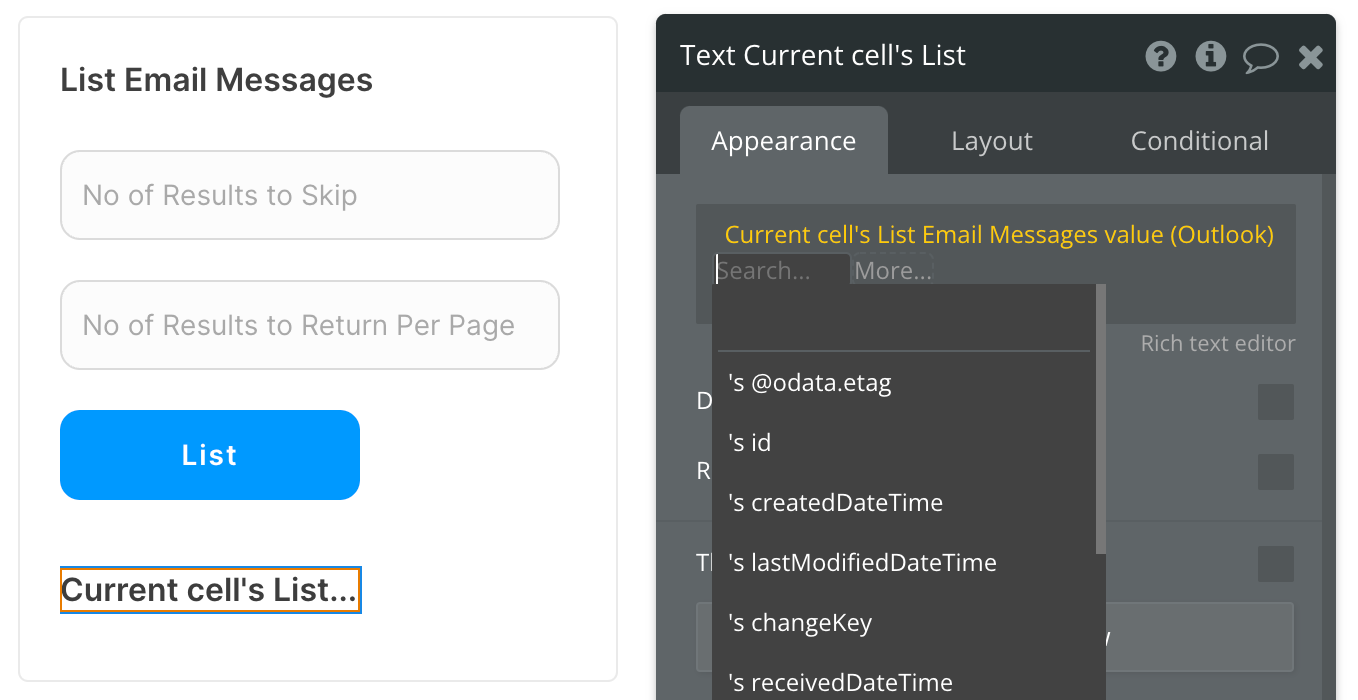
Set up the API call
Now that your repeating group is set up properly, let's configure the workflow action to retrieve all Email Messages and display the results. In this demo, we're using the blue "List" button to do this.
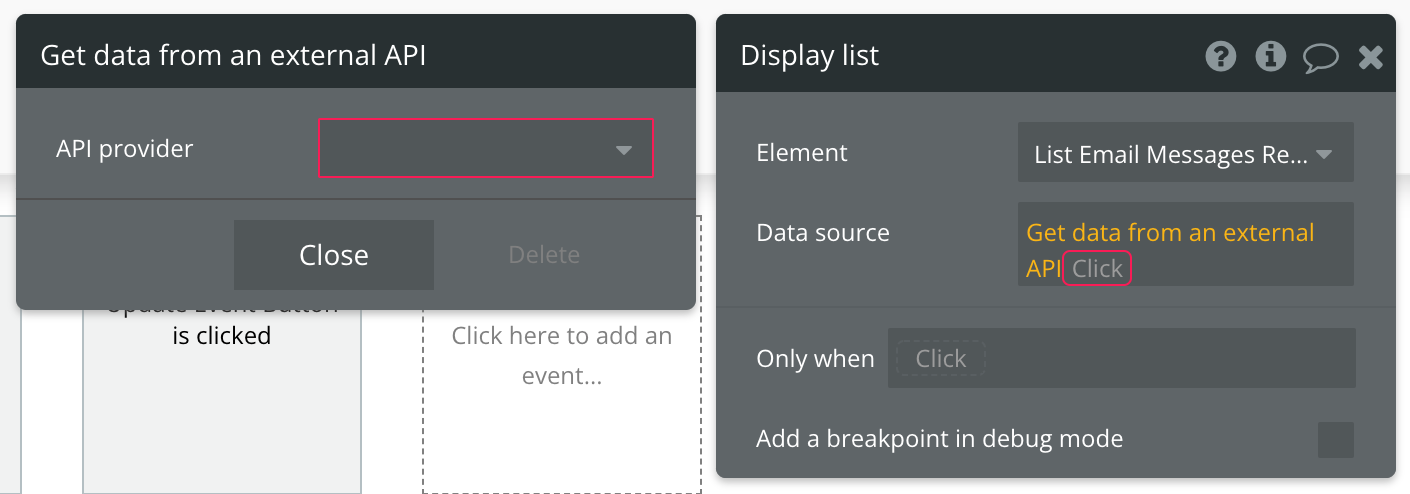
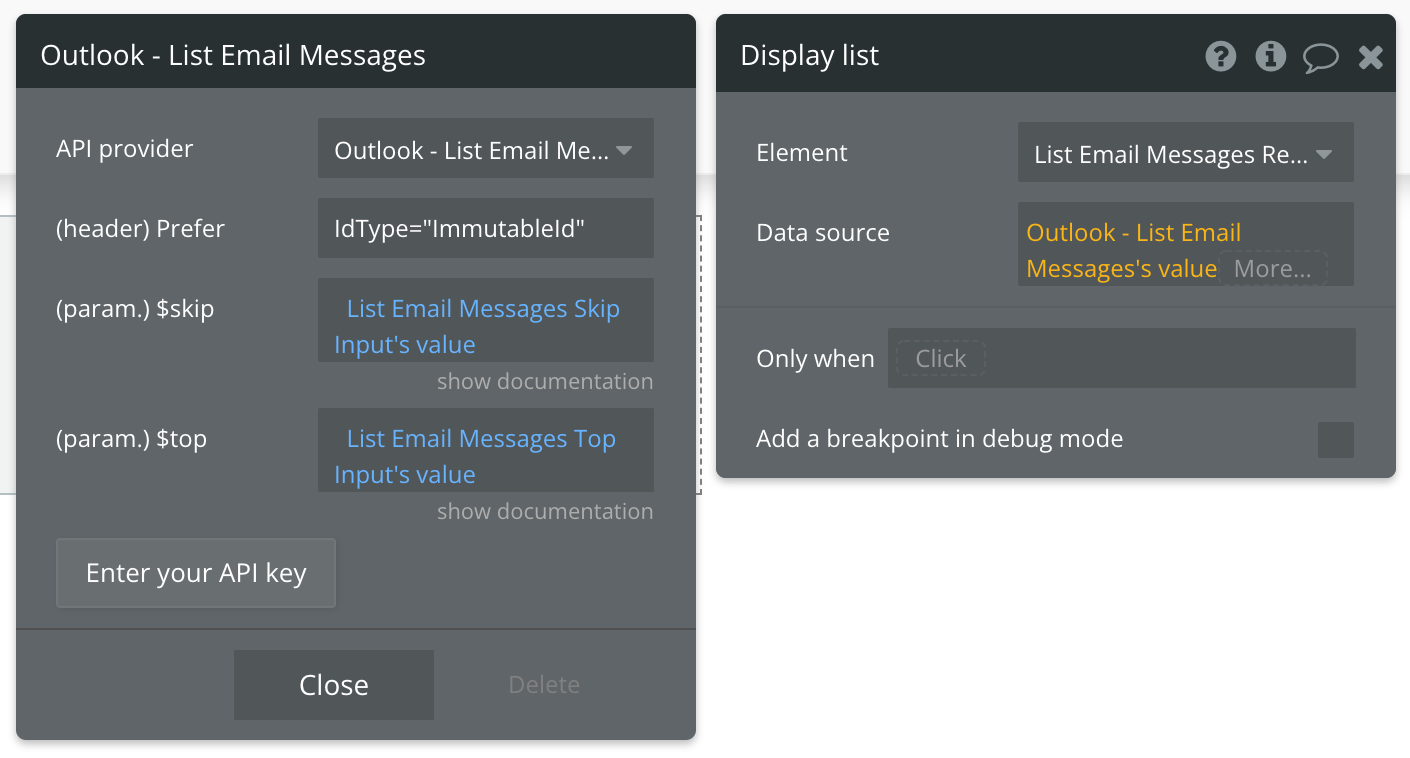
Review the items below to understand what values are optional or required to complete the API call.
Available Parameters (* indicates a required value)
$skip - Enter the number of results you want to skip. E.g. "20" returns results starting at item 21. Default is 0. You can use a custom state to keep track of how many items you're skipping through at a time.
$top - Enter the number of results to return per page. Default is 10.
List Email Folders - Data Call
🔗
Microsoft documentation: https://learn.microsoft.com/en-us/graph/api/user-list-mailfolders?tabs=http&view=graph-rest-1.0
Set up your data source
In this example, we'll use a repeating group to display our data. Since we're using buttons to trigger our API calls, we'll leave the data source blank and use a Display list in RG action to send the results to the repeating group.
- Type of content = List Email Folders value (Outlook)
- Data source = leave blank
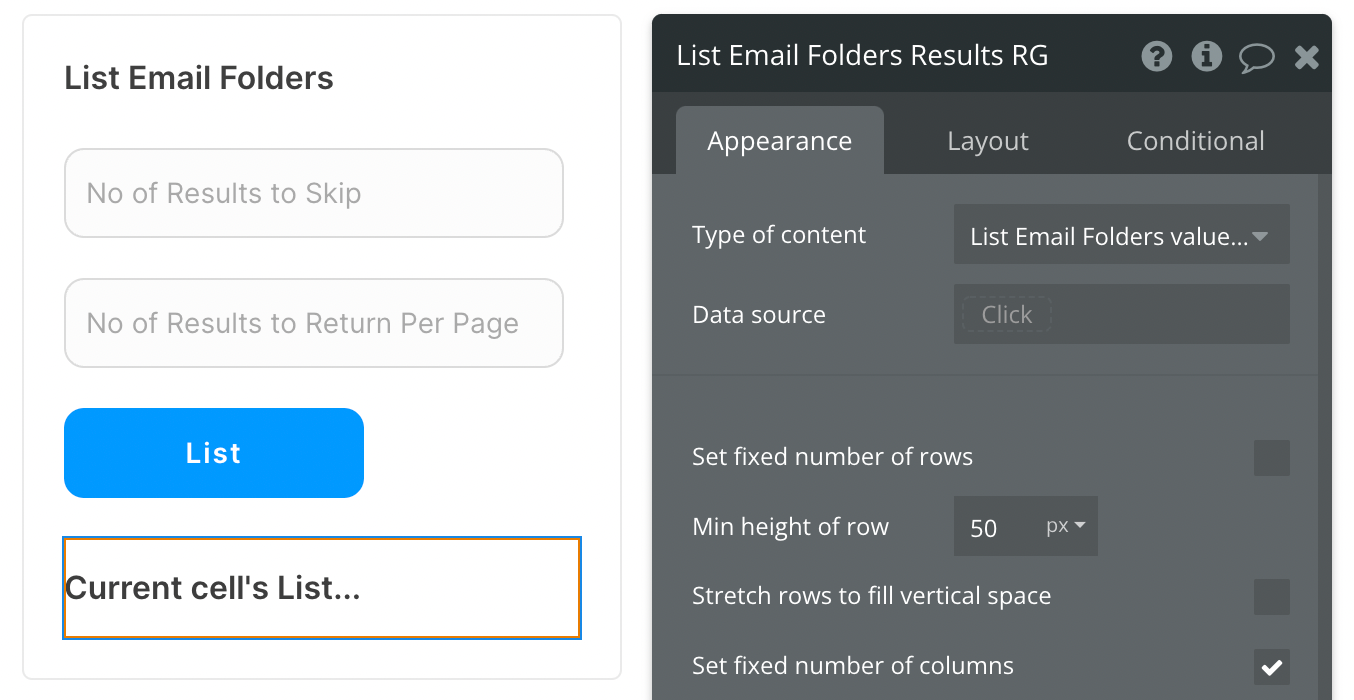
There are many fields that can be displayed for each email folder, so be sure to review all options when selecting the text element inside your repeating group cell.
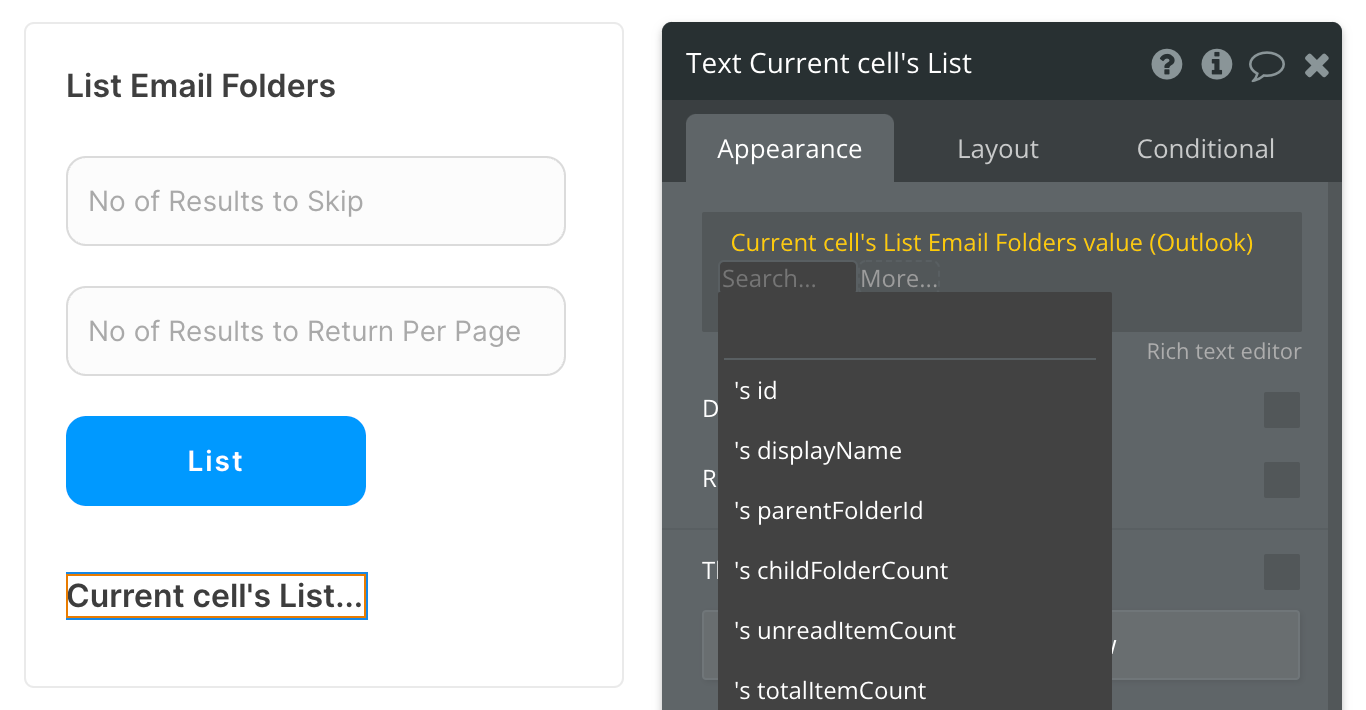
Set up the API call
Now that your repeating group is set up properly, let's configure the workflow action to retrieve all Email Folders and display the results. In this demo, we're using the blue "List" button to do this.
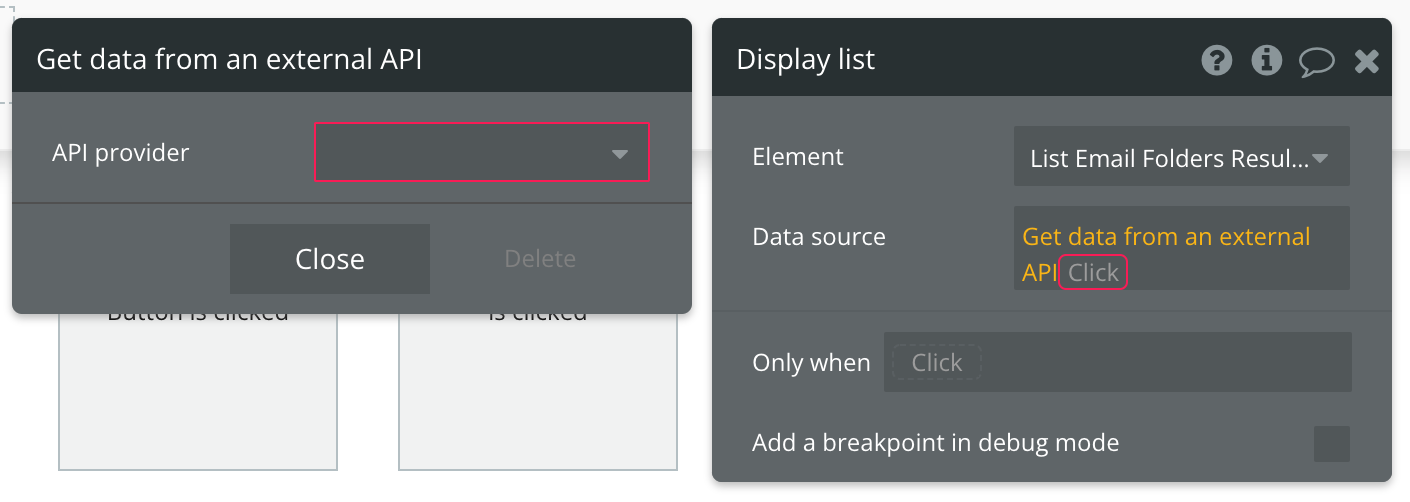
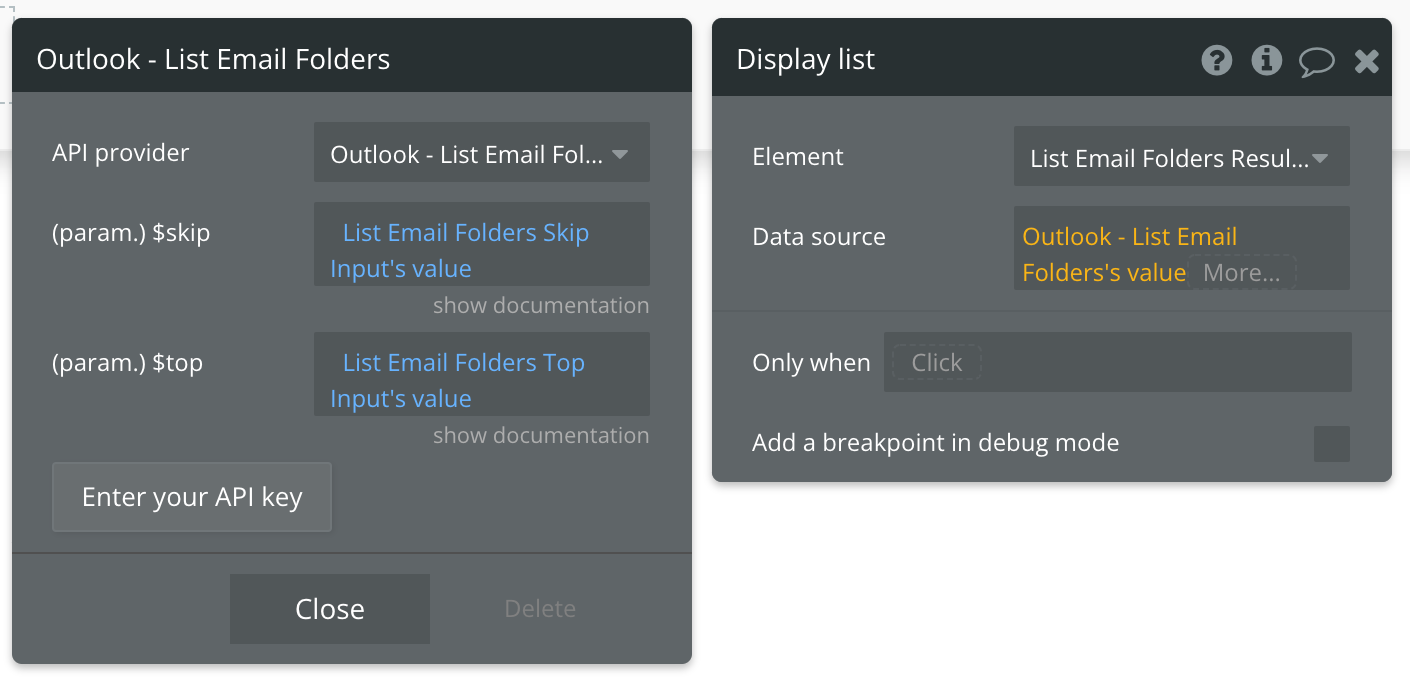
Review the items below to understand what values are optional or required to complete the API call.
Available Parameters (* indicates a required value)
$skip - Enter the number of results you want to skip. E.g. "20" returns results starting at item 21. Default is 0. You can use a custom state to keep track of how many items you're skipping through at a time.
$top - Enter the number of results to return per page. Default is 10.
List Calendars - Data Call
🔗
Microsoft documentation: https://learn.microsoft.com/en-us/graph/api/user-list-calendars?tabs=http&view=graph-rest-1.0
Set up your data source
In this example, we'll use a repeating group to display our data. Since we're using buttons to trigger our API calls, we'll leave the data source blank and use a Display list in RG action to send the results to the repeating group.
- Type of content = List Calendars value (Outlook)
- Data source = leave blank
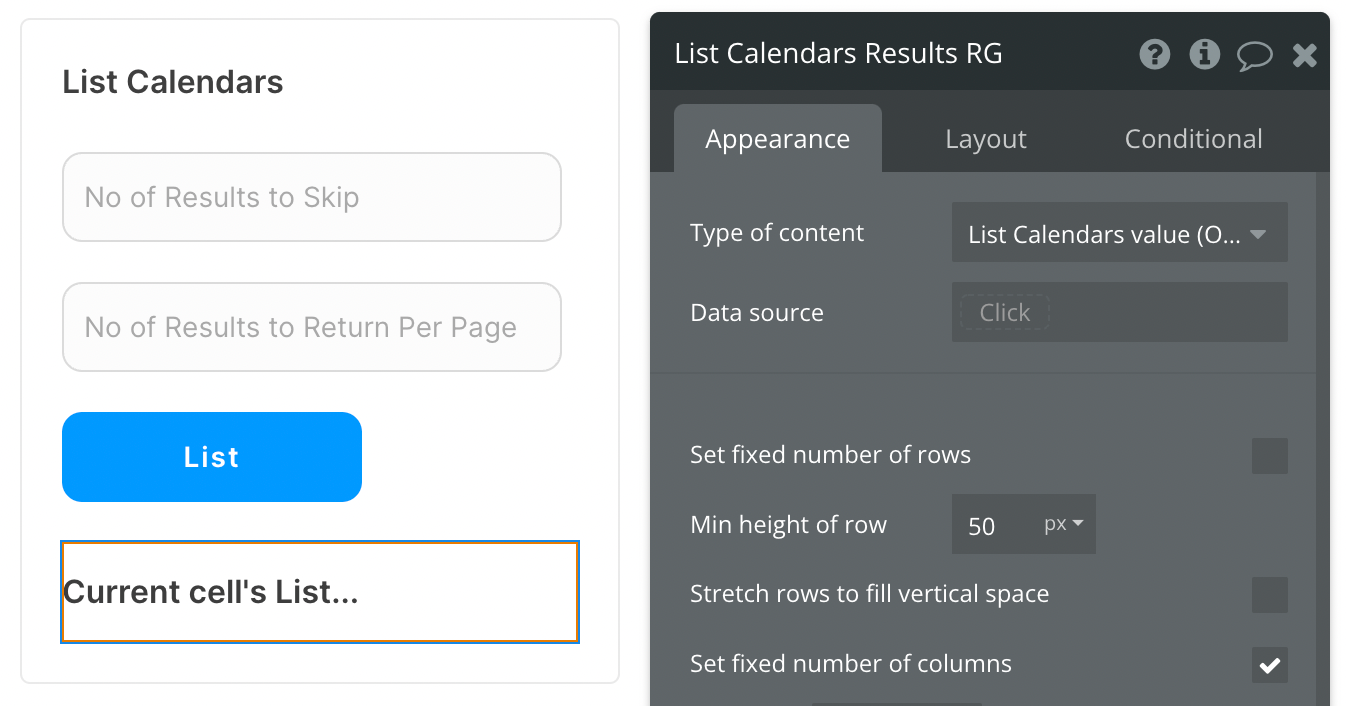
There are many fields that can be displayed for each calendar, so be sure to review all options when selecting the text element inside your repeating group cell.
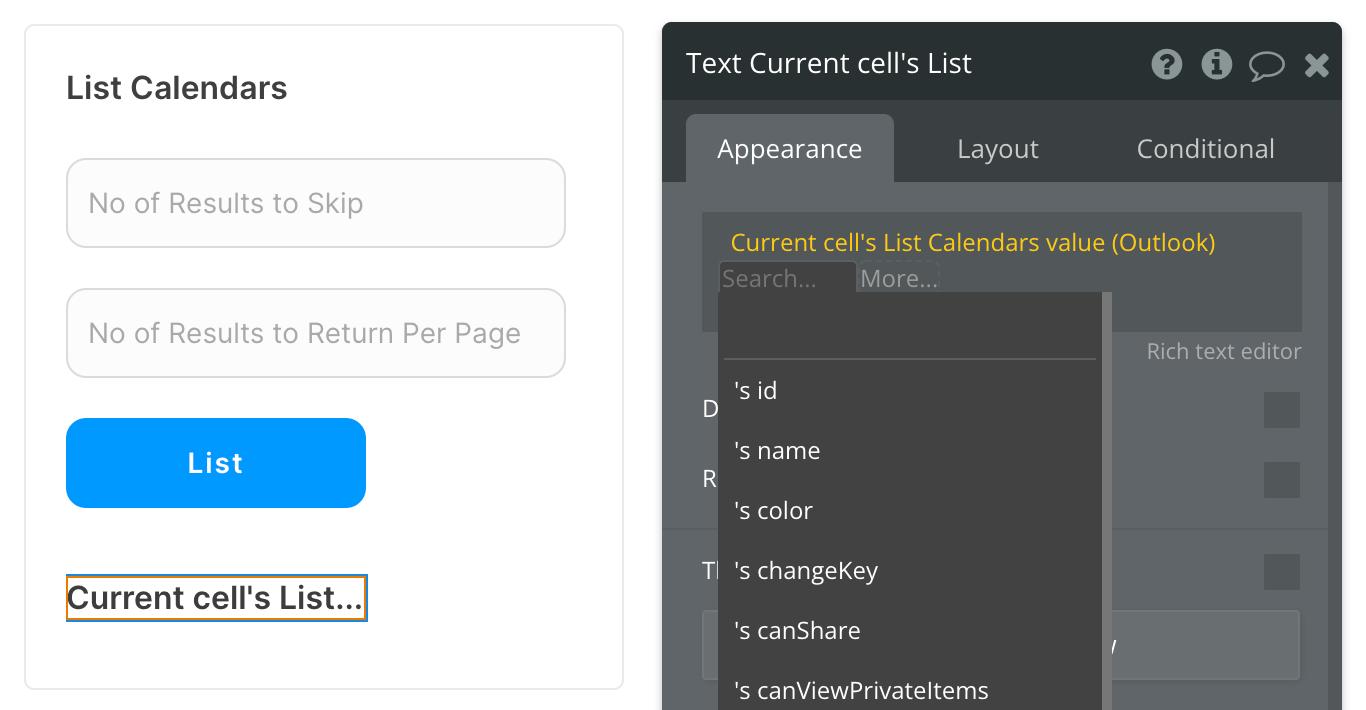
Set up the API call
Now that your repeating group is set up properly, let's configure the workflow action to retrieve all Calendars and display the results. In this demo, we're using the blue "List" button to do this.
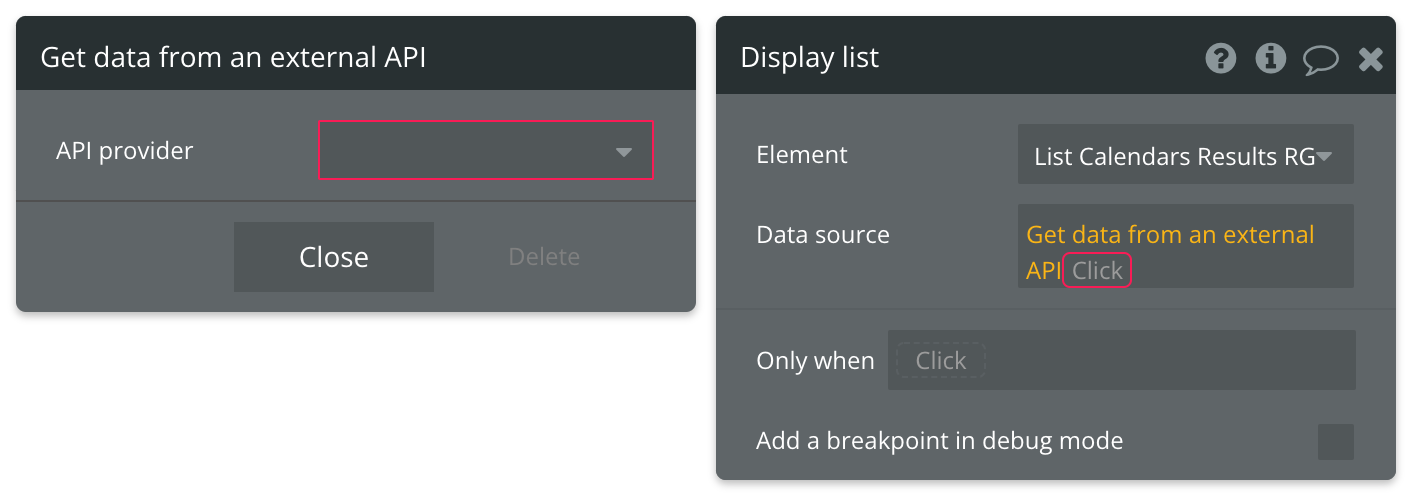
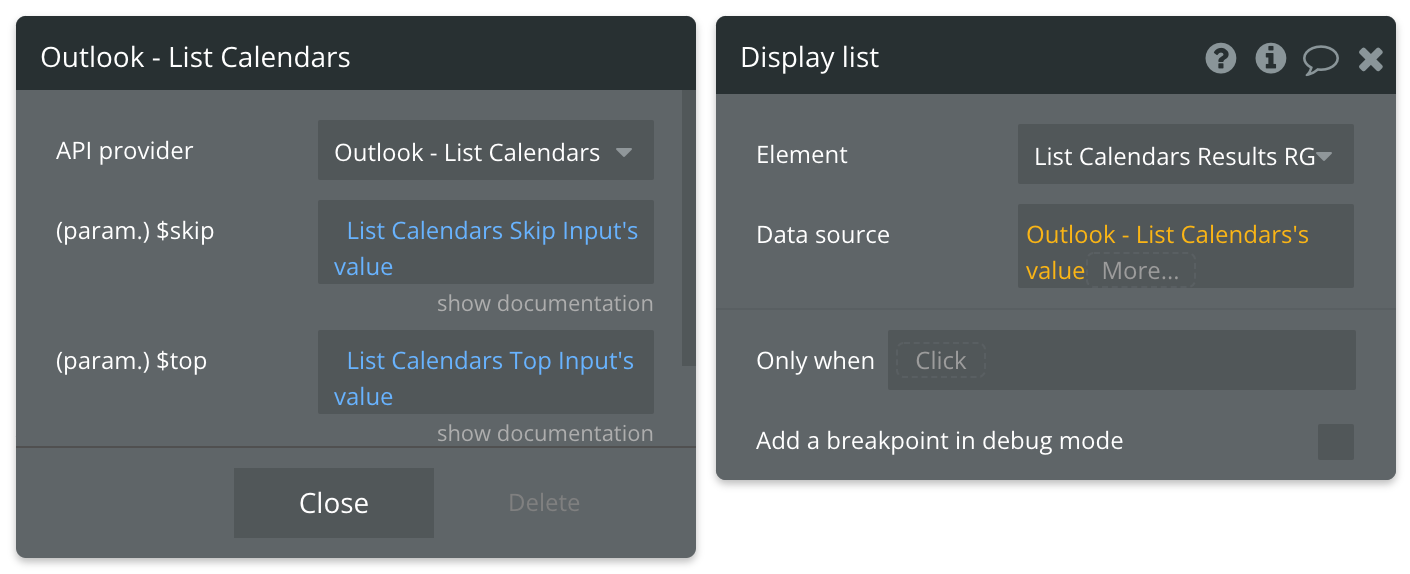
Review the items below to understand what values are optional or required to complete the API call.
Available Parameters (* indicates a required value)
$skip - Enter the number of results you want to skip. E.g. "20" returns results starting at item 21. Default is 0. You can use a custom state to keep track of how many items you're skipping through at a time.
$top - Enter the number of results to return per page. Default is 10.
List Events - Data Call
🔗
Microsoft documentation: https://learn.microsoft.com/en-us/graph/api/user-list-events?tabs=http&view=graph-rest-1.0
Set up your data source
In this example, we'll use a repeating group to display our data. Since we're using buttons to trigger our API calls, we'll leave the data source blank and use a Display list in RG action to send the results to the repeating group.
- Type of content = List Events value (Outlook)
- Data source = leave blank
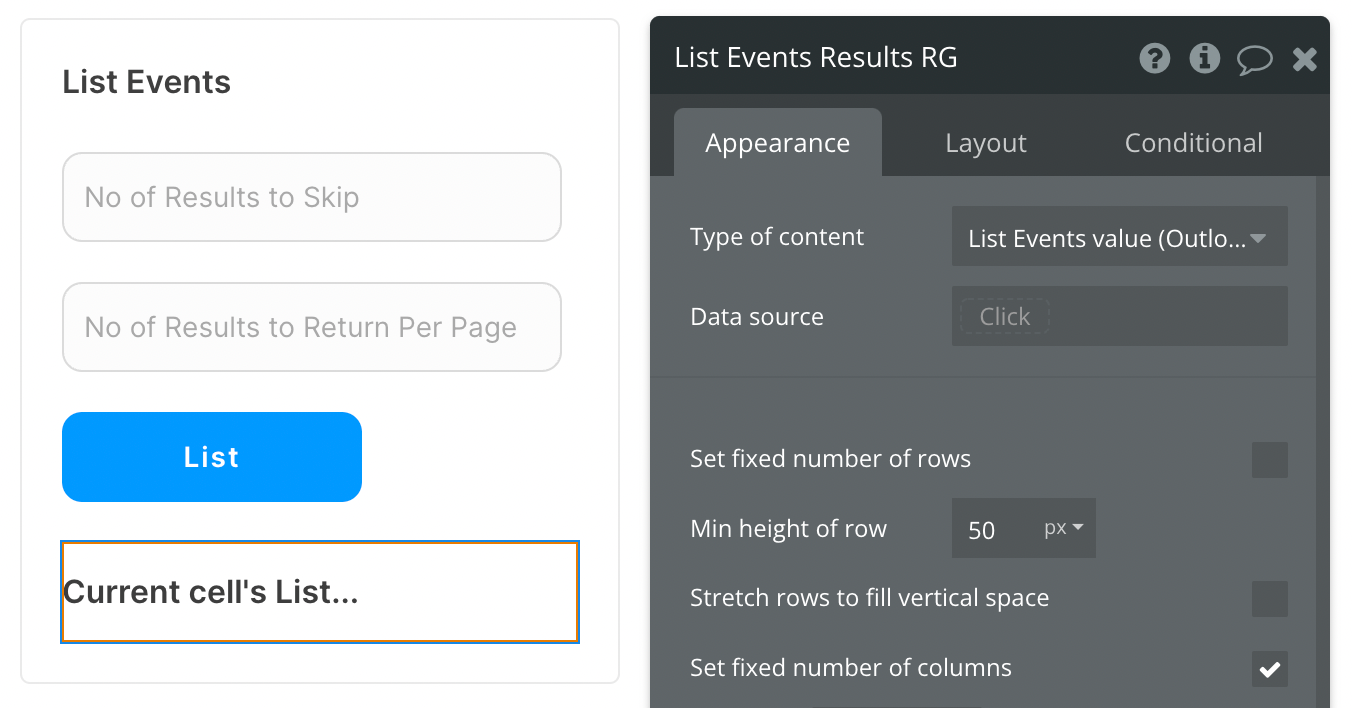
There are many fields that can be displayed for each event, so be sure to review all options when selecting the text element inside your repeating group cell.
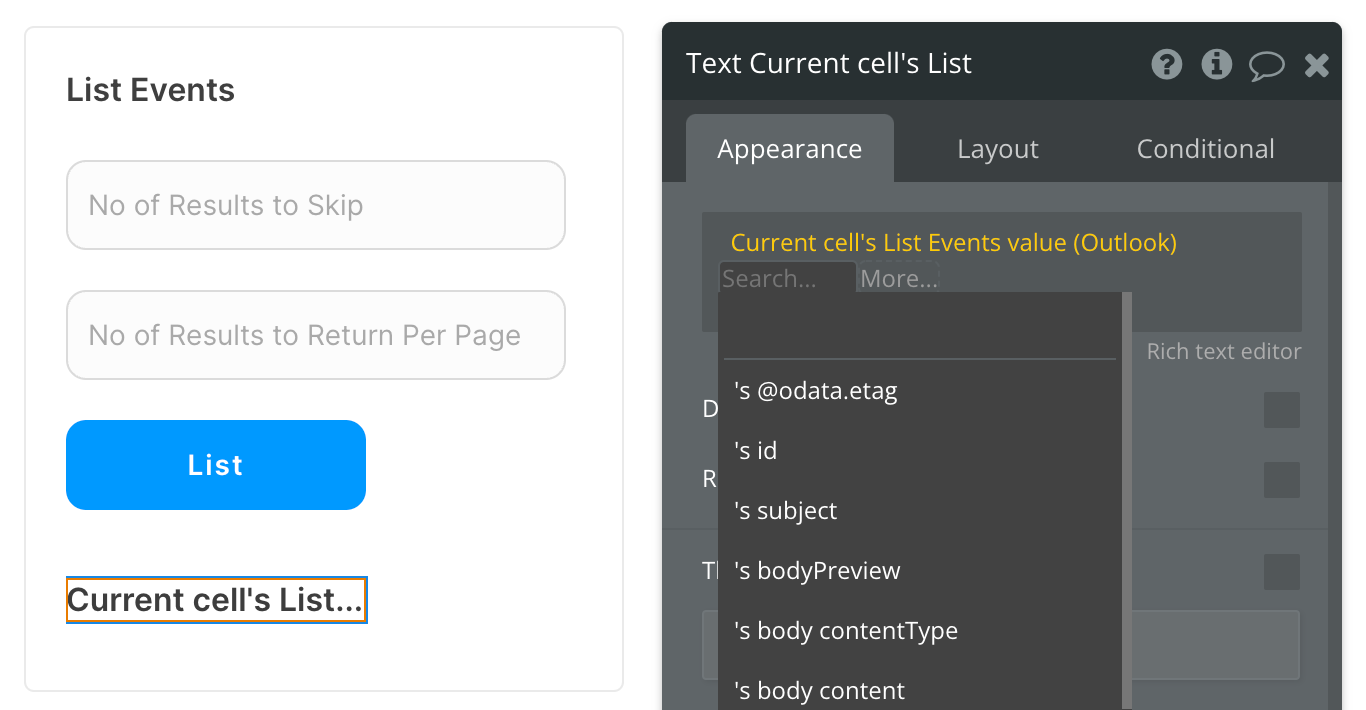
Set up the API call
Now that your repeating group is set up properly, let's configure the workflow action to retrieve all Events and display the results. In this demo, we're using the blue "List" button to do this.
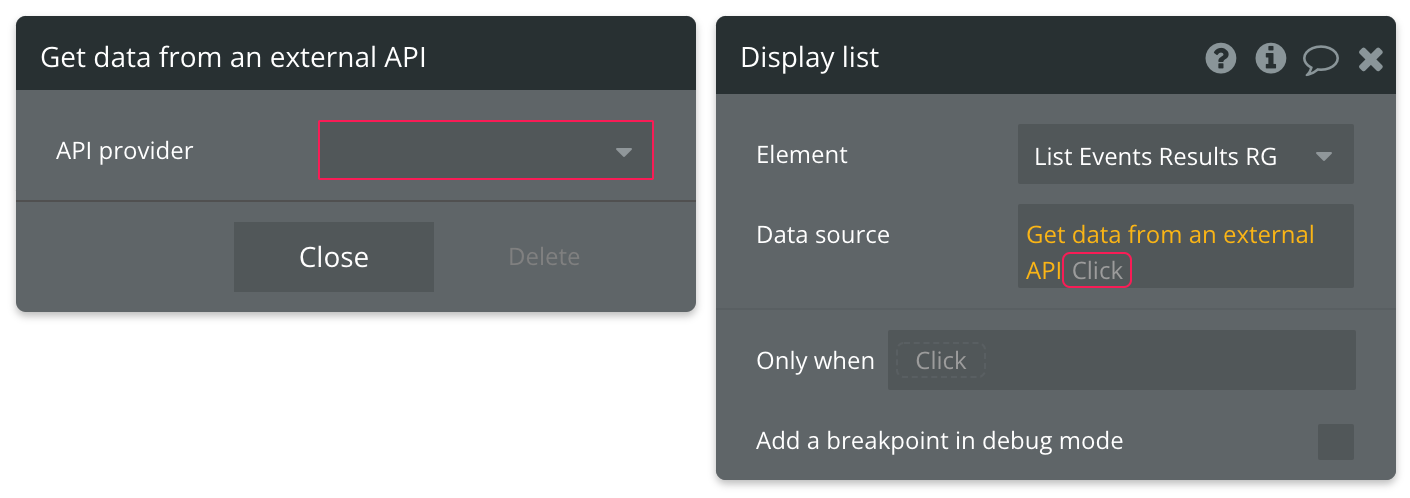
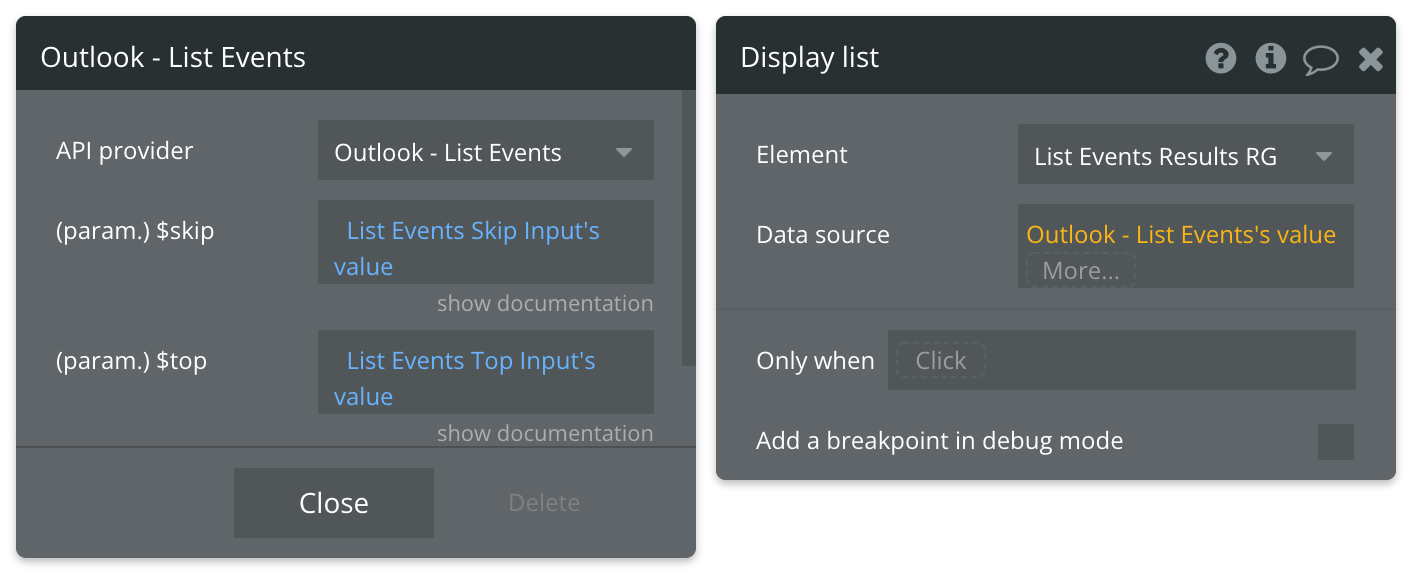
Review the items below to understand what values are optional or required to complete the API call.
Available Parameters (* indicates a required value)
$skip - Enter the number of results you want to skip. E.g. "20" returns results starting at item 21. Default is 0. You can use a custom state to keep track of how many items you're skipping through at a time.
$top - Enter the number of results to return per page. Default is 10.
Get User - Data Call
🔗
Microsoft documentation: https://learn.microsoft.com/en-us/graph/api/user-get?tabs=http&view=graph-rest-1.0
Set up your data source
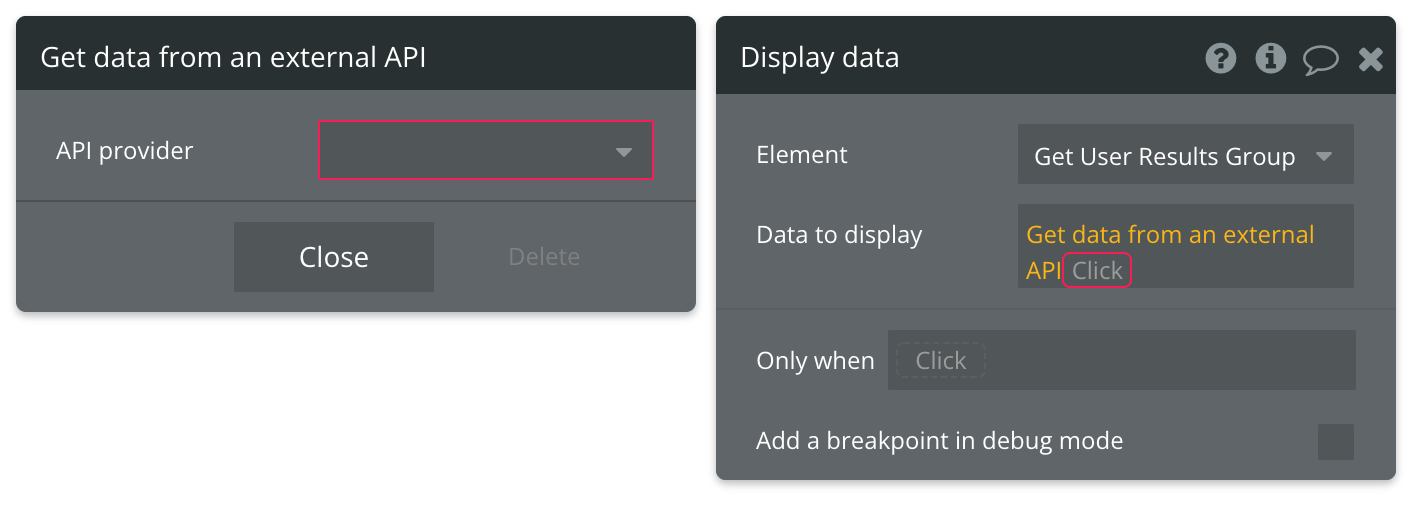
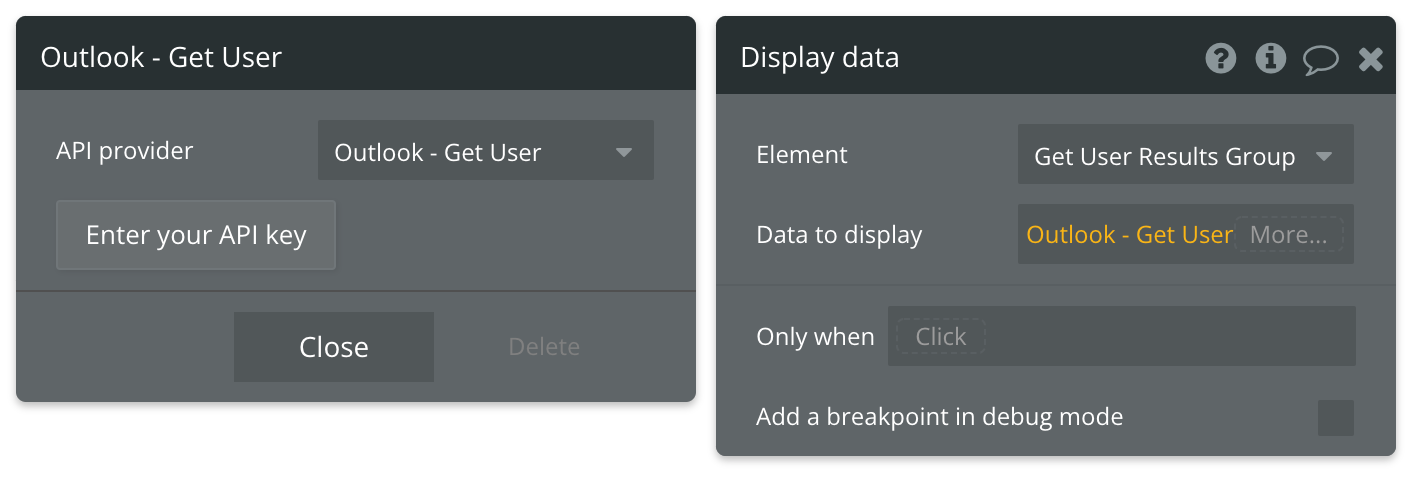
In this example, we'll use a group to display our data. Since we're using buttons to trigger our API calls, we'll leave the data source blank and use a Display data in group action to send the results to the group.
- Type of content = Get User (Outlook)
- Data source = leave blank
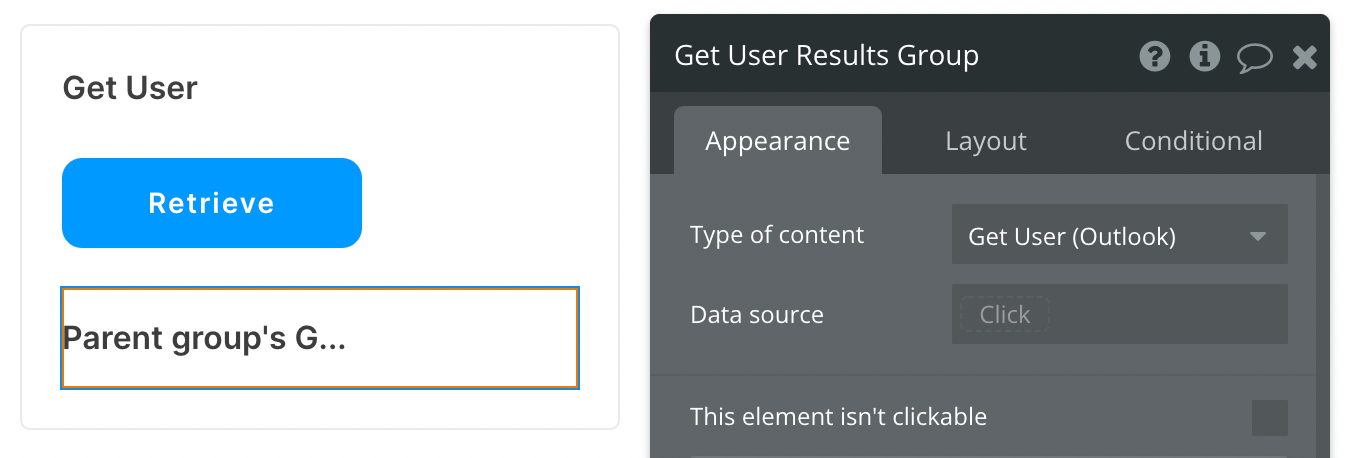
There are many fields that can be displayed for the User, so be sure to review all options when selecting the text element inside your group.

Set up the API call
Now that your group is set up properly, let's configure the workflow action to retrieve User information and display the results. In this demo, we're using the blue "Retrieve" button to do this.
List Contacts - Data Call
🔗
Microsoft documentation: https://learn.microsoft.com/en-us/graph/api/user-list-contacts?tabs=http&view=graph-rest-1.0
Set up your data source
In this example, we'll use a repeating group to display our data. Since we're using buttons to trigger our API calls, we'll leave the data source blank and use a Display list in RG action to send the results to the repeating group.
- Type of content = List Contacts value (Outlook)
- Data source = leave blank
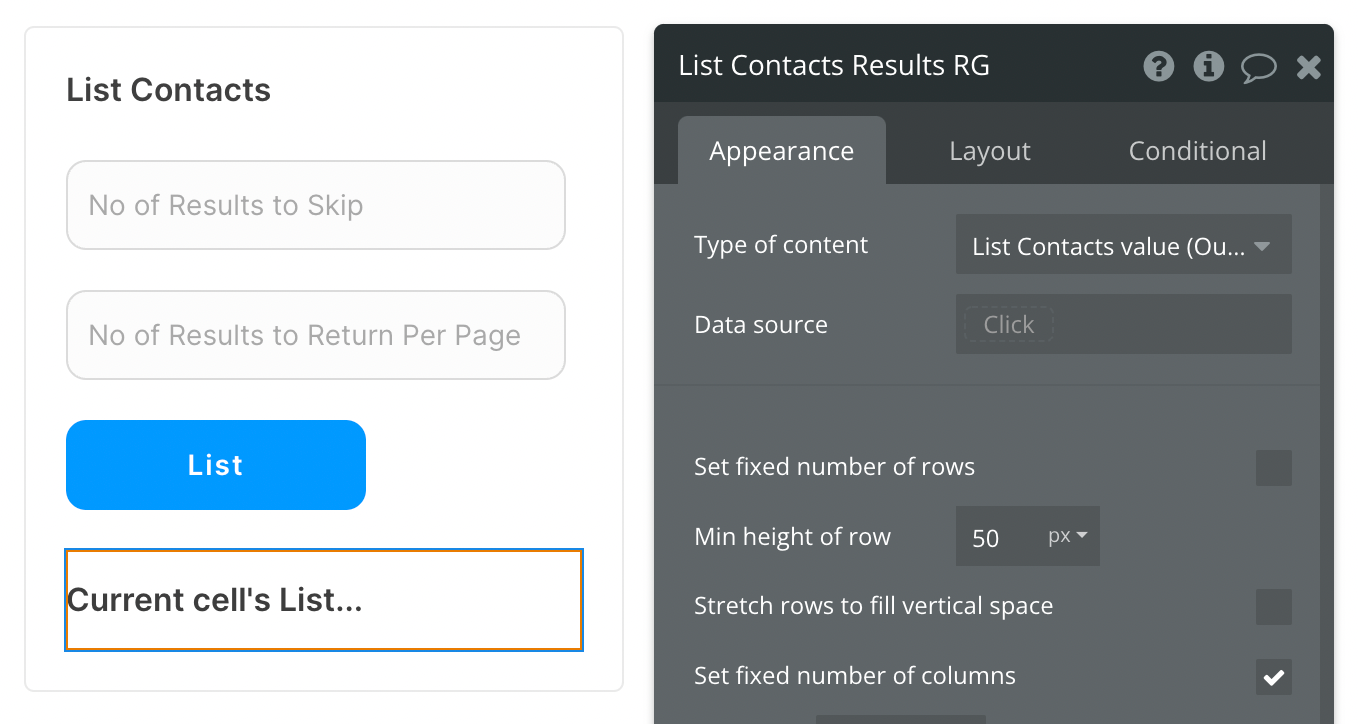
There are many fields that can be displayed for each contact, so be sure to review all options when selecting the text element inside your repeating group.
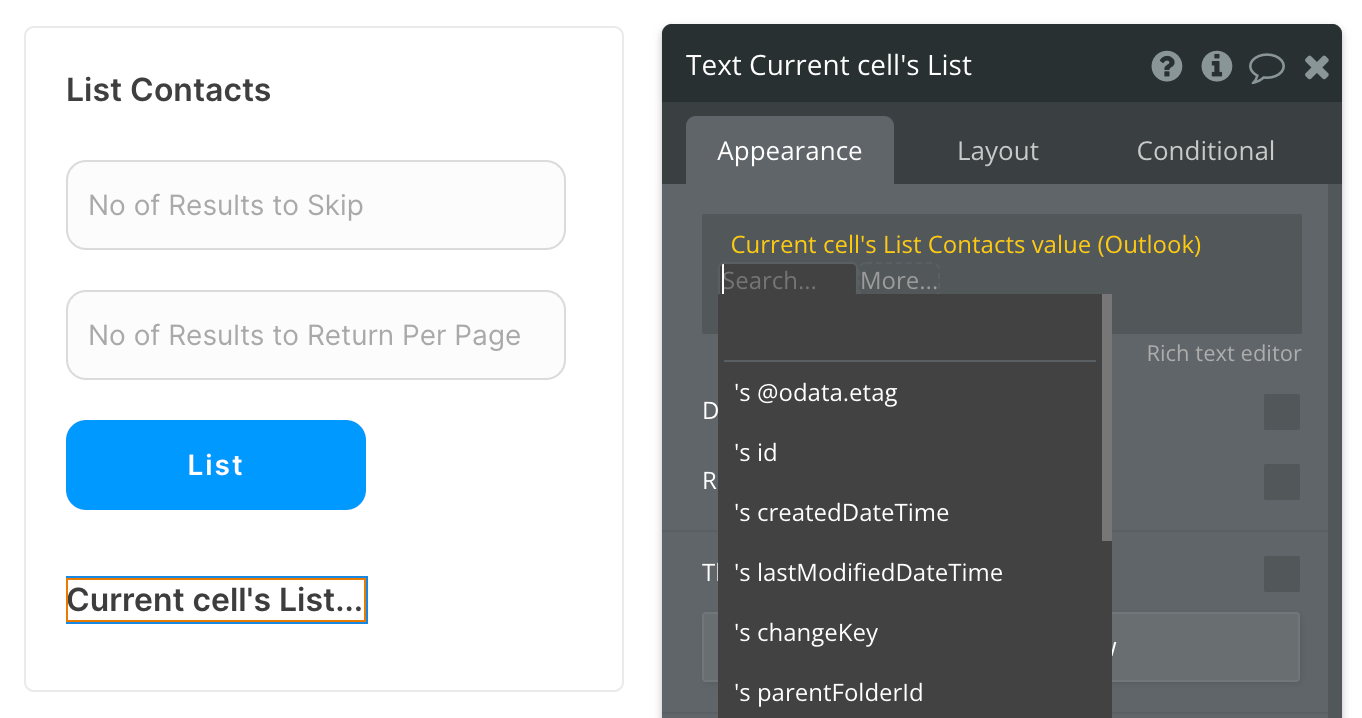
Set up the API call
Now that your repeating group is set up properly, let's configure the workflow action to retrieve all Email Messages and display the results. In this demo, we're using the blue "List" button to do this.
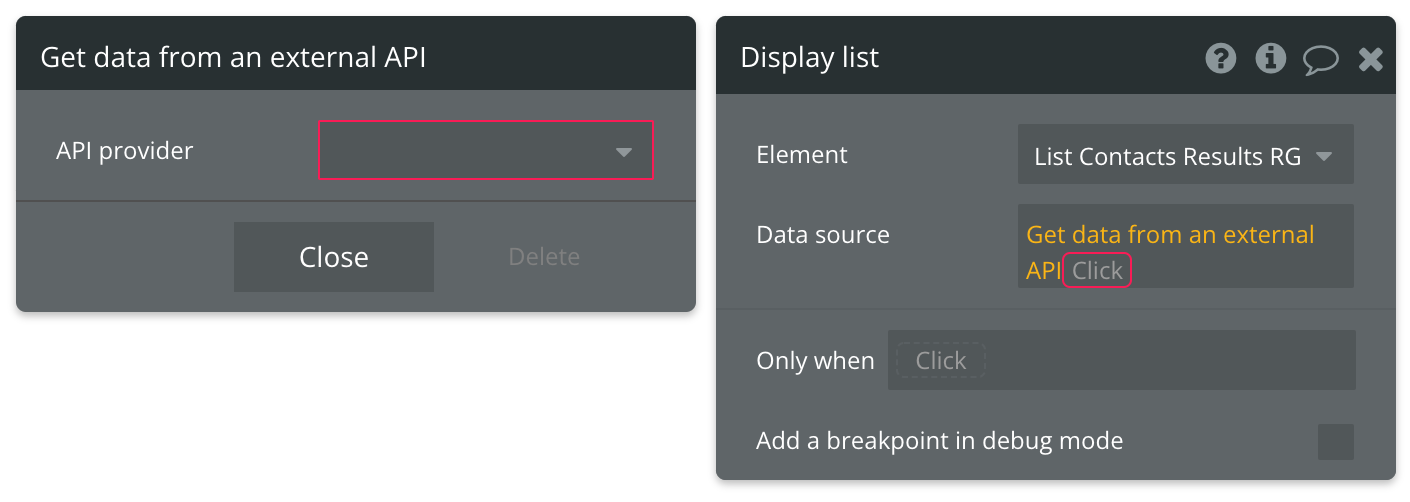
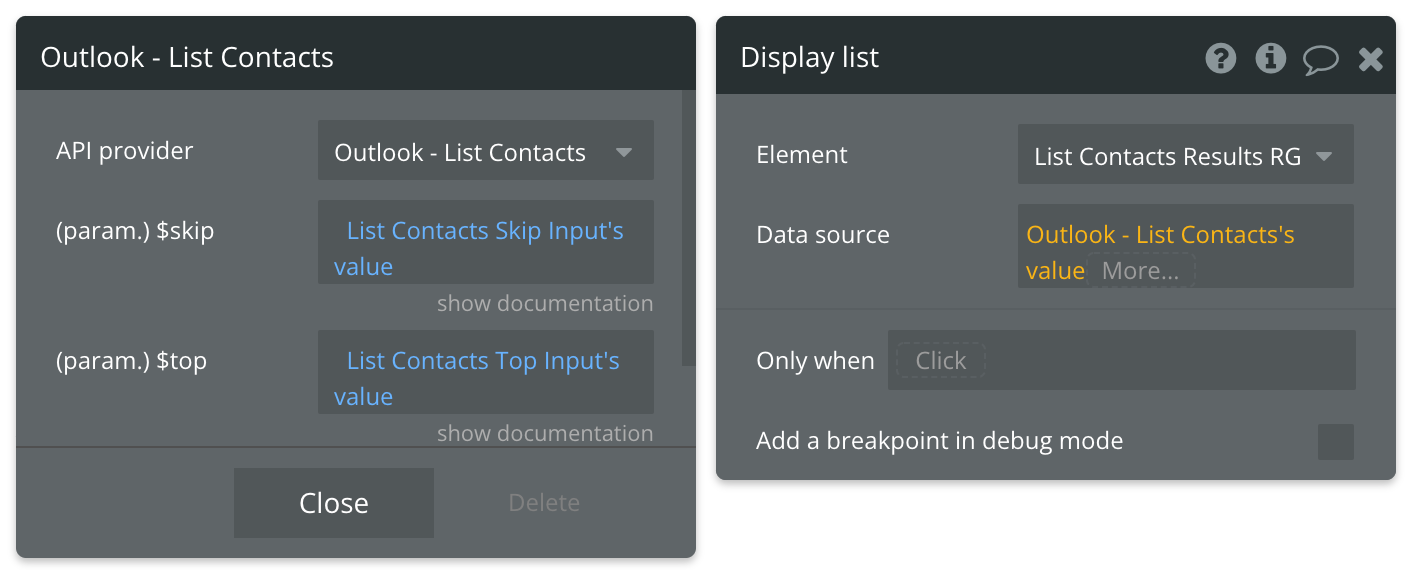
Review the items below to understand what values are optional or required to complete the API call.
Available Parameters (* indicates a required value)
$skip - Enter the number of results you want to skip. E.g. "20" returns results starting at item 21. Default is 0. You can use a custom state to keep track of how many items you're skipping through at a time.
$top - Enter the number of results to return per page. Default is 10.
List Users in Organization - Data Call
☝
Note: Unlike the List Contacts API call, List Users in Organization will return all users with accounts within an organization and excludes any contacts.
🔗
Microsoft documentation: https://learn.microsoft.com/en-us/graph/api/user-list-people?tabs=http&view=graph-rest-1.0
Set up your data source
In this example, we'll use a repeating group to display our data. Since we're using buttons to trigger our API calls, we'll leave the data source blank and use a Display list in RG action to send the results to the repeating group.
- Type of content = List Users in Organization value (Outlook)
- Data source = leave blank
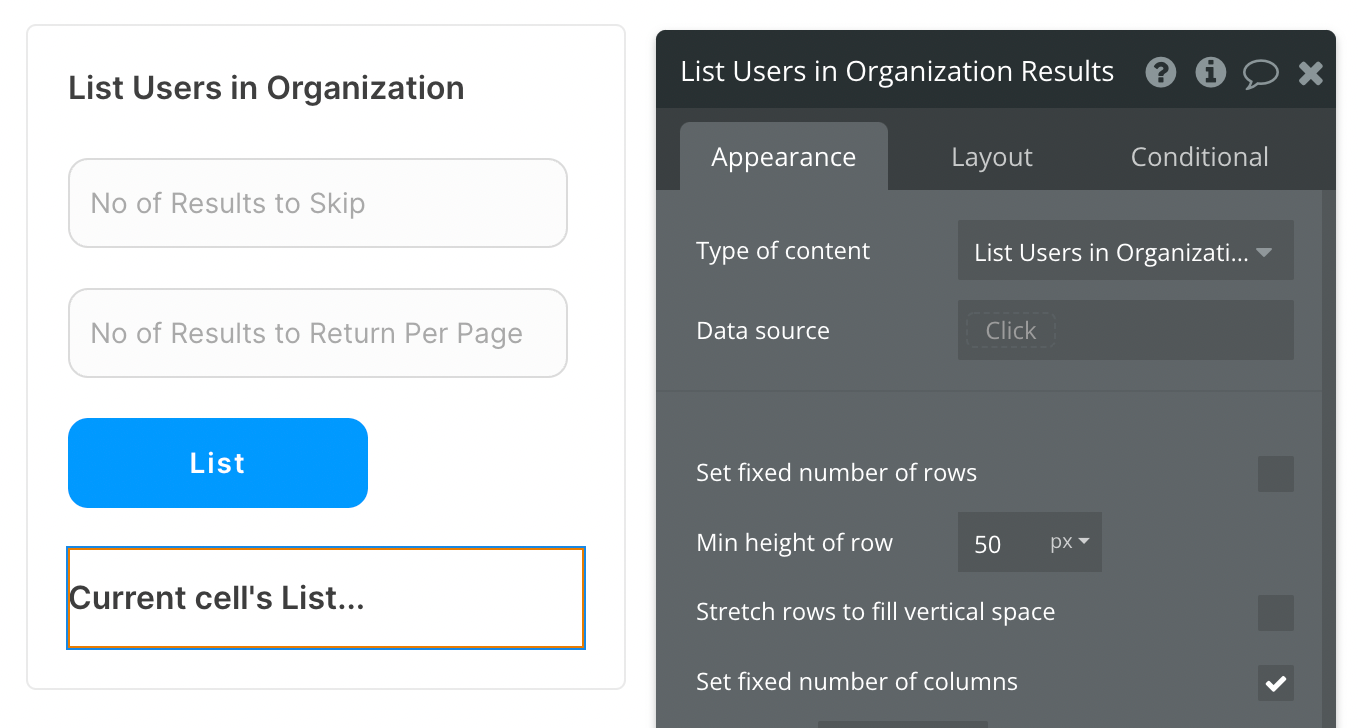
There are many fields that can be displayed for each User, so be sure to review all options when selecting the text element inside your repeating group.
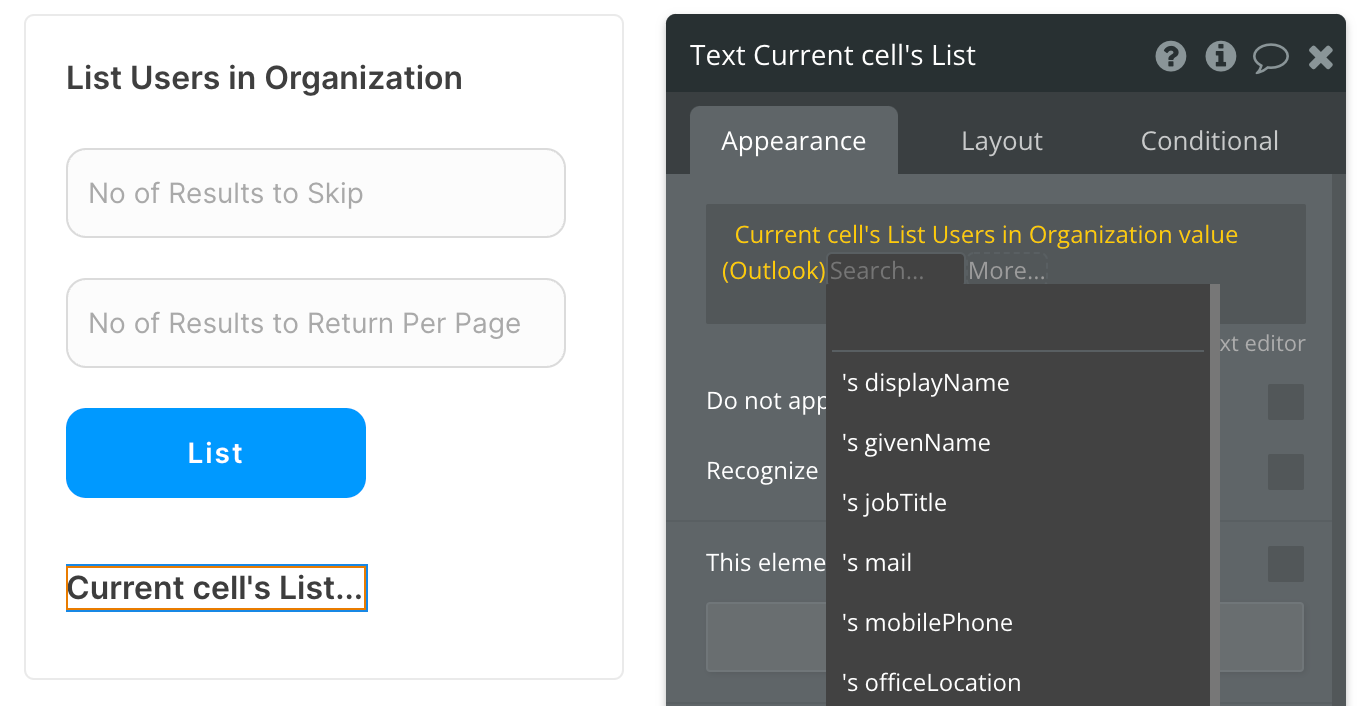
Set up the API call
Now that your repeating group is set up properly, let's configure the workflow action to retrieve all Email Messages and display the results. In this demo, we're using the blue "List" button to do this.
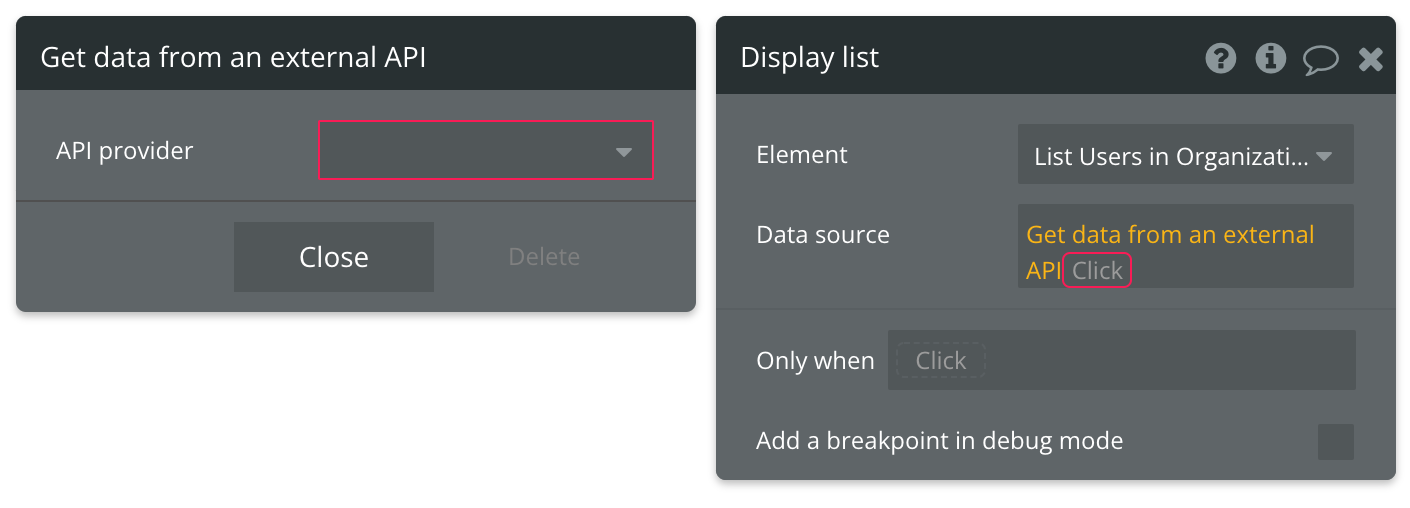
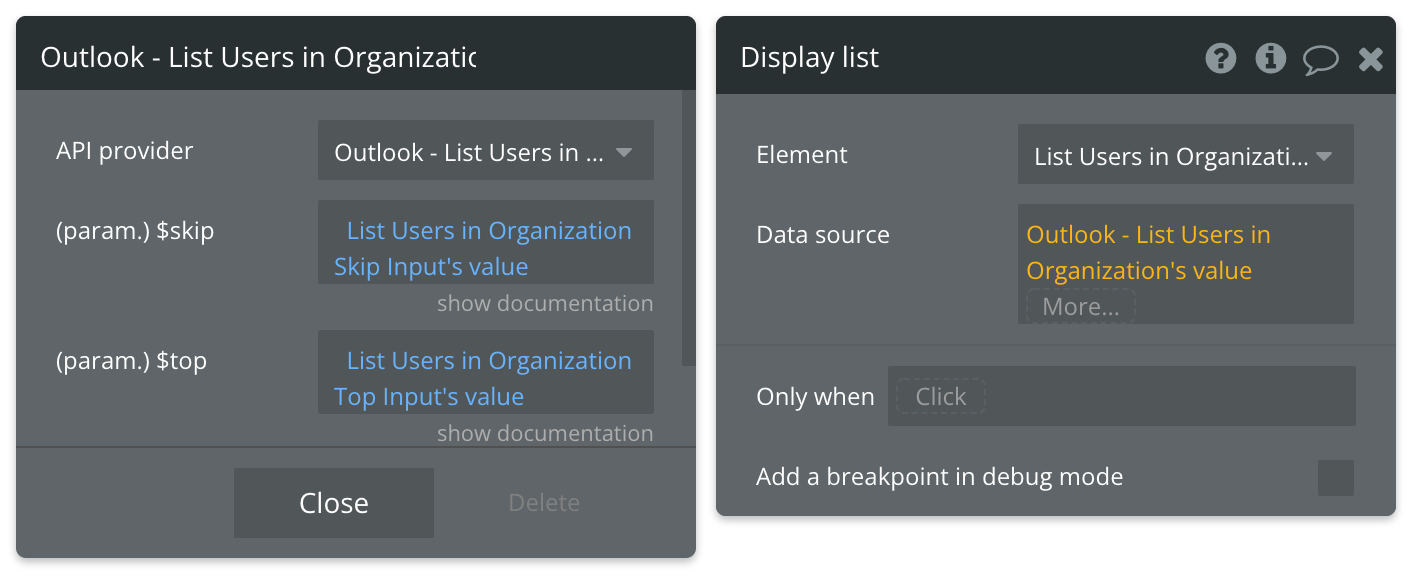
Review the items below to understand what values are optional or required to complete the API call.
Available Parameters (* indicates a required value)
$skip - Enter the number of results you want to skip. E.g. "20" returns results starting at item 21. Default is 0. You can use a custom state to keep track of how many items you're skipping through at a time.
$top - Enter the number of results to return per page. Default is 10.
Search User in Organization by Email - Data Call
🔗
Microsoft documentation: https://learn.microsoft.com/en-us/graph/api/user-list?view=graph-rest-1.0&tabs=http
Set up your data source
In this example, we'll use a group to display our data. Since we're using buttons to trigger our API calls, we'll leave the data source blank and use a Display data in group action to send the results to the group.
- Type of content = Search User in Organization by Email (Outlook)
- Data source = leave blank
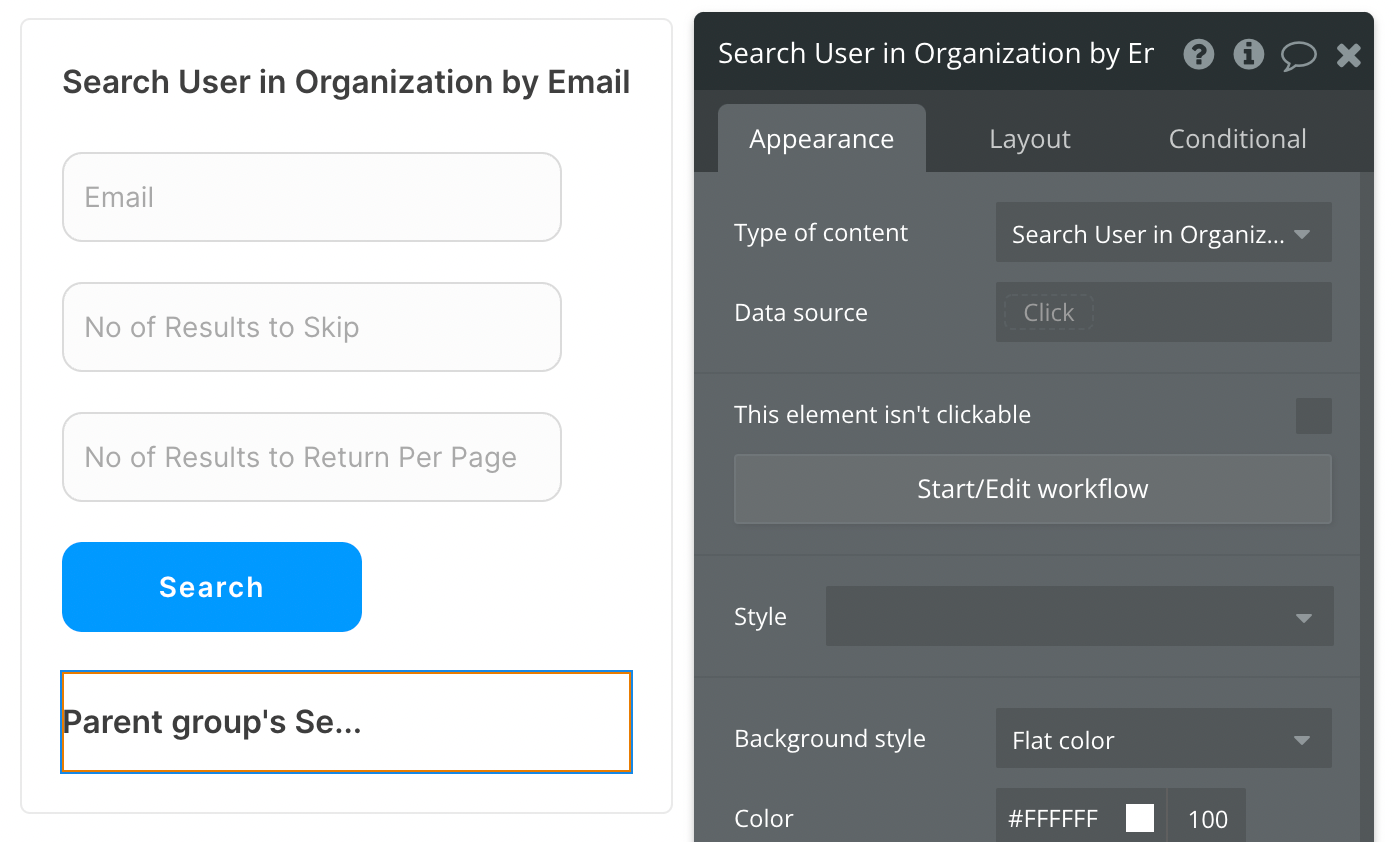
There are many fields that can be displayed for the User, so be sure to review all options when selecting the text element inside your group.
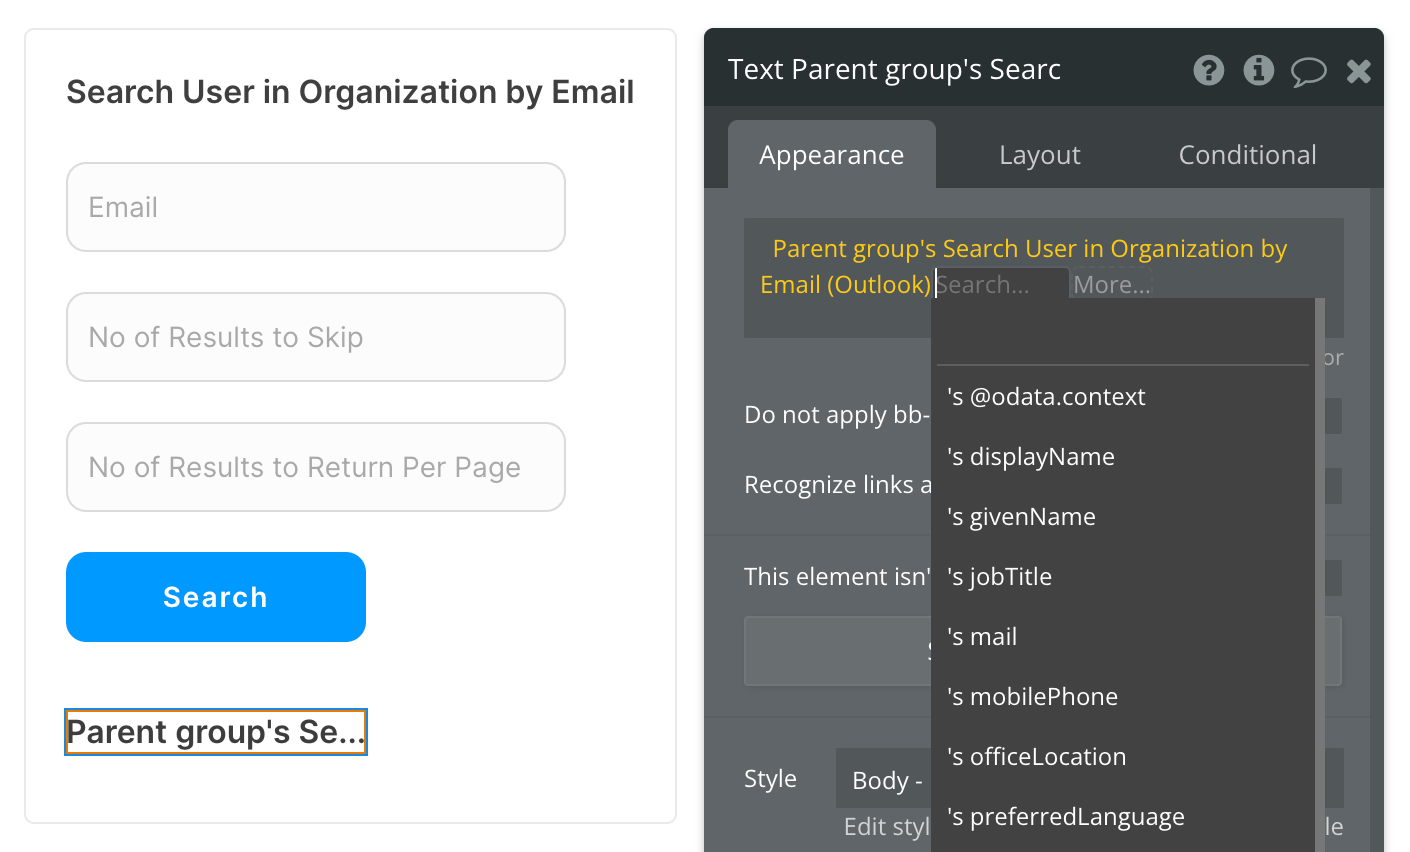
Set up the API call
Now that your group is set up properly, let's configure the workflow action to retrieve all Email Messages and display the results. In this demo, we're using the blue "List" button to do this.
Review the items below to understand what values are optional or required to complete the API call.
Available Path (* indicates a required value)
email - Enter the email of the User you're searching for.
Available Parameters (* indicates a required value)
$skip - Enter the number of results you want to skip. E.g. "20" returns results starting at item 21. Default is 0. You can use a custom state to keep track of how many items you're skipping through at a time.
$top - Enter the number of results to return per page. Default is 10.
Get Folder - Data Call
🔗
Microsoft documentation: https://learn.microsoft.com/en-us/graph/api/mailfolder-get?tabs=http&view=graph-rest-1.0
Set up your data source
In this example, we'll use a group to display our data. Since we're using buttons to trigger our API calls, we'll leave the data source blank and use a Display data in group action to send the results to the group.
- Type of content = Get Folder (Outlook)
- Data source = leave blank
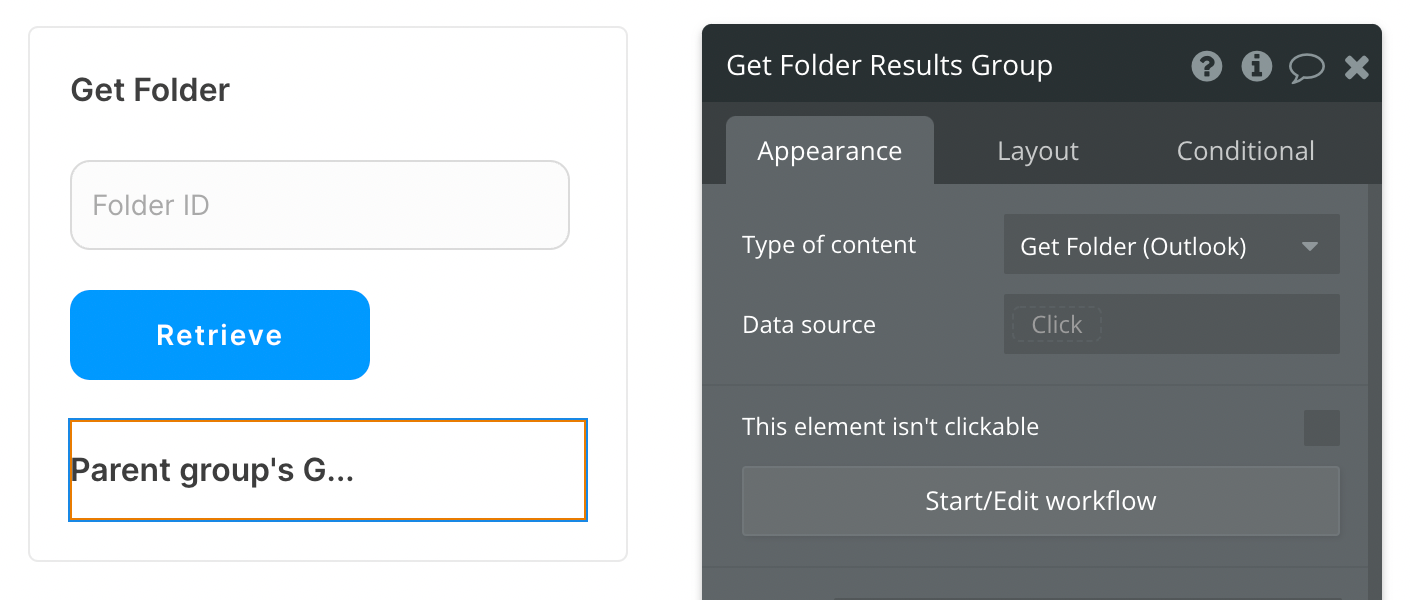
There are many fields that can be displayed for the folder, so be sure to review all options when selecting the text element inside your group.
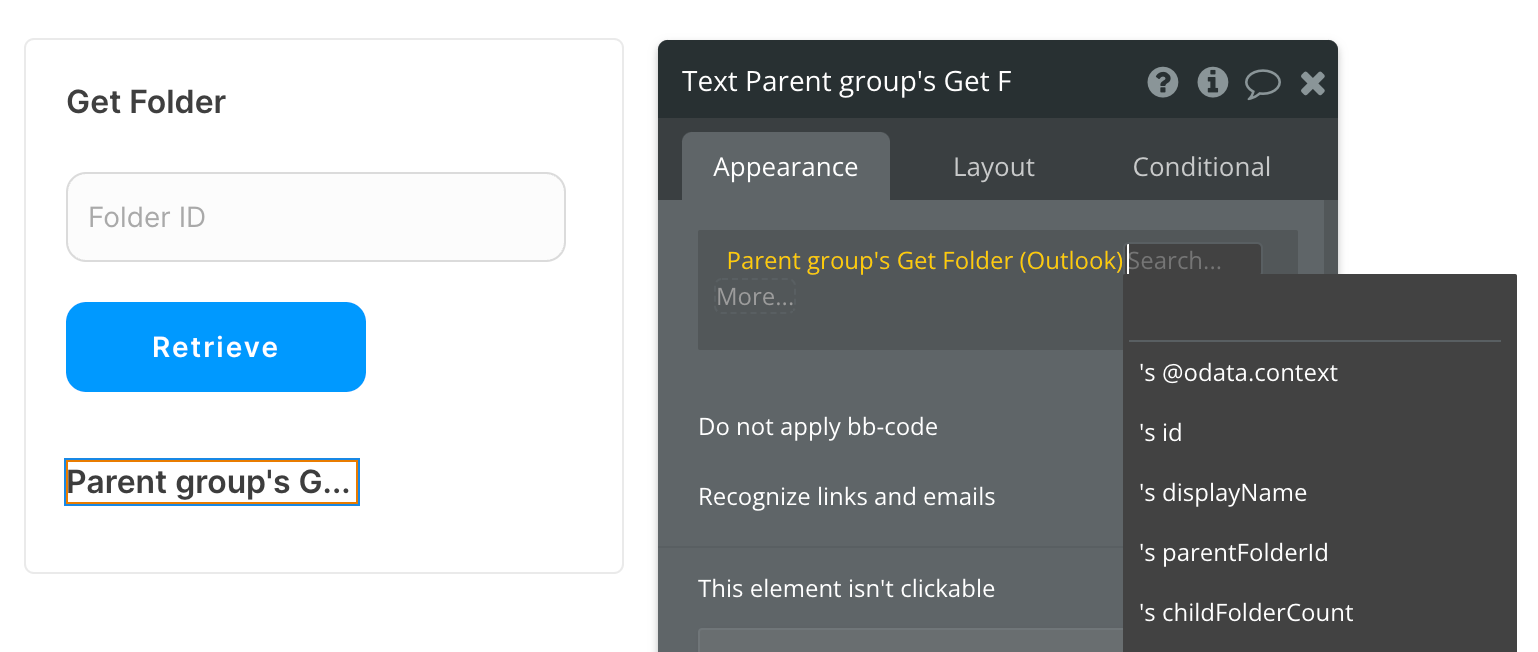
Set up the API call
Now that your group is set up properly, let's configure the workflow action to retrieve a Folder and display the result. In this demo, we're using the blue "Retrieve" button to do this.
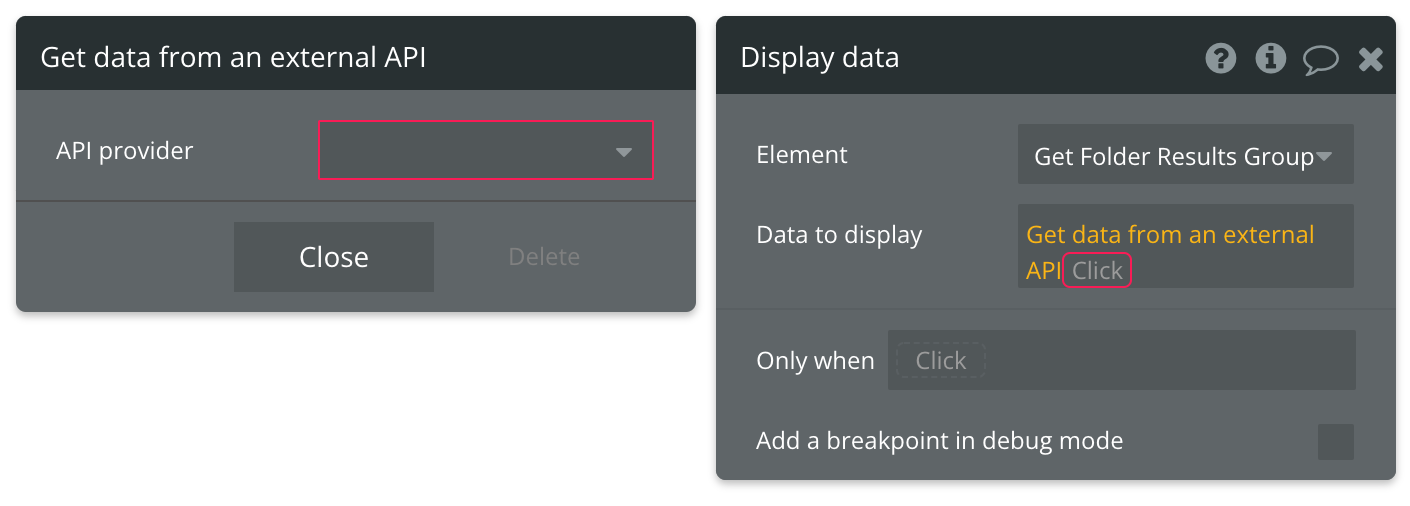
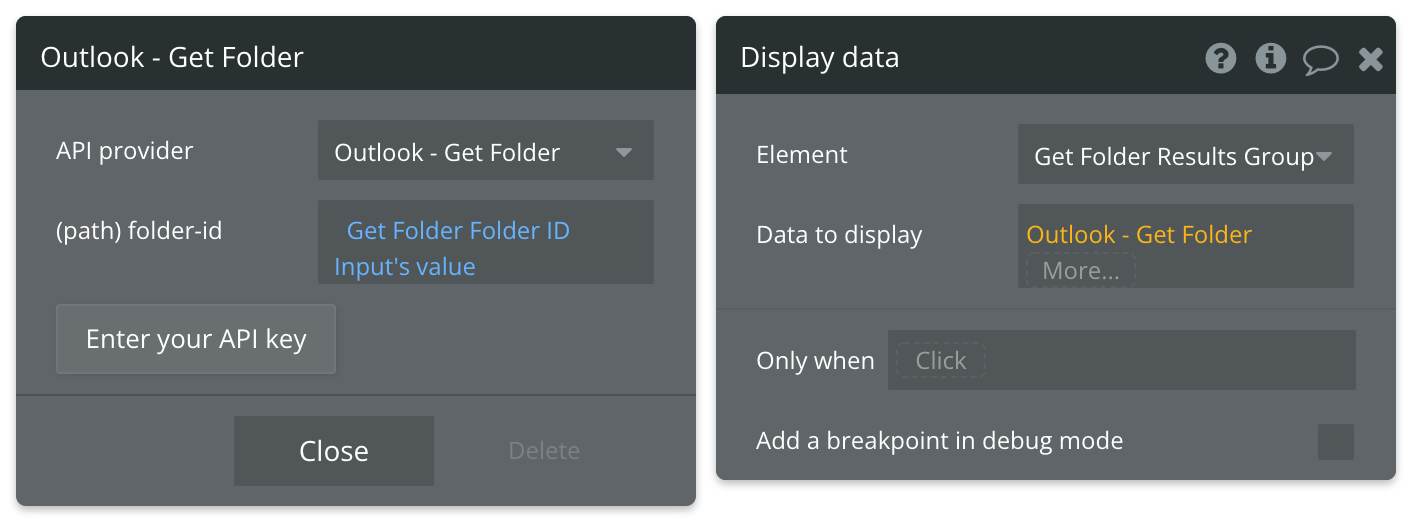
Review the items below to understand what values are optional or required to complete the API call.
Available Path (* indicates a required value)
folder-id - Enter the ID of the Folder you're searching for.
Get Message Images - Data Call
🔗
Microsoft documentation: https://learn.microsoft.com/en-us/graph/api/message-list-attachments?tabs=http&view=graph-rest-1.0
Set up your data source
In this example, we'll use a repeating group to display our data. Since we're using buttons to trigger our API calls, we'll leave the data source blank and use a Display list in RG action to send the results to the repeating group.
- Type of content = Get Message Image value (Outlook)
- Data source = leave blank
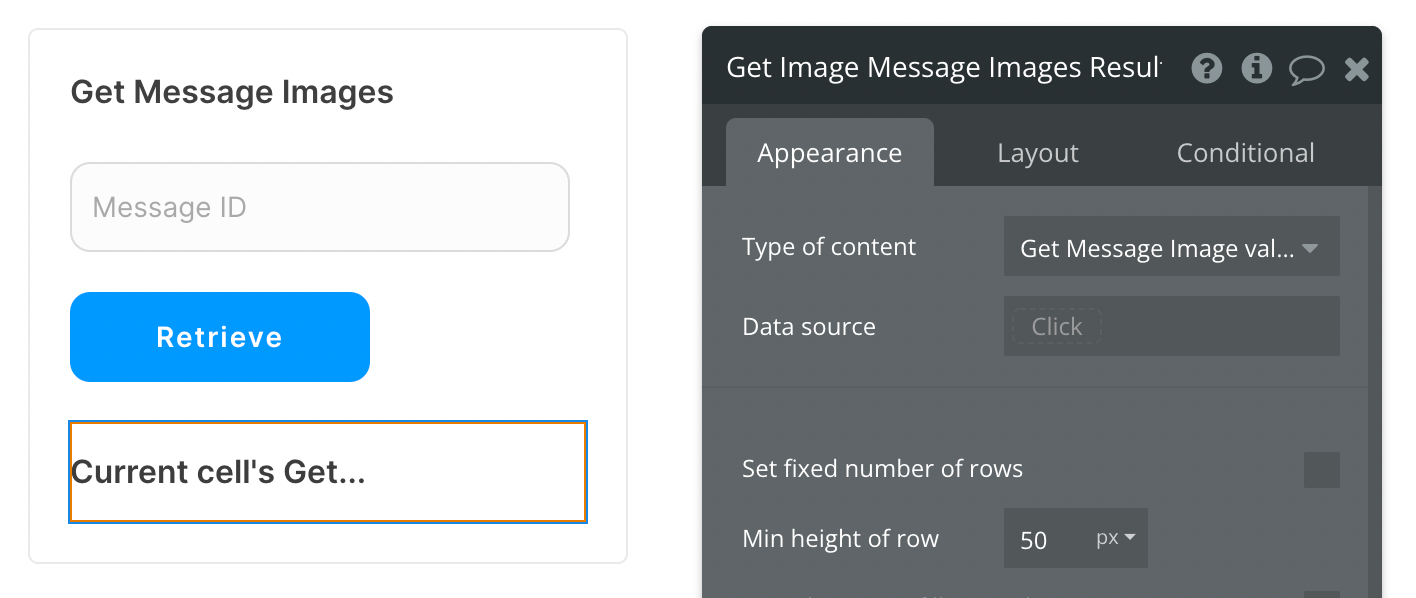
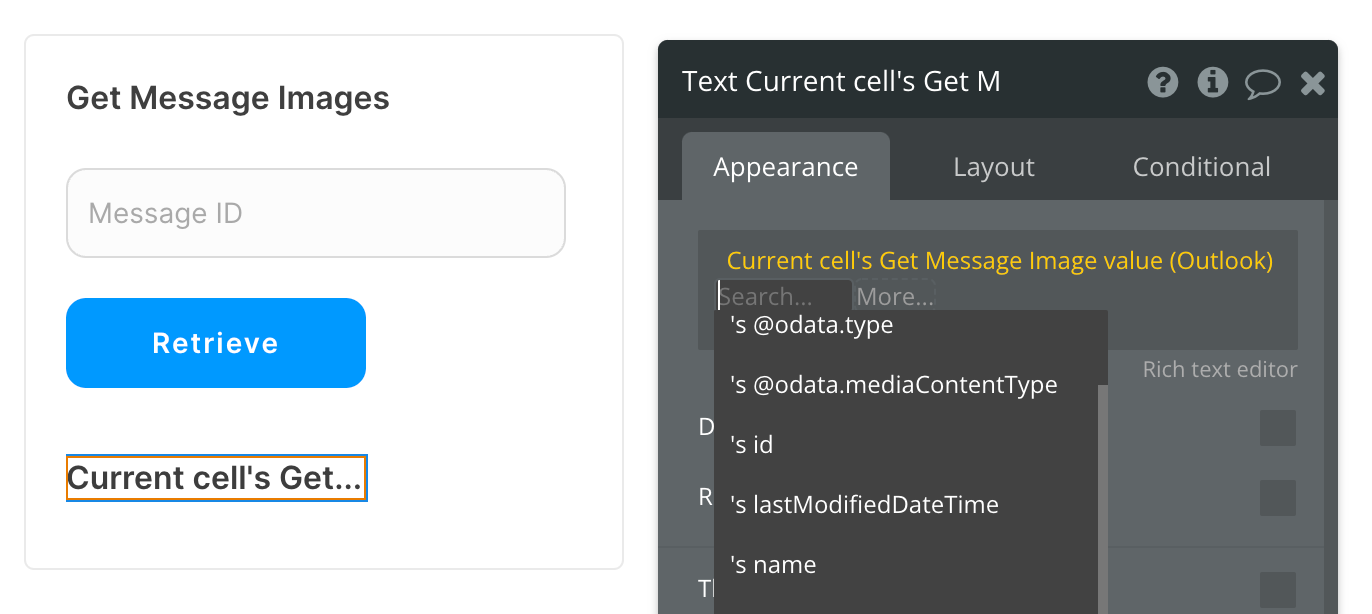
There are many fields that can be displayed for the message image, so be sure to review all options when selecting the text element inside your repeating group.
Set up the API call
Now that your repeating group is set up properly, let's configure the workflow action to retrieve all Email Messages and display the results. In this demo, we're using the blue "Retrieve" button to do this.
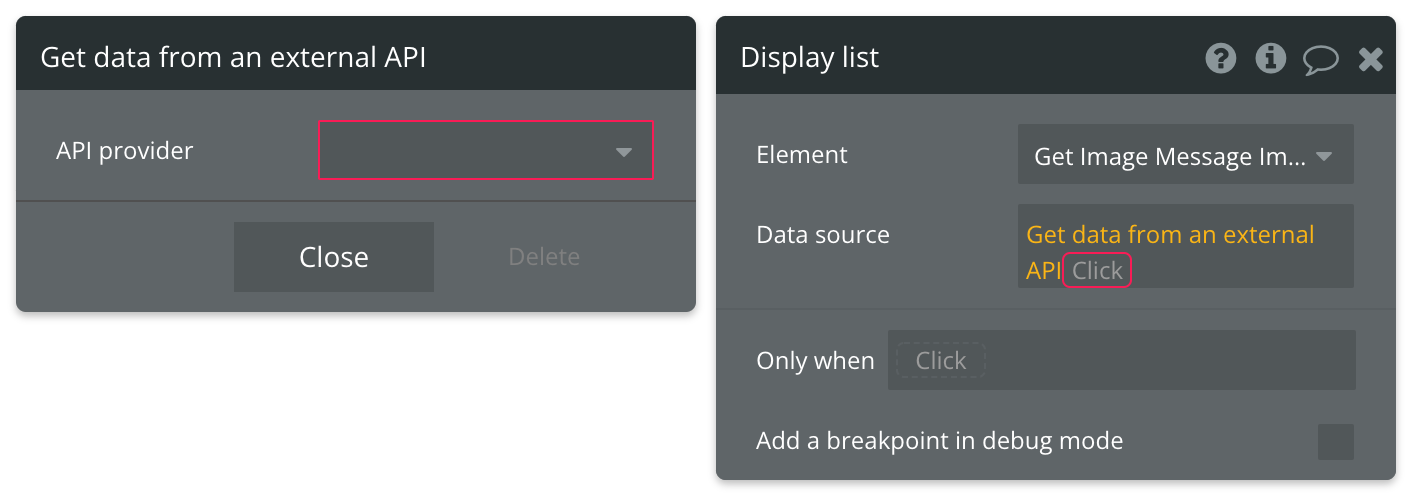
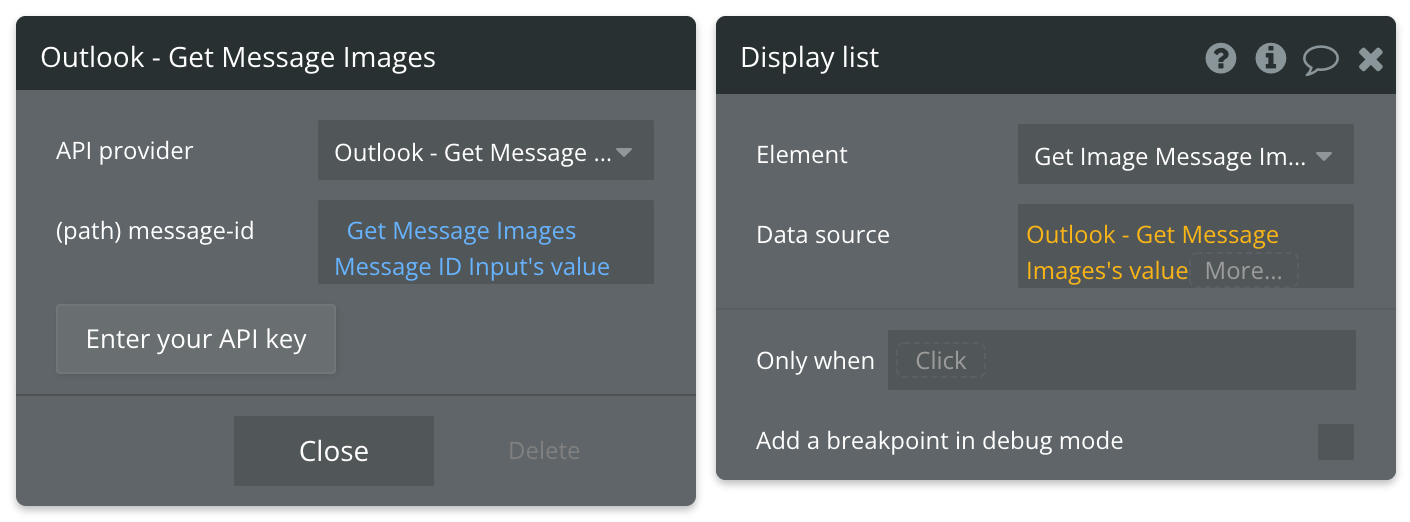
Review the items below to understand what values are optional or required to complete the API call.
Available Path (* indicates a required value)
message-id - Enter the ID of the Message attachments you want to view.
Create Folder - Action
🔗
Microsoft documentation: https://learn.microsoft.com/en-us/graph/api/user-post-mailfolders?tabs=http&view=graph-rest-1.0
Set up your API call
In this example, we'll be making on quick API call to Outlook to Create a Folder. Like our other demos, we'll use a blue "Create" button to do this.
Start by creating a form to collect the necessary parameters.
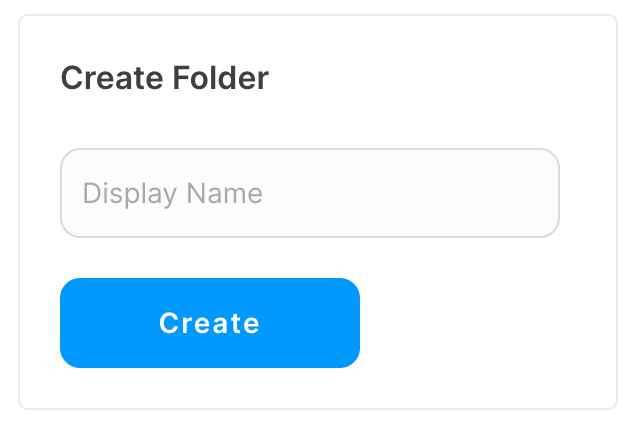
Now map the inputs to their corresponding parameters and paths. More information on which paths and/or parameters are required is covered at the end of this article.
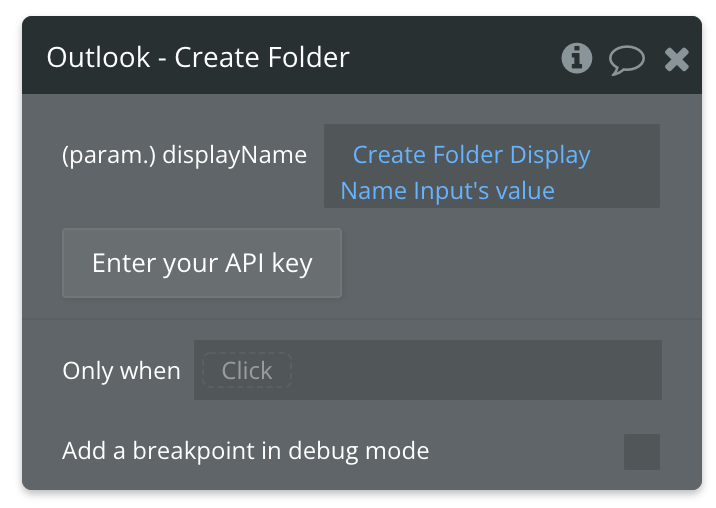
Review the items below to understand what values are optional or required to complete the API call.
Available Parameters (* indicates a required value)
displayName* - Enter the name of this new Folder.
Create Calendar - Action
🔗
Microsoft documentation: https://learn.microsoft.com/en-us/graph/api/user-post-calendars?tabs=http&view=graph-rest-1.0
Set up your API call
In this example, we'll be making on quick API call to Outlook to Create a Calendar. Like our other demos, we'll use a blue "Create" button to do this.
Start by creating a form to collect the necessary parameters.
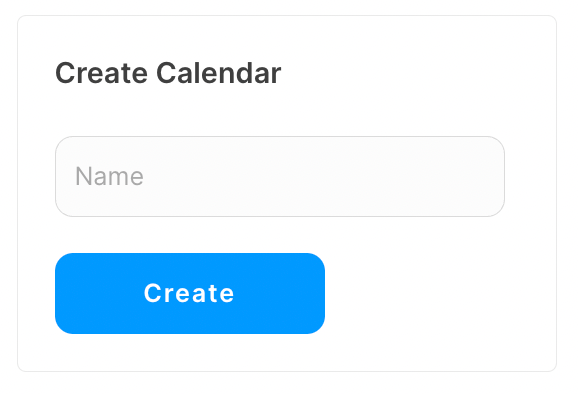
Now map the inputs to their corresponding parameters and paths. More information on which paths and/or parameters are required is covered at the end of this article.
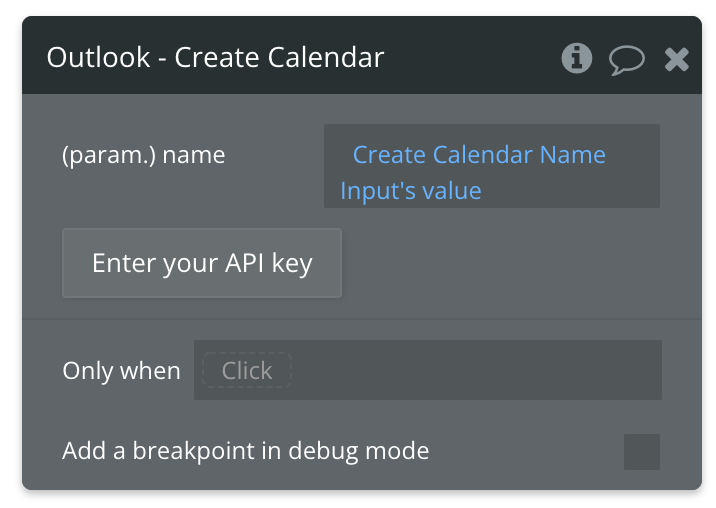
Review the items below to understand what values are optional or required to complete the API call.
Available Parameters (* indicates a required value)
name* - Enter the name of this new Calendar.
Create Event - Action
🔗
Microsoft documentation: https://learn.microsoft.com/en-us/graph/api/user-post-events?tabs=http&view=graph-rest-1.0
Set up your API call
In this example, we'll be making on quick API call to Outlook to Create an Event. Like our other demos, we'll use a blue "Create" button to do this.
Start by creating a form to collect the necessary parameters.
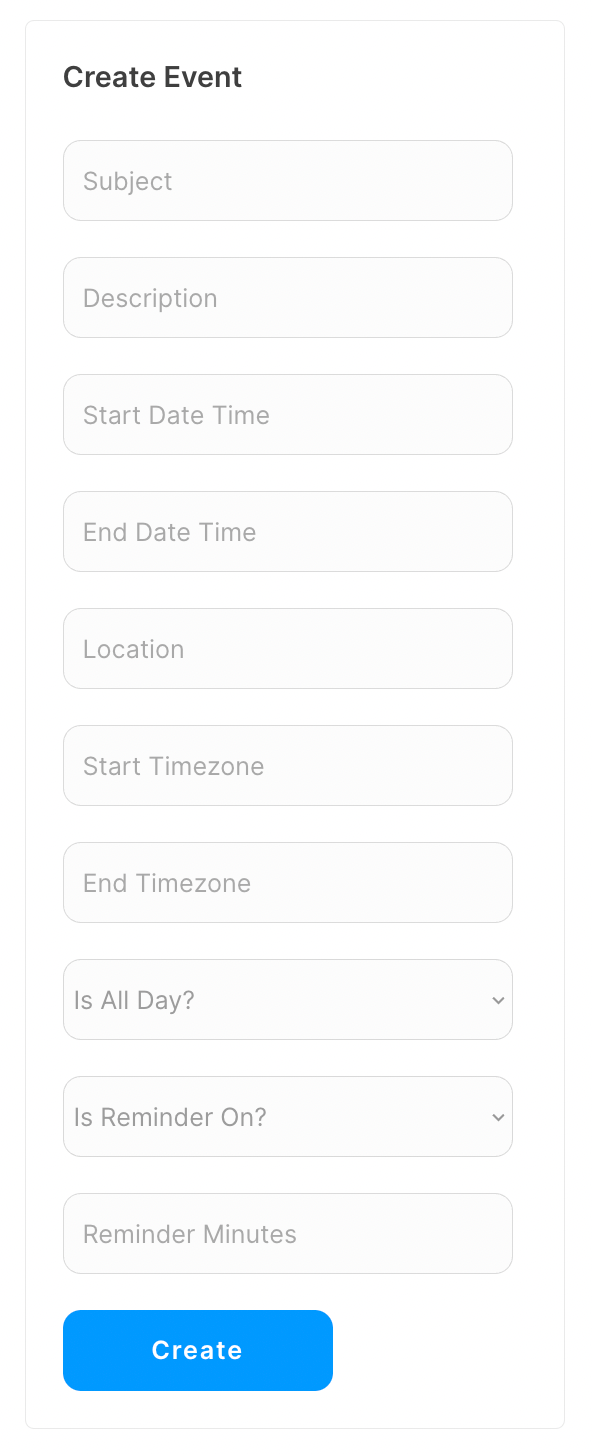
Now map the inputs to their corresponding parameters and paths. More information on which paths and/or parameters are required is covered at the end of this article.
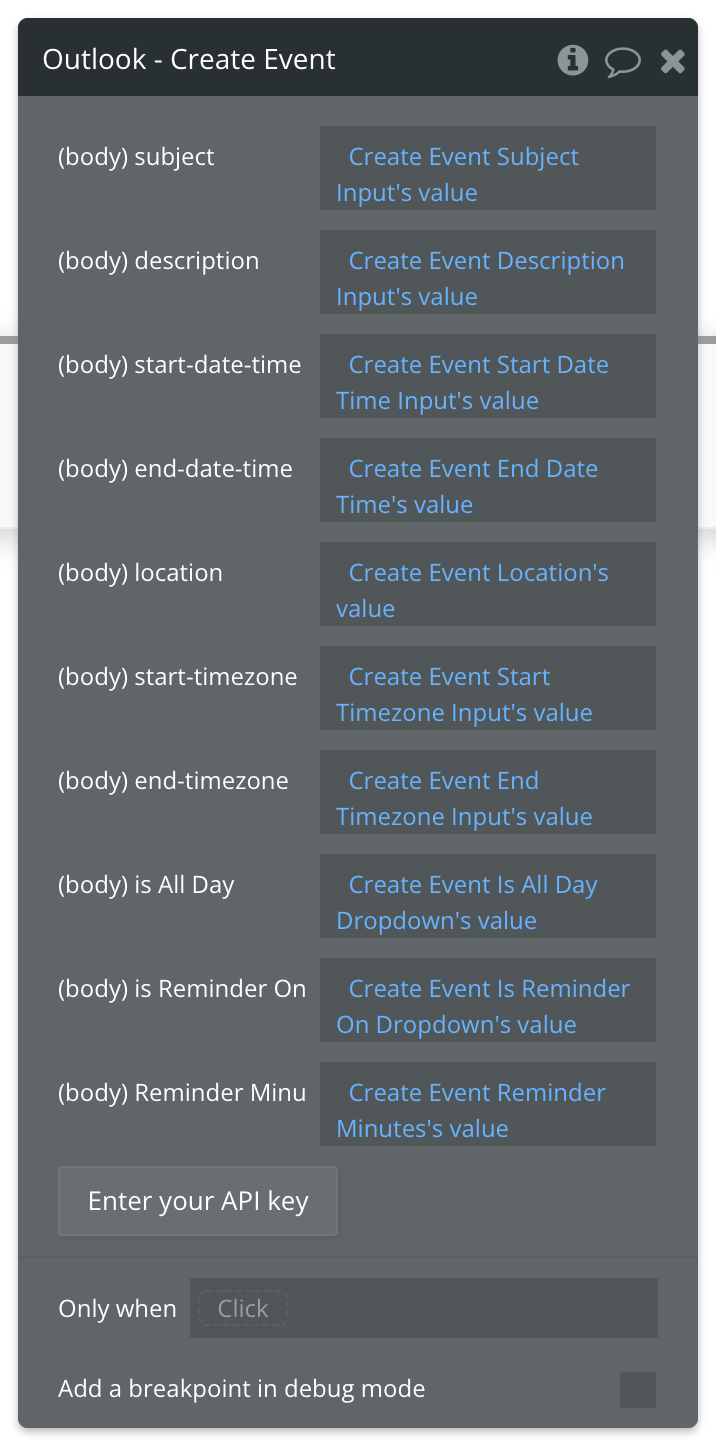
Review the items below to understand what values are optional or required to complete the API call.
Available Parameters (* indicates a required value)
subject* - Subject of your event.
description* - Description of your event.
start-date-time* - Must follow this time format: 2018-07-21T00:00:00
end-date-time* - Must follow this time format: 2018-07-21T00:00:00
location* - Example value: Paris, France
start-timezone* - Example value: Central Standard Time
end-timezone* - Example value: Central Standard Time
is All Day* - Must be a true or false value.
is Reminder On* - Must be a true or false value.
Reminder Minutes* - Number of minutes before the event a reminder is sent.
Update Event - Action
🔗
Microsoft documentation: https://learn.microsoft.com/en-us/graph/api/event-update?tabs=http&view=graph-rest-1.0
Set up your API call
In this example, we'll be making on quick API call to Outlook to Update an Event. Like our other demos, we'll use a blue "Update" button to do this.
Start by creating a form to collect the necessary parameters.
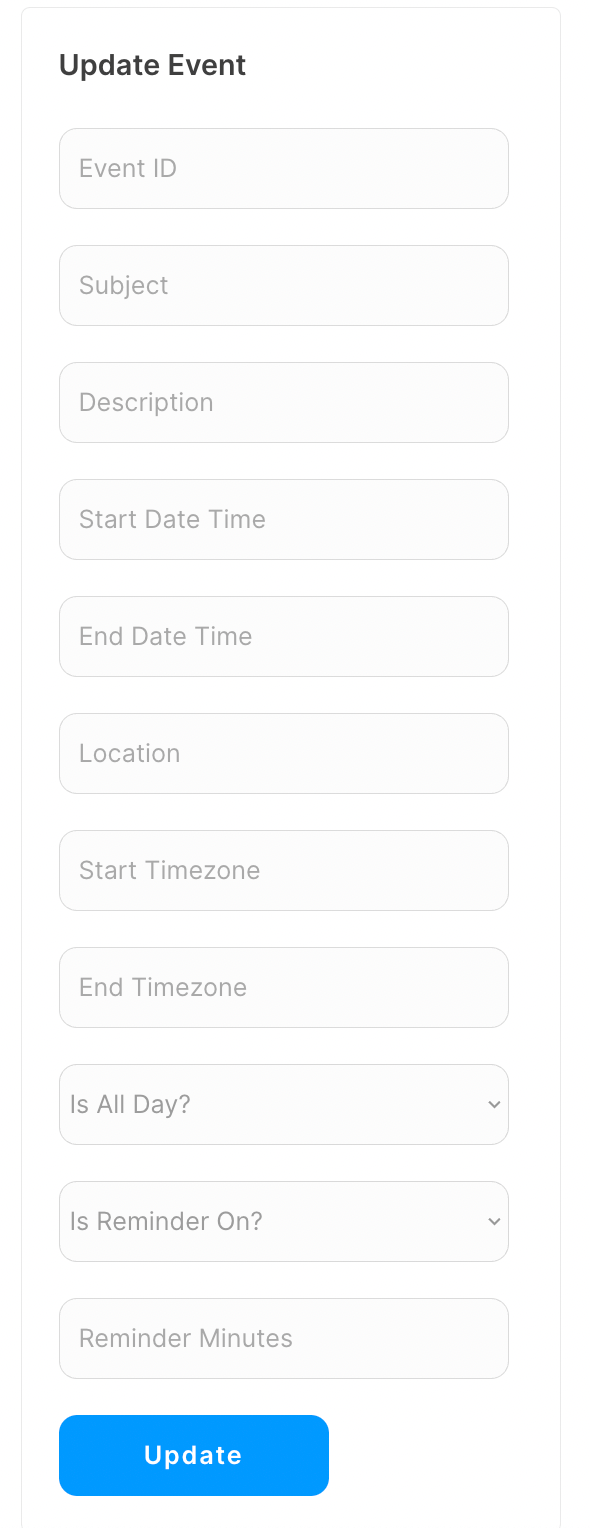
Now map the inputs to their corresponding parameters and paths. More information on which paths and/or parameters are required is covered at the end of this article.
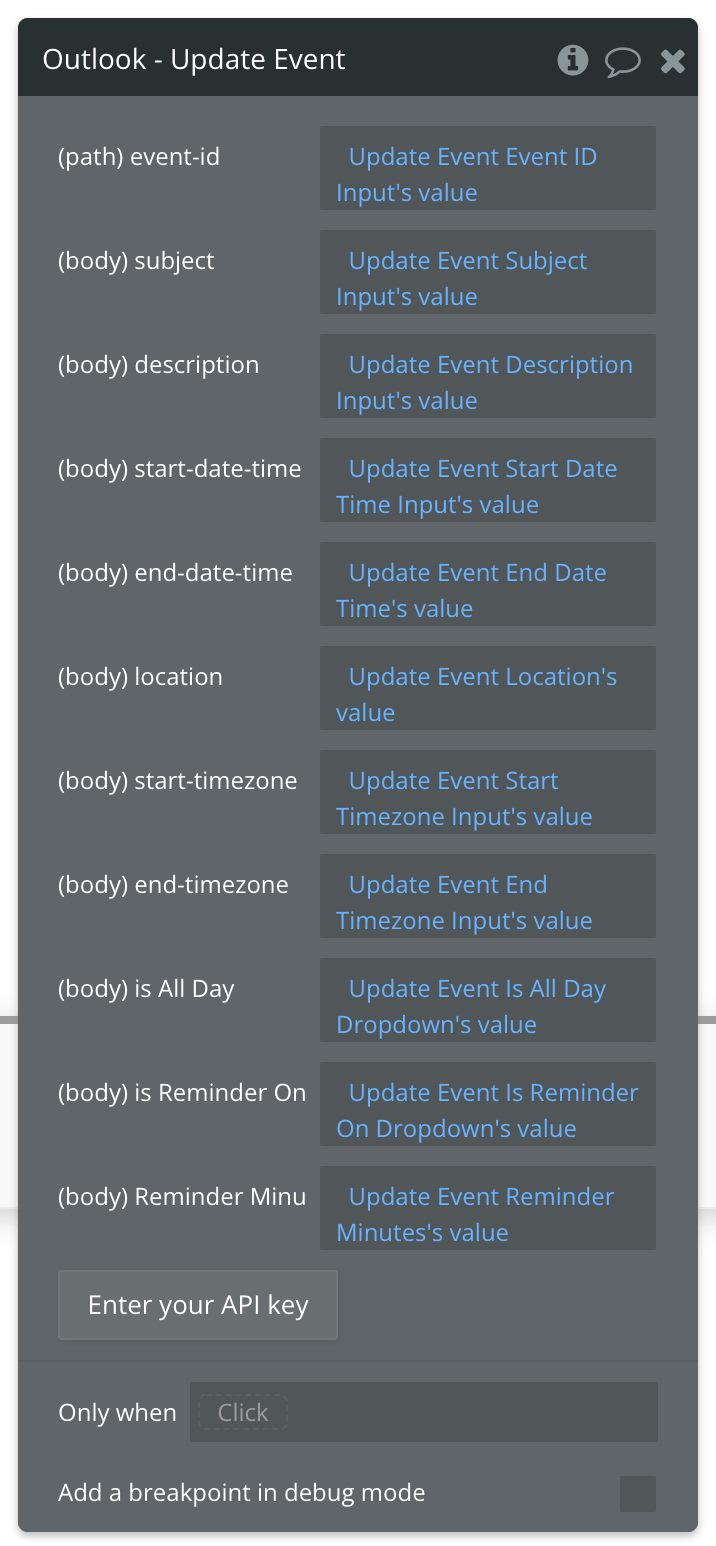
Review the items below to understand what values are optional or required to complete the API call.
☝
Note: Not sure where to find your Event ID? Use the List Events API call to find the ID of the Event you want to update.
Available Path (* indicates a required value)
event-id - Enter the ID of the Event you want to update.
Available Parameters (* indicates a required value)
subject* - Subject of your event.
description* - Description of your event.
start-date-time* - Must follow this time format: 2018-07-21T00:00:00
end-date-time* - Must follow this time format: 2018-07-21T00:00:00
location* - Example value: Paris, France
start-timezone* - Example value: Central Standard Time
end-timezone* - Example value: Central Standard Time
is All Day* - Must be a true or false value.
is Reminder On* - Must be a true or false value.
Reminder Minutes* - Number of minutes before the event a reminder is sent.
Delete Event - Action
🔗
Microsoft documentation: https://learn.microsoft.com/en-us/graph/api/event-delete?tabs=http&view=graph-rest-1.0
Set up your API call
In this example, we'll be making on quick API call to Outlook to Delete an Event. Like our other demos, we'll use a blue "Delete" button to do this.
Start by creating a form to collect the necessary parameters.
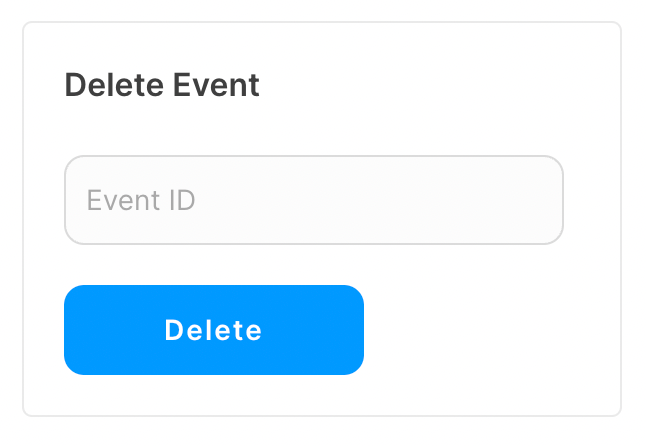
Now map the inputs to their corresponding parameters and paths. More information on which paths and/or parameters are required is covered at the end of this article.
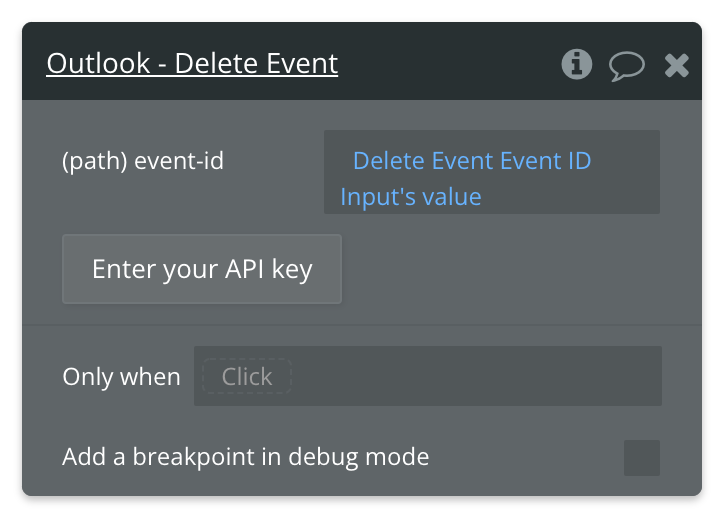
Review the items below to understand what values are optional or required to complete the API call.
☝
Note: Not sure where to find your Event ID? Use the List Events API call to find the ID of the Event you want to delete.
Available Path (* indicates a required value)
event-id* - Enter the ID of the Event you want to delete.
Create Contact - Action
🔗
Microsoft documentation: https://learn.microsoft.com/en-us/graph/api/user-post-contacts?tabs=http&view=graph-rest-1.0
Set up your API call
In this example, we'll be making on quick API call to Outlook to Create a Contact. Like our other demos, we'll use a blue "Create" button to do this.
Start by creating a form to collect the necessary parameters.
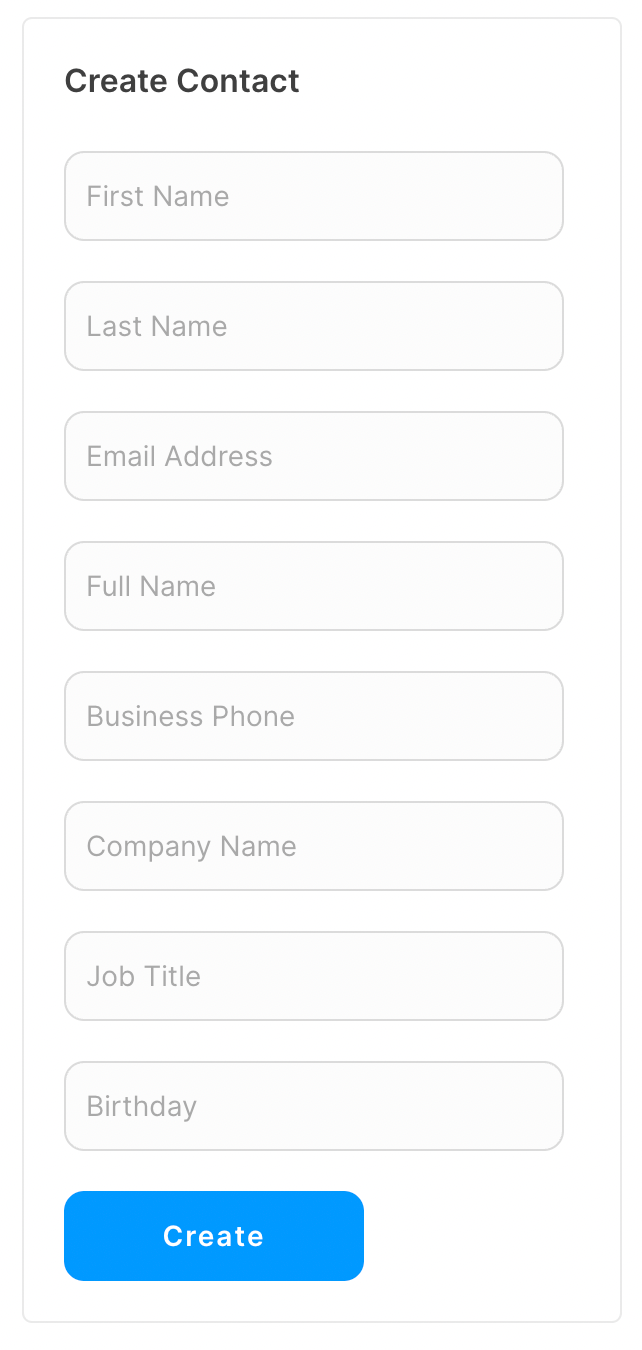
Now map the inputs to their corresponding parameters and paths. More information on which paths and/or parameters are required is covered at the end of this article.
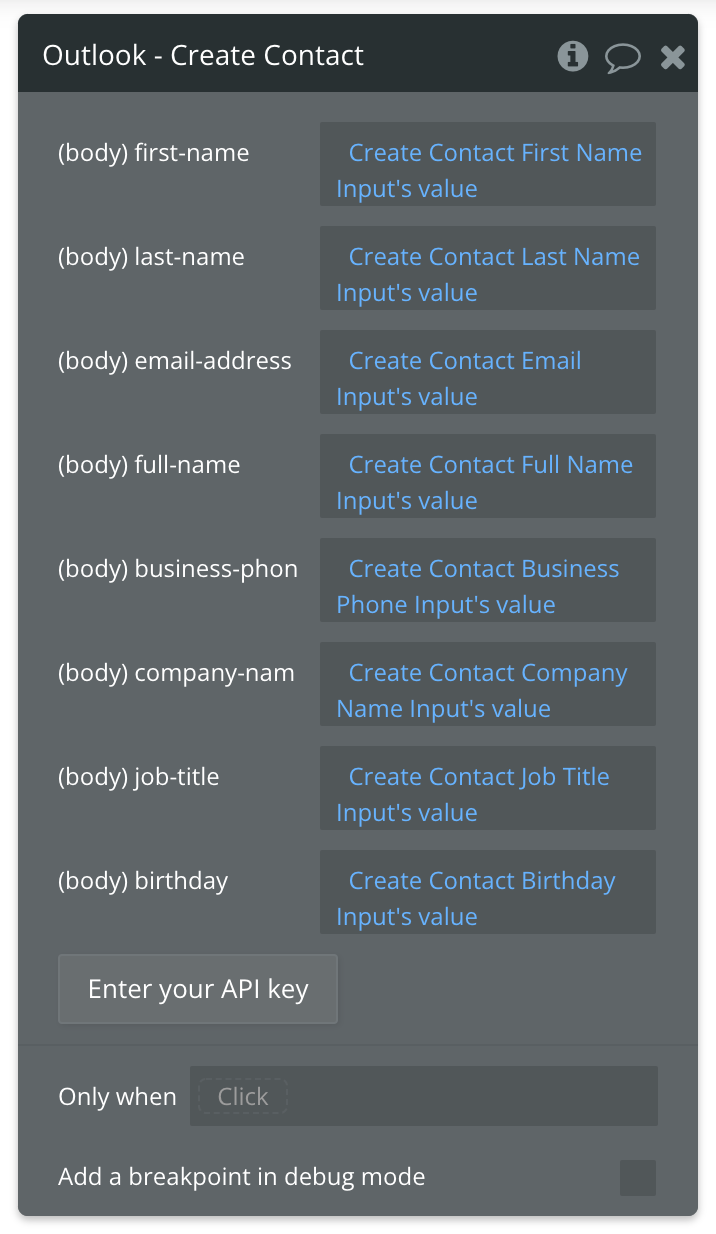
Review the items below to understand what values are optional or required to complete the API call.
Available Parameters (* indicates a required value)
first-name* - Enter the New Contact's first name.
last-name* - Enter the New Contact's last name.
email-address* - Enter the New Contact's last name.
full-name* - Enter the New Contact's last name.
business-phone* - Enter the New Contact's last name.
company-name* - Enter the New Contact's last name.
job-title* - Enter the New Contact's last name.
birthday* - Enter the New Contact's last name. Must follow this format: 1980-01-01T00:00:00Z
Update Contact - Action
🔗
Microsoft documentation: https://learn.microsoft.com/en-us/graph/api/contact-update?tabs=http&view=graph-rest-1.0
Set up your API call
In this example, we'll be making on quick API call to Outlook to Update a Contact. Like our other demos, we'll use a blue "Update" button to do this.
Start by creating a form to collect the necessary parameters.
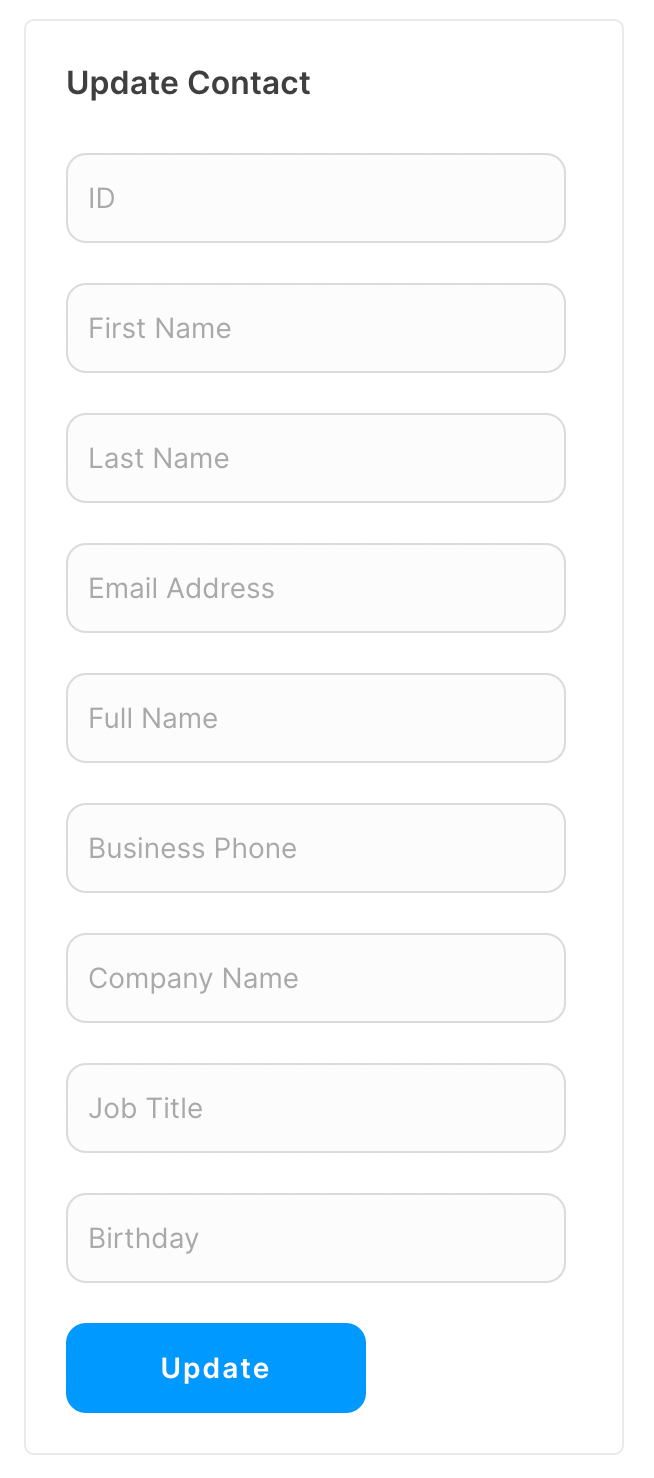
Now map the inputs to their corresponding parameters and paths. More information on which paths and/or parameters are required is covered at the end of this article.
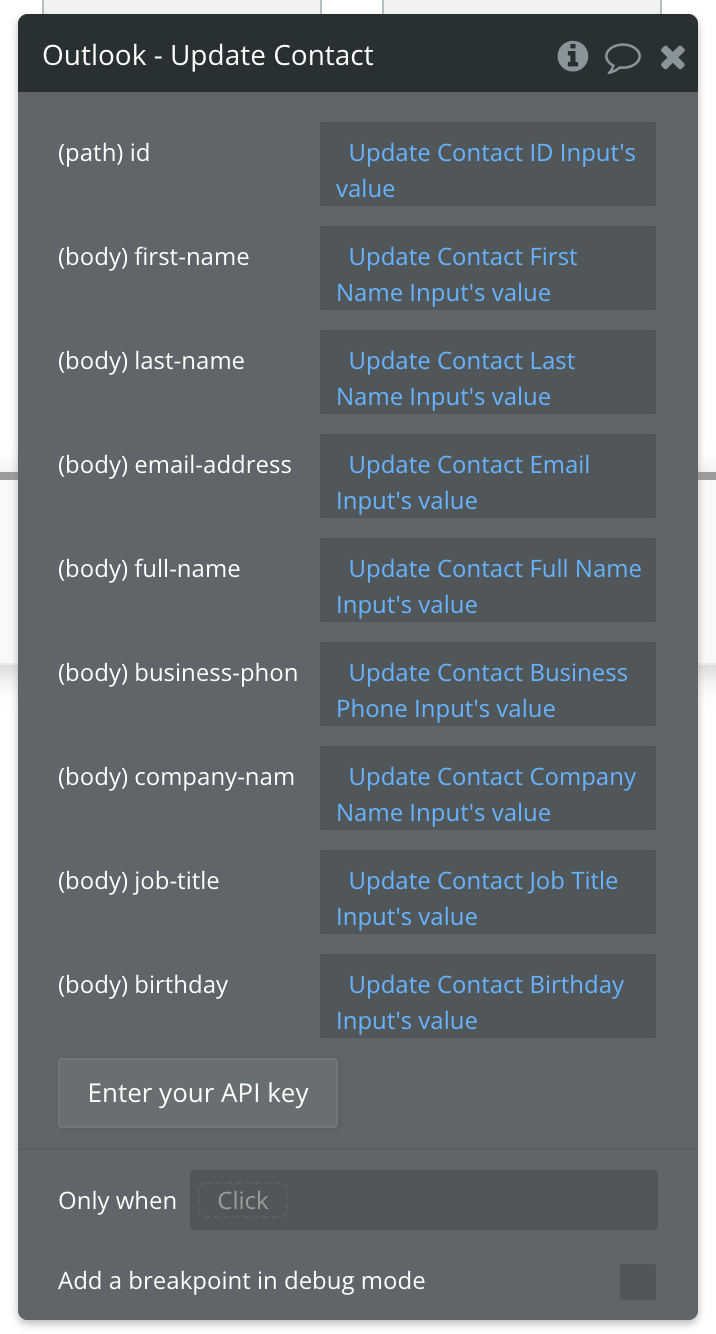
Review the items below to understand what values are optional or required to complete the API call.
☝
Note: Not sure where to find your Contact ID? Use the List Contacts API call to find the ID of the Contact you want to update.
Available Path (* indicates a required value)
id - Enter the ID of the Contact you want to update.
Available Parameters (* indicates a required value)
first-name* - Enter the New Contact's first name.
last-name* - Enter the New Contact's last name.
email-address* - Enter the New Contact's last name.
full-name* - Enter the New Contact's last name.
business-phone* - Enter the New Contact's last name.
company-name* - Enter the New Contact's last name.
job-title* - Enter the New Contact's last name.
birthday* - Enter the New Contact's last name. Must follow this format: 1980-01-01T00:00:00Z
Send Email - Action
🔗
Microsoft documentation: https://learn.microsoft.com/en-us/graph/api/user-sendmail?tabs=http&view=graph-rest-1.0
Set up your API call
In this example, we'll be making on quick API call to Outlook to Send an Email. Like our other demos, we'll use a blue "Send" button to do this.
Start by creating a form to collect the necessary parameters.
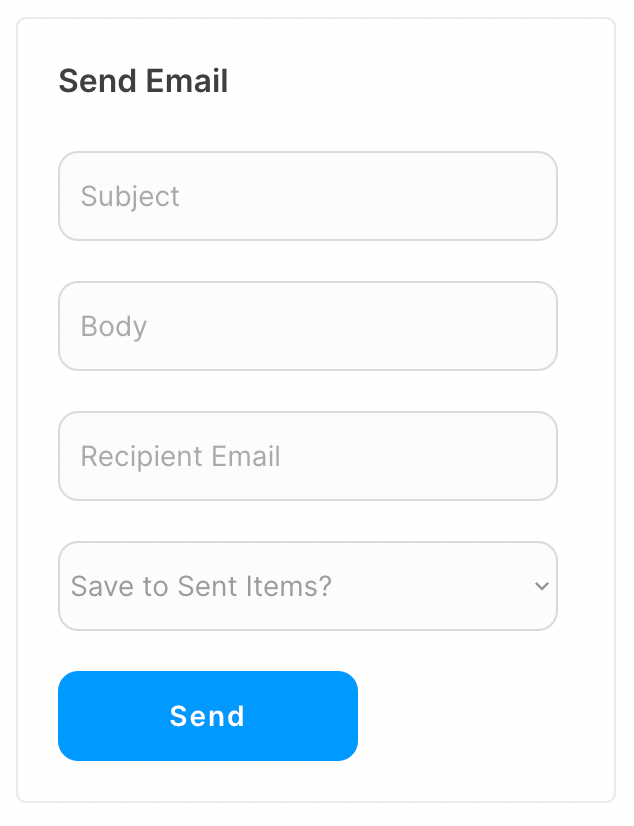
Now map the inputs to their corresponding parameters and paths. More information on which paths and/or parameters are required is covered at the end of this article.
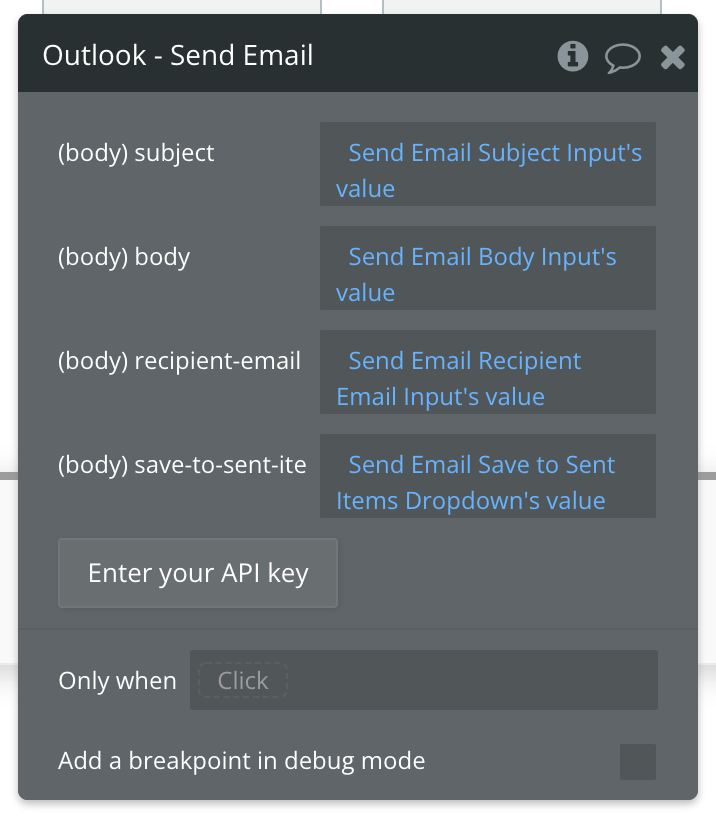
Review the items below to understand what values are optional or required to complete the API call.
Available Parameters (* indicates a required value)
subject* - Subject of your Email.
body* - Body of your Email.
recipient-email* - Recipient of your Email.
save-to-sent-items* - Must be a true or false value.
contentType - Email format to send, can be Text or HTML
Send HTML Emails
1) Set The contentType to HTML
2) Replace Escaping Quotes: In the JSON payload, every instance of a double quote (
") within the HTML string must be escaped with a backslash (\).
3) Replace Single String: The entire HTML must be a single string within the JSON structure. This means no line breaks or formatting outside the context of a single-line string. Send Email With CC Recipient - Action
🔗
Microsoft documentation: https://learn.microsoft.com/en-us/graph/api/user-sendmail?tabs=http&view=graph-rest-1.0
Set up your API call
In this example, we'll be making on quick API call to Outlook to Send an Email With CC Recipient. Like our other demos, we'll use a blue "Send" button to do this.
Start by creating a form to collect the necessary parameters.
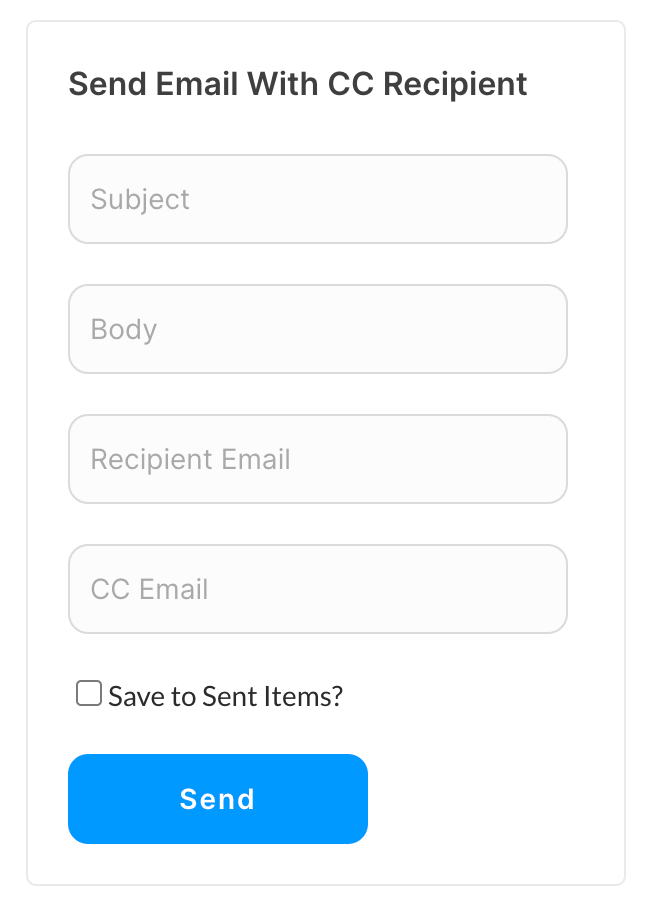
Now map the inputs to their corresponding parameters and paths. More information on which paths and/or parameters are required is covered at the end of this article.
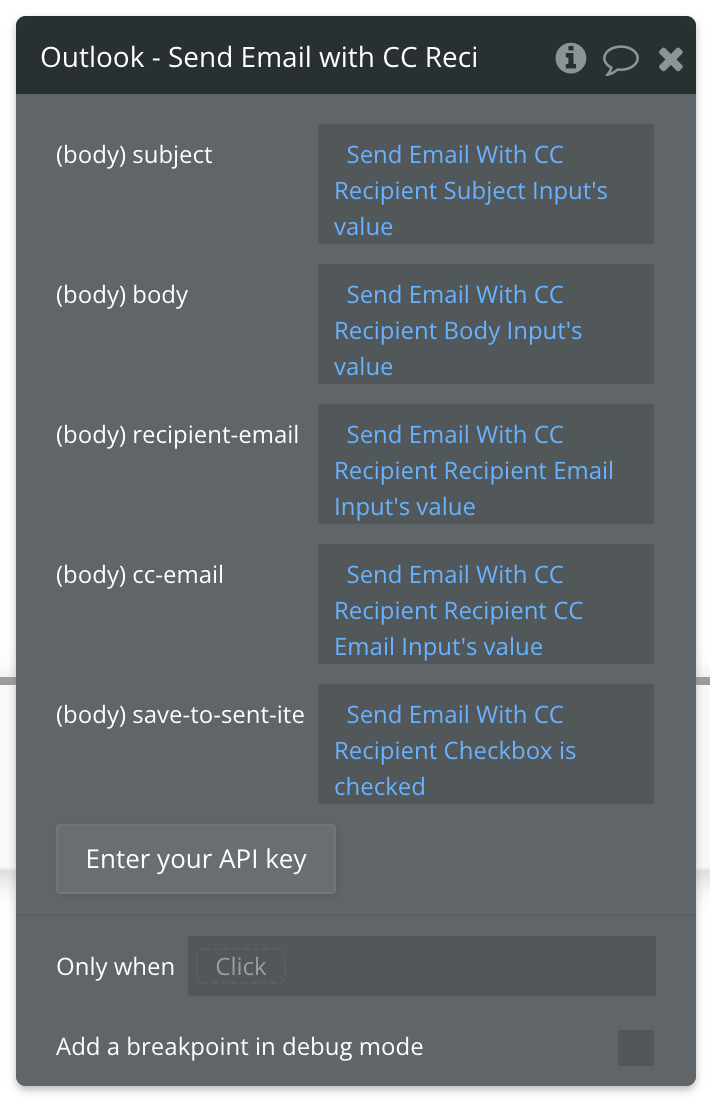
Review the items below to understand what values are optional or required to complete the API call.
Available Parameters (* indicates a required value)
subject* - Subject of your Email.
body* - Body of your Email.
recipient-email* - Recipient of your Email.
cc-email* - CC'd recipient of your Email.
save-to-sent-items* - Must be a true or false value.
Move Message to Folder - Action
🔗
Microsoft documentation: https://learn.microsoft.com/en-us/graph/api/message-move?tabs=http&view=graph-rest-1.0
Set up your API call
In this example, we'll be making on quick API call to Outlook to Move a Message to Folder. Like our other demos, we'll use a blue "Move" button to do this.
Start by creating a form to collect the necessary parameters.
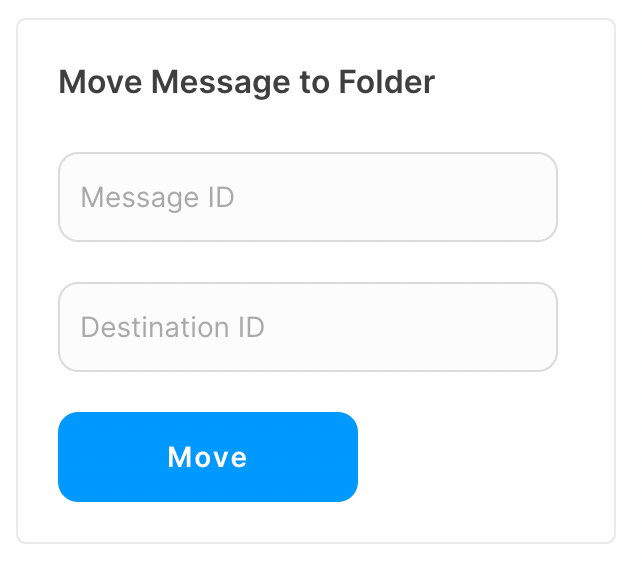
Now map the inputs to their corresponding parameters and paths. More information on which paths and/or parameters are required is covered at the end of this article.
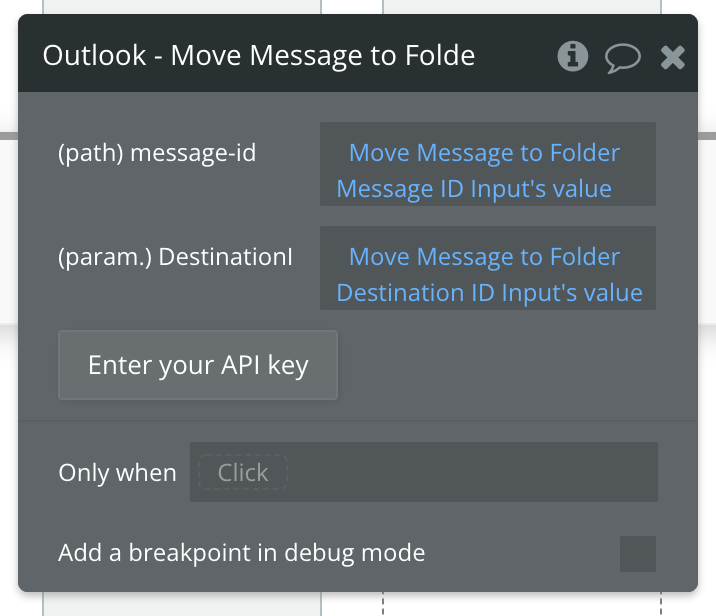
Review the items below to understand what values are optional or required to complete the API call.
☝
Note: Not sure where to find your Folder or Message ID? Use the List Email Messages API call to find the ID of the Message you want to move, or use the List Email Folders API call to find the ID of the Folder you want to move the Message to.
Available Path (* indicates a required value)
message-id* - Enter the ID of the Message you want to move.
Available Parameters (* indicates a required value)
DestinationId* - Enter the ID of the Folder you're moving this Message to.
Mark Email as Read/Unread - Action
🔗
Microsoft documentation: https://learn.microsoft.com/en-us/graph/api/message-update?tabs=http&view=graph-rest-1.0
Set up your API call
In this example, we'll be making on quick API call to Outlook to Mark Email as Read/Unread. Like our other demos, we'll use a blue "Update" button to do this.
Start by creating a form to collect the necessary parameters.
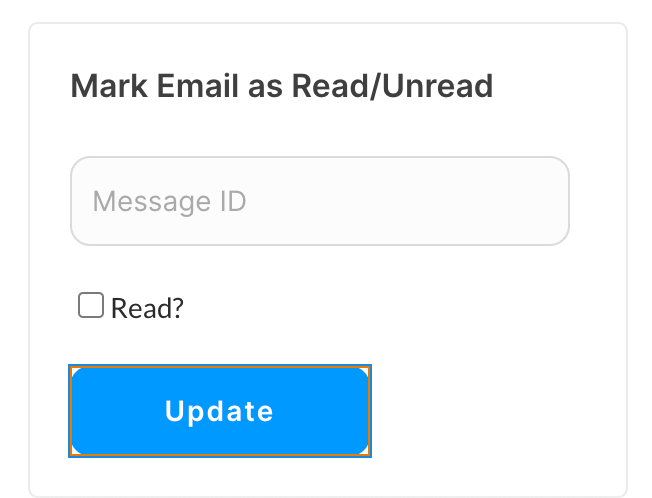
Now map the inputs to their corresponding parameters and paths. More information on which paths and/or parameters are required is covered at the end of this article.
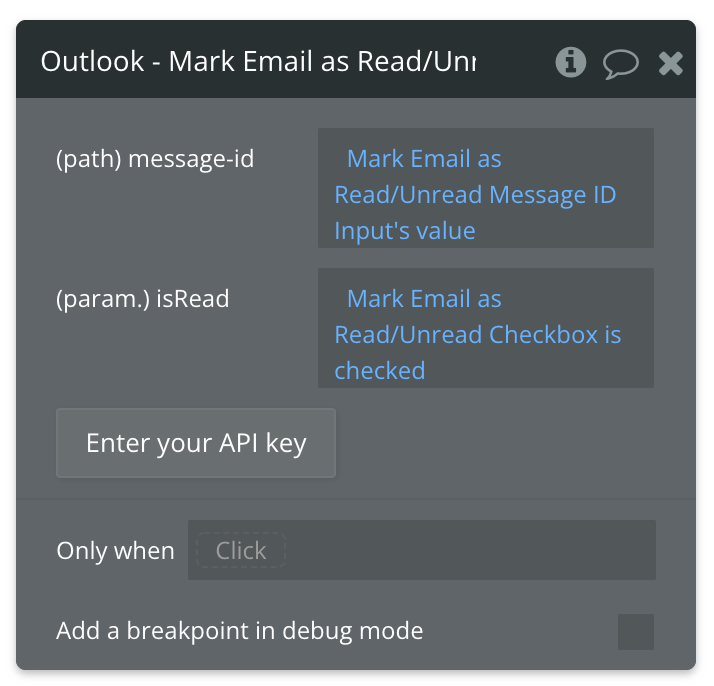
Review the items below to understand what values are optional or required to complete the API call.
☝
Note: Not sure where to find your Message ID? Use the List Email Messages API call to find the ID of the Message you want to update.
Available Path (* indicates a required value)
message-id* - Enter the ID of the Message you want to move.
Available Parameters (* indicates a required value)
isRead* - Must be a true or false value.
Changelogs
Update 28.01.25 - Version 3.22.0
- Updated API security.
Update 15.09.24 - Version 3.20.0
- Minor update (Marketing update).
Update 23.07.24 - Version 3.19.0
- Minor update.
Update 14.06.24 - Version 3.18.0
- Updated demo/service links.
Update 13.03.24 - Version 3.17.0
- internal updates.
Update 12.03.24 - Version 3.16.0
- Send email with attachments".
Update 12.03.24 - Version 3.15.0
- Send email with attachments.
Update 08.03.24 - Version 3.14.0
- Added "contentType" field to the Send Email action for HTML or Text emails..
Update 26.02.24 - Version 3.13.0
- fixed action Outlook: Auth.
Update 22.11.23 - Version 3.12.0
- updated description .
Update 20.10.23 - Version 3.11.0
- Upgrade to Verstion 4.
Update 19.10.23 - Version 3.10.0
- Updated description.
Update 18.10.23 - Version 3.9.0
- Added access token renewal. Fixed minor bugs.
Update 18.09.23 - Version 3.8.0
- updated description.
Update 13.09.23 - Version 3.7.0
- minor updates.
Update 05.09.23 - Version 3.6.0
- internal updates.
Update 04.09.23 - Version 3.5.0
- updated description.
Update 25.07.23 - Version 3.4.0
- updated description.
Update 09.06.22 - Version 3.3.0
- Updated Documentation.
Update 12.04.21 - Version 3.2.0
- Fixed bug for "List Events" action only.
Update 18.12.20 - Version 3.1.0
- Signup/login will now save the user's Microsoft email to the Bubble user record.
Update 14.09.20 - Version 3.0.0
- Updates made to reflect move to Azure. Please register your app at portal.azure.com before upgrading..
Update 01.11.19 - Version 2.0.0
- Separated "Send Email" actions: "Send Email" and "Send Email with CC Recipient". You must replace any existing "Send Email" actions that use the CC field with the new "Send Email with CC Recipient" action..
Update 12.09.19 - Version 1.9.1
- Bug fix for "Move Message to Folder" action.
Update 29.08.19 - Version 1.9.0
- Mark an email message as read or unread.
Update 23.07.19 - Version 1.8.0
- Added call to Update Contact.
Update 01.07.19 - Version 1.7.0
- Added call to search for a user in the organization by email.
Update 01.07.19 - Version 1.6.0
- Added call to get all users in organization.
Update 16.05.19 - Version 1.5.1
- Minor bug fix.
Update 24.04.19 - Version 1.5.0
- Added Update Event and Delete Event actions. You need to store the Event ID after creating in order to later update or delete with that ID..
Update 16.11.18 - Version 1.4.0
- Added pagination parameters to the List Events, Contacts, Messages, Calendars, and Folders data calls. Use "skip" to skip the first X number of results. Use "top" to request X number of results in a page. The response will contain a parameter for @odata:nextLink whose value is a URL with a skip parameter you can use to retrieve the next page of results.
Update 18.09.18 - Version 1.3.0
- Added calls: Create/List email folders, List email messages, Send email, Move message to folder, Get single folder.
Update 20.07.18 - Version 1.2.0
- Added All Day and Reminder fields to the Create Event call.
Update 09.09.17 - Version 1.1.0
- Added Create Contact.
Update 09.09.17 - Version 1.0.0
- Initial release.
