✅
Demo to preview the settings
✅
Introduction
Level up your Bubble app by connecting your ConvertKit email marketing subscribers, forms, sequences and more.
Prerequisites
- You must create an account on ConvertKit.
How to set up
🔗
ConvertKit API documentation: https://developers.convertkit.com/
Get Your API Secret
Navigate to this page after you've logged into your account: https://app.convertkit.com/account_settings/advanced_settings
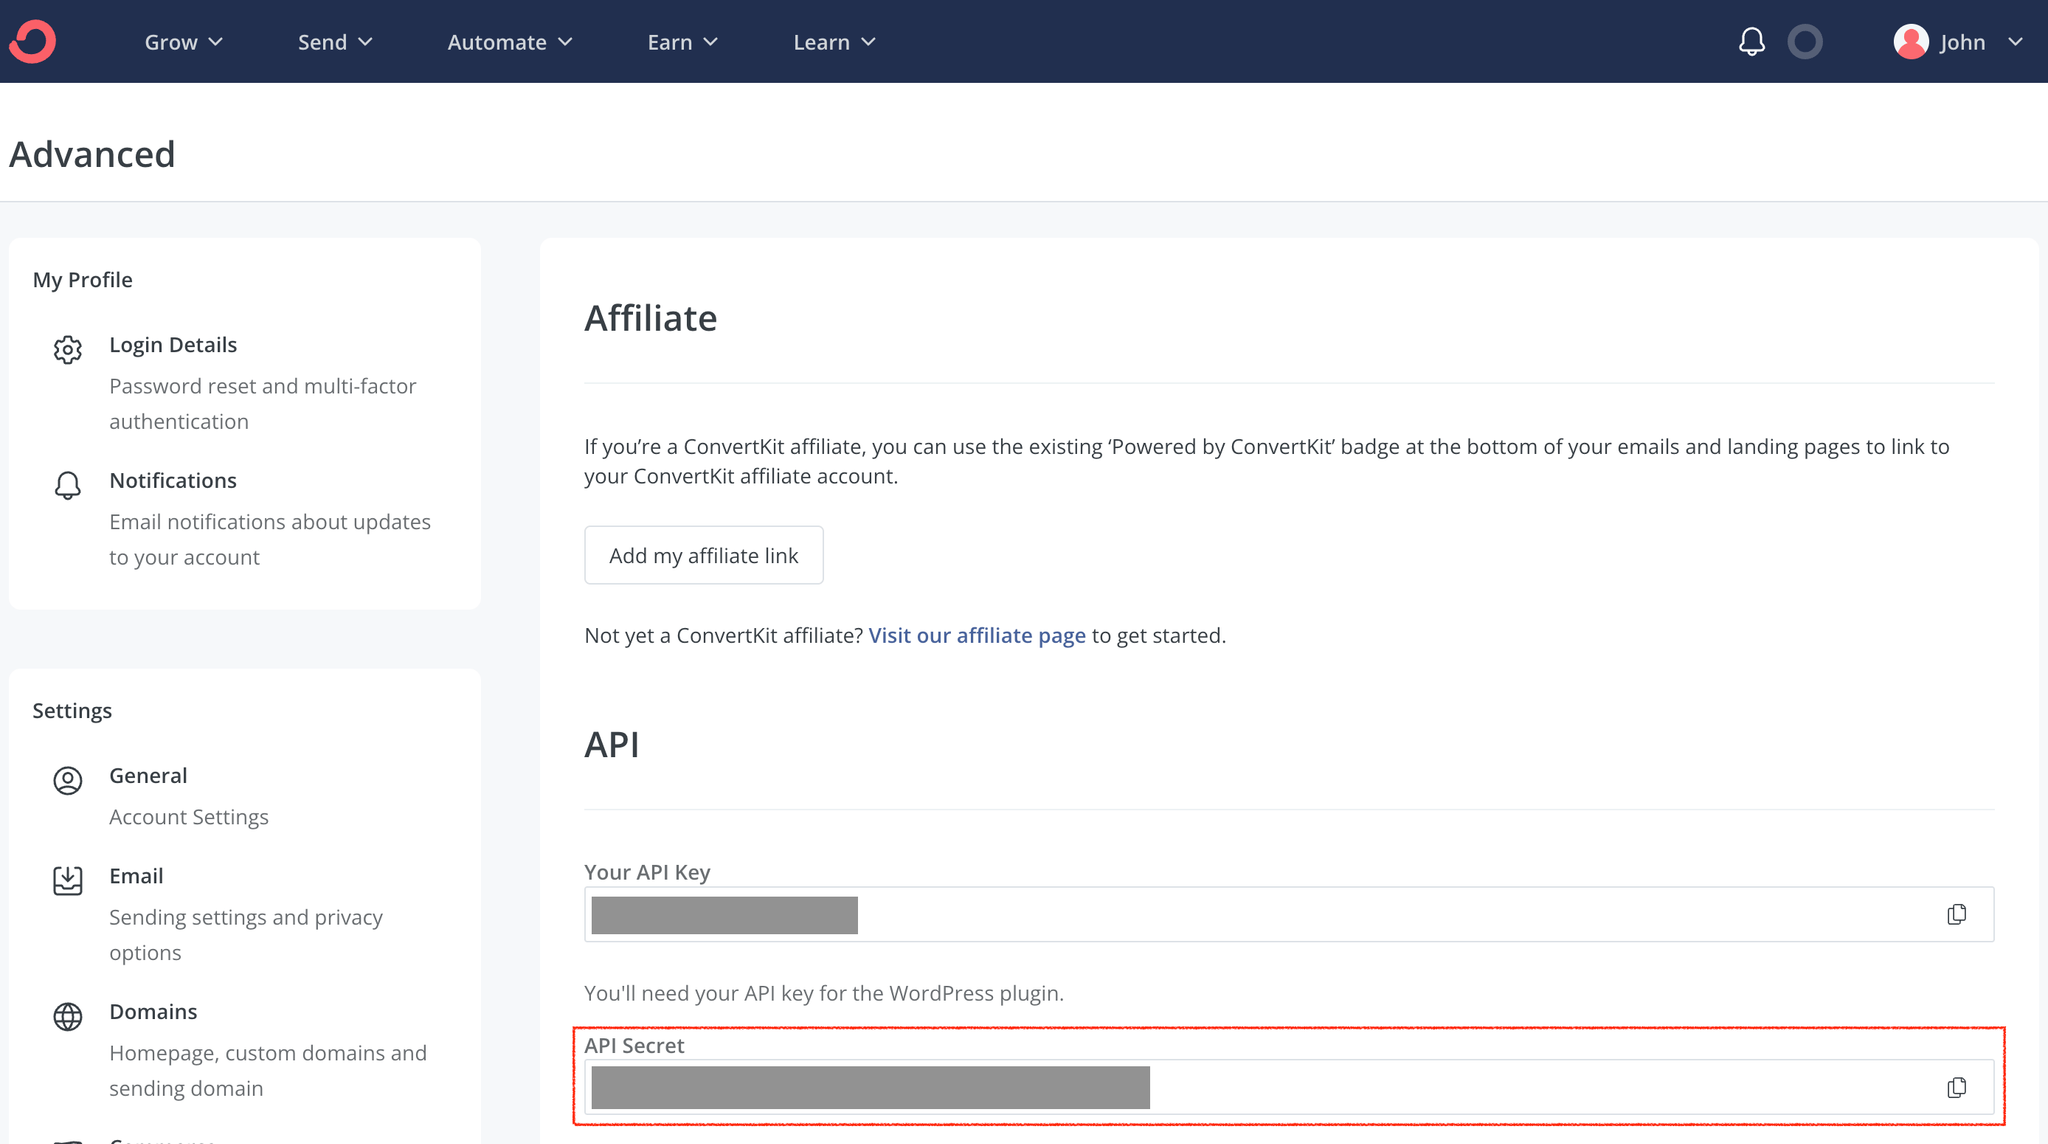
Scroll down to the API section, and copy your API secret.
Paste this value into your plugin settings area:

That's it!
Get Account - Data Call
🔗
ConvertKit documentation: https://developers.convertkit.com/?shell=#account
Set up your data source
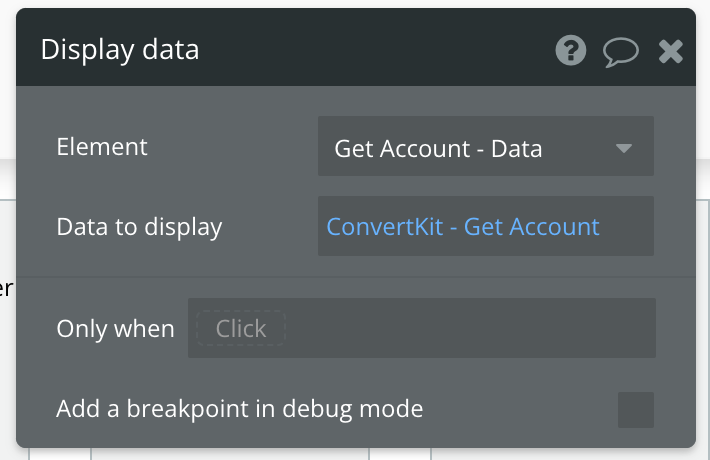
In this example, we'll use a group to display our data. Since we're using buttons to trigger our API calls, we'll leave the data source blank and use a Display data in group action to send the results to the group.

Set up the API call
Now that your group is set up properly, let's configure the workflow action to retrieve the User's account information and display the results. In this demo, we're using the blue "Get Account" button to do this.
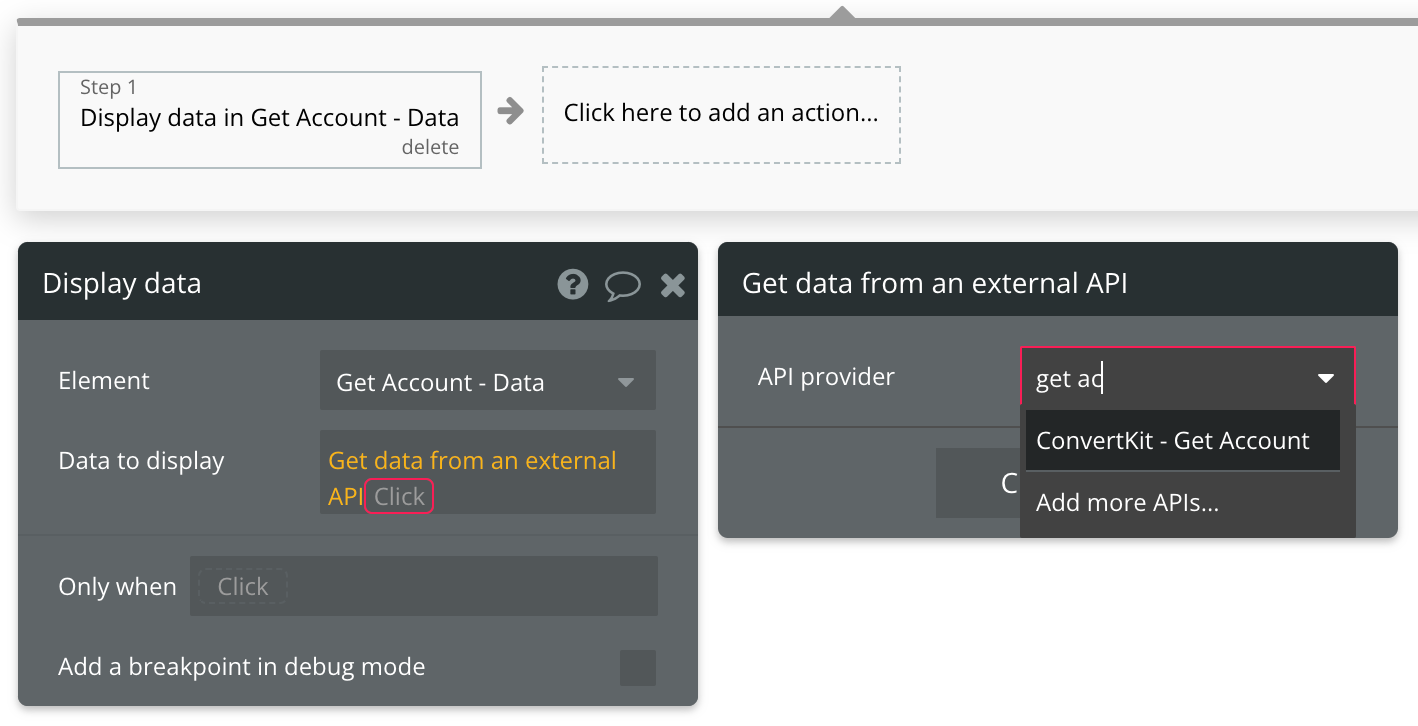
No additional information is needed to perform this call, so make sure the final expression matches the screenshot below and you're good to go!
Get Forms - Data Call
🔗
ConvertKit documentation: https://developers.convertkit.com/?shell=#forms
Set up your data source
In this example, we'll use a repeating group to display our data. Since we're using buttons to trigger our API calls, we'll leave the data source blank and use a Display list in RG action to send the results to the repeating group.
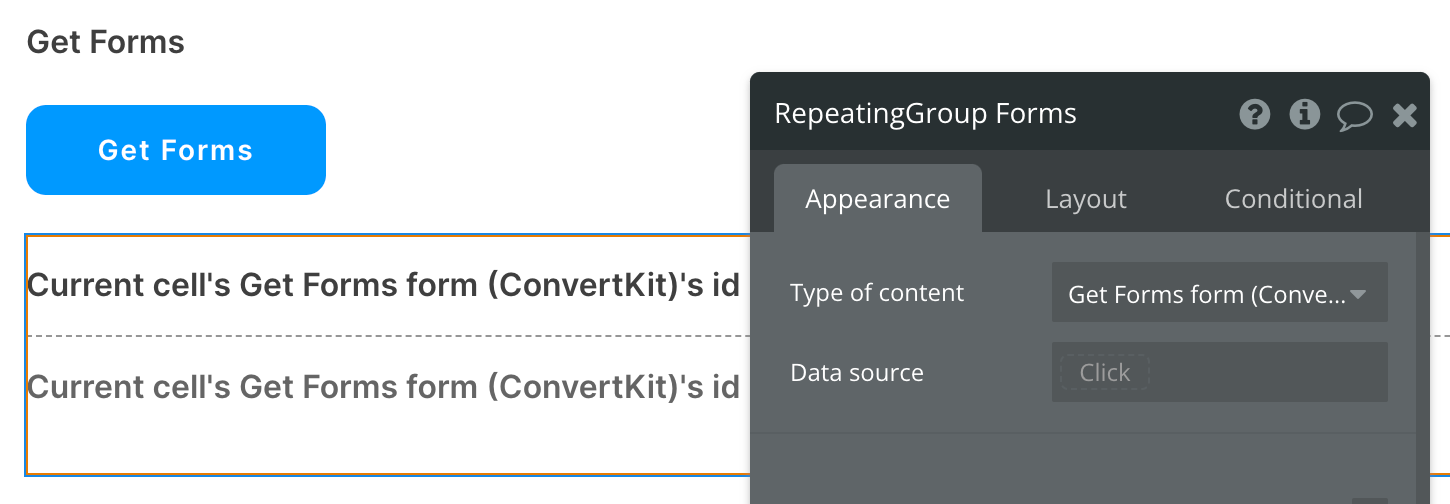
Set up the API call
Now that your repeating group is set up properly, let's configure the workflow action to retrieve the Forms and display the results. In this demo, we're using the blue "Get Forms" button to do this.
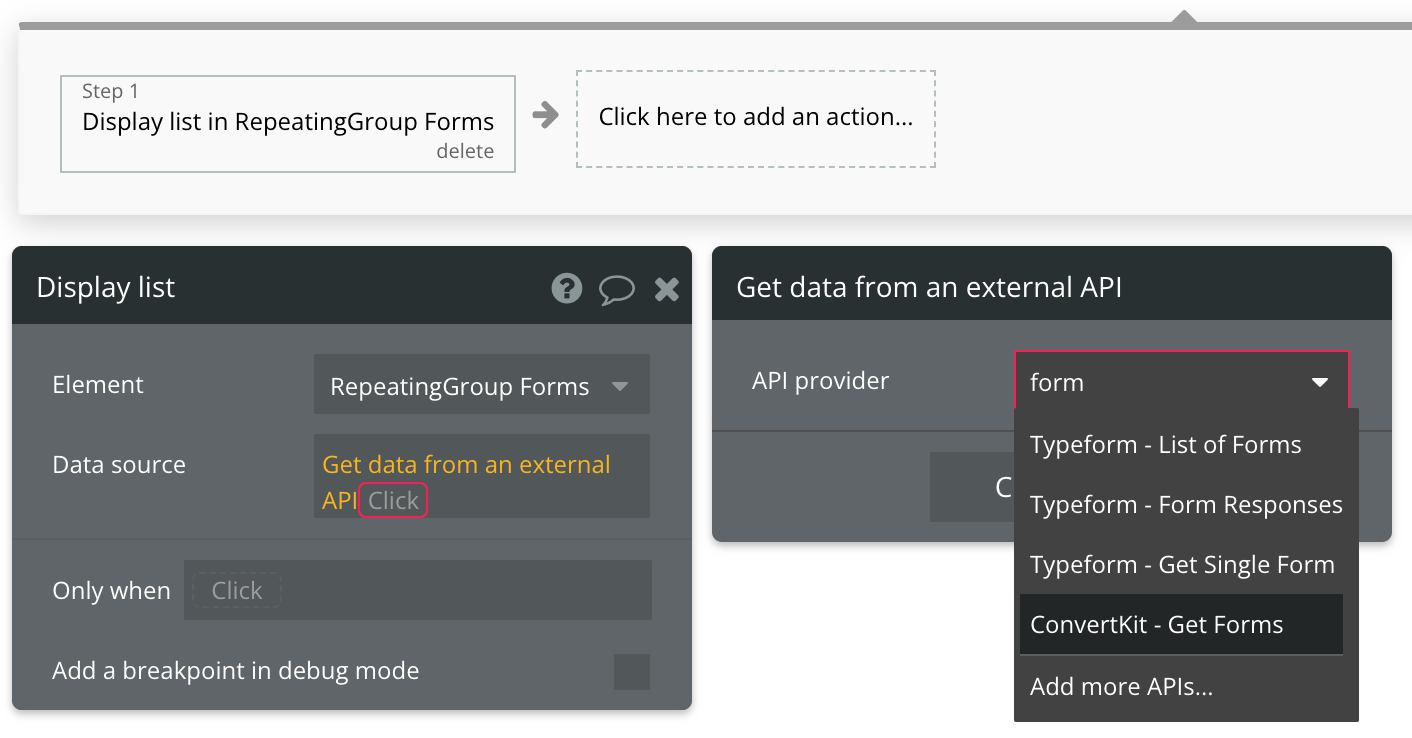
No additional information is needed to perform this call, so make sure the final expression matches the screenshot below and you're good to go!
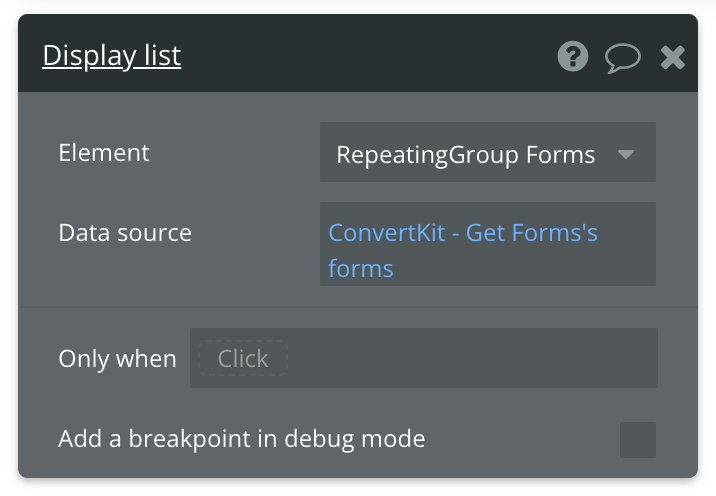
Get Subscriptions - Data Call
🔗
ConvertKit documentation: https://developers.convertkit.com/?shell=#list-subscriptions-to-a-form
Set up your data source
In this example, we'll use a repeating group to display our data. Since we're using buttons to trigger our API calls, we'll leave the data source blank and use a Display list in RG action to send the results to the repeating group.
Make sure the Repeating Group's Type of content is set to "Get Subscriptions subscription (ConvertKit)"
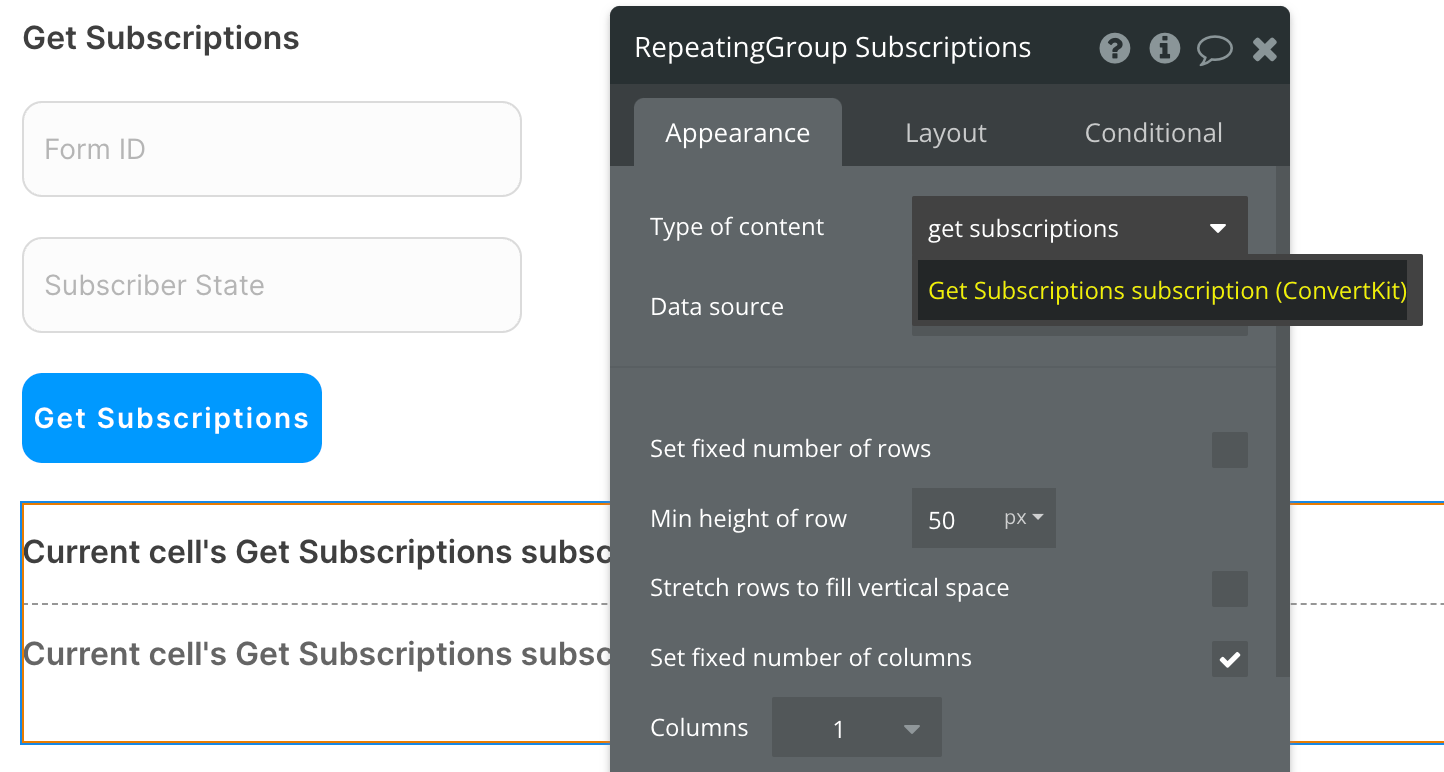
Set up the API call
Now that your repeating group is set up properly, let's configure the workflow action to retrieve the Subscriptions and display the results. In this demo, we're using the blue "Get Subscriptions" button to do this.
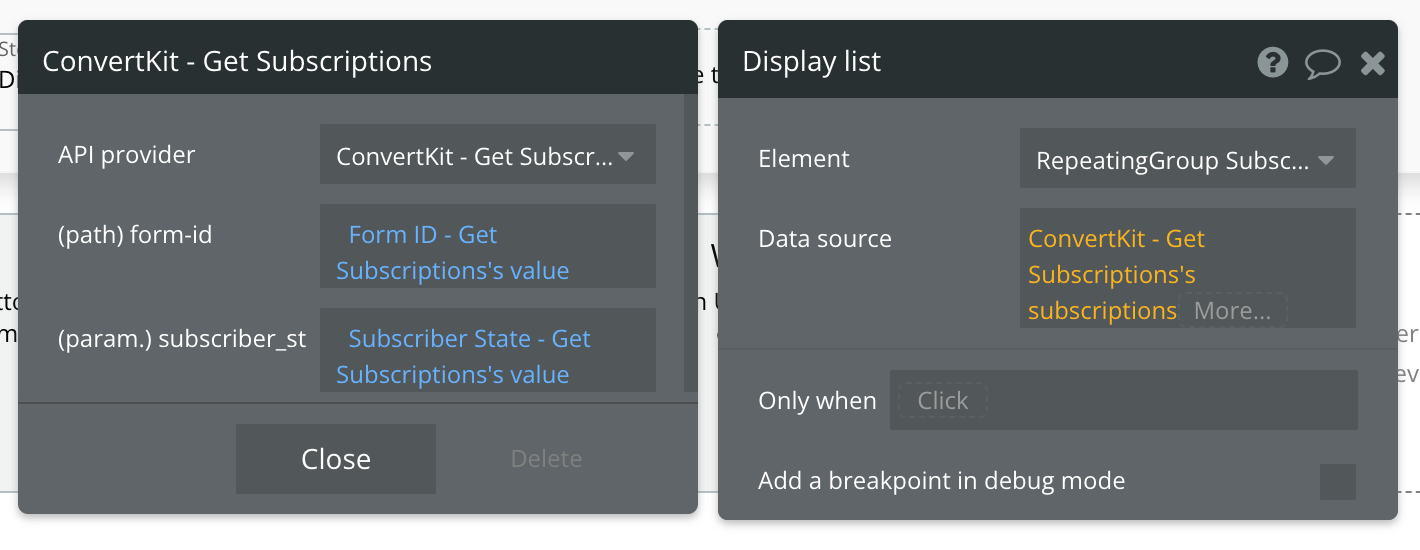
Now map the inputs to their corresponding path and parameter.
Available Path (* indicates a required value)
form_id* - The ID of the Form. You can retrieve these values using the Get Forms data call.
Available Parameter (* indicates a required value)
subscriber_state* - The state of the subscriber to filter on. Find a list of available options from the documentation link.
Get Sequences - Data Call
🔗
ConvertKit documentation: https://developers.convertkit.com/?shell=#list-sequences
Set up your data source
In this example, we'll use a repeating group to display our data. Since we're using buttons to trigger our API calls, we'll leave the data source blank and use a Display list in RG action to send the results to the repeating group.
Make sure the Repeating Group's Type of content is set to "Get Sequences course (ConvertKit)"
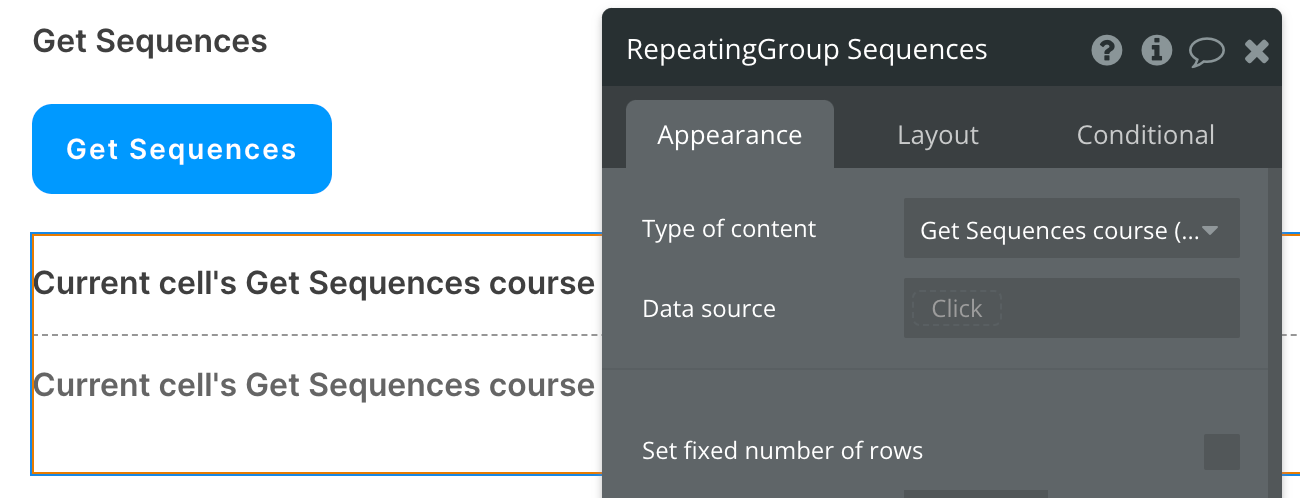
Set up the API call
Now that your repeating group is set up properly, let's configure the workflow action to retrieve Sequences and display the results. In this demo, we're using the blue "Get Sequences" button to do this.
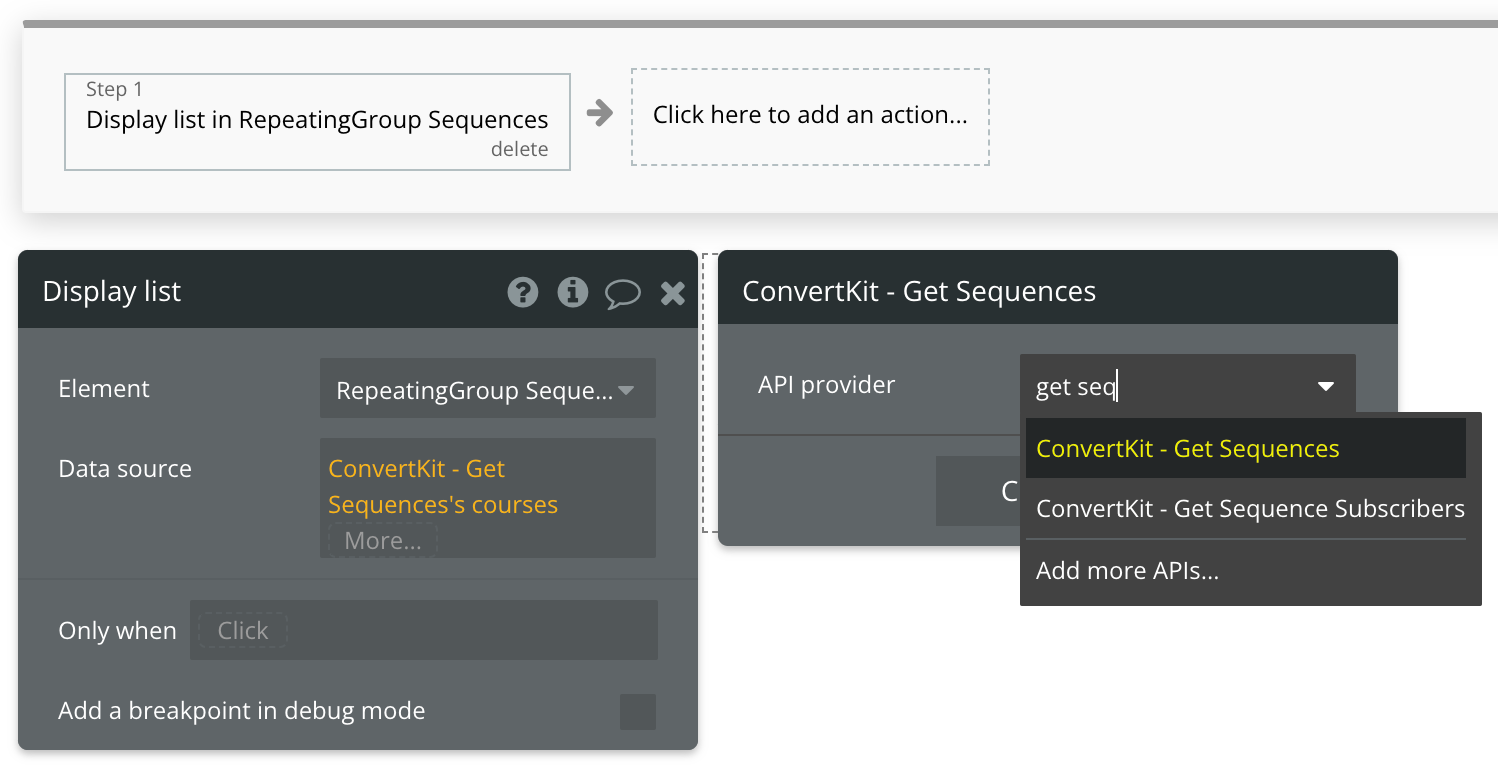
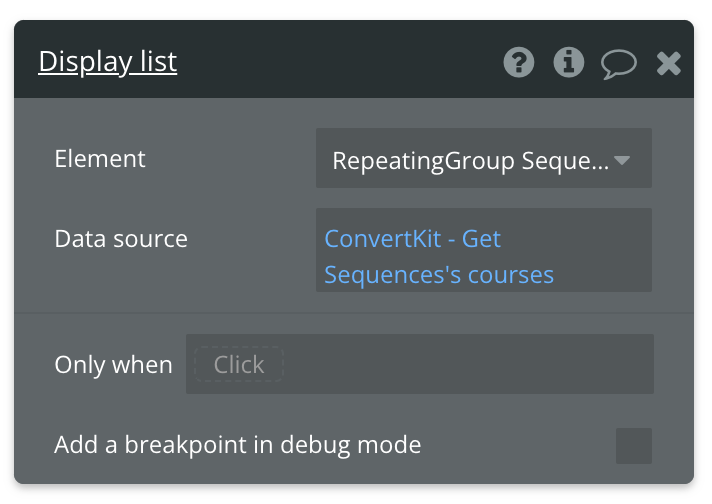
No additional information is needed to perform this call, so make sure the final expression matches the screenshot below and you're good to go!
Get Sequence Subscribers - Data Call
🔗
ConvertKit documentation: https://developers.convertkit.com/?shell=#list-subscriptions-to-a-sequence
Set up your data source
In this example, we'll use a repeating group to display our data. Since we're using buttons to trigger our API calls, we'll leave the data source blank and use a Display list in RG action to send the results to the repeating group.
Make sure the Repeating Group's Type of content is set to "Get Sequence Subscribers subscription (ConvertKit)"
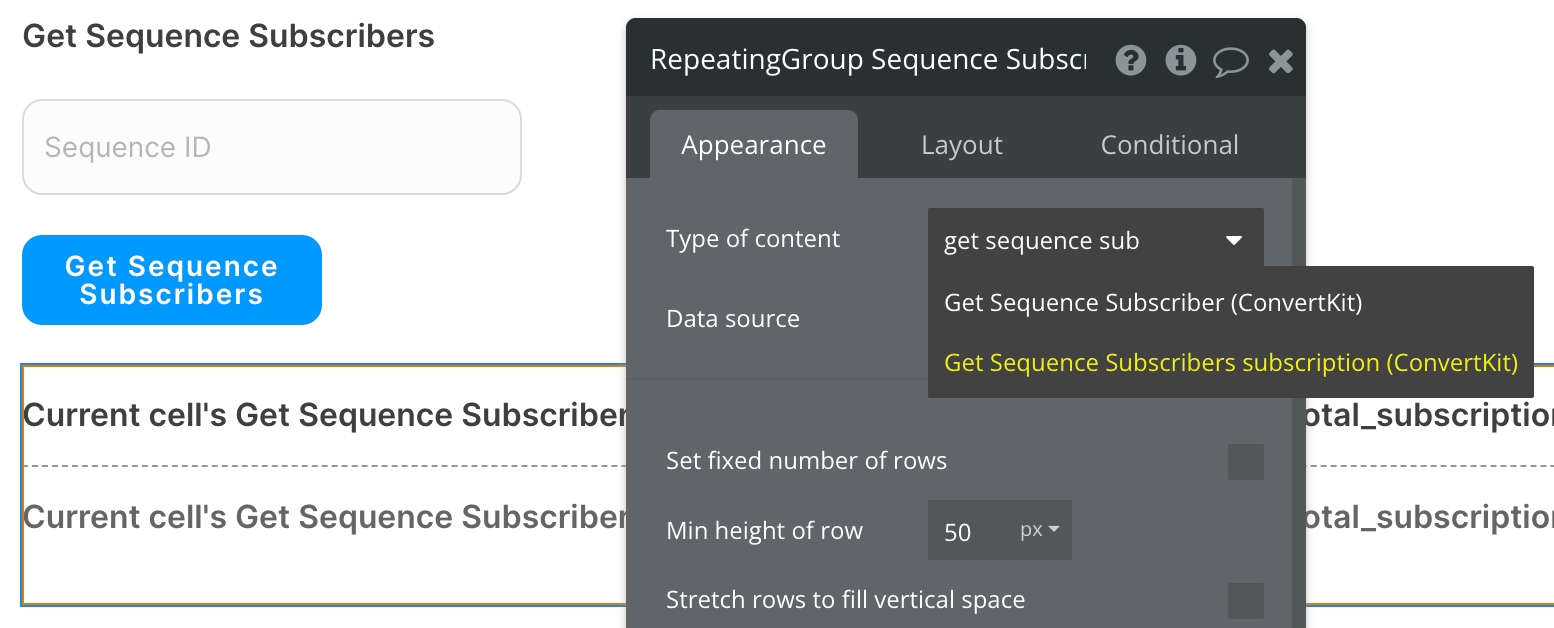
Set up the API call
Now that your repeating group is set up properly, let's configure the workflow action to retrieve Subscribers from a Sequence and display the results. In this demo, we're using the blue "Get Sequence Subscribers" button to do this.
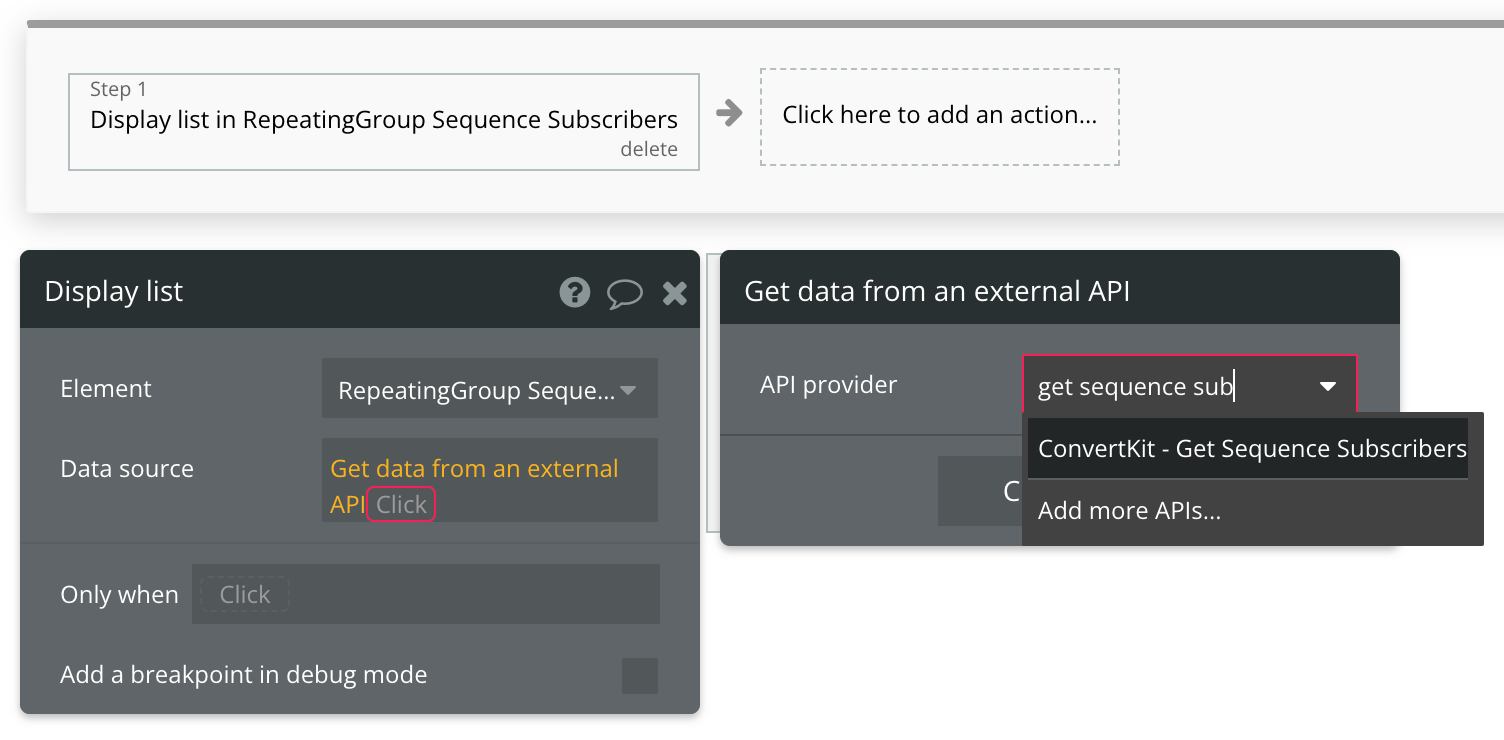
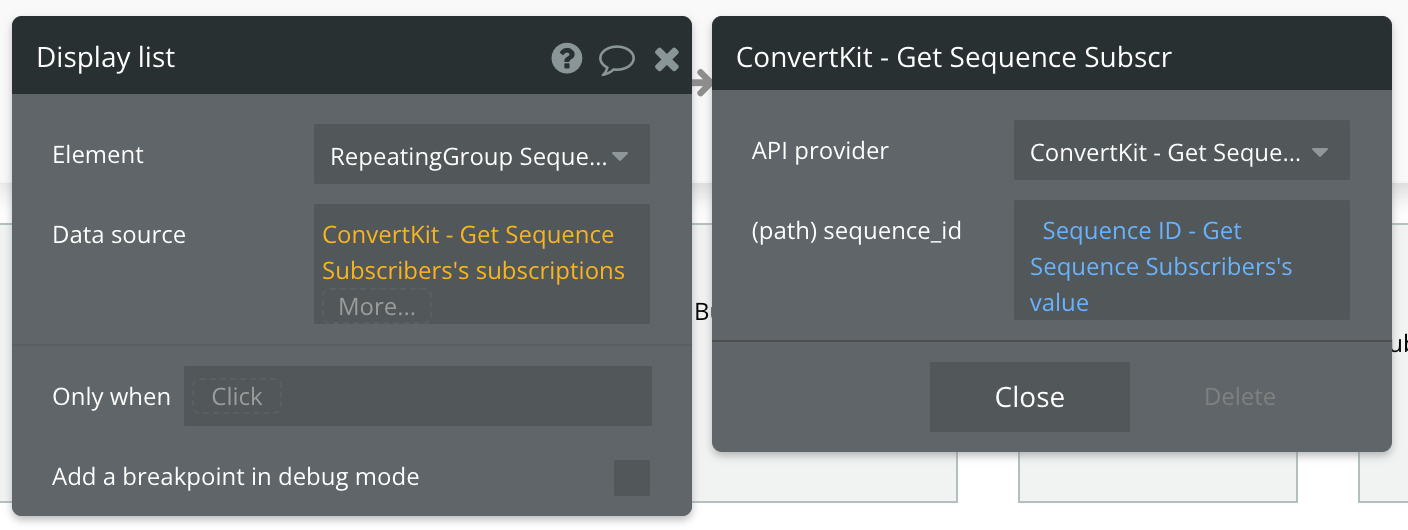
Now map the input to the sequence ID which you can find from the Get Sequences call.
Get Tags - Data Call
🔗
ConvertKit documentation: https://developers.convertkit.com/?shell=#list-tags
Set up your data source
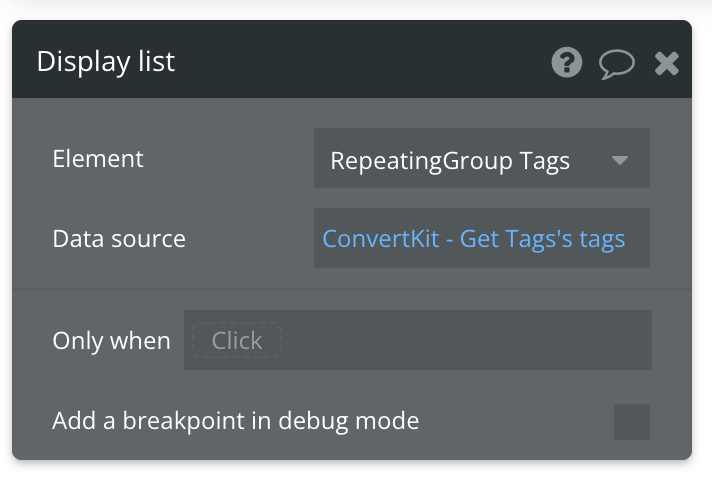
In this example, we'll use a repeating group to display our data. Since we're using buttons to trigger our API calls, we'll leave the data source blank and use a Display list in RG action to send the results to the repeating group.
Make sure the Repeating Group's Type of content is set to "Get Tags tag (ConvertKit)"
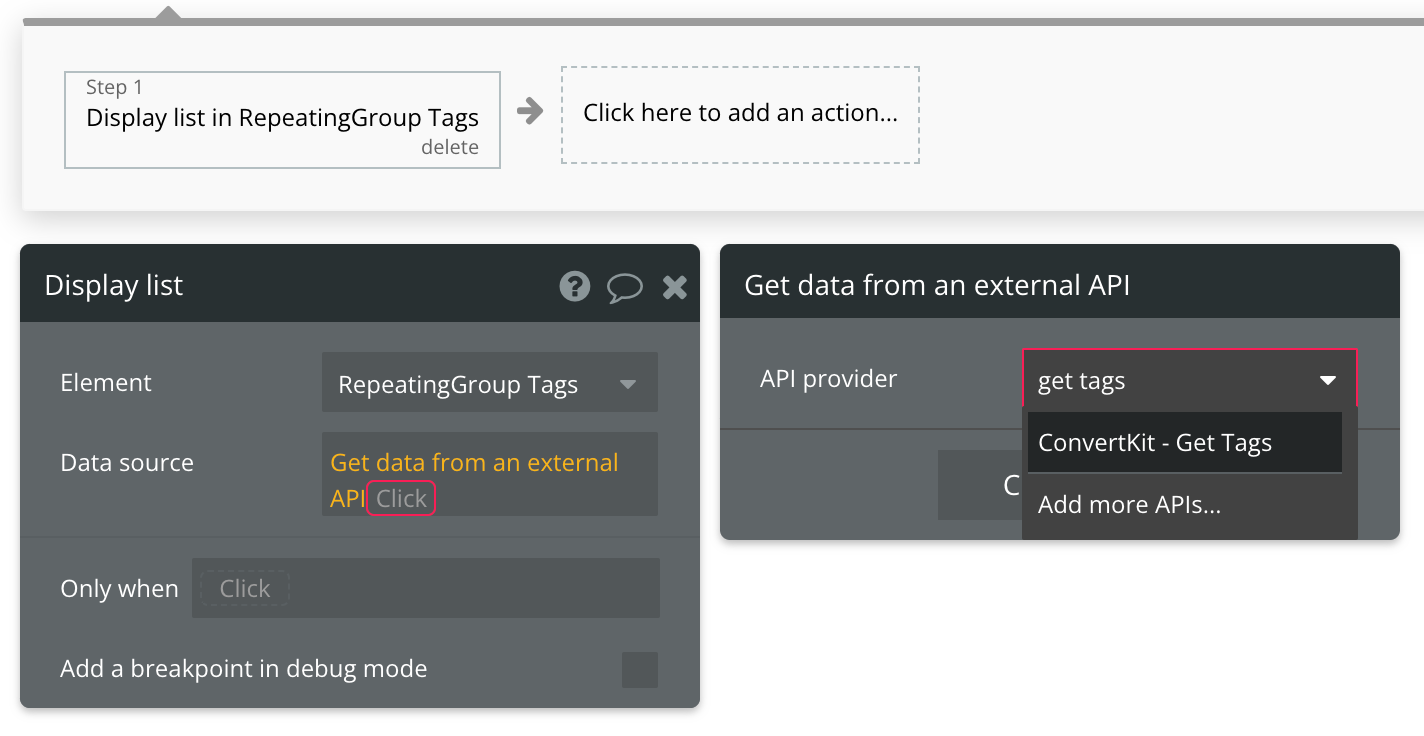
No additional information is needed to perform this call, so make sure the final expression matches the screenshot below and you're good to go!
Get Tag Subscriptions - Data Call
🔗
ConvertKit documentation: https://developers.convertkit.com/?shell=#list-subscriptions-to-a-tag
Set up your data source
In this example, we'll use a repeating group to display our data. Since we're using buttons to trigger our API calls, we'll leave the data source blank and use a Display list in RG action to send the results to the repeating group.
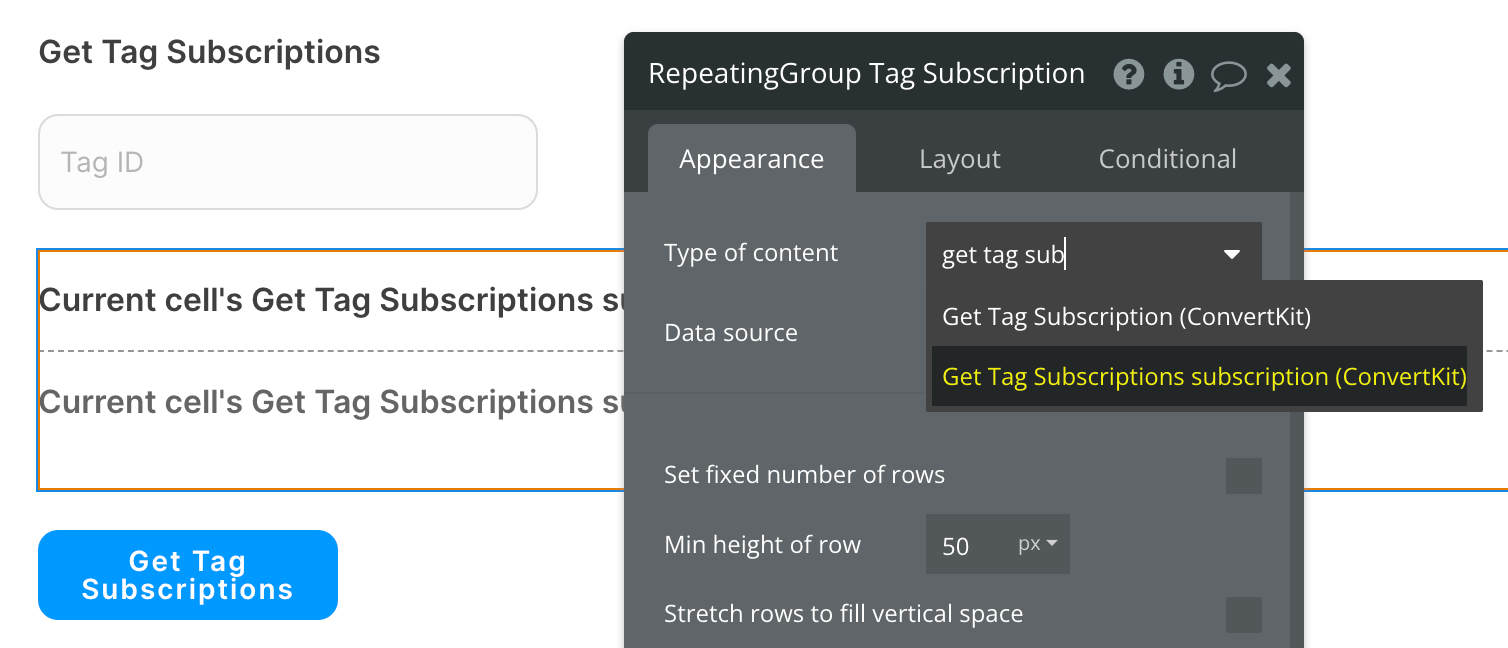
Make sure the Repeating Group's Type of content is set to "Get Tag Subscriptions subscription (ConvertKit)"
Set up the API call
Now that your repeating group is set up properly, let's configure the workflow action to retrieve Subscriptions with a certain Tag and display the results. In this demo, we're using the blue "Get Tag Subscriptions" button to do this.
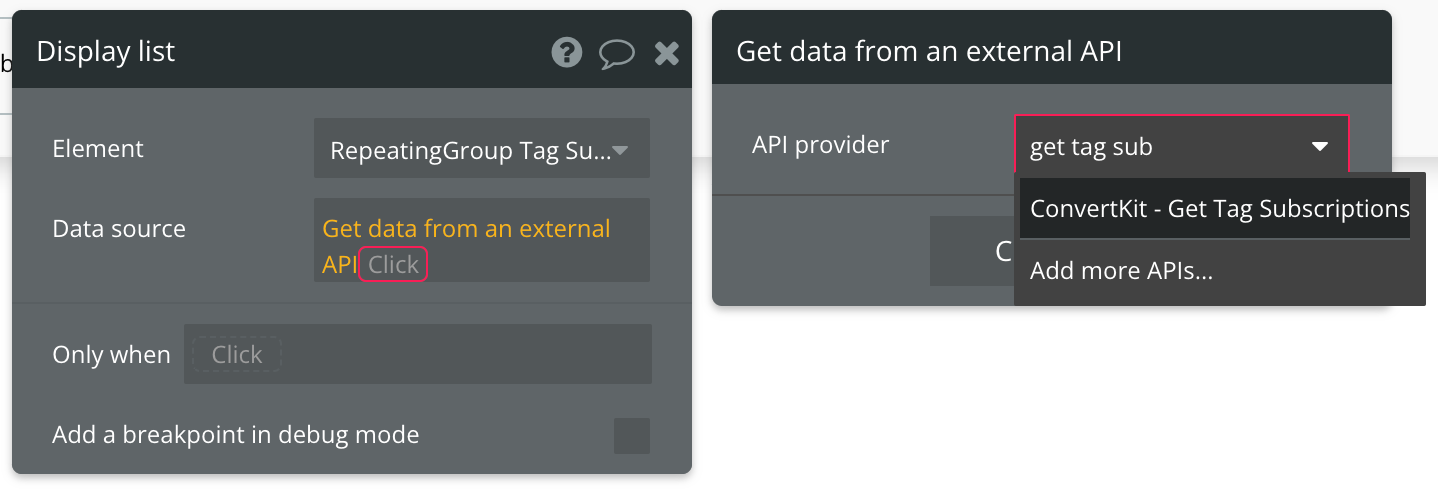
Now define the tag ID you want to get subscriptions for:
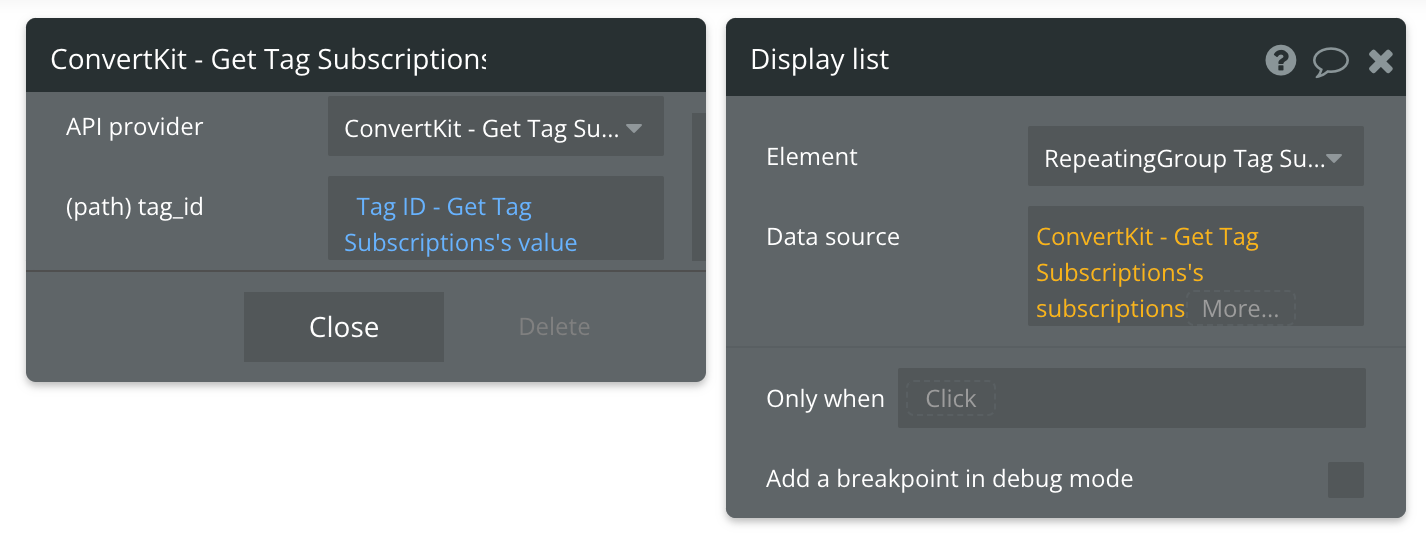
Available Path (* indicates a required value)
tag_id* - The ID of the Tag. You can retrieve these values using the Get Tags data call.
Get Subscriber List - Data Call
🔗
ConvertKit documentation: https://developers.convertkit.com/?shell=#list-subscribers
Set up your data source
In this example, we'll use a repeating group to display our data. Since we're using buttons to trigger our API calls, we'll leave the data source blank and use a Display list in RG action to send the results to the repeating group.
Make sure the Repeating Group's Type of content is set to "Get Subscriber List subscriber (ConvertKit)"
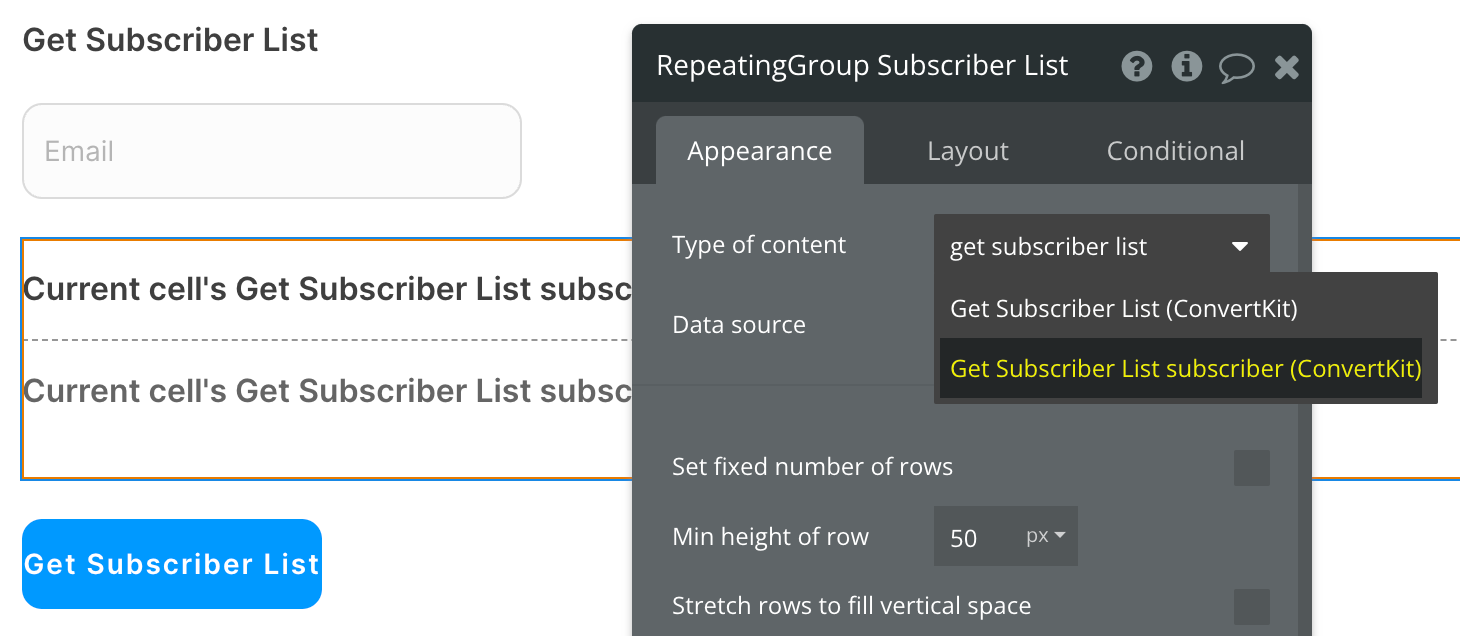
Set up the API call
Now that your repeating group is set up properly, let's configure the workflow action to retrieve the List of Subscriber and display the results. In this demo, we're using the blue "Get Subscriber List" button to do this.
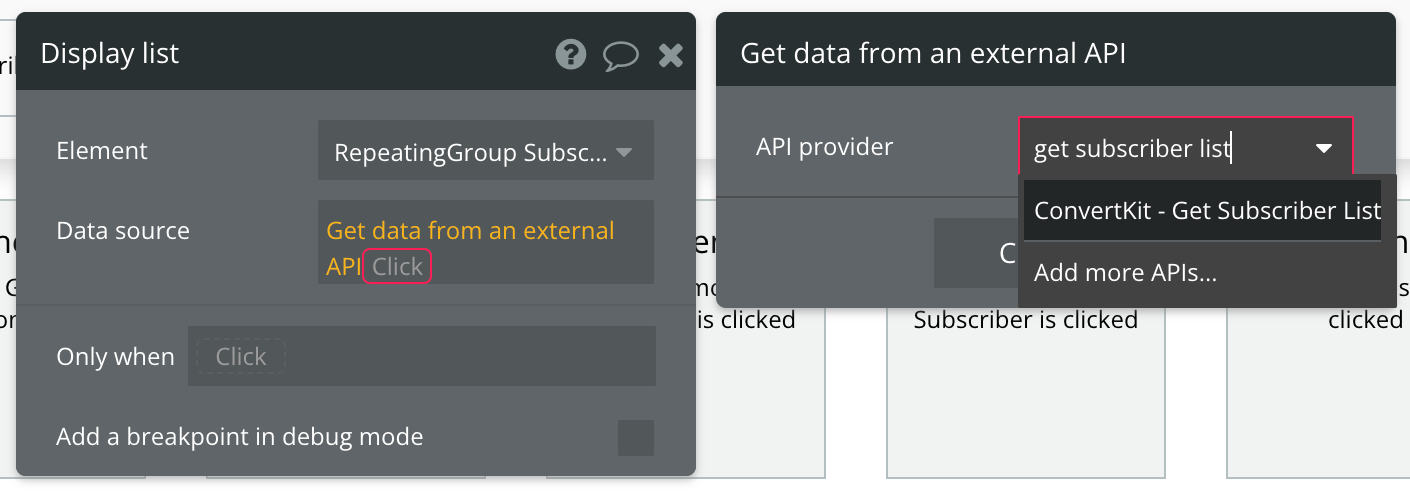
You can optionally filter the list by a specific email address. If left blank, you'll receive the full subscriber list.
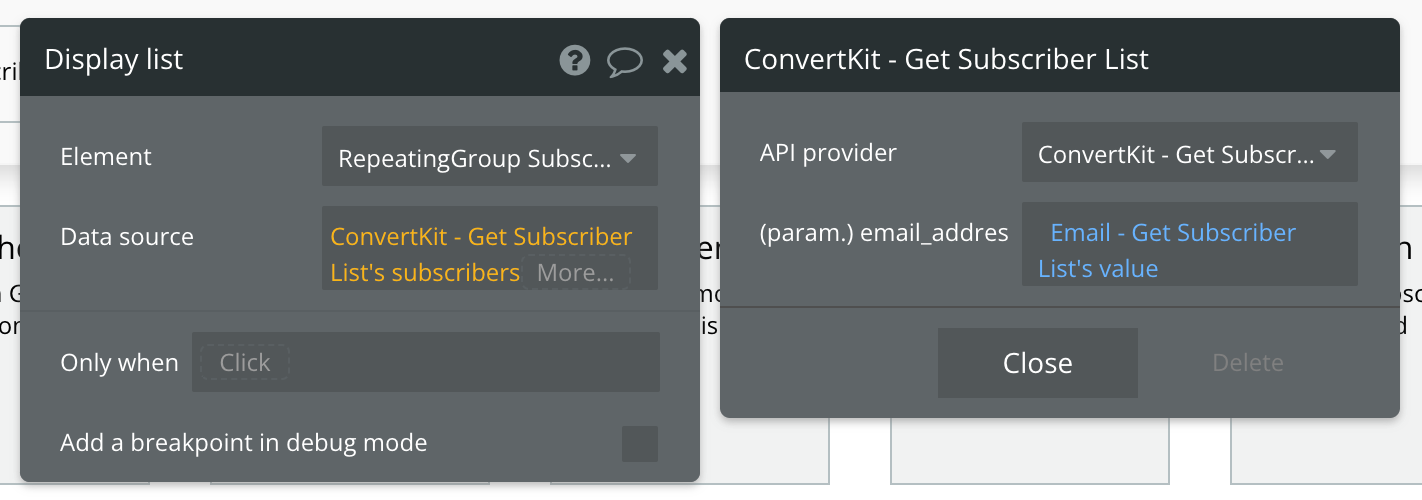
Available Parameter (* indicates a required value)
email_address - The email address of the subscriber. Optional.
Get Single Subscriber - Data Call
🔗
ConvertKit documentation: https://developers.convertkit.com/?shell=#view-a-single-subscriber
Set up your data source
In this example, we'll use a group to display our data. Since we're using buttons to trigger our API calls, we'll leave the data source blank and use a Display data in group action to send the results to the group.
Make sure to set the group's data source as "Get Single Subscriber (ConvertKit)"
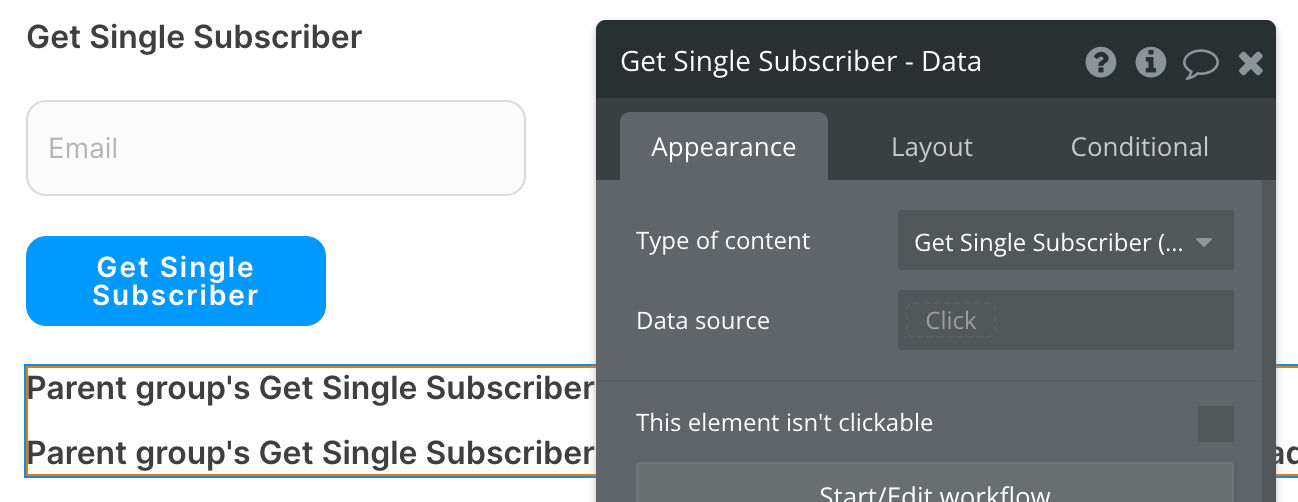
Set up the API call
Now that your group is set up properly, let's configure the workflow action to retrieve the Subscriber and display the results. In this demo, we're using the blue "Get Single Subscriber" button to do this.
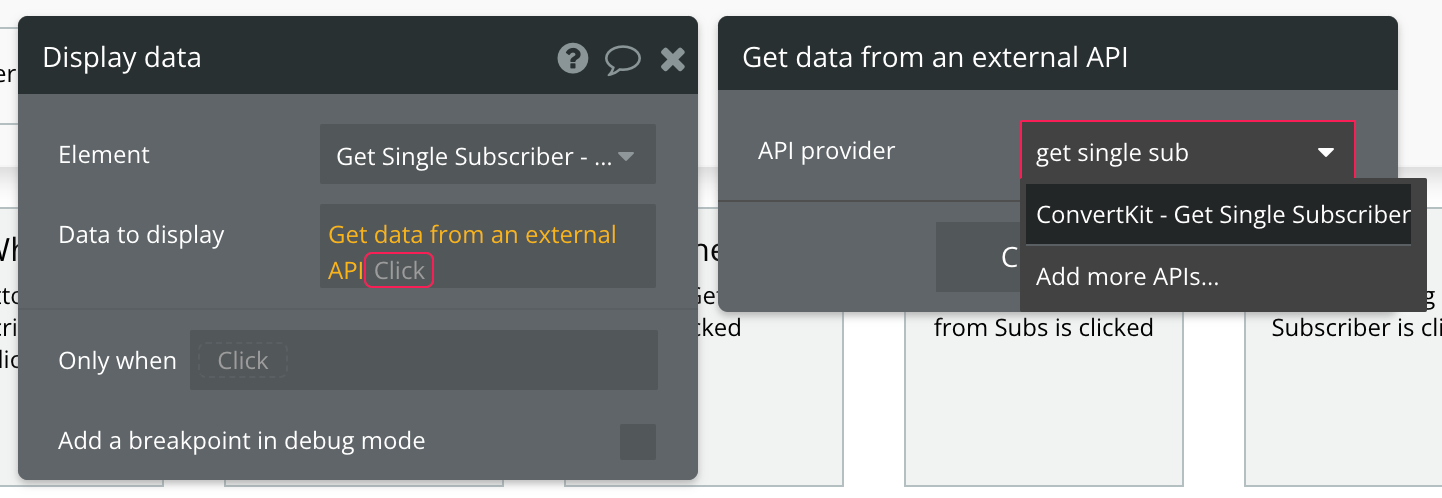
Now map the input to its corresponding path.
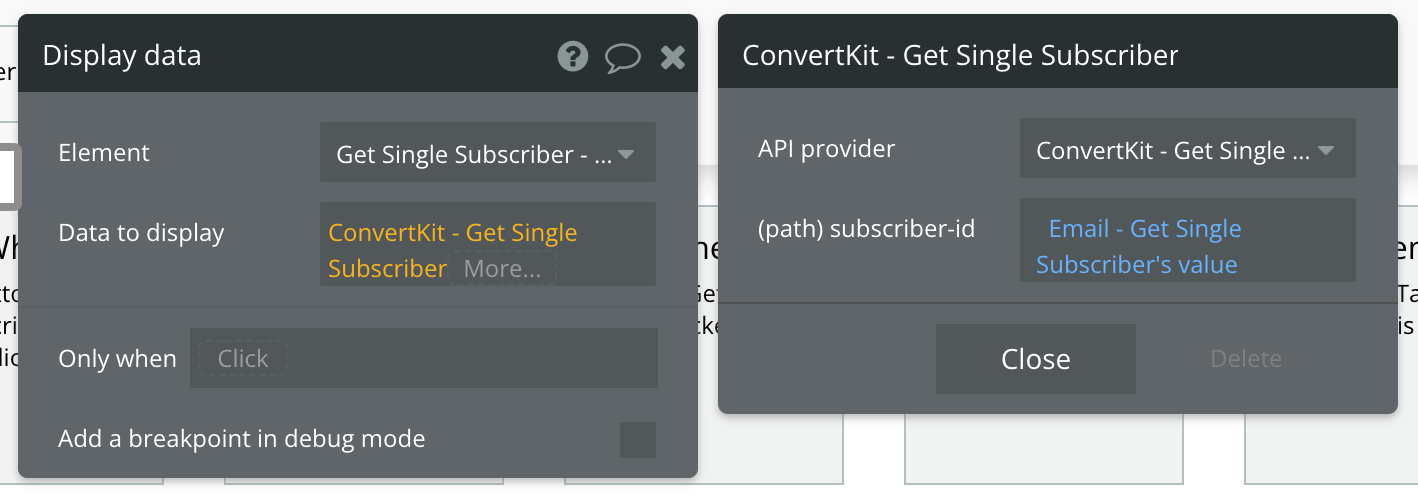
Available Path (* indicates a required value)
subscriber-id* - The ID of the subscriber. You can find this value by using the Get Subscriptions data call.
List Tags For a Subscriber - Data Call
🔗
ConvertKit documentation: https://developers.convertkit.com/?shell=#list-tags-for-a-subscriber
Set up your data source
In this example, we'll use a repeating group to display our data. Since we're using buttons to trigger our API calls, we'll leave the data source blank and use a Display list in RG action to send the results to the repeating group.
Make sure the Repeating Group's Type of content is set to "List Tags for a Subscriber tag (ConvertKit)"
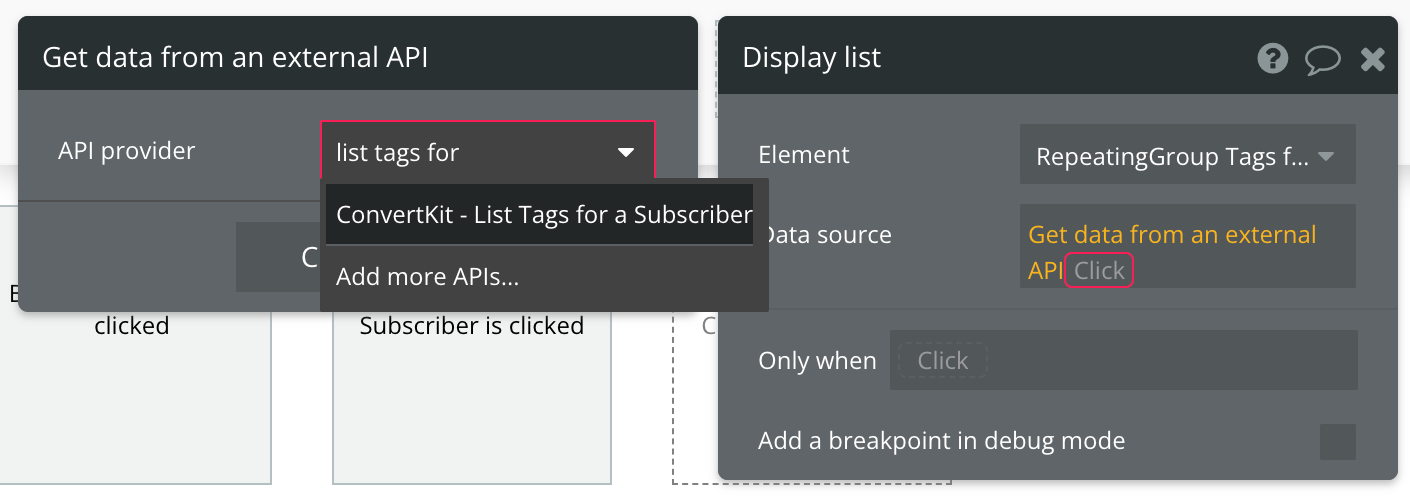
Now define the subscriber ID you want to find tags for. You can find this ID from the Get Subscriber List call.
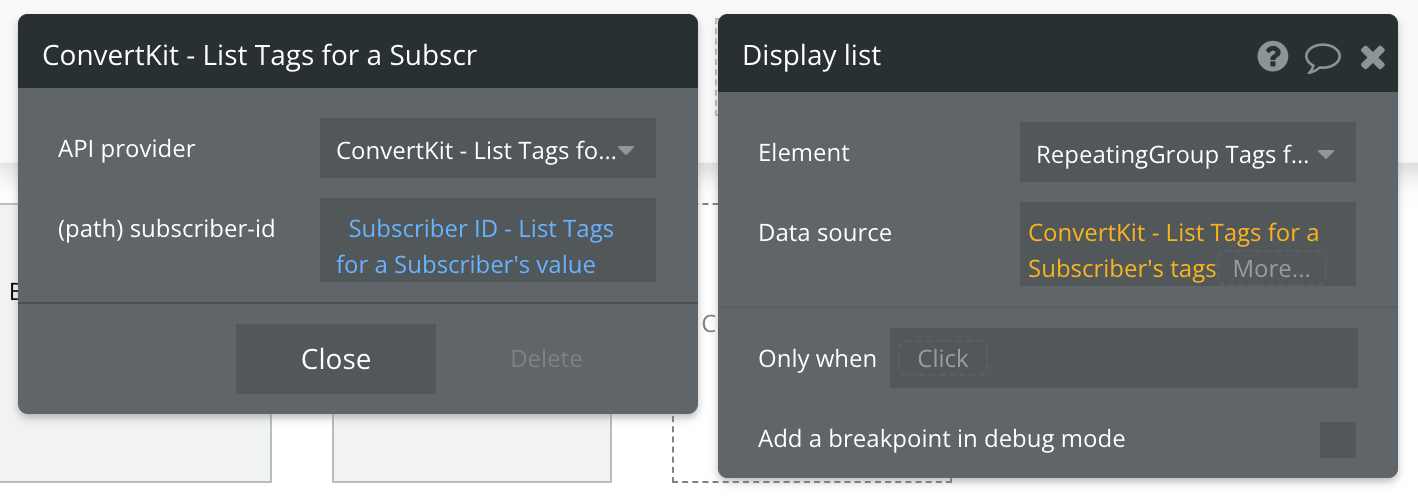
Available Path (* indicates a required value)
subscriber-id* - The ID of the subscriber you want to view tags for.
Add Subscriber to Form - Action Call
🔗
ConvertKit documentation: https://developers.convertkit.com/?shell=#add-subscriber-to-a-form
Set up your API call
In this example, we have a form with all necessary inputs to trigger the "Add Subscriber to Form" action:
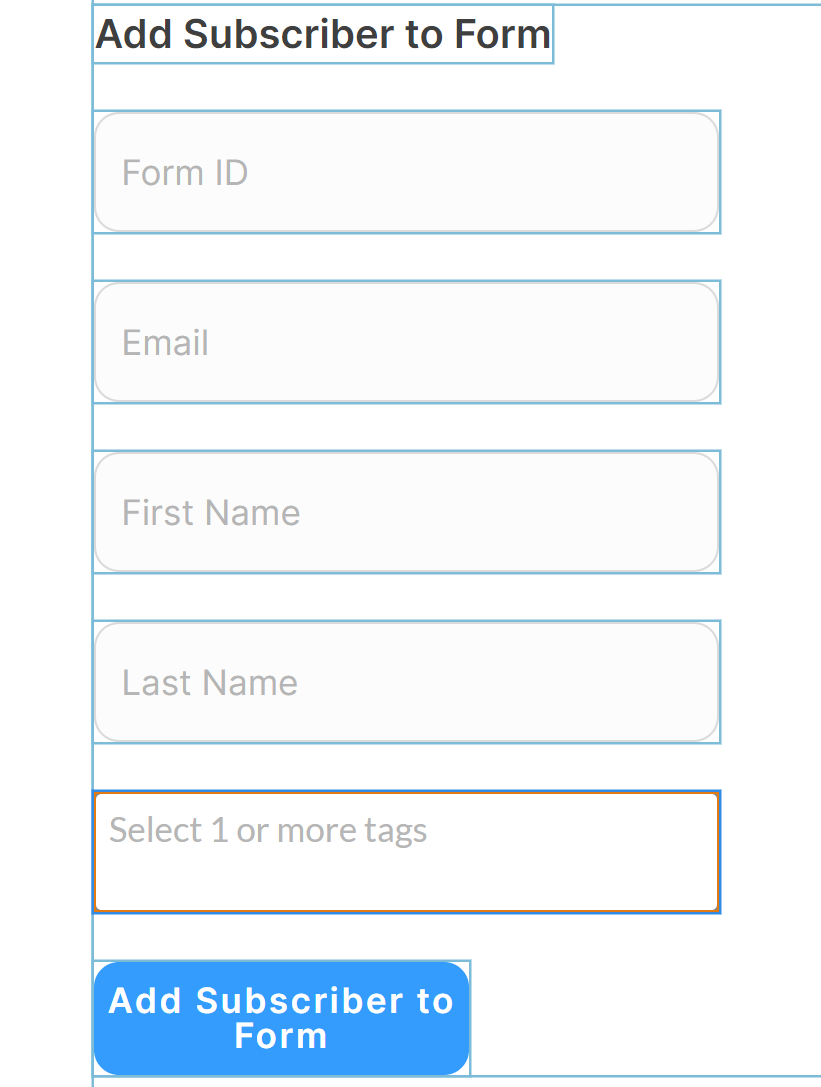
Note that for the tags input, we're using a multiselect dropdown (Bubble plugin). This is so you can dynamically populate the options with tags from the List Tags call.
Start your workflow with a button click (like our blue button above), and add the "ConvertKit - Add Subscriber to Form" action.
Map the inputs to their corresponding parameters and paths.
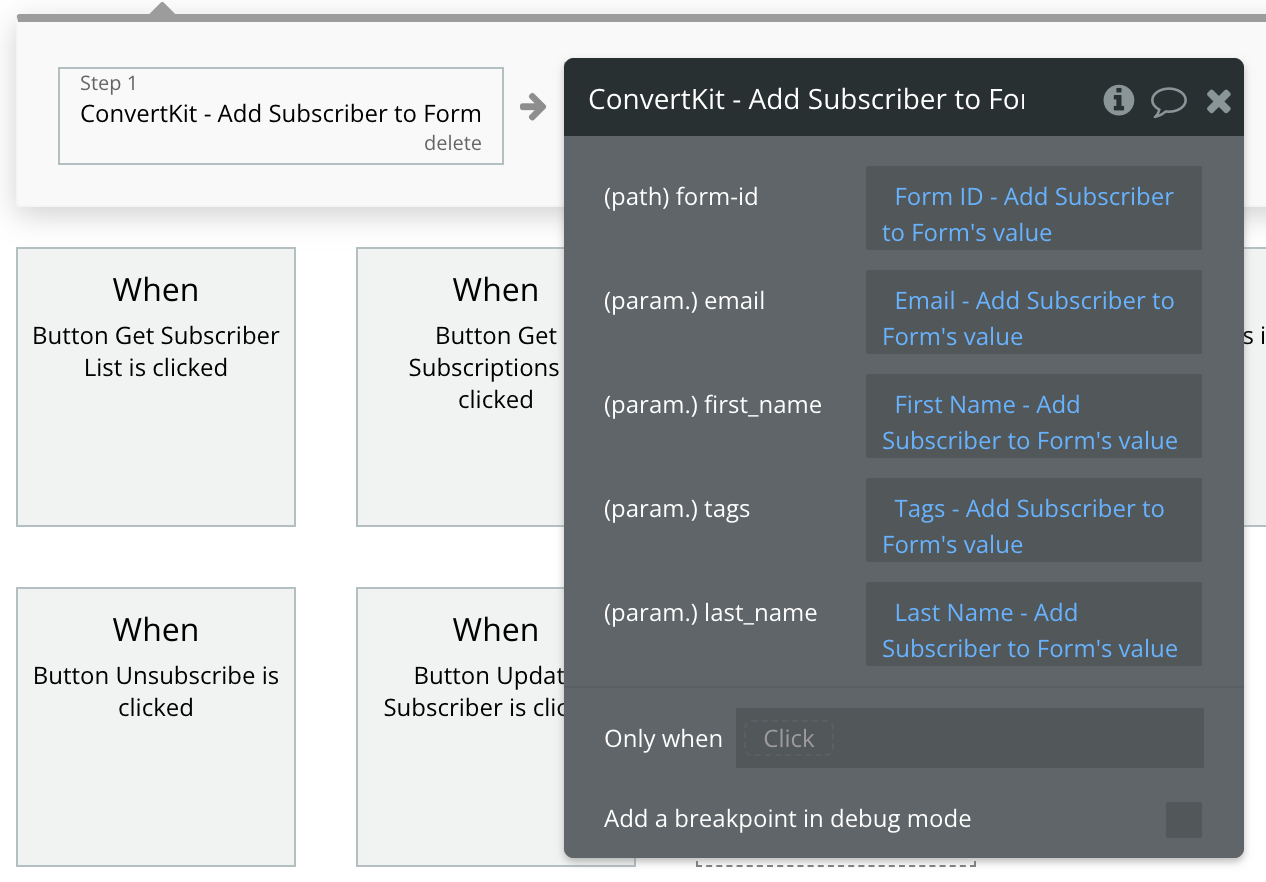
That's it!
Available Path (* indicates a required value)
form-id* - The ID of the form to subscribe the User to. You can find this ID with the Get Forms call.
Available Parameters (* indicates a required value)
email* - The email of the User you're adding to this Form.
first_name - The first name of the User you're adding to this Form.
last_name - The last name of the User you're adding to this Form.
tags - The tag IDs you want to assign to the subscriber (comma separated). You can find tag IDs with the List Tags call.
Add Subscriber to Sequence - Action Call
🔗
ConvertKit documentation: https://developers.convertkit.com/?shell=#add-subscriber-to-a-sequence
Set up your API call
In this example, we have a form with all necessary inputs to trigger the "Add Subscriber to Sequence" action:
Start by adding a workflow trigger to this button.
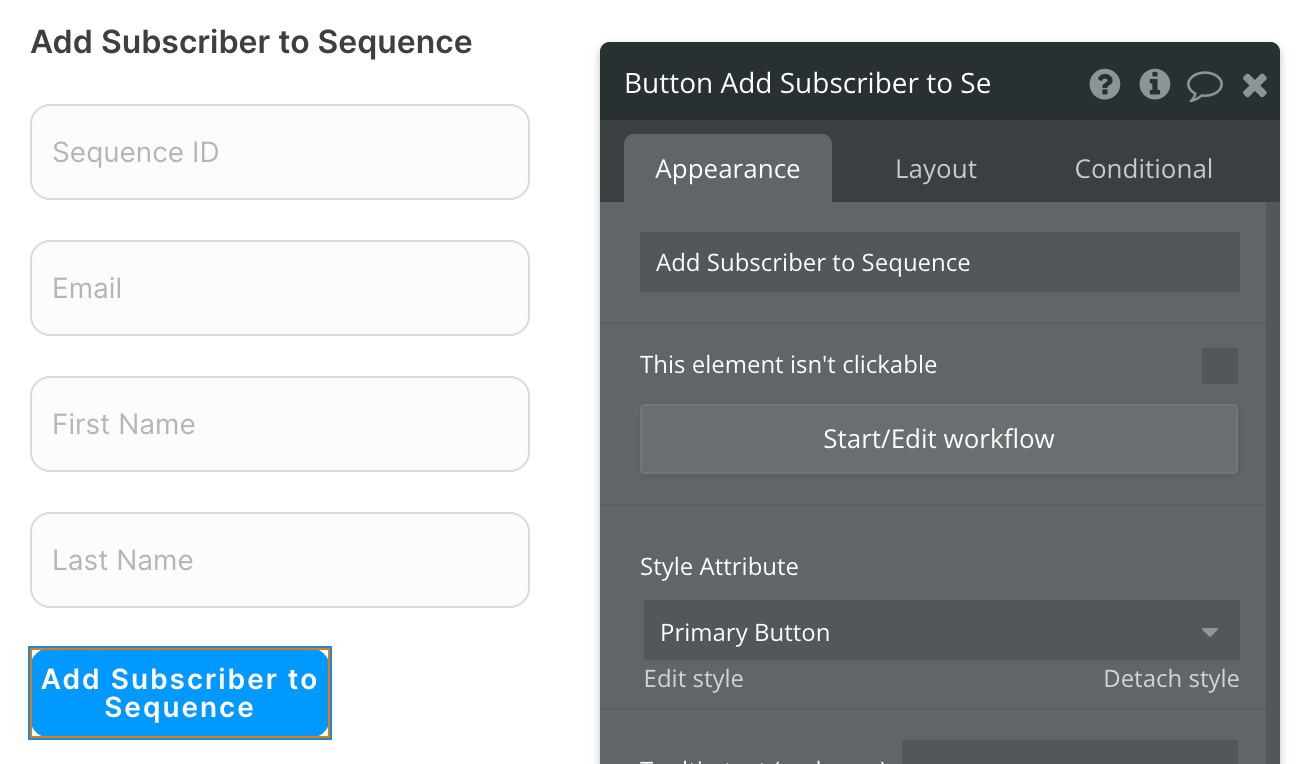
Now map the inputs to their corresponding parameters and paths.
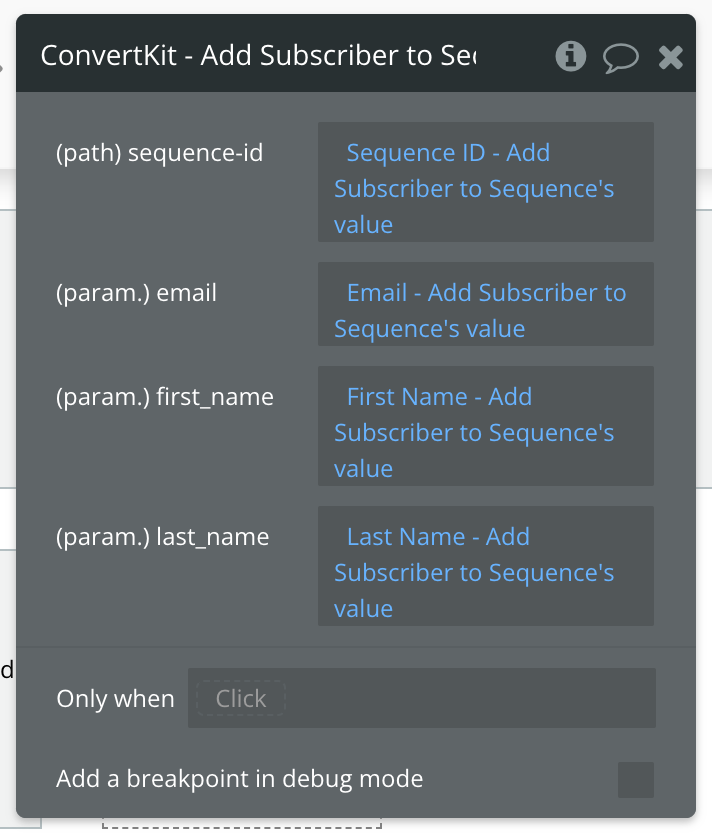
That's it!
Available Path (* indicates a required value)
sequence-id* - The ID of the sequence to add to the subscriber. You can get the ID from the Get Sequences call.
Available Parameters (* indicates a required value)
email* - The email of the User you're adding.
first_name - The first name of the User you're adding.
last_name - The last name of the User you're adding.
Tag a Subscriber - Action Call
🔗
ConvertKit documentation: https://developers.convertkit.com/?shell=#tag-a-subscriber
Set up your API call
In this example, we have a form with all necessary inputs to trigger the "Tag a Subscriber" action:
Start by adding a workflow trigger to this button.
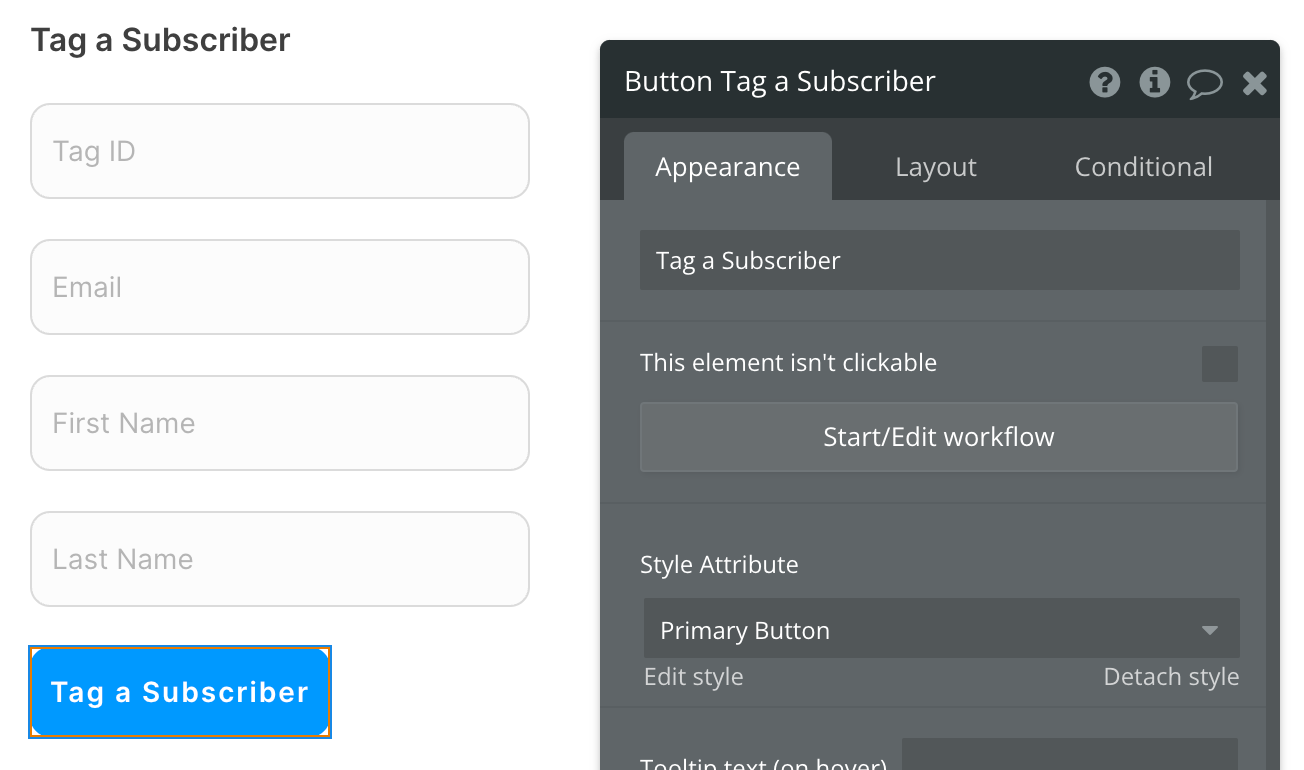
Now map the inputs to their corresponding parameters and paths.
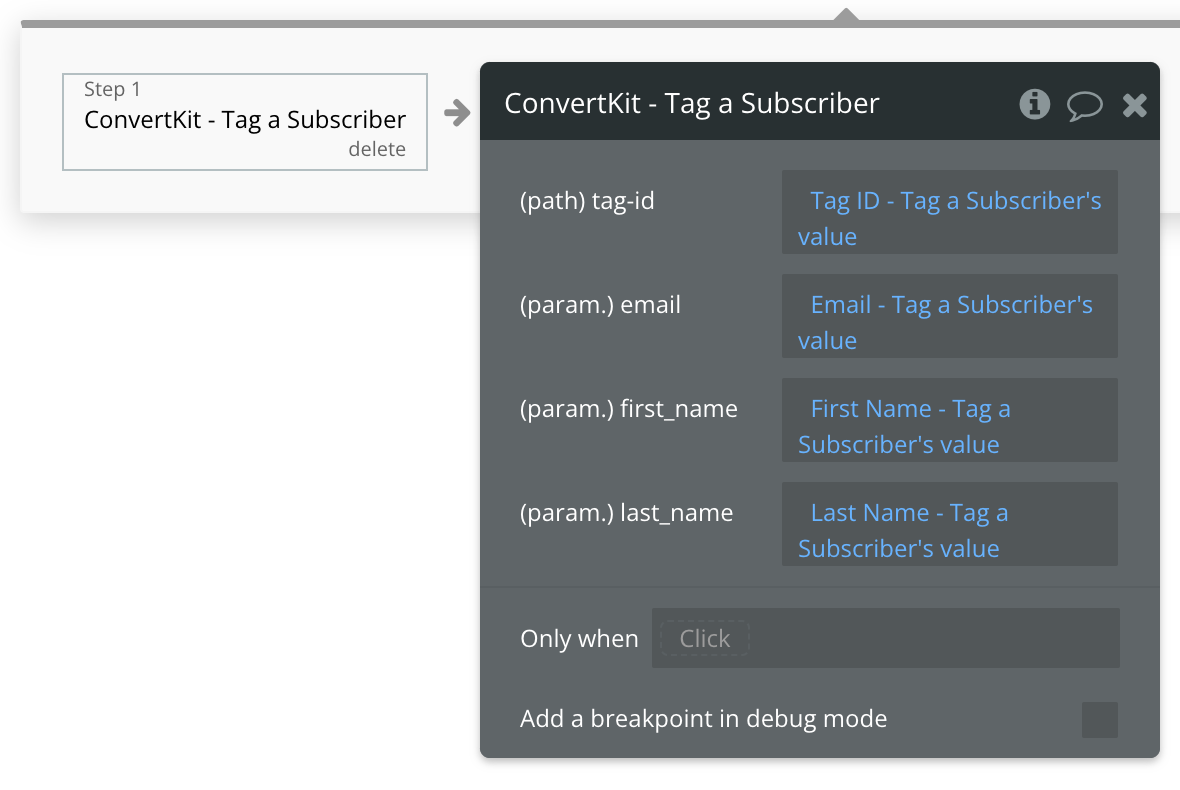
Available Path (* indicates a required value)
tag-id* - The ID of the tag to add to the subscriber. You can get tag IDs from the Get Tags call.
Available Parameters (* indicates a required value)
email* - The email of the User you're tagging.
first_name - The first name of the User you're tagging.
last_name - The last name of the User you're tagging.
Remove Tag From a Subscriber - Action Call
🔗
ConvertKit documentation: https://developers.convertkit.com/?shell=#remove-tag-from-a-subscriber
Set up your API call
In this example, we have a form with all necessary inputs to trigger the "Remove Tag from Subscriber" action:
Start by adding a workflow trigger to this button.
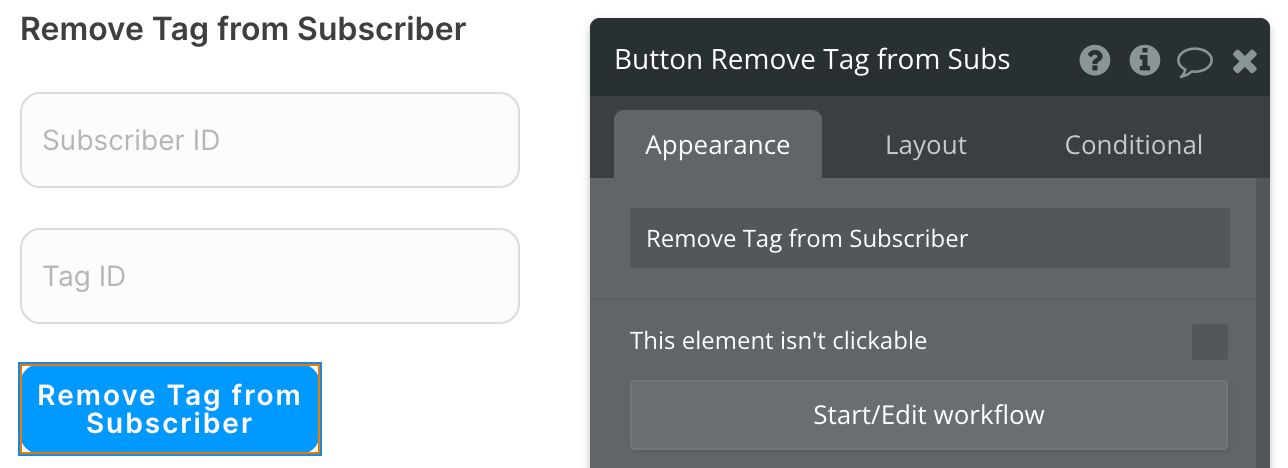
Now map the inputs to their corresponding parameters and paths.
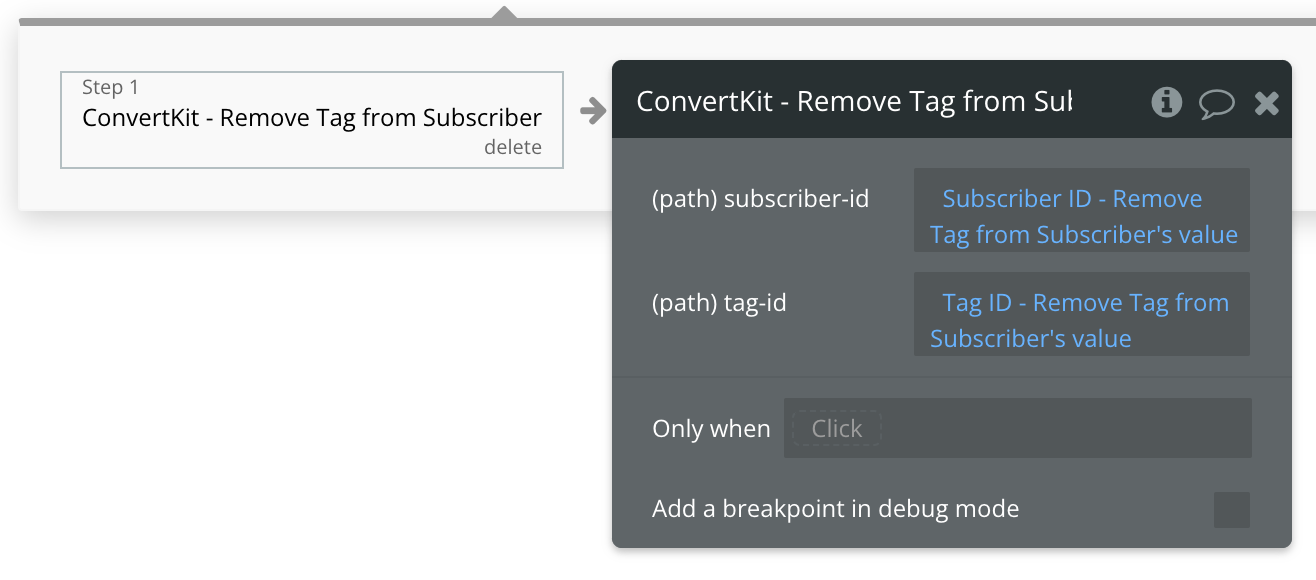
That's it!
Available Path (* indicates a required value)
subscriber-id* - The ID of the subscriber.
tag-id* - The ID of the tag to add to remove from the subscriber.
Update a Subscriber - Action Call
🔗
ConvertKit documentation: https://developers.convertkit.com/?shell=#update-subscriber
Set up your API call
In this example, we'll be making on quick API call to ConvertKit to Update a Subscriber. We'll use a blue "Update Subscriber" button to do this.
Start by adding a workflow trigger to this button.
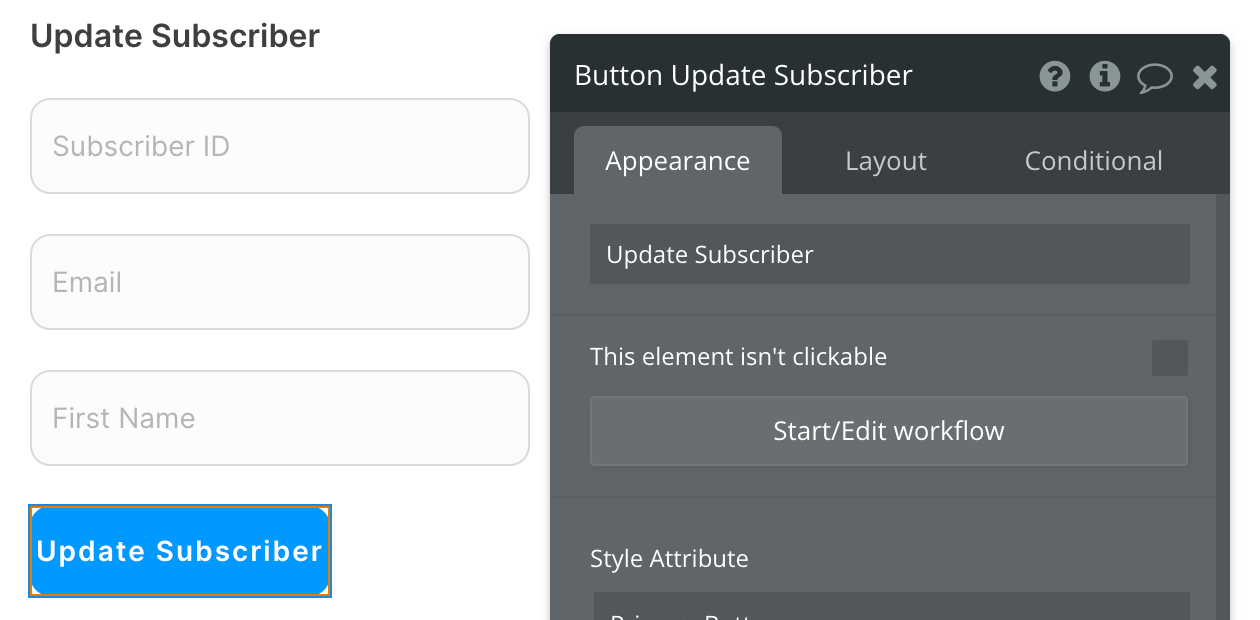
Now map the inputs to their corresponding parameters and paths.
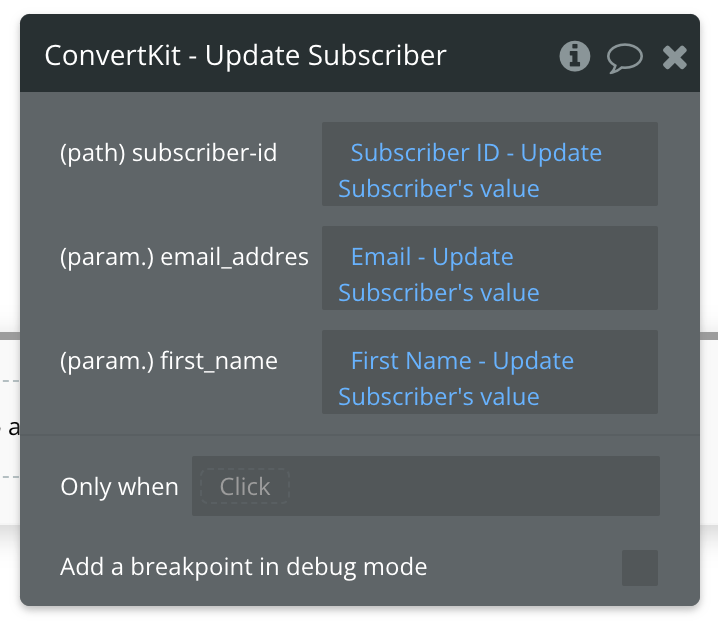
That's it!
Available Path (* indicates a required value)
subscriber-id - The ID of the subscriber you're updating.
Available Parameters (* indicates a required value)
email_address* - The new email of the User you're updating.
first_name* - The new first name of the User you're updating.
Unsubscribe a Subscriber - Action Call
🔗
ConvertKit documentation: https://developers.convertkit.com/?shell=#unsubscribe-subscriber
Set up your API call
In this example, we have a form with all necessary inputs to trigger the "Unsubscribe a Subscriber" action:
Start by adding a workflow trigger to this button.

Now map the input to its corresponding parameter.
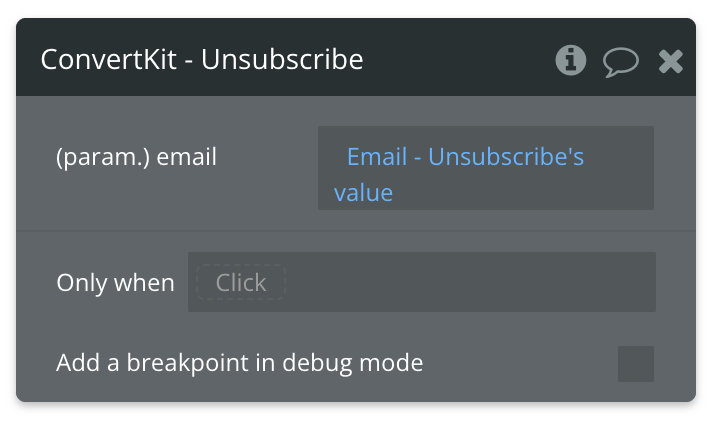
That's it!
Available Parameter (* indicates a required value)
email* - The email of the subscriber you're unsubscribing.
Create a Webhook - Action Call
💡
Whenever a subscriber event occurs in your ConvertKit account, you can trigger a backend workflow with a Webhook.
🔗
ConvertKit documentation: https://developers.convertkit.com/?shell=#create-a-webhook
Setup your backend workflow
Create a new API workflow and name it to match the type of webhook event you're capturing. Refer to the ConvertKit documenation linked above to see a list of all available events.
We're using "subscriber.subscriber_activate" as the example in this demo.
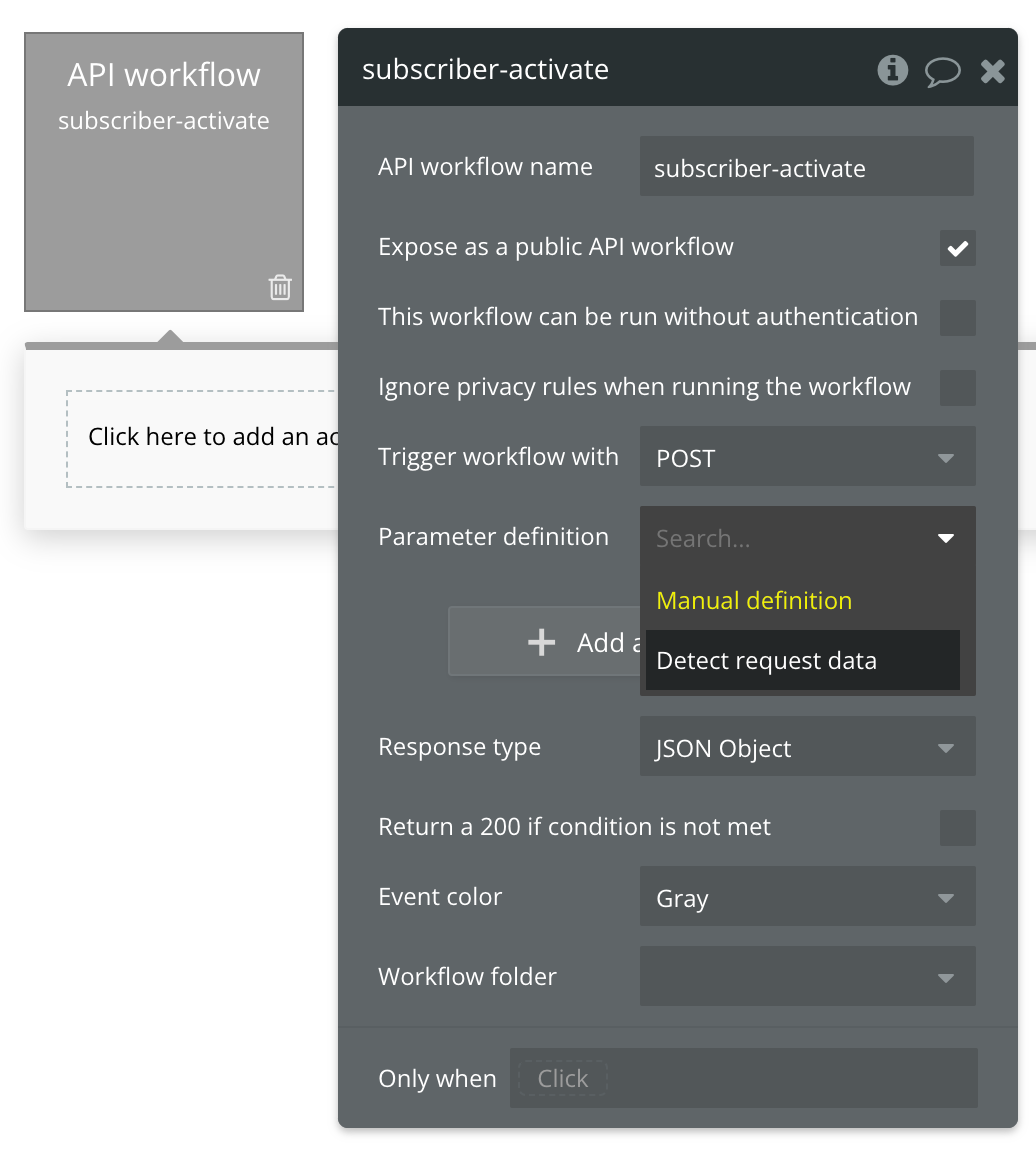
Select Detect request data from the Parameter definition dropdown.
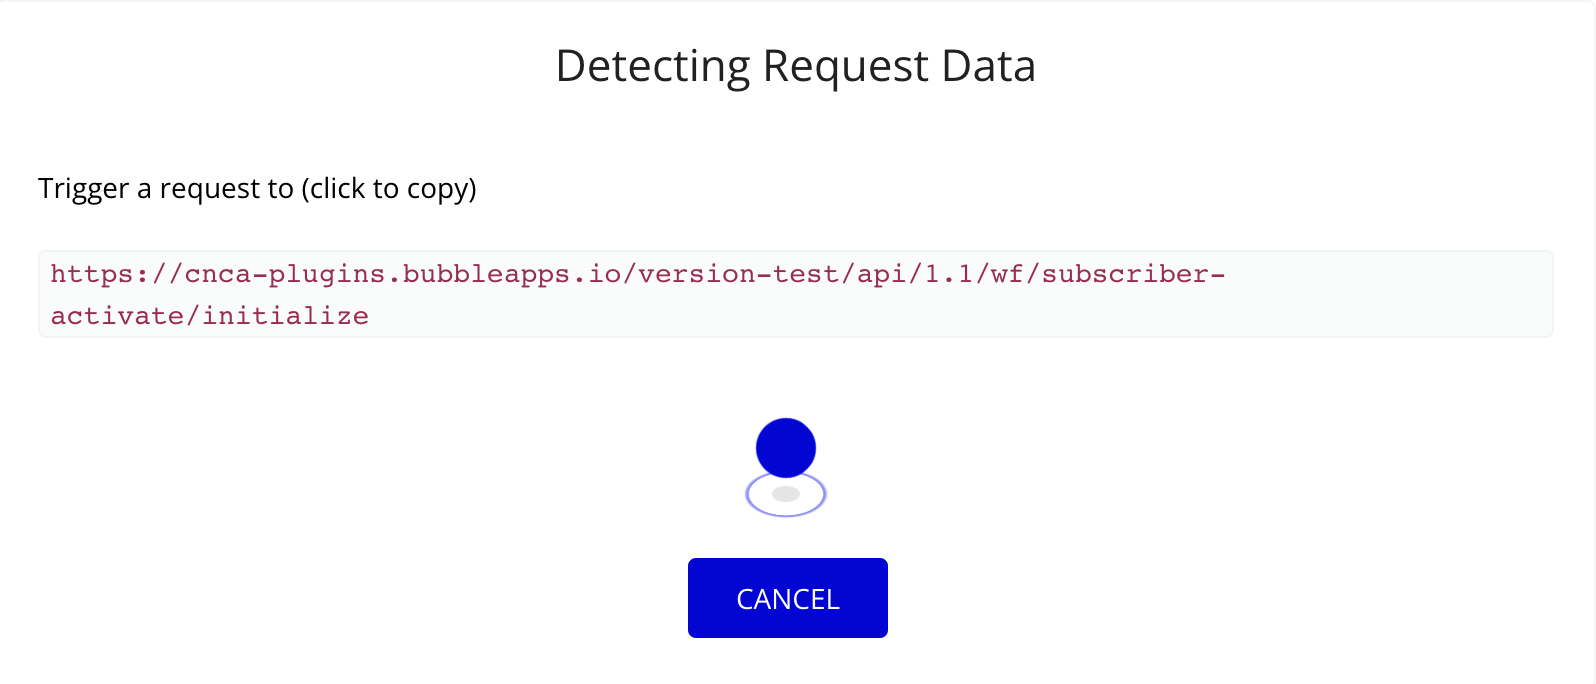
Once you've updated this, press the Detect data button. You'll see this screen appear:
⚠️
Copy this URL and don't close the popup yet as you need both for next steps.
Create your webhook
Create a form in your app to create your first webhook. This enables real-time notifications to be sent to your Bubble app whenever the action you've selected from the list of available webhooks occurs.

Create a workflow on the button and select the plugin action titled "ConvertKit - Create Webhook":
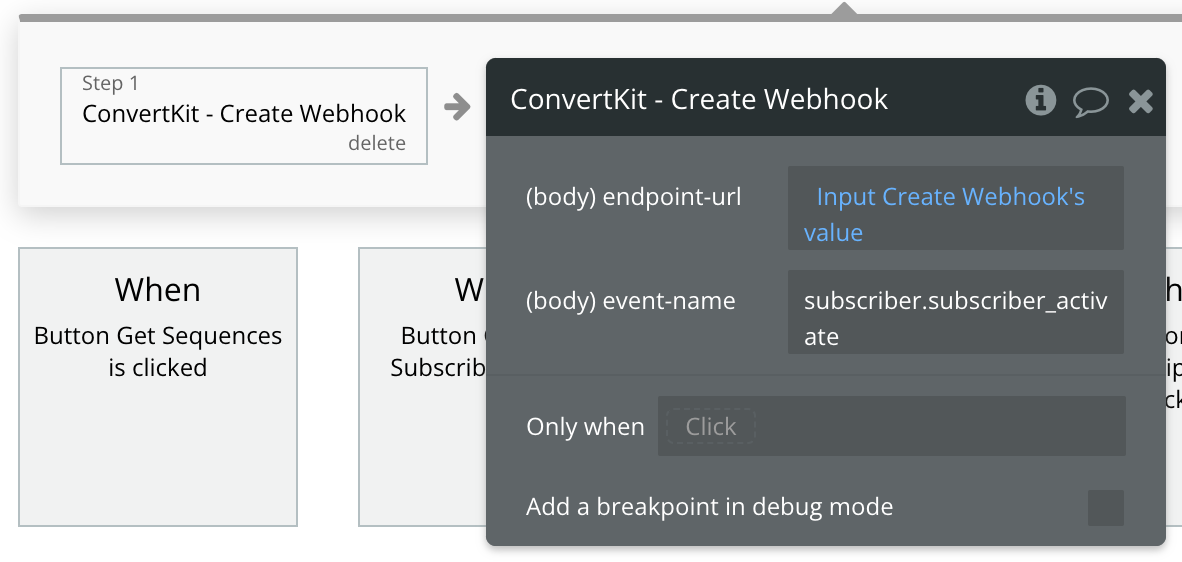
endpoint-url: You can either paste in the URL you copied from the backend workflow popup here directly or refer to a dynamic source on your page, such as an input like in our example.
event-name: This is the event type you want to receive webhooks for. Refer to this documentation link for the full list of options.
☝
Save the ID of the new webhook in a subsequent step. This will allow you to delete the webhook in the future. In our example, we're saving it to a custom state and then displaying that state below the "Create Webhook" button, but for long term planning, you should save this ID to a database record.
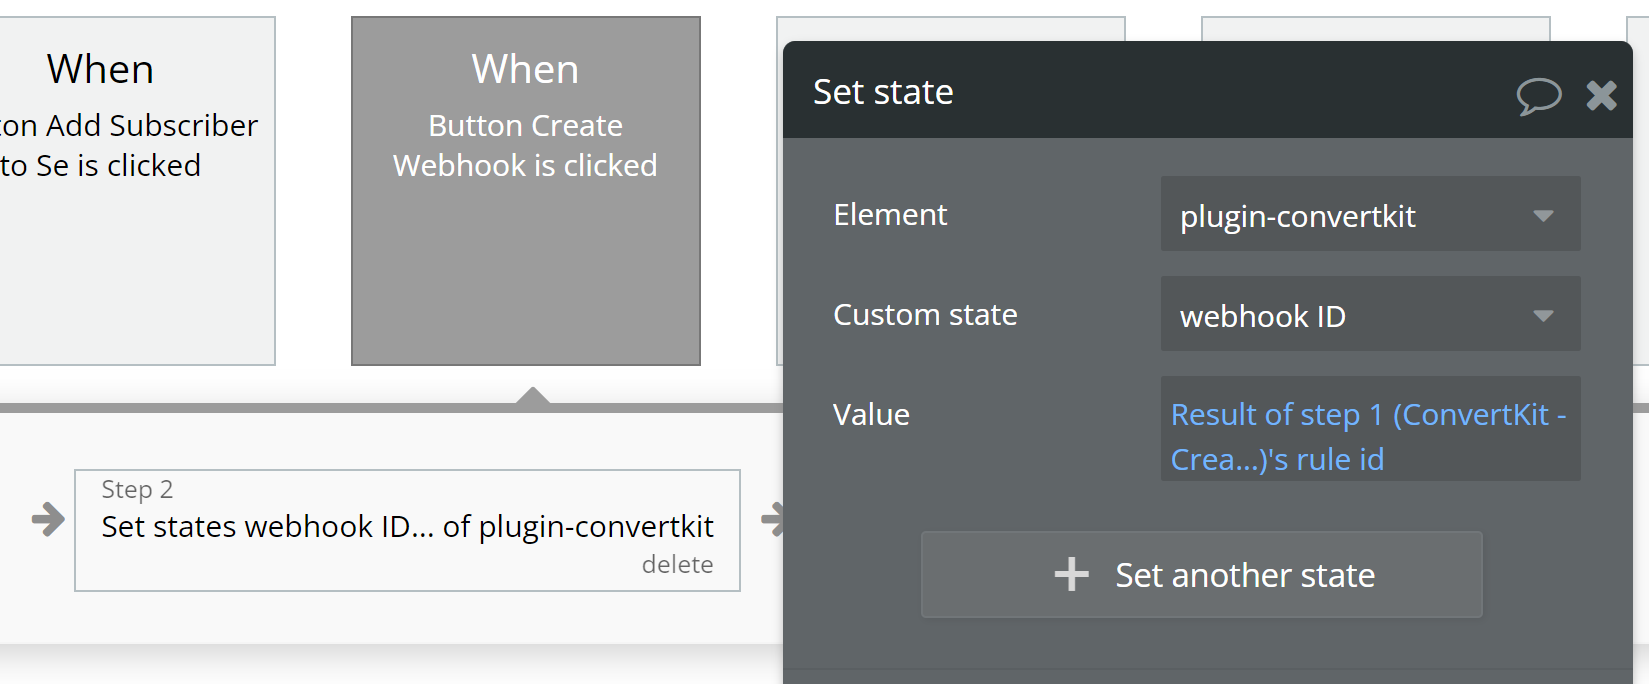
Now, you can run the page and click the button to create the webhook. This will only enable a webhook for the defined event. This doesn't trigger a notification yet.
Initialize the backend workflow
Now, you need to perform an action that will trigger a webhook. In our example, we set up our webhook for whenever a new subscriber is created, so we'd want to create a new Subscriber. The quickest way to do this is directly from the ConvertKit dashboard.
Make sure the backend workflow popup is still open before you trigger the event. Once triggered, this popup will be updated with the incoming event data.
Make any edits to field definitions (texts, numbers, dates) if necessary and click save.
Replace webhook to complete setup
Now that you've initialized the backend workflow, Bubble understands the structure of an incoming notification. It's important to note that the URL you used to initialize this is not the "real" notification URL because it contains the word "initialize":

Your final steps are to:
- Create a new webhook with the same URL but without the final "/initialize" in the URL.
- Add actions to your backend workflow so you can use the incoming data however you need. For example, update existing records, send an email, etc.
- Trigger an event again (such as create a new subscriber) and test your full workflow.
Delete a Webhook - Action Call
🔗
ConvertKit documentation: https://developers.convertkit.com/?shell=#destroy-webhook
Set up your API call
In this example, you'll set up the "Delete a Webhook" action. It's important that you save the ID of previously created webhooks in order to properly use this call.
Start by adding a workflow trigger to a button.

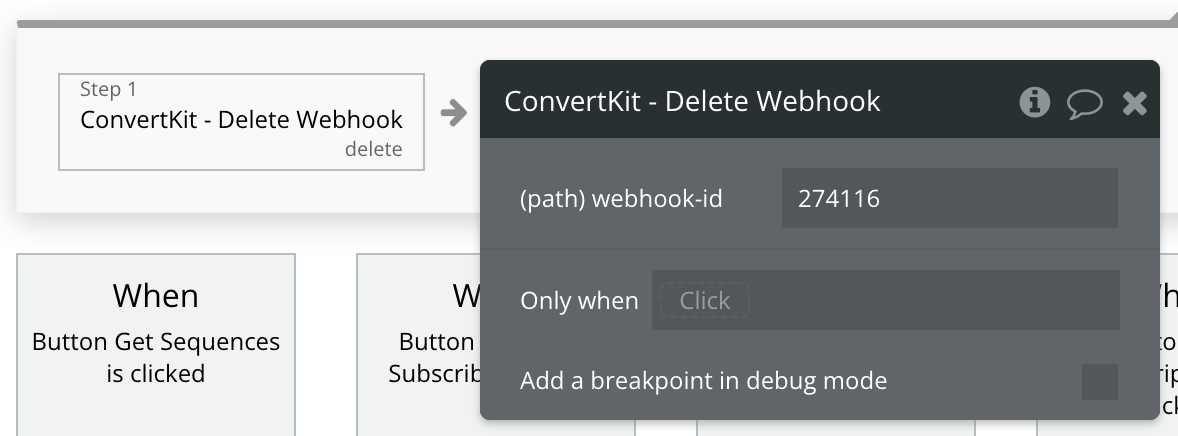
Now define the "webhook-id" in the action settings:
That's it!
Available Path (* indicates a required value)
webhook-id* - The ID of the webhook you're deleting.
Changelogs
Update 11.09.24 - Version 1.10.0
- Minor update (Marketing update).
Update 20.07.24 - Version 1.9.0
- Minor update .
Update 06.06.24 - Version 1.8.0
- Updated demo/service links.
Update 22.11.23 - Version 1.7.0
- updated description.
Update 19.10.23 - Version 1.6.0
- Updated description.
Update 18.09.23 - Version 1.5.0
- updated description.
Update 13.09.23 - Version 1.4.0
- minor updates.
Update 12.07.23 - Version 1.3.0
- updated description.
Update 26.06.23 - Version 1.2.0
- updated description.
Update 18.04.23 - Version 1.1.0
- Updated documentation and bug fixes .
Update 31.07.18 - Version 1.0.0
- Added a field for Last Name in subscriber actions - note that you must have a Last Name field created in ConverKit.
Update 09.09.17 - Version 0.2.0
- Initial public release.
Update 09.09.17 - Version 0.1.0
- Tag Subscriber.
Update 08.09.17 - Version 0.0.1
- Initial release.
