Demo to preview the plugin:
Introduction
The Google Analytics with Webhooks plugin provides full control over your Google Analytics tracking by capturing detailed events and statistical data. This plugin compiles the complete GA object and sends it to your Bubble application via webhooks alongside your GA Tracking ID, enabling advanced analytics integration and data management.
The plugin automatically tracks user interactions including buttons, divs, and input fields, capturing event types, values, and states. It supports Google Analytics 4 (GA4) with measurement IDs, allows sending page view events, logging custom events with detailed metadata, creating and managing multiple trackers, and retrieving the complete GA Tracker Object for advanced tracking insights.
Note: This plugin (due to used library restrictions) works only with web applications, and due to that, can't be used to monitor native applications (for example a Bubble application converted through Air Native service).
Prerequisites
To use this plugin effectively, you need:
- Google Analytics 4 (GA4) Account: Create a GA4 property and obtain your Measurement ID (format: G-XXXXXXXXXX) from https://analytics.google.com
- API Workflow Endpoint: You must set up an API workflow endpoint in your Bubble application named ‘analytics’ to receive the webhook data from the plugin
- Basic understanding of Google Analytics: Familiarity with GA events, tracking, and campaign parameters is helpful
How to setup
Setting up the Google Analytics with Webhooks plugin requires configuring both Google Analytics and your Bubble application:
Step 1: Get your Google Analytics 4 Measurement ID
- Go to https://analytics.google.com
- Navigate to Admin → Data Streams
- Select your web data stream
- Copy your Measurement ID (format: G-XXXXXXXXXX)
Step 2: Configure the Plugin Header
- In your Bubble editor, go to Plugins tab
- Find “Google Analytics with Webhooks” plugin
- In the HTML Headers section, replace
G-XXXXXXXXXXwith your actual Measurement ID
Step 3: Setup API Workflow Endpoint
- In your Bubble app, go to Settings → API tab
- Check “This app exposes a Workflow API”
- From the top menu, select API Workflows
- Create a new API Endpoint and name it exactly
analytics(without quotes)
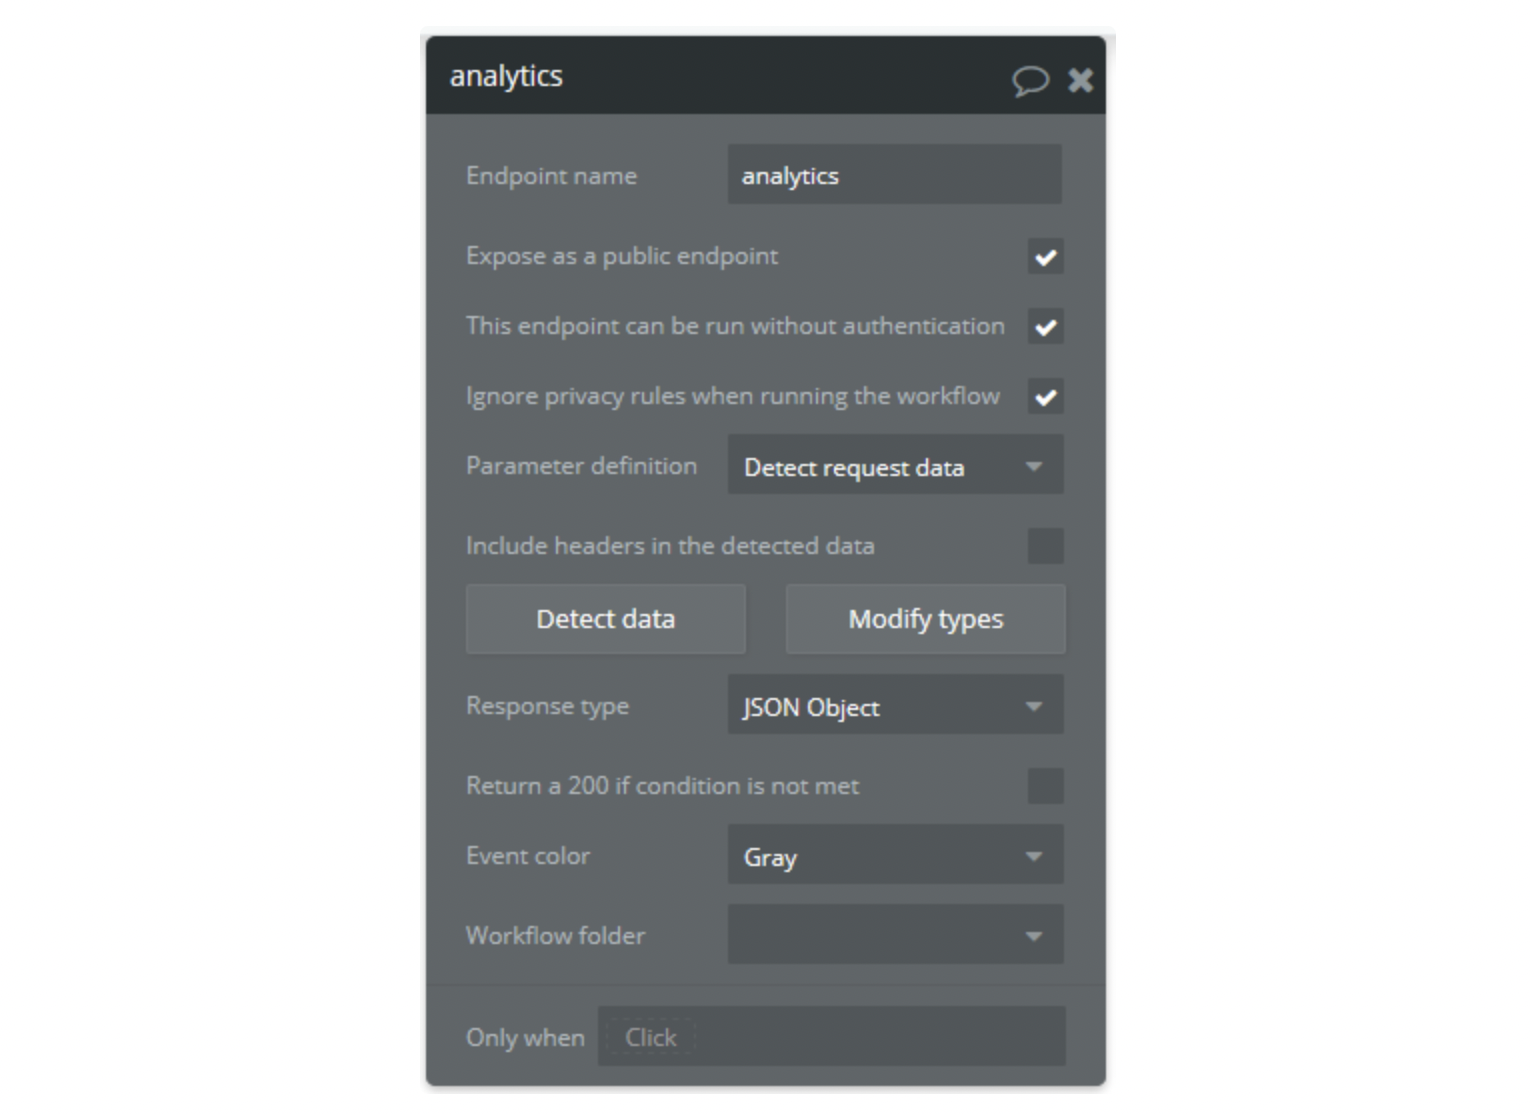
- Place the Auto Analytics element or use the “Setup Endpoint” action on a page
- Preview your app in another window
- In the API Workflow editor, click “Detect Data”
- Trigger the Setup Endpoint action in the preview window
- Your endpoint will now be configured to receive the full GA data objects
Step 4: Configure Data Reception
In your API workflow, set up actions to handle the received data:
- Create a new thing in your database to store analytics data
- Parse the pbAnalytics object which contains tracking results and event information
- Use the Event object to capture event_name, event_category, event_action, and event_label
Plugin Element Properties
The plugin contains two visual elements that can be placed on your pages.
Auto Analytics
The Auto Analytics element automatically tracks user interactions across your page, including button clicks, div clicks, and input field focus events. When enabled, it captures detailed information and sends it to both Google Analytics and your webhook endpoint.
Fields:
Title | Description | Type |
Measurement ID | The unique identifier of your data stream in Google Analytics 4 (GA4). Format: G-XXXXXXXXXX | Text |
Enable POST? | Determines whether tracking data should be sent to your webhook endpoint. When enabled, all tracked events are posted to your analytics API workflow | Boolean |
Campaign Builder
The Campaign Builder element helps you create properly formatted URLs with UTM parameters for marketing campaigns. It generates tracking URLs that can be used to measure campaign effectiveness in Google Analytics.
Fields:
This element has no configurable properties. All functionality is accessed through element actions.
Element Actions
1. Setup Endpoint
This action configures the POST request by sending all current page’s GA data to your API endpoint. It initializes the data structure and validates that your endpoint is ready to receive analytics data.
Title | Description | Type |
Initialize | Set to “true” for the first initialization of the data structure in your endpoint API. This sends setup configuration data including page location, title, referrer, screen resolution, viewport size, language, browser info, and a snapshot of the dataLayer | Boolean |
2. Create Tracker
Creates a new Google Analytics tracker with the specified Measurement ID. This action initializes GA4 tracking and sends comprehensive tracking data to your webhook endpoint.
Title | Description | Type |
Measurement ID | The unique identifier of your data stream in Google Analytics 4 (GA4). Must start with “G-” followed by your tracking ID | Text |
3. Get Current Tracker
Retrieves and sends the complete tracker data from the current page, including measurement ID, client ID, GA4 cookies, page information, screen details, and the last 10 dataLayer entries.
Fields:
Title | Description | Type |
Info | Informational label indicating that the GA Object will be POSTed to your endpoint | Label |
4. Create Page View
Sends a page view event to Google Analytics and your webhook endpoint. This tracks when users view pages in your application.
Title | Description | Type |
Measurement ID | The unique identifier of your data stream in Google Analytics 4 (GA4). Must start with “G-” | Text |
5. Send an Event
Sends a custom event to Google Analytics with detailed parameters including category, name, label, and action. This allows tracking of specific user interactions and behaviors.
Title | Description | Type |
Measurement ID | The unique identifier of your data stream in Google Analytics 4 (GA4) | Text |
Event Category | Custom event category (e.g., “Video”, “Button”, “Form”) | Text |
Event Name | Custom event name (e.g., “Custom event”, “User Registration”) | Text |
Event Label | Custom event label providing additional context (e.g., “cats.mp4”, “Submit Button”) | Text |
Event Action | Custom event action describing what happened (e.g., “play”, “click”, “submit”) | Text |
6. Get Campaign URL (Campaign Builder Element)
Generates a formatted URL with UTM campaign parameters for tracking marketing campaigns in Google Analytics.
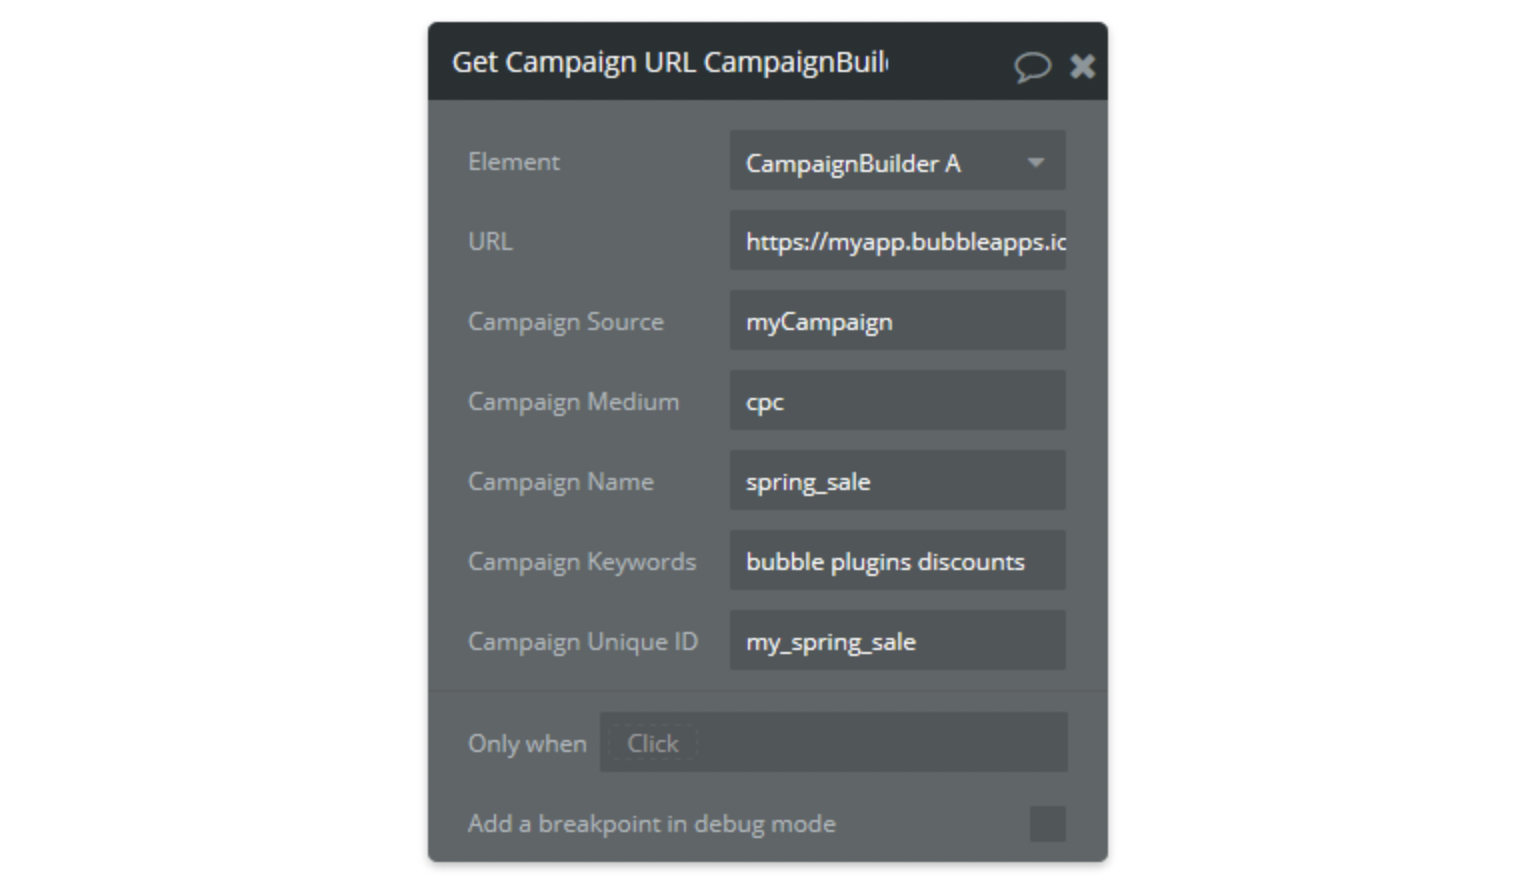
Title | Description | Type |
URL | The base URL for your campaign (e.g., “https://myapp.bubbleapps.io”) | Text |
Campaign Source | Identifies which site sent the traffic (e.g., “myCampaign”, “google”, “newsletter”) | Text |
Campaign Medium | The marketing medium (e.g., “cpc”, “banner”, “email”) | Text |
Campaign Name | The name of your campaign (e.g., “spring_sale”, “product_launch”) | Text |
Campaign Keywords | Keywords for paid search campaigns (e.g., “bubble plugins discounts”) | Text |
Campaign Unique ID | A unique identifier for differentiating similar content or links (e.g., “my_spring_sale”) | Text |
7. Clear Output (Campaign Builder Element)
Clears the generated campaign URL from the Campaign Builder element’s output state.
This action has no parameters.
Exposed states
Auto Analytics States
This element does not expose any states.
Campaign Builder States
Name | Description | Type |
Output URL | The generated URL with all UTM parameters encoded and appended. This URL can be used directly for campaign tracking | Text |
Element Events
Auto Analytics Events
This element does not trigger any custom events. All tracking happens automatically in the background.
Campaign Builder Events
This element does not trigger any custom events.
Plugin Data/Action Calls (API Calls only)
This plugin does not contain server-side API calls. All functionality is client-side JavaScript that communicates with Google Analytics and your Bubble API workflow endpoint.
The plugin sends data to your custom API workflow endpoint (named ‘analytics’) with the following structure:
POST Data Structure:
json{
  "pbAnalytics": {
    "results": [{
      "measurement_id": "G-XXXXXXXXXX",
      "page_location": "https://...",
      "page_title": "...",
      "event_category": "...",
      "event_action": "...",
      "event_label": "...",
      "screen_resolution": "1920x1080",
      "viewport_size": "1366x768",
      "language": "en-US",
      "user_agent": "...",
      "timestamp": "2025-01-15T10:30:00.000Z"
    }],
    "Event": {
      "event_name": "...",
      "event_category": "...",
      "event_action": "...",
      "event_label": "..."
    }
  }
}
Workflow example
Here are some practical workflow examples to help you get started with the Google Analytics with Webhooks plugin:
Workflow 1: Initial Setup and Configuration
- Add the Auto Analytics element to your page
- Set the Measurement ID field to your GA4 ID (e.g., “G-ABC123DEF456”)
- Enable “Enable POST?” checkbox to send data to your webhook
- Create a button and add the “Setup Endpoint” action
- Set Initialize to “yes” on first run
- Preview your app and click the button to initialize the endpoint
- Check your API workflow’s detect data to verify the structure
Workflow 2: Automatic User Interaction Tracking
- Place the Auto Analytics element on your index page
- Configure with your Measurement ID
- The element will automatically track:
- All button clicks (captures button text)
- All div clicks (captures class and ID)
- All input focus events (captures input type and name)
- View tracked events in your database or Google Analytics dashboard
Workflow 3: Custom Event Tracking
- Create a workflow for a specific user action (e.g., form submission)
- Add the “Send an Event” action
- Configure the parameters:
- Measurement ID: Your GA4 ID
- Event Category: “Form”
- Event Name: “Submission”
- Event Label: “Contact Form”
- Event Action: “submit”
- The event will be sent to both GA4 and your webhook endpoint
Workflow 4: Campaign URL Generation
- Add the Campaign Builder element to your page
- Create a workflow triggered by a button click
- Add the “Get Campaign URL” action with parameters:
- URL: Your landing page URL
- Campaign Source: “facebook”
- Campaign Medium: “social”
- Campaign Name: “summer_sale”
- Campaign Keywords: “discount promo”
- Campaign Unique ID: “fb_ad_001”
- Display the Campaign Builder’s “Output URL” state in a text element
- Use this URL in your marketing materials