
✅
Link to the plugin page: https://zeroqode.com/plugin/video-recorder-1641459923217x281479548148178200
Demo to preview the settings
✅
Introduction
With this plugin, you are able to record a video using the device camera. It allows access to the webcam and microphone when prompted by the browser, to enable recording.
Recordings can be saved in DB, AWS, and Wasabi accounts. Any type of fan videos, crowdsourced videos, or user-generated videos.
These could be video testimonials, video interviews, video contests, video auditions, video reviews, video feedback etc.
The plugin can limit video recording time, also supports pause/play, and cancel recording features. It includes many actions and events that make the implementation of your idea nice and easy. Simple to use, simple to record.

How To Setup
Step 1: Place plugin element on the page

Step 2: Enable file upload, should be set always as "yes"

Step 3: Add a button to the page

Step 4: Set workflow for this button


Step 5: Add a button to the page

Step 6: And set workflow


Step 7: And save URL to Bubble data

💡
If you want to save the Video File URL to the App Data, use the “Create a new thing” action in the new workflow only. It will give the plugin the needed timing for the Video URL state’s value creation. Thus, use the “Video Recorder - File is uploaded” event in such a use case.
Plugin Elements Properties
The main element of the plugin. Show captured from camera track, record, and save it.
Video Recorder
Element Fields
Title | Description | Type |
Enable file size limit | Automatically stops recording before reaching Bubble's maximum file size limit to prevent upload failures. Recording stops at 94% of the limit (e.g., 47MB for a 50MB limit), providing a 6% safety buffer.
REQUIREMENTS:
•Element's field 'Max file size (MB)' must be > 0
EXPOSED_STATES:
•'Current recording size (MB)' - Real-time size tracking
•'Recording size percent' - Progress towards limit (0-100%)
The plugin monitors size every 100ms and stops automatically when the safety threshold is reached, ensuring successful uploads within Bubble's file size constraints. | Checkbox (yes/no) |
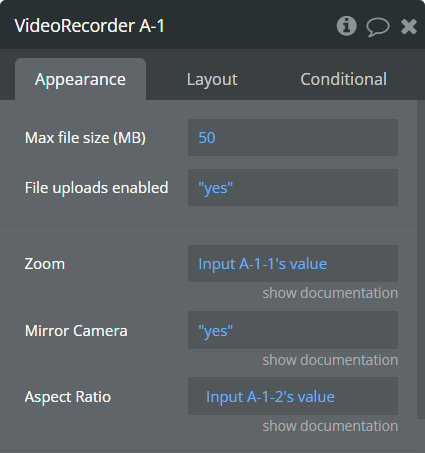
Zoom | Zoom video in video recorder element. | number |
Mirror Camera | Mirror the recording. ❗When use this option the max resolution will be 1080p | yes/no |
Aspect Ratio | The aspect ratio of recorded video. Ex.,16/9, 4/3, 1/1 | text |
Plugin Actions
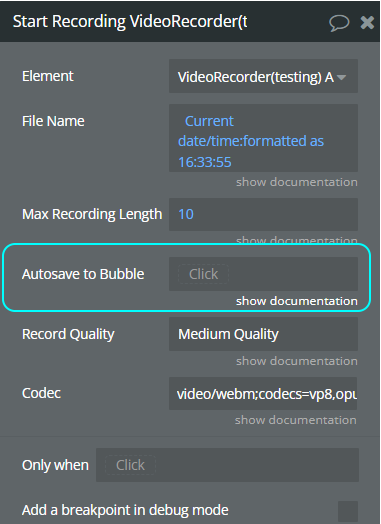
Start Recording
Title | Description | Type |
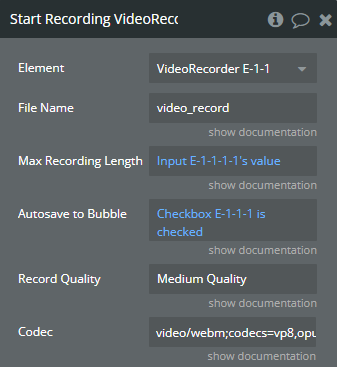
File Name | File Name of the record which is used for saving | Text |
Max Recording Length | Maximal length of record in seconds | Number |
Autosave to Bubble | If 'yes' - the record will be saved to Bubble. If 'no' - the record will be downloaded locally. If 'empty' - the record will not be saved (use the 'Save Record' action to save it). | (optional) yes/no |
Record Quality | Choose the quality of your record. The only accepted values are : Low Quality, Medium Quality, High Quality, Very High Quality . Available options: Low Quality, Medium Quality, High Quality, Very High Quality | Text (optional) |
Codec | By default the action uses "video/mp4;codecs=avc1" for IOS.
Other browsers select codec by their own settings. Usually select "webm" or "x-matroska".
Recommended use "video/webm;codecs=vp8", most modern browsers support playing video with this format.
Action checks if the selected codec is supported by current browser, if not, will change to default.
The selected codec is shown in an exposed state "Codec" right after the recording is started. | Text (optional) |
Stop Recording
Get track from the camera and record it
You must turn on the camera before recording.

Start Camera
This action is used to start audio and video stream.
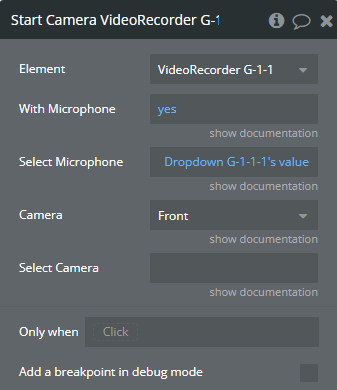
Fields:
Title | Description | Type |
With Microphone | Enable microphone in record. | yes/no |
Select Microphone | Accepts a microphone label from the "List of microphones" state. Note: To select a microphone, "With Microphone" field should be "yes". | text (optional) |
Camera | If selected type of camera is available it will be used, else will be used first detected camera. Available options: Front, Rear | Dropdown |
Select Camera | Accepts a camera label from the "List of cameras" state. | text (optional) |
Stop Camera
Disable camera

Pause\Resume Recording
Pause or resume recording

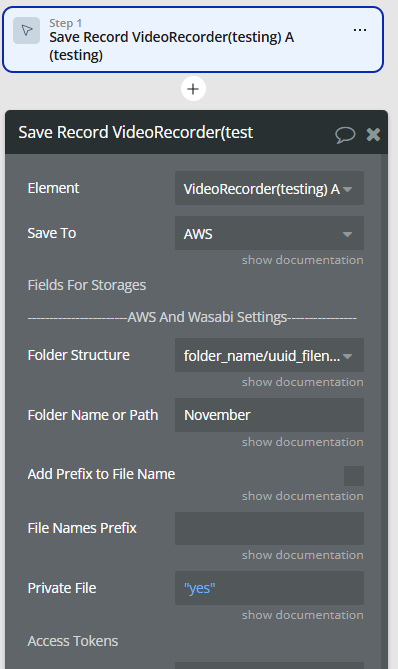
Save Record
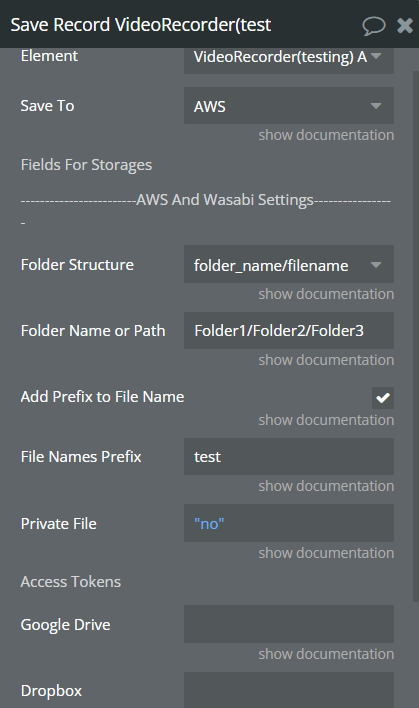
Save the record to one of the storage
How to setup workflow to upload to AWS or Wasabi read below
Title | Description | Type |
Save To | Choose the service to save the file Available options: AWS,Wasabi,Bubble,Dropbox,Drive,Download | Dropdown |
Fields For Storages | ||
AWS And Wasabi Settings | ||
Folder Structure | Structure to be used for uploaded files.
If "folder_name/uuid_filename" and folder_name/filename" is chosen, provide the 'Folder name' value below.
If in this case the 'Folder name' is not indicated, the folder name 'unknown' will be used.
Available values:
uuid/filename
uuid_filename
folder_name/uuid_filename
folder_name/filename | Dropdown |
Folder Name or Path | The name to be used for the user folder on S3 bucket.
Is used only if the 'Folder structure' property is set to 'folder name/uuid_filename' and 'folder_name/filename'.
The folder name should not contain the '%' sign | Text (optional) |
Add Prefix to File Name | If checked, file names will get custom prefixes to make it easier to locate them on S3 Bucket. | Checkbox (yes/no) |
File Names Prefix | Add a prefix. For prefix do not use any special characters like: ! $ # @ etc ... | Text (optional) |
Private File | A boolean value indicating whether the saved file should be marked as private or not. It might control access permissions to the file in the cloud storage. | Checkbox (yes/no) (optional) |
Access Tokens | ||
Google Drive | Google Drive Access Token | Text (optional) |
Dropbox | Dropbox Access Token | Text (optional) |
Reset Record
Delete the last record in the plugin

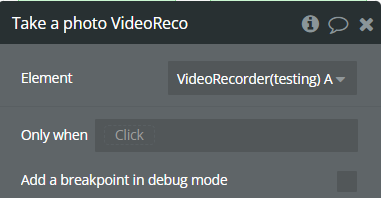
Take a photo
Takes a photo, return in a state Photo URL the photo and triggers photo uploaded event
Upload file on AWS/Wasabi
This action is used to finish the uploading process of file on the AWS or Wasabi
Fill-in with result of a server side action Generating a Pre-signed URL

Title | Description | Type |
Pre-signed Upload URL | The pre-signed URL that was generated with the Generate Pre-signed URL action | Text |
Plugin Exposed States
Title | Description | Type |
Video Size | File size in bytes | Number |
Recording Length | Length in seconds | Number |
Recording Status | Recording Status | Text |
Video URL | URL to the video | File |
Device Supported | Return is Device is Supported | Checkbox (yes/no) |
Paused | Yes when paused | Checkbox (yes/no) |
Recording | Yes when recording | Checkbox (yes/no) |
Photo URL | URL to a photo | Text |
List of cameras | List of available cameras | Text |
List of microphones | List of available microphones | Text |
Codec | Video and Audio codec that is used on last recording | Text |
File path for AWS/Wasabi | Action Save Record updates this state. Use value from the state in Generating a Pre-signed URL action | Text |
Current recording size (MB) | Current size of the recording in megabytes (updated in real-time) | Number |
Recording size percent | Percentage of maximum file size used (0-100) | Number |
Plugin Events
Title | Description |
Camera Is Enabled | Triggered when the camera is enabled |
Recording Started | Triggered then recording is started |
Recording Finished | Triggered then recording is finished |
File is uploaded | Triggered when video record is uploaded to cloud storage |
Camera is Disabled | Triggered when the camera is disabled |
Error in uploading a file | Triggered then an error is occurred in file uploading |
Upload file on AWS/Wasabi | Triggered when file uploaded to AWS or Wasabi, updates Video URL state |
Steps to Get a Google Drive Access Token:
- Set Up a Google Cloud Project:
- Go to the Google Cloud Console.
- Create a new project or use an existing one.
- Enable Google Drive API:
- In your project, go to "APIs & Services" → "Library."
- Search for "Google Drive API" and click on it.
- Click the "Enable" button to activate the API for your project.
- Create OAuth 2.0 Credentials:
- Go back to "APIs & Services" → "Credentials."
- Click on "Create Credentials" and select "OAuth 2.0 Client ID."
- You will be prompted to configure the OAuth consent screen. Provide the necessary information (e.g., app name, email, etc.).
- After configuring the consent screen, create an OAuth 2.0 Client ID. Choose the application type (e.g., Web application or Desktop application).
- Add "Authorized Redirect URIs" for your app (e.g.,
http://localhostif you are developing locally).
- Get Client ID and Client Secret:
- After creating the OAuth 2.0 Client ID, you will receive the Client ID and Client Secret. You will need these for the authentication process.
- Use Google’s OAuth 2.0 Playground (or build your own flow): You can test the OAuth flow using Google’s OAuth 2.0 Playground:
- Go to the OAuth 2.0 Playground.
- In the list of APIs, select
Drive API v3. - Click on the gear icon in the top-right corner and make sure to check the option to "Use your own OAuth credentials."
- Enter your Client ID and Client Secret.
- In Step 1 of the playground, click on "Authorize APIs."
- You’ll be redirected to a Google consent screen. Select your account and give permissions.
- In Step 2, click "Exchange Authorization Code for Tokens." This will provide you with both the Access Token and Refresh Token.
- Store Access and Refresh Tokens:
- You can use the access token for uploading files to Google Drive. It will expire after 1 hour, so you will need to use the refresh token to get a new access token when it expires.
- Save the access token and refresh token securely in your application (e.g., in
context.keys).
Steps to Get a Dropbox Access Token:
- Create a Dropbox App:
- Go to the Dropbox App Console.
- Sign in with your Dropbox account if you aren’t already signed in.
- Click on the Create App button.
- Select API & Permissions:
- Choose Dropbox API as the API type.
- Select the type of access your app needs:
- Full Dropbox: Gives your app access to the entire Dropbox account.
- App folder: Gives your app access only to a dedicated folder within the user’s Dropbox.
- Give your app a unique name.
- Generate an Access Token:
- After creating your app, you'll be directed to the app's settings page.
- Scroll down to the section labeled OAuth 2.
- Click on the Generate Access Token button. This will provide you with a token you can use for accessing the account.
- Use the Access Token in Your App:
- Copy the generated access token and use it in your code to interact with Dropbox's API.
How to set keys for AWS or Wasabi
Wasabi
Visit wasabi.com to sign up for their service, you will get an email with a link to your console. In your Wasabi console go to Billing->Payment settings then add your Payment method.
While you do receive a month's free trial to upload private files, a paid account is required to upload public files.
Next, go to the Access Keys page & create a new access key.


Insert the access key/secret from the plugins tab.
AWS
Title | Description |
Access Key | AWS/Wasabi access key |
Secret Key | AWS/Wasabi secret key |
How to upload to AWS or Wasabi
- Set empty value for Autosave to Bubble field in Start Recording action
- Configuring the "Recording finished" Event
- In the Workflow section, add a new event by selecting Recording finished from the list of available events.
- Add “Save Record” action
- Configure fields “Save To”,” Folder Structure”, “Folder Name or Path” and “Private File” checkbox
- Configuring the "Generation URL" Event
- In the Workflow section, add a new event by selecting “Generation URL” from the list of available events.
- Adding the "Generate Pre-Signed URL" Action
- In the "Generation URL" event, add a new action.
- Select "Generate Pre-signed URL " from the list of available actions.
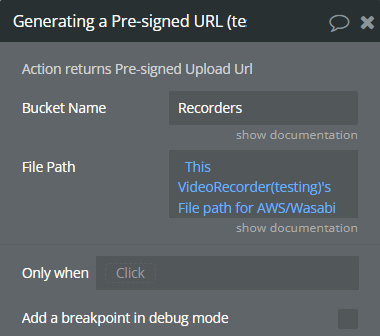
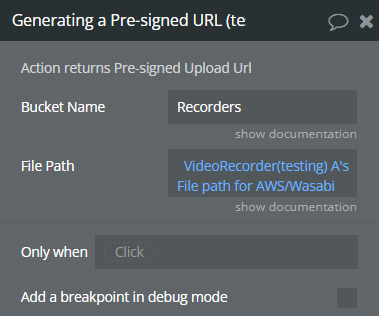
- Configuring Fields for "Generate Pre-signed URL"
- Bucket Name - Bucket name from AWS or Wasabi where to upload the files.
- File Path - This field requires the path of the file in order to upload it. Use state from the Video Recorder element
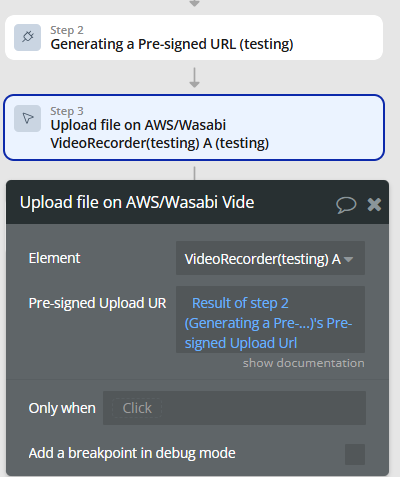
- Adding the "Upload File" Action
- After configuring the "Generate Pre-signed URL" action, add a new action under the same "Generation URL" event.
- Select "Upload File on AWS/Wasabi" from the list of available actions for the new elements.
- Configuring Fields for "Upload to AWS"
- Pre-signed upload URL - Enter the Pre-signed URL for uploading the file as the result of the previous “Generate Pre-signed URL" action. This URL will be used to upload the new file to AWS S3 or Wasabi.
- After uploading is finished, the plugin triggers “File is uploaded” event and updates “Video URL” state
Plugin Actions
Generating a Pre-signed URL
Server side action returns Pre-signed Upload Url
Title | Description | Type |
Bucket Name | If empty, the actinon takes bucket name from plugin keys field | (optional) Text |
File Path | The options necessary for pre-signed URL generation.
Note: Use the value of "file path for AWS/Wasabi" state from the element. | Text |
Return Values:
Title | Description | Type |
Pre-signed Upload Url | Use in Upload file on AWS/Wasabi action | Text(list) |
Helpful details
Displaying a “mkv” video in Chrome browser
☝
HTML5 does not support Matroska (MKV) files!
⚠️
This guide is helpful for use cases where the recorded video is displayed using an HTML element on the page, similar to this example!
The plugin may record a video in the MKV format. This can occur in two cases:
- when you explicitly specify the codec
video/x-matroska;codecs=avc1in the Codec field of the Start Recording element action.
- when the indicated format into Codec field from the Start Recording element action is not supported by your browser and the system automatically selects the codec “video/x-matroska;codecs=avc1”.
- when the format specified in the Codec field of the Start Recording element action is not supported by your browser, and the system automatically selects the codec
video/x-matroska;codecs=avc1.
☝
Check the Codec field documentation! The final codec may be automatically selected by the system based on the formats supported by the browser.
Solution
There are two solutions for properly displaying MKV videos:
- Instead of using
video/mkvfor thetypeattribute of thesourcetag, usevideo/mp4.
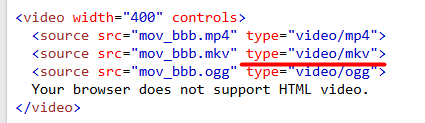
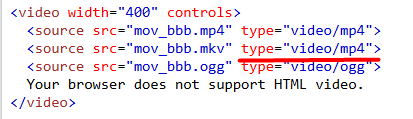
- Remove the
typeattribute from thesourcetag entirely.

Changelogs
Update 16.01.26 - Version 1.59.0
- Added "Enable file size limit" field, "current recording size" and "recording size percent" states.
Update 01.12.25 - Version 1.58.0
- Bubble Plugin Page Update (Forum).
Update 01.12.25 - Version 1.57.0
- Bubble Plugin Page Update (Description).
Update 14.11.25 - Version 1.56.0
- Bubble Plugin Page Update (Description).
Update 07.11.25 - Version 1.55.0
- Bubble Plugin Page Update (Description).
Update 09.09.25 - Version 1.54.0
- Bubble Plugin Page Update (Forum).
Update 16.07.25 - Version 1.53.0
- Bubble Plugin Page Update (Logo).
Update 20.06.25 - Version 1.52.0
- Bubble Plugin Page Update (Logo).
Update 21.05.25 - Version 1.51.0
- Fixed recording when mirror is turned off, restricted resolution to max 1080p when mirror is turned on.
Update 09.05.25 - Version 1.50.0
- Fixed low resolution recording.
Update 10.02.25 - Version 1.49.0
- Added dynamic Bucket Name field to Generating a Pre Pre-signed URL action.
Update 29.01.25 - Version 1.48.0
- Secured plugin keys:
- Keys:
- Deleted public keys
- Added private keys for AWS and Wasabi
- Action Save File
- Added fields:
- Folder Structure
- Add Prefix to File Name
- File Names Prefix
- Remove fields:
- Region (moved to private key)
- Bucket (moved to private key)
- Added New client side action - Upload file on AWS
- Added New server side action - Generating a Pre-signed URL
- Added New State File path for AWS/Wasabi for AWS
- Added New Event URL generation time
Update 19.12.24 - Version 1.47.0
- Fixed restarting a stopped camera when hiding and showing a plugin element.
Update 27.11.24 - Version 1.46.0
- Minor update(Marketing update).
Update 29.10.24 - Version 1.45.0
- Added "Select Microphone" field for "Start Camera" action.
Update 17.10.24 - Version 1.44.0
- Fixed black frames recording at the start of video.
Update 04.10.24 - Version 1.43.0
- Combined "Save To Bubble" & "Autosave" fields into "Autosave to Bubble"("Start Recording" action).
Update 19.09.24 - Version 1.42.0
- Dropbox & Google Drive saving feature.
Update 02.09.24 - Version 1.41.0
- Extended zoom support and fixed duration count of record.
Update 14.08.24 - Version 1.40.0
- Fixed "aspect-ratio" & "zoom" effect.
Update 19.07.24 - Version 1.39.0
- Fixed mirror feature.
Update 17.07.24 - Version 1.38.0
- Fixed "List of cameras" when the access was not given before.
Update 11.07.24 - Version 1.37.0
- fixed zoom in feature.
Update 24.06.24 - Version 1.36.0
- Fixed "Start Recording" action.
Update 11.06.24 - Version 1.35.0
- Updated demo/service links.
Update 09.05.24 - Version 1.34.0
- Added Codec field for action Start Recording, added Codec state.
Update 03.05.24 - Version 1.33.0
- new aspect ratio field.
Update 29.04.24 - Version 1.32.0
- updated mirror video recording.
Update 09.04.24 - Version 1.31.0
- minor update.
Update 08.03.24 - Version 1.30.0
- Fixed Microphone remaining active during video recording despite being disabled.
Update 16.01.24 - Version 1.29.0
- Added mirror video recording.
Update 03.01.24 - Version 1.28.0
- Minor fixes.
Update 03.01.24 - Version 1.27.0
- Added "Mirror Camera" field.
Update 18.12.23 - Version 1.26.0
- Added border style options.
Update 04.12.23 - Version 1.25.0
- Fixed element responsive..
Update 24.11.23 - Version 1.24.0
- updated description.
Update 13.11.23 - Version 1.23.0
- Added "Record Quality" field for "Start Recording" action.
Update 11.11.23 - Version 1.22.0
- Added "folder" field for "save_record" action..
Update 09.11.23 - Version 1.21.0
- Adapted for new responsive.
Update 27.10.23 - Version 1.20.0
- Updated documentation.
Update 18.10.23 - Version 1.19.0
- Updated description.
Update 17.10.23 - Version 1.18.0
- Changed plugin API to v4.
Update 06.10.23 - Version 1.17.0
- Updated "List of cameras" state.
Update 15.09.23 - Version 1.16.0
- updated description.
Update 12.09.23 - Version 1.15.0
- minor updates.
Update 11.09.23 - Version 1.14.0
- Fixed Safari browser detection.
Update 06.09.23 - Version 1.13.0
- Obfuscation.
Update 12.07.23 - Version 1.12.0
- updated description.
Update 19.06.23 - Version 1.11.0
- Updated the description .
Update 20.03.23 - Version 1.10.0
- Added Zoom feature.
Update 02.03.23 - Version 1.9.0
- Added "Select Camera" field in the "Start Camera" action.
Update 23.02.23 - Version 1.8.0
- deleted the icons.
Update 22.02.23 - Version 1.7.0
- updated the description.
Update 02.02.23 - Version 1.6.0
- Updated description.
Update 20.01.23 - Version 1.5.0
- Updated description.
Update 28.12.22 - Version 1.4.0
- Added "File is uploaded" event for Wasabi and AWS. Updated reset action..
Update 19.01.22 - Version 1.3.0
- added action "Take a photo".
Update 14.01.22 - Version 1.2.0
- Added demo .
Update 14.01.22 - Version 1.1.0
- Updated icon and added common part.
Update 06.12.21 - Version 1.0.0
- Initial Release.