
✅
Link to plugin page: https://zeroqode.com/plugin/aws-file-uploader-1533465056312x784389392881156100
Demo to preview the settings
✅
Introduction
AWS File Uploader Plugin is a powerful tool, that allows you or your users to upload files from Bubble apps directly to your AWS (Amazon Web Services) S3 Bucket without any file size limits.
The plugin comes with the multi-file uploader element as well as the S3 objects element that returns a list of all the files uploaded to your AWS S3 bucket or a special folder on that bucket. The plugin also allows you to delete S3 objects from your bucket.
Each uploaded file has its own visual progress bar, so you or your users can see the upload progress. Plugin will also return a state with file URL(s), file size(s), last modified date(s), etc.

Video Tutorials
How to Upload Large Files to AWS S3 from Your Bubble App With Plugin from Zeroqode
How to Upload Files to AWS S3 in Bubble
How to Show Real-Time Upload Progress in Bubble
How to Setup
To run this plugin you need the following to set it up on the AWS side:
1. AWS account
You can create the AWS account for free, just by visiting the following link: https://aws.amazon.com/console/
❕
Please note that the AWS Free Tier has limitations like the number of free GET/POST requests per 12 months:
https://aws.amazon.com/s3/pricing/
https://aws.amazon.com/free/?nc1=h_ls&all-free-tier.sort-by=item.additionalFields.SortRank&all-free-tier.sort-order=asc
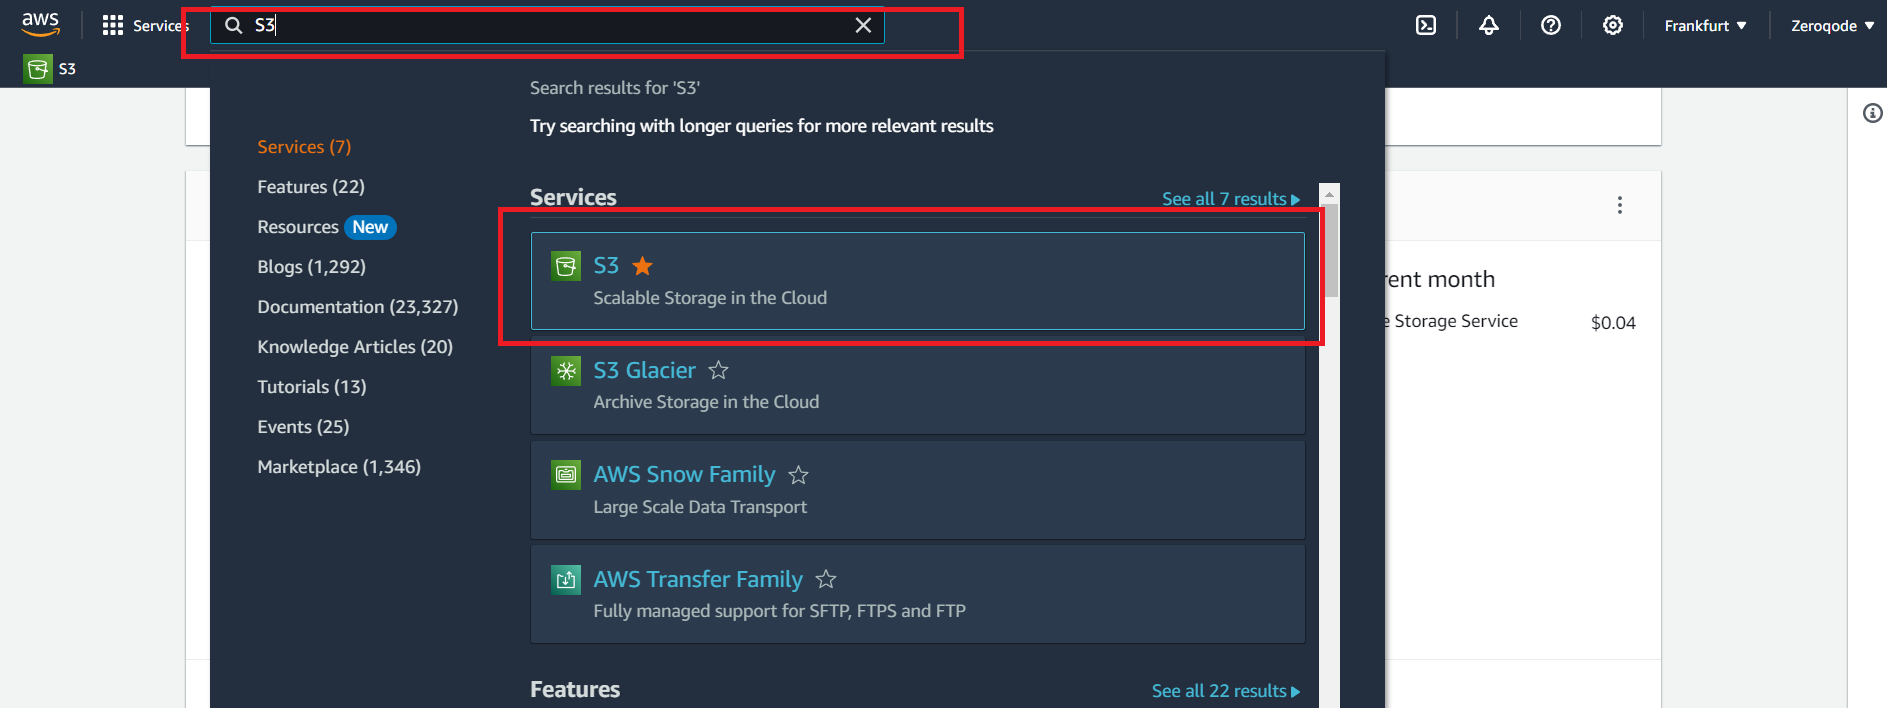
2. Create your first S3 bucket
- In the AWS services search bar at the top, type "S3" and click on "S3" in the dropdown to navigate to the S3 Dashboard or open this link
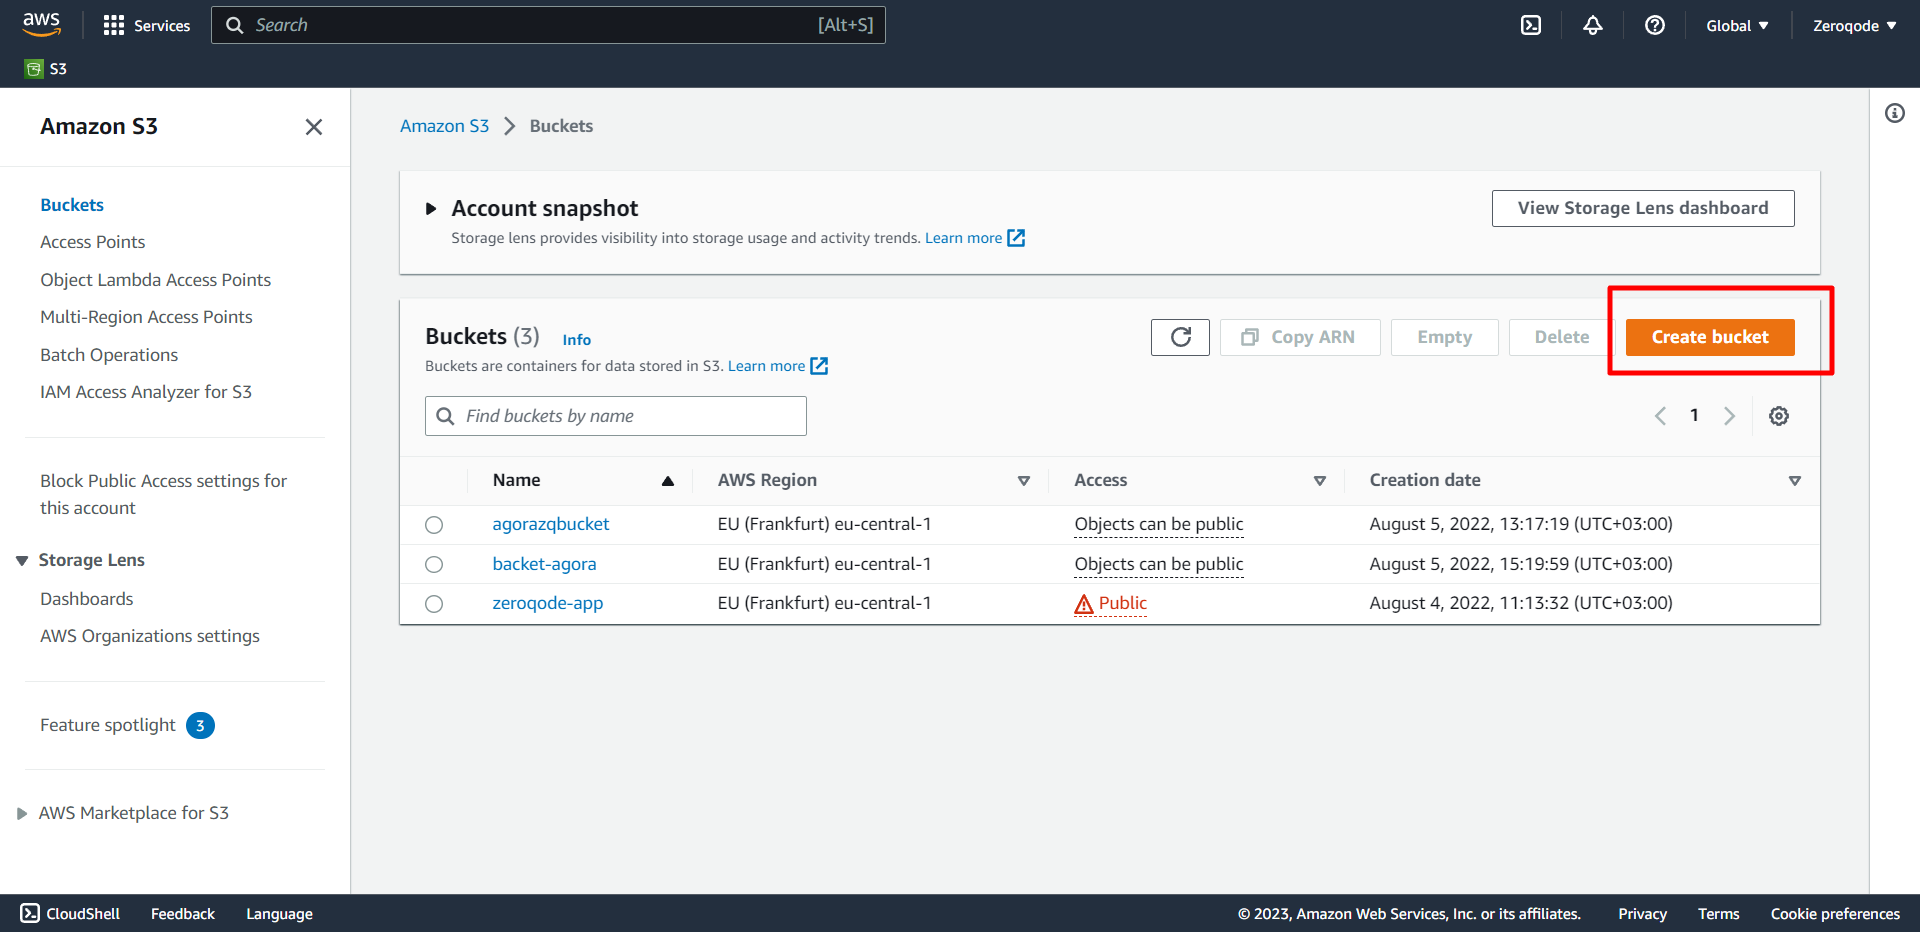
- Choose to Create bucket. The Create bucket page opens:
The bucket name must be created with the next conditions:
- The name should be between 3 and 63 characters long.
- Consist only of lowercase letters, numbers, dots (.), and hyphens (-). For best compatibility, we recommend that you avoid using dots (.) in bucket names, except for buckets that are used only for static website hosting.
- The name should begin and end with a letter or number.
After you create the bucket, you cannot change its name. For more information about naming buckets, see Bucket naming rules.
❗
IMPORTANT! Avoid including sensitive information, such as account numbers, in the bucket name. The bucket name is visible in the URLs that point to the objects in the bucket.
- For Region, choose the AWS Region where you want the bucket to reside. To minimize latency and costs and address regulatory requirements, choose a Region close to you. Objects stored in a Region never leave that Region unless you explicitly transfer them to another Region.
- For a list of Amazon S3 AWS Regions, see AWS service endpoints in the Amazon Web Services General Reference.
- Under Object Ownership, to disable or enable ACLs and control ownership of objects uploaded in your bucket, choose one of the following settings:
ACLs disabled
- Bucket owner enforced – ACLs are disabled, and the bucket owner automatically owns and has full control over every object in the bucket. ACLs no longer affect access permissions to data in the S3 bucket. The bucket uses policies to define access control.
To require that all new buckets are created with ACLs disabled by using AWS Identity and Access Management (IAM) or AWS Organizations policies, see Disabling ACLs for all new buckets (bucket owner enforced).
ACLs enabled
- Bucket owner preferred – The bucket owner owns and has full control over new objects that other accounts write to the bucket with the
bucket-owner-full-controlcanned ACL.
If you apply the bucket owner preferred setting, to require all Amazon S3 uploads to include the
bucket-owner-full-control canned ACL, you can add a bucket policy that allows only object uploads that use this ACL.- Object writer – The AWS account that uploads an object owns the object, has full control over it and can grant other users access to it through ACLs.
- Under Block Public Access settings for this bucket, choose the Block Public Access settings that you want to apply to the bucket. We recommend that you keep all settings enabled unless you know that you need to turn off one or more of them for your use case, such as to host a public website. The Block Public Access settings that you enable for the bucket are also enabled for all access points that you create on the bucket. For more information about blocking public access, see Blocking public access to your Amazon S3 storage.
- (Optional) Under Bucket Versioning, you can choose if you wish to keep variants of objects in your bucket. For more information about versioning, see Using Versioning in S3 buckets. To disable or enable versioning on your bucket, choose either Disable or Enable.
- (Optional) Under Tags, you can choose to add tags to your bucket. Tags are key-value pairs used to categorize storage. To add a bucket tag, enter a Key and optionally a Value and choose to Add Tag.
- Under Default encryption, choose Edit.
- To configure default encryption, under the Encryption key type, choose one of the following
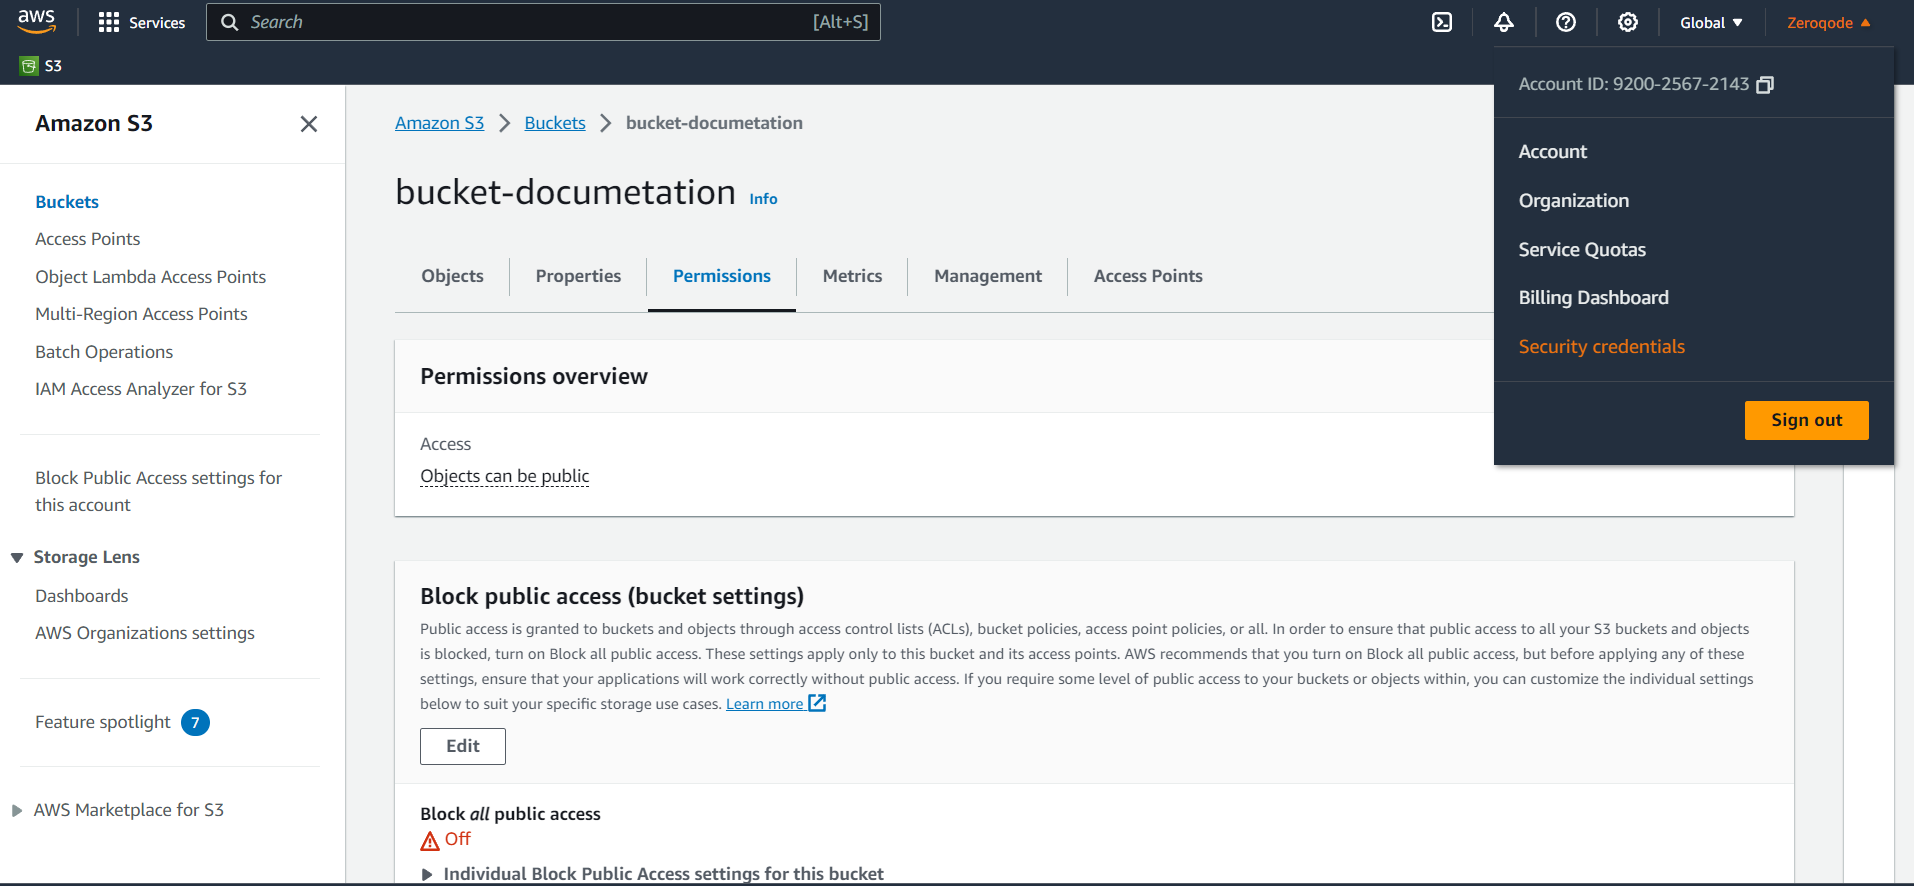
2. Get credentials
- Navigate to Your Account: At the top-right corner of the AWS Management Console, you'll see your account name or number. Click on it to open the dropdown menu.
- From the dropdown, select the "Security Credentials" option.
- Access Keys Section: Once on the Security Credentials page, expand the "Access keys (access key ID and secret access key)" section.
- Create New Access Key:
-If you already have existing access keys, you'll see them listed here.
-To create a new access key, click the "Create New Access Key" button.

- Download Credentials: After creating a new access key, you'll have the option to download it as a
.csvfile. Save this file securely, as AWS will not show these credentials again for security reasons.
☝
The policy we present in the documentation is just a template. Each client can set their own rules. The plugin works with pre-signed URLs and can operate with any policy.
☝
Important: for multipart upload to work correctly in the browser, the S3 bucket CORS configuration must explicitly expose the ETag response header. Each uploaded part
returns an ETag, and that value is required to complete CompleteMultipartUpload. If ETag is not exposed through CORS, the upload may appear to succeed for each part,
but the final multipart completion step will fail because the browser cannot read the ETag values.
3. Setting Cross-origin and Politics.
CROSS Configuration is required for the case when your resources should not to be accessed by external resources.
For example, you set domain "https://your-domain/" in cross, this means that only apps with the domain "https://your-domain/" will be able to access AWS Bucket.
⚠️There are two ways for set cross-origin and bucket policy
- Set cross-origin and bucket policy from Bubble.
- On a test page in Bubble app, add a button and add the action "Set standard Cross-origin".
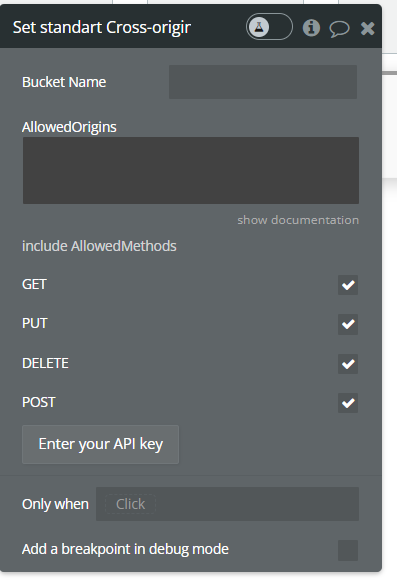
2. In AllowedOrigin - Enter the domains to which you want it to have access to the AWS bucket.
3. AllowedMethod - Check the checkbox for the methods to which the domain has access.
- GET - allow files to be accessed.
- PUT - allow files to be uploaded file.
- DELETE - allow files to be deleted.
- POST - allow files to be uploaded file.
2. Go to Preview and click our button with the action “Set standard Cross-origin”
3. Now, try to upload a file and if the upload is successful you can delete this page.
Second mode: Manual setting
Add security to your AWS bucket by configuring policies on the 'Permissions' tab:

In the next steps, we'll show you how to set Access Control, Bucket Policy, and CORS policy to get started with basic security restrictions.
1. In the 'Block public access' area unlock public access to all for time being.

2. In the 'Bucket Policy' area you can configure the rules for security and privacy via Bucket Policy. Take a look at the "Action", "Resource" and "Condition" fields where we grant access to reading the objects from our bucket.
In this case, we are granting read file access only to users from our application domain, so if a user gets an image URL and tries to open it in a new tab or a new window, the bucket policy will block this request because we stated in the privacy rules that the link can be opened only from our domain:

Here's a code example (JSON):
javascript{
    "Version": "2012-10-17",
    "Statement": [
        {
            "Sid": "AddPerm",
            "Effect": "Allow",
            "Principal": "*",
            "Action": "s3:GetObject",
            "Resource": "arn:aws:s3:::YOUR-BUCKET-NAME/*",
            "Condition": {
                "StringLike": {
                    "aws:Referer": "https://zeroqode-demo-02.bubbleapps.io/*"
                }
            }
        },
        {
            "Sid": "AddPerm2",
            "Effect": "Allow",
            "Principal": "*",
            "Action": "*",
            "Resource": "arn:aws:s3:::YOUR-BUCKET-NAME/*"
        }
    ]
}
YOUR-BUCKET-NAME - should be your S3 bucket name (ex: zeroqodedemo02).
You can find more Bucket Policy examples here. Feel free to try out other rules in order to improve your bucket security, since this documentation presents only our example of the settings.
3. In the Access control list (ACL) area make sure that all the options look like the image below to match our configuration:

Setting Cross-Origin Resource Sharing (CORS) Restrictions
- In the Permissions section, open CORS configuration.
- Add the following CORS configuration
javascript[
    {
        "AllowedHeaders": ["*"],
        "AllowedMethods": ["GET", "PUT"],
        "AllowedOrigins": ["https://your-website.com"],
        "ExposeHeaders": ["ETag"],
        "MaxAgeSeconds": 3000
    }
]
3.Click Save changes.
☝
Setting the CORS policy like this will allow everyone to change anything in your bucket, but you can definitely go deeper and set it up more securely.
For example, you can use the following JSON for CORS policy to allow access from your domain only (change the allowed origin to the URL of your app starting with https://)
⚠️
Note: We use CORS Configuration and Bucket Policy for informative purposes only for the test case.
For Access Permissions (CORS, Bucket Policy, Access Control List, etc.) please follow Amazon AWS's Setup Documentation to better understand your personal requirements.
❕https://docs.aws.amazon.com/AmazonS3/latest/dev/cors.html
❕https://docs.aws.amazon.com/AmazonS3/latest/user-guide/add-cors-configuration.html
❕https://docs.aws.amazon.com/AmazonS3/latest/dev/example-bucket-policies.html
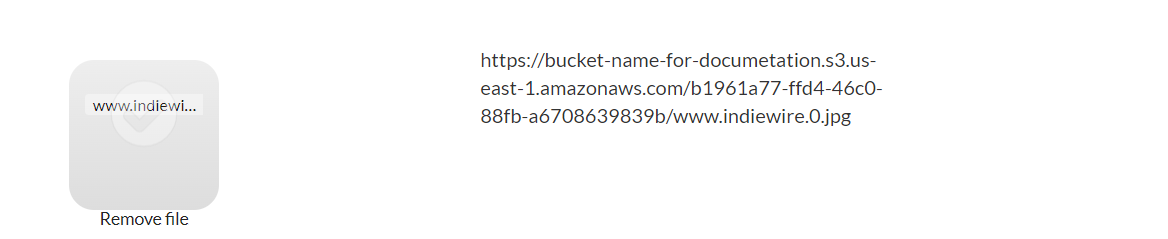
7. First test of the key and the plugin settings
- Put on a page the plugin's element and text element, in the text element display the state "file URL”.
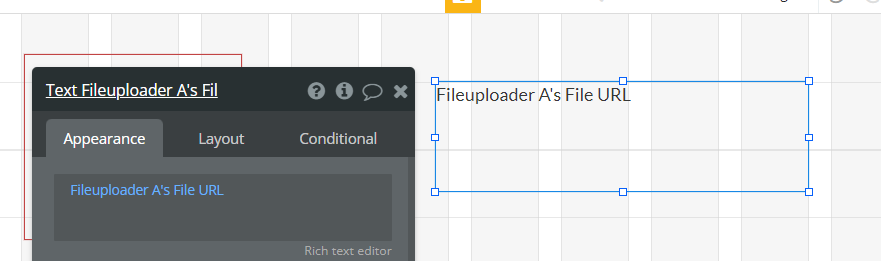
- Now you try to upload a file, if you get all with success, your page will be shown the file URL
✅
Here's a good Introduction Video by Amazon Team on how to get started with Amazon S3 - https://www.youtube.com/watch?v=vFfY_-TL-pc
Important: for multipart upload to work correctly in the browser, the S3 bucket CORS configuration must explicitly expose the ETag response header. Each uploaded part
returns an ETag, and that value is required to complete CompleteMultipartUpload. If ETag is not exposed through CORS, the upload may appear to succeed for each part,
but the final multipart completion step will fail because the browser cannot read the ETag values.
NEW ELEMENTS❤️🔥
This elements allows you to upload files directly to AWS S3 using pre-signed URLs. This documentation details the necessary steps for configuring the plugin and using it, including generating pre-signed URLs and setting up actions for uploading files to AWS S3.
File uploader
This element lets you easily upload files into your S3 Bucket using the User Interface
☝
The “File uploader element” conflicts with the “Multi-File Uploader - Dropzone” created by Bubble because they use the same library but different versions. Unfortunately, the Bubble plugin uses an outdated library, which breaks the functionality of our plugin.
☝
HEIC images require a license to be displayed and worked with on the web, which means that most modern browsers cannot utilise the crop feature with HEIC images. If your use case requires this functionality, please note that Safari on iOS, iPadOS, and macOS is the only browser that supports it currently.
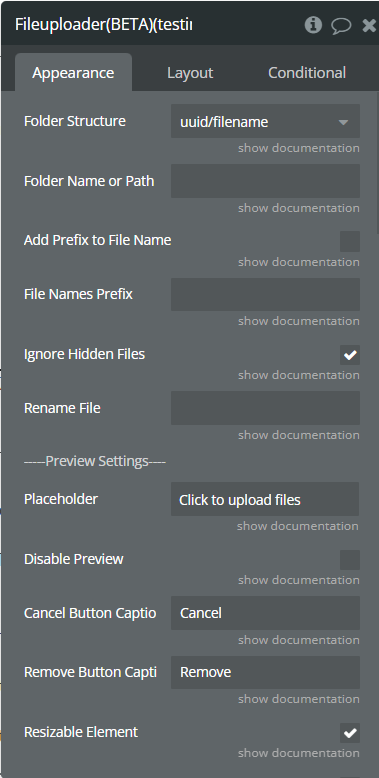
Element Properties
Title | Description | Type |
Folder Structure | Structure to be used for uploaded files. If “folder_name/uuid_filename” and folder_name/filename” is chosen, provide the ‘Folder name’ value below. If in this case the ‘Folder name’ is not indicated, the folder name ‘unknown’ will be used Available options: uuid/filename, uuid_filename, folder_name/uuid_filename, folder_name/filename | Dropdown |
Folder Name or Path | The name to be used for the user folder on S3 bucket. Is used only if the ‘Folder structure’ property is set to ‘folder name/uuid_filename’ and ‘folder_name/filename’. | Text (optional) |
Add Prefix to File Name | if checked, file names will get custom prefixes to make it easier to locate them on S3 Bucket. | Checkbox (yes/no) |
File Names Prefix | Add a prefix. For prefix do not use any special characters like: ! $ # @ etc … | Text (optional) |
Rename File | Works only with one file. If selected uploading multiple files, ALL files will be renamed the same. | Text (optional) |
Ignore Hidden Files | When you upload a folder, and in it can will be hidden files, and they will not upload in AWS. | Checkbox (yes/no) |
—–Preview Settings—- | ||
Placeholder | default text description that will be displayed in the editor until there is something to preview | Text |
Disable Preview | If cheked, a file preview and captions are disabled. | Checkbox (yes/no) |
Cancel Button Caption | If specified then the caption for the Cancel button will be applied. If empty, the button will not appear. | Text |
Remove Button Caption | If specified then the caption for the Remove button will be applied. If empty, the button will not appear. | Text |
Resizable Element | When uploading a lot of files the element will resize. | Checkbox (yes/no) |
Hide ScrollBar | If this checkbox is checked and you are uploading a large number of files and the element size is NOT resizable, the scrollbar will be hidden. | Checkbox (yes/no) |
This Input is Clickable | the dropzone element itself will be clickable | Checkbox (yes/no) |
—–Files’ Restrictions—– | ||
Max File Size (mb) | Max file size (mb) | Number |
Text when File Too Big | The text that will be displayed when the file size is too big | Text |
Max Files | Maximum number of uploaded files. | Number (optional) |
Text when Max Files is Exceeded. | The text will be displayed when Max Files is exceeded. | Text |
Accepted Files Type | Types of files accepted for uploading. This is a comma separated list of mime types or file extensions. Example: image/*,application/pdf,.psd | Text |
Text when Invalid File Type | The text will be displayed when invalid file type. | Text |
Image Resize Before Uploading | ||
Allow Image Resizing | If checked, the uploaded images will be resized according to the filed values below. | Checkbox (yes/no) |
Image Resize Width | If set, images will be resized to these dimensions before uploaded | Number (optional) |
Image Resize Height | If set, images will be resized to these dimensions before uploaded | Number (optional) |
Image Resize Method | How the images should be scaled down in case both, “Image Resize Width” and “Image Resize Height” are provided. Available options: crop, contain | Dropdown (optional) |
Image Resize Quality | If set, images quality will be resized to before uploaded Available options: 0.2, 0.4, 0.6, 0.8, 1 | Dropdown (optional) |
—–Crop Settings—– | ||
Allow Image Cropping | Connect the cropping window | Checkbox (yes/no) |
Aspect Ratio | Define the initial aspect ratio of the crop box. By default, it is the same as the aspect ratio of the canvas (image wrapper).EX: 16 / 9 | Text |
Style Crop Window | ||
Crop Window Title | Crop modal title | Text (optional) |
Crop Save Button Caption | Crop window save button caption. | Text (optional) |
Save Button Color | Color for SAVE Button | Color (optional) |
Save Button Text Color | Color for the text in the SAVE button | Color (optional) |
Crop Cancel Button Caption | Crop window cancel button caption. | Text (optional) |
Cancel Button Color | Color for Cancel Button | Color (optional) |
Cancel Button Text Color | Color for Text Button | Color (optional) |
-----Crop Hover Button settings--- | ||
Save Button Color | Color for SAVE Button at hover event | Color (optional) |
Save Button Text Color | Color for the text in the SAVE button at hover event | Color (optional) |
Cancel Button Color | Color for Cancel Button at hover event | Color (optional) |
Cancel Button Text Color | Color for the text in the Cancel button at hover event | Color (optional) |
Initial Value | File to be uploaded to AWS initially | File (optional) |
Manual Upload Mode | If checked, files will NOT be uploaded automatically after selection. The user must trigger upload manually via the 'Start Upload' action. This allows users to review and remove files before uploading. | Checkbox |
Element events
Title | Description |
An Error Occurred | When an error occurred |
Current file uploaded | When uploading is finished |
Initial Value is Set | When initial file for uploading is set |
Added Max Files Limit and Event “file limit exceeded” | When upload files more limit files |
Uploading is Start | When uploading is start |
Start Cropping | When start Cropping |
End Cropping | When end cropping. |
All files uploaded | When all file are uploaded. |
Generation URL | To this event, we must attach the "Generating a Pre-signed URL" action and “Upload file” action of the element |
File Removed from Selection | Triggered when a file is removed from the pre-upload selection. |
Element states
Title | Description | Type |
File URL | File URL | Text |
Error Message | Error message | Text |
List of File Names in AWS | List of file names | Text |
File Name in AWS | File Name | Text |
List of File URL | List of file URL | Text |
Progress of Files Upload (%) | Progress | Number |
Upload Progress of Current File | Progress | Number |
List of Files Sizes (KB) | List of files sizes | Number |
File Size (KB) | File size | Number |
Images Width | Images width | Number |
Images Height | Images Height | Number |
Too Big Files | Too big files names | Text |
Cropped Images Width | Width of the cropped image | Number |
Copped Images Height | Height of the cropped image | Number |
Initial Value URL | URL of the file initially added for upload | Text |
File Name Original | Name of the last file uploaded | Text |
List of File Names Original | List of original file names | Text |
List of Files Type | List of file's type what was uploaded | Text |
File Type | The type of last file which was uploaded | Text |
Size File After Processing | The size of a file after cutting and resizing | Number |
File Path | This is a state that you must send to the action "Generating a Pre-signed URL ” | Text |
Selected File Names (pre-upload) | List of names of files currently in the Dropzone queue (including those not yet uploaded). Updates when files are added or removed. | List of text |
Selected File Sizes (KB) | List of file sizes (KB) for files currently in the Dropzone queue. | List of number |
Element actions
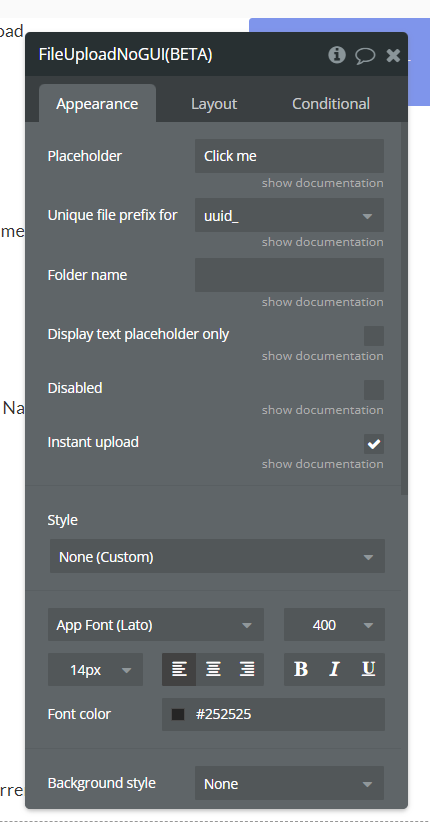
File Upload No GUI
Elements Proprieties
Title | Description | Type |
Placeholder | the title of the File Upload No GUI element | Text |
Unique file prefix format | Choose the unique file id format to be used for the uploaded files Available options: uuid_, zq_random.
Note: the uuid_ format prefix will always have a constant length of 36+1 = 37 characters, while for the prefix with the zq_random format, the length will vary.
| Dropdown |
Folder name | the directory within the S3 bucket where the uploaded files will be stored. If this property is provided, all uploaded files will be saved in the specified folder. If not provided, files will be stored at the root level of the bucket. | Text (optional) |
Display text placeholder only | If checked, in uploader will show only placeholder instead of file name after uploading | Checkbox (yes/no) |
Disabled | If checked the file input is disabled, and users cannot interact with it.
| Checkbox (yes/no) |
Instant upload | determines whether files should be uploaded immediately after they are selected. When this property is checked, the upload process starts automatically as soon as the user selects a file. When unchecked, the upload process must be triggered manually. | Checkbox (yes/no) |
File Size Limit (MB) | Defines the maximum allowed size (in MB) for each uploaded file.
If a selected file exceeds this limit, the upload is cancelled and the error event is triggered.
Examples: 5 → allows files up to 5 MB50 → allows files up to 50 MBNote:
This limit applies per file, not to the total combined size. | Number (MB) |
File Number Limit | Specifies the maximum number of files the user is allowed to select and upload at once.
If the user selects more files than the limit, the operation is stopped and the error event is triggered. | Number |
File Type Restriction | Restricts which file types the user is allowed to select and upload.
ex: application/pdf | Text |
Element events
Title | Description |
Upload Start | Triggered when plugin starts uploading file. |
Upload End | Triggered when plugin finished file uploading. |
Error | Triggered when error’s happened. |
Generation URL | To this event, we must attach the "Generating a Pre-signed URL” action and “Upload file” action of the element |
Preview Generated | Triggered right after one or more files are selected, and the temporary preview URLs are generated and published into the T emporary Preview state. |
All Files Uploaded | Triggered automatically after every selected file has been uploaded successfully.
Useful when you want to perform actions only after the entire upload batch is completed. |
File Removed | Triggered when a file is removed from the pre-upload selection via the 'Remove file by index' action. |
Element states
Title | Description | Type |
URL | Uploaded file URL. | Text |
Error | Error message. | Text |
AWS Name | Uploaded file name. | Text |
Size | File size in bytes. | Number |
Type | File type. | Text |
URls | the URLs of the files successfully uploaded to the S3 bucket | Text(list) |
Original Name | The original name of the file | Text |
File Path | This is a state that you must send to the action "Generating a Pre-signed URL ” | Text |
Upload Progress | Represents the current percentage or stage of a file upload process. This numerical value indicates to the user how much of the upload has been completed. | Number |
Total Progress | Shows the overall progress of an operation that may include multiple uploads or steps. It's a numerical value that displays the general completion percentage of the entire process. | Number |
Temporary Preview | Returns a list of temporary local URLs ( blob:) generated when the user selects one or more files. These links allow displaying image previews before the upload starts. | List of text |
Selected File Names | List of names of files currently selected for upload (before upload starts). Updates when files are added or removed via 'Remove file by index' action | List of text |
Elements Actions
Plugin actions
Delete Files/File
This action should be used in order to delete a list of files or file from an S3 Bucket
Title | Description | Type |
Links For Delete | A comma-separated list of full URLs pointing to the files that need to be deleted. | Text(list) |
Bucket Name | The name of the S3 bucket from which files are to be deleted. | Text |
Return Values:
Title | Description | Type |
Succes | returns an object { succes: 'succes' } upon completion, indicating successful deletion of the objects. | Text |
Set standart Cross-origin
configures CORS (Cross-Origin Resource Sharing) rules and a bucket policy for an AWS S3 bucket
Title | Description | Type |
Bucket Name | The name of the S3 bucket to configure. | Text (optional) |
AllowedOrigins | A comma-separated list of origins allowed to interact with the S3 bucket under the CORS policy. | Text(list) |
GET, PUT, DELETE, POST | HTTP method properties ( get, put, delete, post): (boolean) Flags indicating which HTTP methods should be allowed under the CORS policy. | Checkbox (yes/no) |
Delete Folder
deletes all files within a specific folder in an AWS S3 bucket
Title | Description | Type |
Bucket Name | The name of the S3 bucket from which files are to be deleted. | Text |
Folder | The folder within the S3 bucket whose contents are targeted for deletion. | Text |
Get All Files
It is a new action that returns the information to all the files uploaded to your Bucket!
Title | Description | Type |
Bucket Name | The name of the S3 bucket from which files are to be deleted. | Text |
Folder Name | In case you want to retrieve the files from a certain folder within a bucket. | Text |
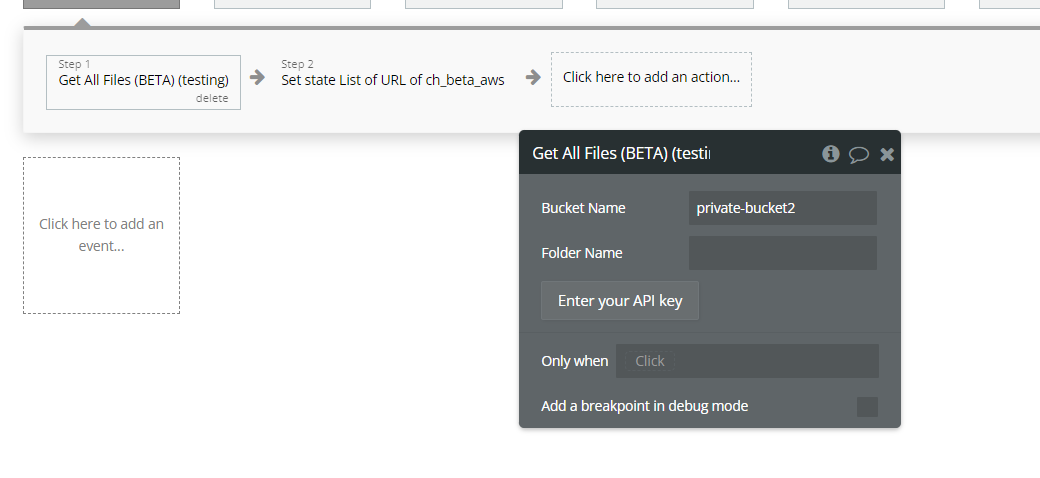
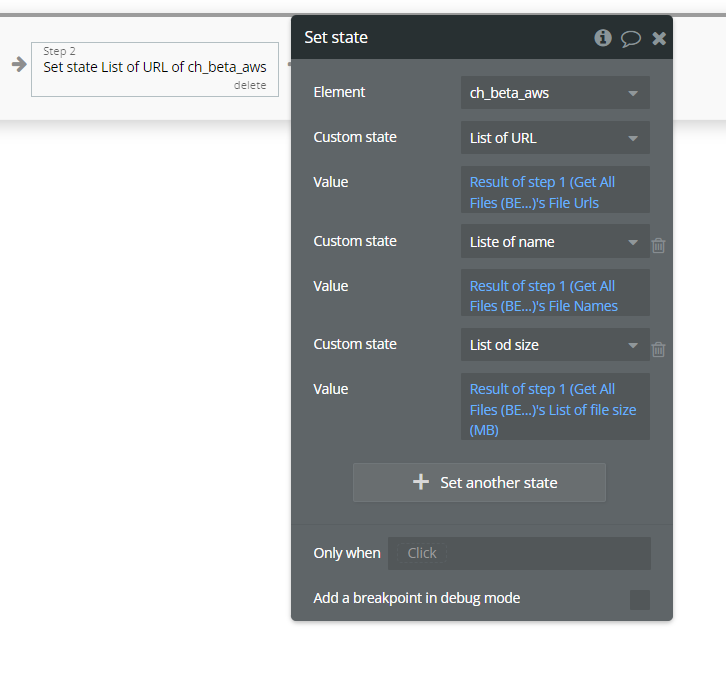
You can save the obtained data in custom states to display them wherever you want.
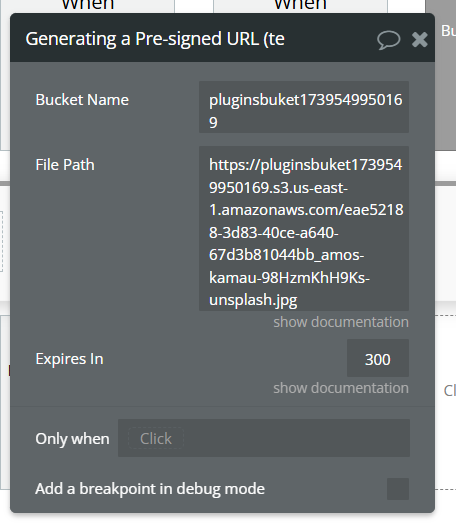
Generating a Pre-signed URL
This action generates pre-signed URLs that allows the plugin to upload files from new elements.
Title | Description | Type |
Bucket Name | Bucket name from AWS where to upload the files. | Text |
File Path | This field requires the file path in order to generate the Pre-Signed URL.
If you use this action to upload files from our uploader elements NOGUI and GUI, please make sure to set the element's file path state.
| Text |
Expires In | The expiresIn value defines how long the URL remains valid before it automatically becomes inaccessible.
| Number |
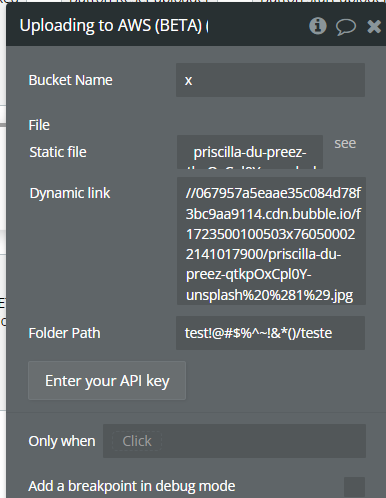
Uploading to AWS
The AWS upload action entails the transfer of files from the Bubble application to an S3 storage bucket.
Title | Description | Type |
Bucket Name | Bucket name from AWS where to upload the files. | Text |
File | The file to be uploaded | Text |
Folder Path | The address where the file should be uploaded. | Text |
Steps for Configuring the “File Uploader" and "File Uploader No GUI”
- Adding the Element to the Page
- Open the page editor and navigate to the page where you want to add the AWS file upload functionality.
- Select the “File uploader” or “File Upload No GUI” elements from the component library.
- Add the element on the page.
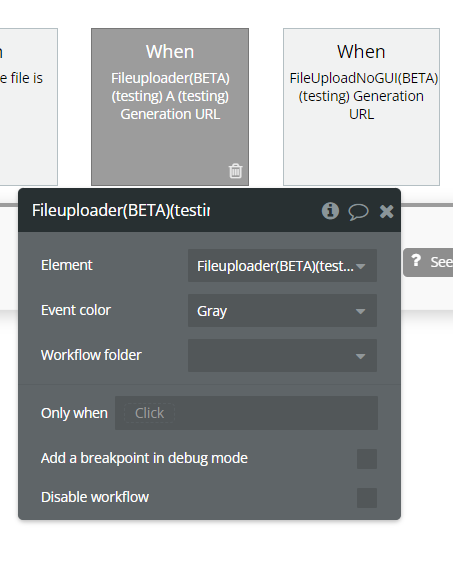
- Configuring the "Generation URL" Event
- In the Workflow section, add a new event by selecting "Generation URL" from the list of available events.
- Select the wanted Uploader element from the Element dropdown.
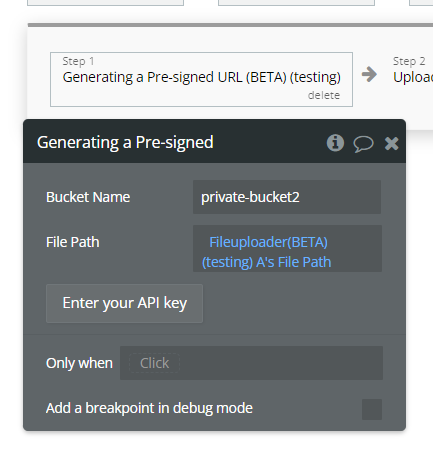
- Adding the "Generate Pre-Signed URL" Action
- In the "Generation URL" event, add a new action.
- Select "Generate Pre-signed URL " from the list of available actions.
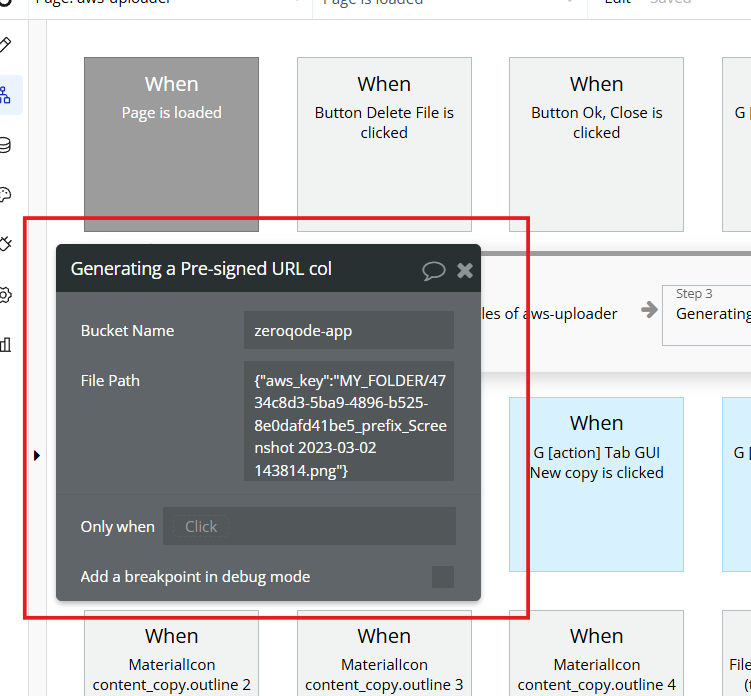
- Configuring Fields for "Generate Pre-signed URL"
- Bucket Name - Bucket name from AWS where to upload the files.
- File Path - This field requires the path of the file in order to upload it. Both new elements have a new state that returns this information.
- Adding the "Upload File" Action
- After configuring the "Generate Pre-signed URL" action, add a new action under the same "Generation URL" event.
- Select "Upload File" from the list of available actions for the new elements.
- Configuring Fields for "Upload to AWS"
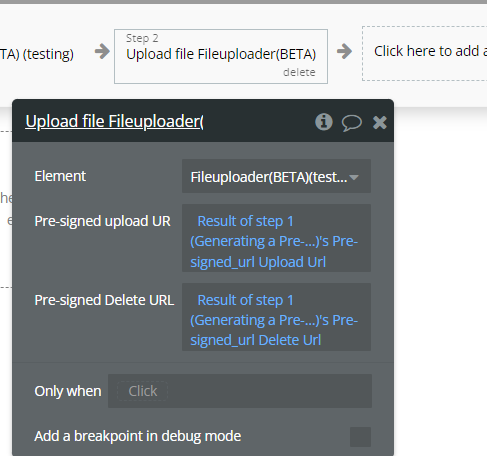
- Element - Select the wanted element from the dropdown.
- Pre-signed upload URL - Enter the Pre-signed URL for uploading the file as the result of the previous “Generate Pre-signed URL" action. This URL will be used to upload the new file to AWS S3.
- Delete Sign URL: Enter the Pre-signed URL for deleting the file (if applicable) as the result of the previous “Generate Pre-signed URL" action. This URL will be used to delete the previously uploaded file from AWS S3.
Tips
1.Warm start
This issue is related to how Bubble works. Server-side actions have a specific set of modules that Bubble installs temporarily during the first execution of the action. To bypass this behavior and make Bubble install the required libraries faster, we can execute the function when the page loads using a dummy object. This way, the action will run before the user interacts with the page, avoiding the unpleasant delay caused by Bubble installing the necessary module.

Changelogs
Update 05.06.26 — Version 1.235.0
- Individual file removal before upload.
Update 14.05.26 - Version 1.234.0
- Bubble Plugin Page Update (Tutorials).
Update 13.03.26 - Version 1.233.0
- AWS - the issue with the "File Type Restriction" field has been fixed.
Update 12.03.26 - Version 1.232.0
- the issue with the "File Type Restriction" field has been fixed.
Update 10.12.25 - Version 1.231.0
- Added pre-upload metadata support similar to HEIC handling.
Update 03.12.25 - Version 1.230.0
- Initialize file metadata (size, type, and name) during file upload.
Update 01.12.25 - Version 1.229.0
- Added File size limit, File number limit, File type restriction and event All files uploaded.
Update 01.12.25 - Version 1.228.0
- Bubble Plugin Page Update (Description).
Update 10.11.25 - Version 1.227.0
- Improve upload action support for Google Drive public link.
Update 30.10.25 - Version 1.226.0
- Bubble Plugin Page Update (Buttons).
Update 29.10.25 - Version 1.225.0
- File Uploader no-GUI - publishing a list of temporary image preview URLs before upload.
Update 29.10.25 - Version 1.224.0
- Bubble Plugin Page Update (Description).
Update 29.10.25 - Version 1.223.0
- Bubble Plugin Page Update (Recommendations).
Update 16.09.25 - Version 1.222.0
- Improvement of the “Upload file from link (Bubble File Manager)” action.
Update 19.08.25 - Version 1.221.0
- Dynamic Update for Accept Type Field.
Update 15.08.25 - Version 1.220.0
- The issue of double trigger for the 'upload was end' event has been fixed..
Update 24.07.25 - Version 1.219.0
- Fixed problem with height.
Update 26.06.25 - Version 1.218.0
- The Heic to png conversion library has been changed to provide more stability.
Update 23.06.25 - Version 1.217.0
- The Heic to png conversion library has been changed to provide more stability.
Update 17.06.25 - Version 1.216.0
- The issue with converting HEIC to PNG has been fixed when the "Disable preview" option is enabled.
Update 09.06.25 - Version 1.215.0
- Marketing update (minor change).
Update 04.06.25 - Version 1.214.0
- The plugin now supports converting HEIC images to PNG for better compatibility with iOS files.
Update 02.05.25 - Version 1.213.0
- Minor update (Marketing update).
Update 07.04.25 - Version 1.212.0
- Preview for HEIC format has been added.
Update 04.04.25 - Version 1.211.0
- Preview for heic format has been added
Update 02.04.25 - Version 1.210.0
- Loaded all dependencies via the plugin editor for use in the plugin
Update 27.03.25 - Version 1.209.0
- Added the option to reset the "File Path" state, clearing it after file removal or uploader reset
Update 17.03.25 - Version 1.208.0
- Now, it works not only with links generated by the uploader elements but also with a direct link to the object provided
- Push Update: Added two new states to the File Uploader NoGUI element - "Upload Progress" which tracks individual file upload percentage and "Total Progress" which monitors overall completion across multiple files.
Update 06.03.25 - Version 1.207.0
- Added expiry time parameter in 'Get all objects'
Update 18.02.25 - Version 1.206.0
- The sate pre-sign disappears, leaving only the "file URL" to optimize the workflow
Update 18.02.25 - Version 1.205.0
- The "Last Modified" state has been converted to date type, and the files are sorted in descending order
Update 18.02.25 - Version 1.204.0
- The "Get all files" action has been restructured
Update 04.02.25 - Version 1.203.0
- Air Calendar - added field 'Current day cells color'. Phone Input Number - updated documentation to field.
Update 04.02.25 - Version 1.202.0
- Big changes in the Rich Text Editor in AWS to improve security
Update 27.01.25 - Version 1.201.0
- Changed CSS for the crop popup to add more bottom padding
Update 20.01.25 - Version 1.200.0
- Fixed the problem when folder name have key '.com'
Update 13.12.24 - Version 1.199.0
- The old elements have been removed. The beta elements have been promoted and are now the primary elements
Update 20.11.24 - Version 1.197.0
- Presigned urls state added to Get all files server side.
Update 07.11.24 - Version 1.195.0
- Fixed problem with NoGUI element uploading same file multiple times.
Update 01.11.24 - Version 1.194.0
- The issue with rotation during resizing for iOS with HEIC extension has been fixed.
Update 21.10.24 - Version 1.193.0
- Improvement logic for big files.
Update 18.10.24 - Version 1.192.0
- AWS -The field "Cropping Quality" was added.
Update 04.10.24 - Version 1.191.0
- The field "Cropping Quality" was added.
Update 30.08.24 - Version 1.190.0
- The ability to upload files larger than 5 GB.
Update 27.08.24 - Version 1.189.0
- Adding the folder file.
Update 17.07.24 - Version 1.187.0
- Added new actions (Get All Files, Generate a Pre-signed URL (BETA)).
Update 17.07.24 - Version 1.186.0
- Added new elements (File Uploader (BETA) and File Upload No GUI (BETA)).
Update 16.07.24 - Version 1.185.0
- Minor update (Marketing update).
Update 02.07.24 - Version 1.184.0
- Fixed AWS File Uploader.
Update 19.06.24 - Version 1.183.0
- Minor update.
Update 14.06.24 - Version 1.182.0
- Fixed the problem with cropping when the image is big.
Update 12.06.24 - Version 1.181.0
- The possibility to change the initial value from condition.
Update 10.06.24 - Version 1.180.0
- Minor update.
Update 07.06.24 - Version 1.179.0
- Added new status "File size after processing".
Update 27.05.24 - Version 1.178.0
- New Generate SignedUrl action.
Update 15.05.24 - Version 1.177.0
- Was updated signature Version.
Update 03.05.24 - Version 1.176.0
- MapBox - Default Zoom.
Update 03.05.24 - Version 1.175.0
- AWS - Hand cursor over No GUI element was added .
Update 01.05.24 - Version 1.174.0
- Changing the rename file option to optional.
Update 29.04.24 - Version 1.173.0
- Hand cursor over No GUI element was added.
Update 11.04.24 - Version 1.172.0
- was added states list of file type and file type.
Update 03.04.24 - Version 1.171.0
- updated description.
Update 02.04.24 - Version 1.170.0
- Was added option 'rename file'.
Update 26.03.24 - Version 1.169.0
- added new state in element "File upload NoGui", Original Name".
Update 21.03.24 - Version 1.168.0
- added function "Create Temporary Credentials" and adopted functions for work with temporary credential.
Update 07.03.24 - Version 1.167.0
- Fixed problem with delete file and files.
Update 20.02.24 - Version 1.166.0
- seated capture as undefined for media.
Update 15.02.24 - Version 1.165.0
- Fixed problem with style pop up and aspect ratio.
Update 08.02.24 - Version 1.164.0
- Revamp the element "File uploader".
Update 24.01.24 - Version 1.163.0
- updated description.
Update 16.01.24 - Version 1.162.0
- the problems with the reset input action have been fixed.
Update 08.01.24 - Version 1.161.0
- Added delay for "reset" action.
Update 05.01.24 - Version 1.160.0
- Reinitialize "File Uploader" in "reset" action.
Update 27.12.23 - Version 1.159.0
- updated description.
Update 25.12.23 - Version 1.158.0
- updated description.
Update 19.12.23 - Version 1.157.0
- updated description.
Update 13.12.23 - Version 1.156.0
- added changes in Rich Text Editor, Advanced Multi Uploader, AWS File uploader - Any size.
Update 08.12.23 - Version 1.155.0
- Improved the "File Upload No GUI" element with uplode with sign up url, disable, and start upload from WF.
Update 21.11.23 - Version 1.154.0
- fixed problem with calculation saize file.
Update 17.11.23 - Version 1.153.0
- was corrected the type of file in AWS.
Update 09.11.23 - Version 1.152.0
- fixed problem with Rotated images for mobile".
Update 31.10.23 - Version 1.151.0
- Fixed problem with state "File URL.
Update 27.10.23 - Version 1.150.0
- Fixed problem with dinamic folder name.
Update 19.10.23 - Version 1.149.0
- Updated description.
Update 04.10.23 - Version 1.148.0
- Major change at AWS connection.
Update 25.09.23 - Version 1.147.0
- Major change at AWS connection.
Update 18.09.23 - Version 1.146.0
- updated description.
Update 13.09.23 - Version 1.145.0
- minor updates.
Update 11.09.23 - Version 1.144.0
- updated the plugin name .
Update 11.09.23 - Version 1.143.0
- Updated field description "Image resize quality".
Update 06.09.23 - Version 1.142.0
- Obfuscation.
Update 26.07.23 - Version 1.141.0
- Fixed scroll of the "File uploader" element.
Update 24.07.23 - Version 1.140.0
- Change log: Added field: "Disable Preview.
Update 19.07.23 - Version 1.139.0
- fixed problem with compressing imagine.
Update 10.07.23 - Version 1.138.0
- updated description.
Update 10.07.23 - Version 1.137.0
- Fixed "Reset input" action in "File uploader" element.
Update 29.06.23 - Version 1.136.0
- migrate plugin to new version.
Update 27.06.23 - Version 1.135.0
- added show docs for "identity_pool_id" field.
Update 27.06.23 - Version 1.134.0
- was fixed action "upload file".
Update 21.06.23 - Version 1.133.0
- updated the description.
Update 16.06.23 - Version 1.132.0
- Updated the description .
Update 14.06.23 - Version 1.131.0
- The error message more user friendly.
Update 12.06.23 - Version 1.130.0
- Added "Delete Folder Backend.
Update 31.05.23 - Version 1.129.0
- Improve keys security.
Update 15.05.23 - Version 1.128.0
- Fixed "Placeholder" field.
Update 21.04.23 - Version 1.127.0
- Fixed Allow Image Cropping.
Update 11.04.23 - Version 1.126.0
- Improved "cancel button" on a crop modal.
Update 07.04.23 - Version 1.125.0
- Fixed file size.
Update 27.03.23 - Version 1.124.0
- Added transparent background on crop modal.
Update 06.03.23 - Version 1.123.0
- Added Event "uploading is stared".
Update 23.02.23 - Version 1.122.0
- Fixed Crop Popup and styles with new responsive.
Update 23.02.23 - Version 1.121.0
- CloudSponge Contact Picker .
Update 21.02.23 - Version 1.120.0
- updated the description.
Update 07.02.23 - Version 1.119.0
- Added Upload Files action, Hide ScrollBar field and fixed thumbnail size.
Update 02.02.23 - Version 1.118.0
- Updated description.
Update 29.01.23 - Version 1.117.0
- Fixed uploading images in HEIC format.
Update 20.01.23 - Version 1.116.0
- Updated description.
Update 19.12.22 - Version 1.115.0
- Fixed file uploader height when "collapse when hidden" is checked.
Update 12.12.22 - Version 1.114.0
- minor fixes.
Update 09.12.22 - Version 1.113.0
- minor fixes.
Update 28.11.22 - Version 1.112.0
- Fixed Crop pop-up.
Update 22.11.22 - Version 1.111.0
- Fixed Crop pop-up and fixed Prefix.
Update 14.11.22 - Version 1.110.0
- Added "List of FileNames Original" state.
Update 09.11.22 - Version 1.109.0
- Fixed Asian character recognition, added “FileName Original” state and fixed “uploading is finished” event.
Update 27.10.22 - Version 1.108.0
- Updated description.
Update 26.10.22 - Version 1.107.0
- Fixed "Allow image processing" option and minor fixes.
Update 20.10.22 - Version 1.106.0
- Fixed "uploading is finished" event. Added "Display only title" in FileUploader. .
Update 04.10.22 - Version 1.105.0
- Fixed "Upload File" action.
Update 03.10.22 - Version 1.104.0
- Fixed event "uploading is finished".
Update 26.09.22 - Version 1.103.0
- Fixed event "AWS Uploading is finished" and added "Display text title only" field.
Update 19.09.22 - Version 1.102.0
- Adjusted common part.
Update 12.09.22 - Version 1.101.0
- added max files limit and event "file limit exceeded".
Update 05.09.22 - Version 1.100.0
- Updated common part.
Update 02.09.22 - Version 1.99.0
- Fixed problem with delete files.
Update 29.08.22 - Version 1.98.0
- updated common part.
Update 22.08.22 - Version 1.97.0
- Added new action for delete files in backend.
Update 22.07.22 - Version 1.96.0
- Fixed duplicate prefix when structure is “folder_name/filename".
Update 30.06.22 - Version 1.95.0
- updated endpoint for action "get files" .
Update 22.06.22 - Version 1.94.0
- Updated description.
Update 23.05.22 - Version 1.93.0
- fixed the problem with states Size, type etc..
Update 09.05.22 - Version 1.92.0
- Added text in description.
Update 01.04.22 - Version 1.91.0
- Added new form to save files in AWS.
Update 01.04.22 - Version 1.90.0
- minor changes.
Update 17.03.22 - Version 1.89.0
- maked preview for file HEIC \ HEIF.
Update 14.02.22 - Version 1.88.0
- minor fixed.
Update 01.02.22 - Version 1.87.0
- Added function for eliminating special character from filename.
Update 17.12.21 - Version 1.86.0
- Fixed problem with the dynamic prefix.
Update 14.12.21 - Version 1.85.0
- Fixed problem with the area clickability.
Update 06.12.21 - Version 1.84.0
- improvement with image orientation correction function.
Update 02.12.21 - Version 1.83.0
- Improvement with function to correct the image orientation..
Update 20.11.21 - Version 1.82.0
- improve NoGui element multiple files upload and selecting the folder.
Update 08.08.21 - Version 1.81.0
- fixed the problem with special characters in the filename.
Update 28.07.21 - Version 1.80.0
- Updated description.
Update 16.07.21 - Version 1.79.0
- fixed problem with signature and updated icon.
Update 06.07.21 - Version 1.78.0
- all areas of the element have become clickable.
Update 19.06.21 - Version 1.77.0
- has been updated documentation for fields..
Update 07.06.21 - Version 1.76.0
- minor fixed problem with 'Allow Image Cropping'..
Update 06.05.21 - Version 1.75.0
- Standardization the logic for encode/decode S3 object.
Update 26.04.21 - Version 1.74.0
- encoding URL for special character.
Update 18.04.21 - Version 1.73.0
- fixed problem with any size.
Update 13.04.21 - Version 1.72.0
- fixed problem when folder name with spacing.
Update 15.03.21 - Version 1.71.0
- Updated description.
Update 13.03.21 - Version 1.70.0
- Updated plugin name.
Update 04.03.21 - Version 1.69.0
- fixed the problem with height in reset function.
Update 03.03.21 - Version 1.68.0
- Updated description.
Update 09.02.21 - Version 1.67.0
- Updated icon.
Update 13.01.21 - Version 1.66.0
- Fixed 'File Upload No GUI' element bug in case of multiple elements.
Update 04.01.21 - Version 1.65.0
- Fixed plugin property value in production.
Update 01.01.21 - Version 1.64.0
- Added new properties to plugin elements. Fixed issue with special characters in Safari. See plugin documentation for mor.
Update 07.12.20 - Version 1.63.0
- Fixed placeholder view in Fileuploader element.
Update 03.12.20 - Version 1.62.0
- Fixed FileUploader element view and height.
Update 27.11.20 - Version 1.61.0
- Updated description.
Update 26.11.20 - Version 1.60.0
- Fixed image preview rotation problem for some devices.
Update 23.11.20 - Version 1.59.0
- Fixed 'space' encoding in published URLs for NoGUI File Uploader element.
Update 19.11.20 - Version 1.58.0
- Minor fixes for Initial value.
Update 13.11.20 - Version 1.57.0
- File Uploader element: added 'Initial Value' property, 'Initial Value URL' state and 'initial value is set' event..
Update 27.10.20 - Version 1.56.0
- Fixed the bug with extra images for cropping functionality.
Update 22.10.20 - Version 1.55.0
- Added states refresh on 'Reset input' action.
Update 09.10.20 - Version 1.54.0
- Updated docs link.
Update 30.09.20 - Version 1.53.0
- Fixed 404 error for one resource.
Update 09.09.20 - Version 1.52.0
- Fixed bug with List of file sizes, file size. Improvement with new states: Cropped width value, Cropped height value.
Update 28.07.20 - Version 1.51.0
- Fixed 'uploading is finished' event triggering. Fixed 'Images Width' and 'Images Height' behavior when 'Many files' is s.
Update 10.07.20 - Version 1.50.0
- Fixed crop feature when checkbox 'Crop if size is smaller than Image Resize Width or Height?' is not set. Fixed NoGUI Up.
Update 23.06.20 - Version 1.49.0
- Fixed error caused by minification during plugin publishing.
Update 19.06.20 - Version 1.48.0
- Improved File Uploader behavior for getting image width and height for disabled thumbnails and image processing options.
Update 15.06.20 - Version 1.47.0
- Improved File Uploader behavior for getting width and height of uploaded image files.
Update 12.06.20 - Version 1.46.0
- Added support for deleting individual files with special characters in file names.
Update 26.05.20 - Version 1.45.0
- Fixed cropping functionality using 2 elements on page.
Update 25.05.20 - Version 1.44.0
- fixed the bug with conflict between elements of plugin.
Update 18.05.20 - Version 1.43.0
- fixed the crash when the prefix is missing..
Update 17.05.20 - Version 1.42.0
- fixed the crash when the prefix is missing.
Update 28.04.20 - Version 1.41.0
- Fixed bug with style, reset input, reset sizes of the element..
Update 23.04.20 - Version 1.40.0
- Update - minor fixes alongside name prefixes and file extensions..
Update 20.02.20 - Version 1.39.0
- Fixed - placeholder text centered on small sizes uploader interface.
Update 20.02.20 - Version 1.38.0
- ix - radio buttons style conflicts fixed.
Update 20.01.20 - Version 1.37.0
- Update - file uploader can handle huge files now..
Update 14.12.19 - Version 1.36.0
- Fixed: Files sizes and dimensions not duplicating after reset inputs..
Update 10.12.19 - Version 1.35.0
- Fix - recalculate height of the container when many files uploaded..
Update 01.11.19 - Version 1.34.0
- Update and Fix - return a state with files sizes correctly.
Update 05.09.19 - Version 1.33.0
- Bug Fix - minor fixes with uploading any types of files..
Update 05.09.19 - Version 1.32.0
- internal improvements, bug fixes.
Update 13.08.19 - Version 1.31.0
- Improvement - image auto rotate when EXIF data is not read correctly. Faster cropping images. .
Update 07.08.19 - Version 1.30.0
- Little fixes - images auto-rotate to the right position, faster cropping process, faster images processing..
Update 05.08.19 - Version 1.29.0
- fixed the time issue.
Update 15.07.19 - Version 1.28.0
- Improvements and fixes.
Update 03.07.19 - Version 1.27.0
- minor fixes.
Update 03.07.19 - Version 1.26.0
- Minor improvements.
Update 01.07.19 - Version 1.25.0
- minor improvements.
Update 14.06.19 - Version 1.24.0
- Minor fixes.
Update 30.05.19 - Version 1.23.0
- Minor fixes.
Update 29.05.19 - Version 1.22.0
- Improvements.
Update 07.02.19 - Version 1.21.0
- Minor improvements.
Update 06.02.19 - Version 1.20.0
- Update.
Update 06.02.19 - Version 1.19.0
- Minor improvements.
Update 06.02.19 - Version 1.18.0
- Minor improvements.
Update 06.02.19 - Version 1.17.0
- minor improvements.
Update 04.02.19 - Version 1.16.0
- Minor improvements.
Update 04.02.19 - Version 1.15.0
- Minor Improvements.
Update 29.01.19 - Version 1.14.0
- Minor improvements.
Update 25.01.19 - Version 1.13.0
- Minor improvements.
Update 23.01.19 - Version 1.12.0
- Minor improvements.
Update 22.01.19 - Version 1.11.0
- Added new plugin element called "File upload no GUI" in which you can define any static or dynamic links that will be uploaded to AWS. It returns 3 states: URL, Uploaded File Name, Error and 3 events: Upload Started, Upload Ended, Error..
Update 18.01.19 - Version 1.10.0
- Minor fixes.
Update 09.01.19 - Version 1.9.0
- Minor improvements.
Update 05.01.19 - Version 1.8.0
- added checkbox that (allowing/not allowing) cropping the image if the cropped size is smaller than "image resize height" or "image resize width" 2. added fields for crop modal title, crop modal save button and crop modal cancel button. 3. if uncheck "image processing" checkbox, will work fine. .
Update 11.10.18 - Version 1.7.0
- Minor improvements.
Update 10.10.18 - Version 1.6.0
- added image crop, file size state + fixing minor bugs.
Update 20.09.18 - Version 1.5.0
- Fixes related to image uploads.
Update 14.09.18 - Version 1.4.0
- Added image resize dimensions.
Update 13.09.18 - Version 1.3.0
- Filename prefix bug fix.
Update 13.09.18 - Version 1.2.0
- Minor fixes.
Update 23.08.18 - Version 1.1.0
- minor fixes.
Update 21.08.18 - Version 1.0.0
- Initial Build.