Demo to preview the settings
Introduction
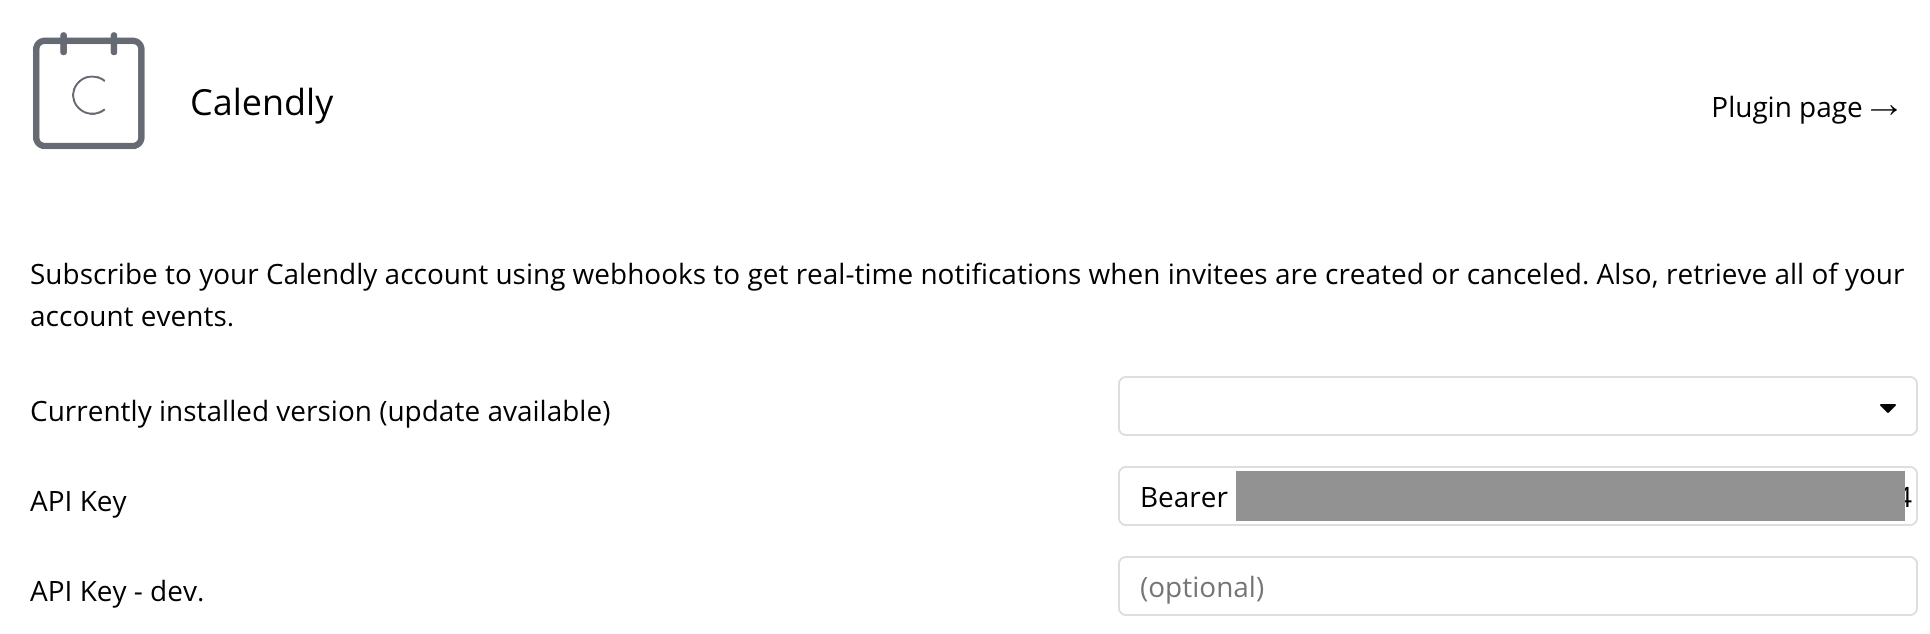
Subscribe to your Calendly account using webhooks to get real-time notifications when invitees are created or canceled. Also, retrieve all of your account events.
Prerequisites
- You must be on the Calendly Professional plan in order to utilize webhooks.
- You must be on the Bubble Personal plan or higher in order to access Backend Workflows to use webhooks.
How to set up
Create a Calendly account
If you don't have one yet, follow this link to create an account.
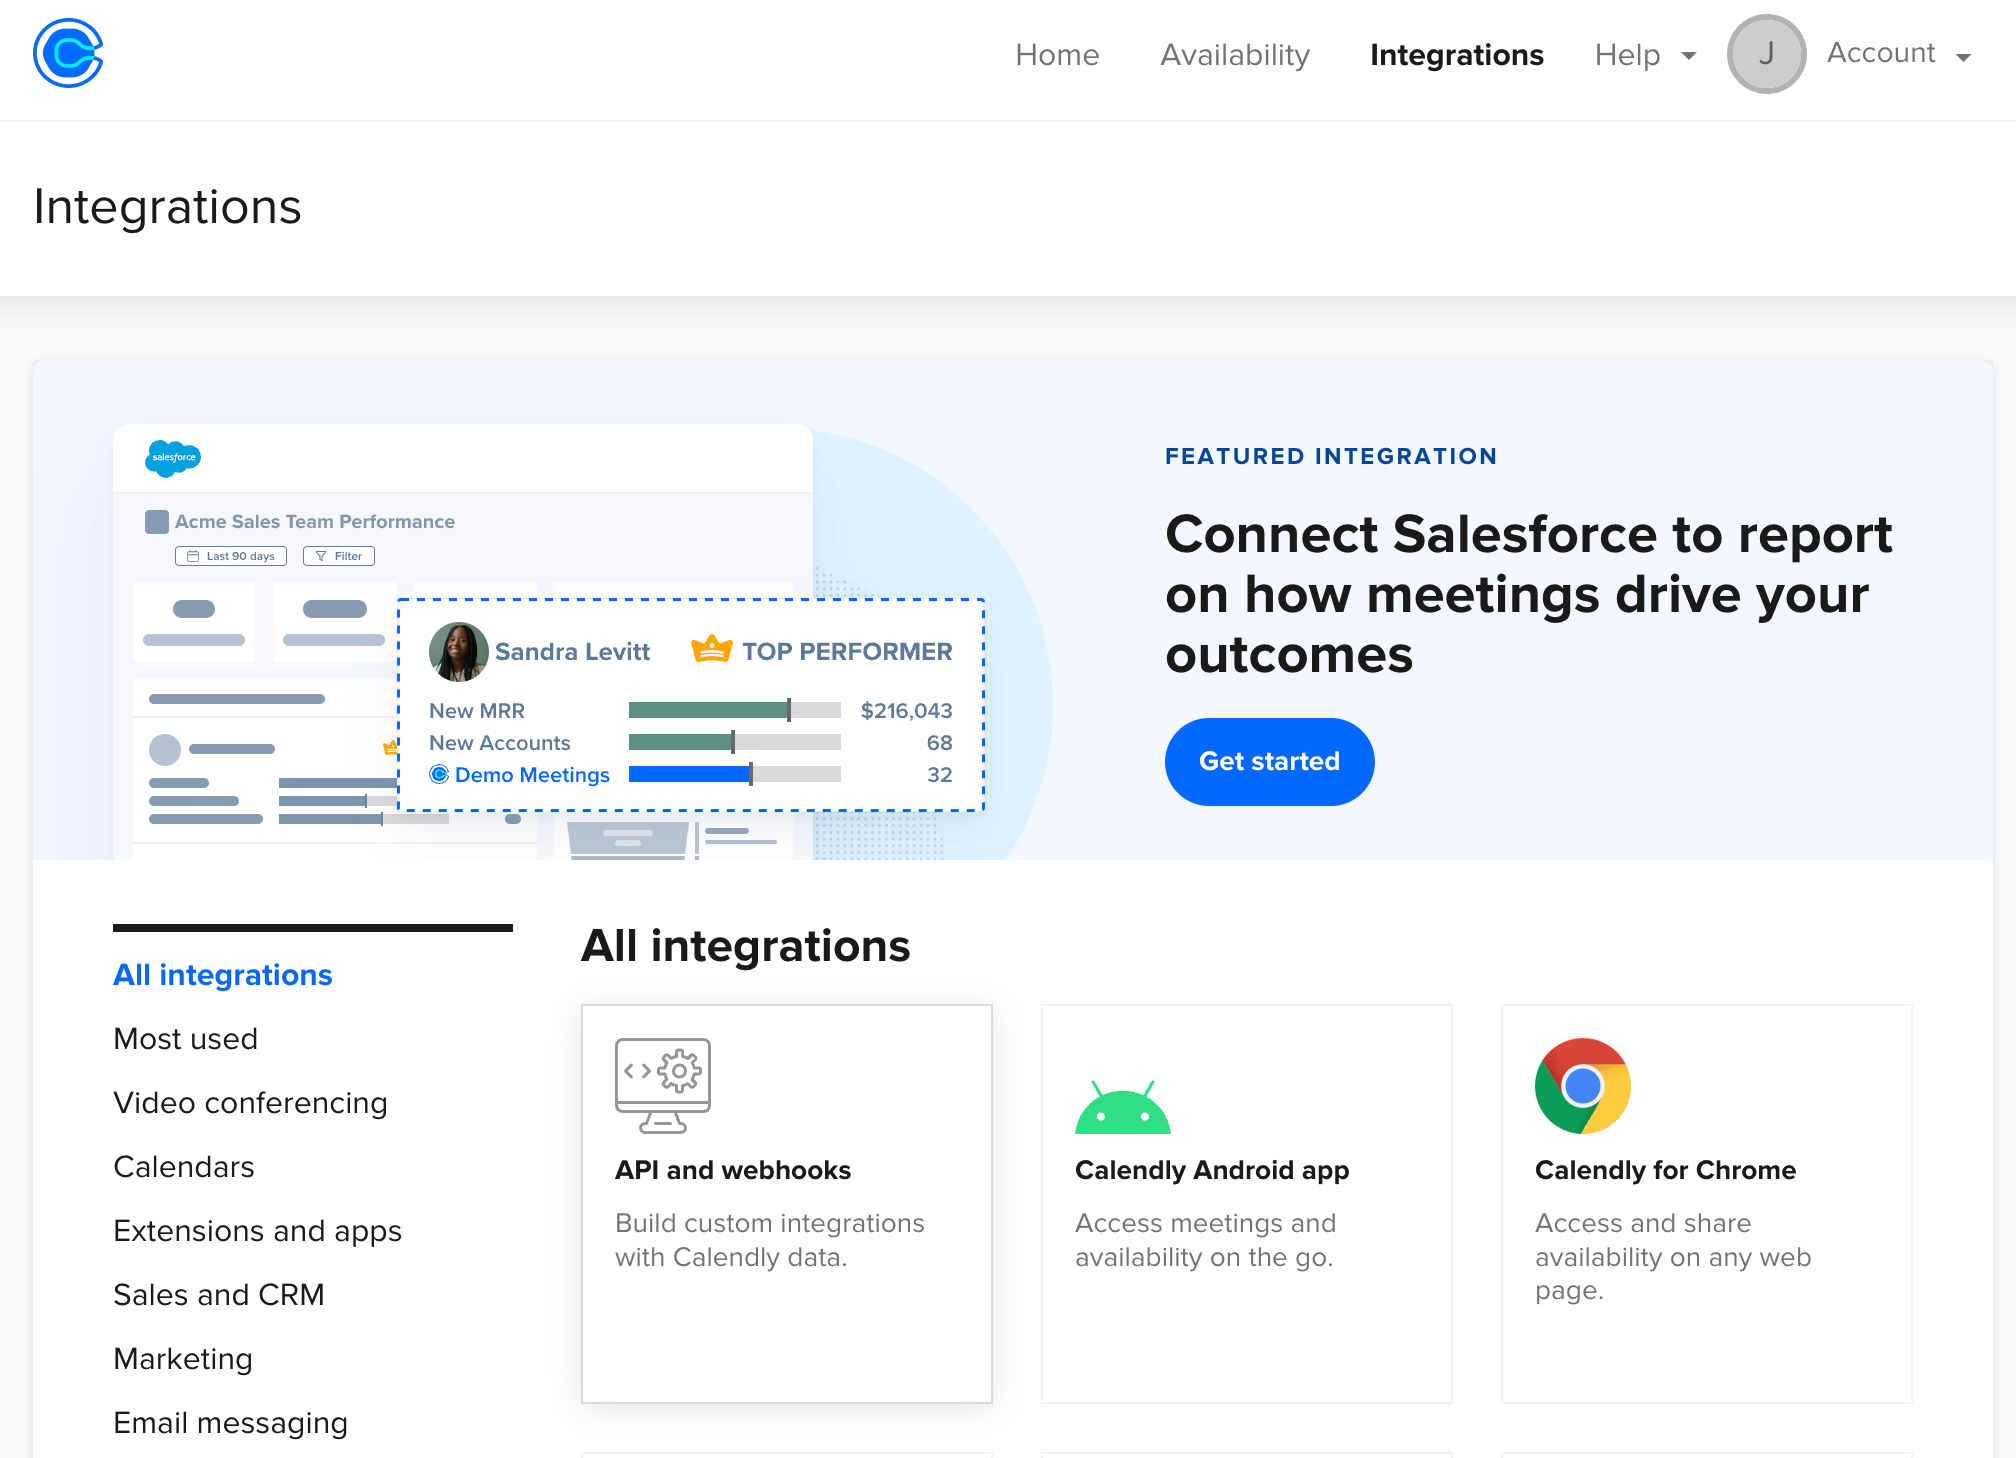
Create an integration
After signing into your account, head over to the integrations page and select API and webhooks:
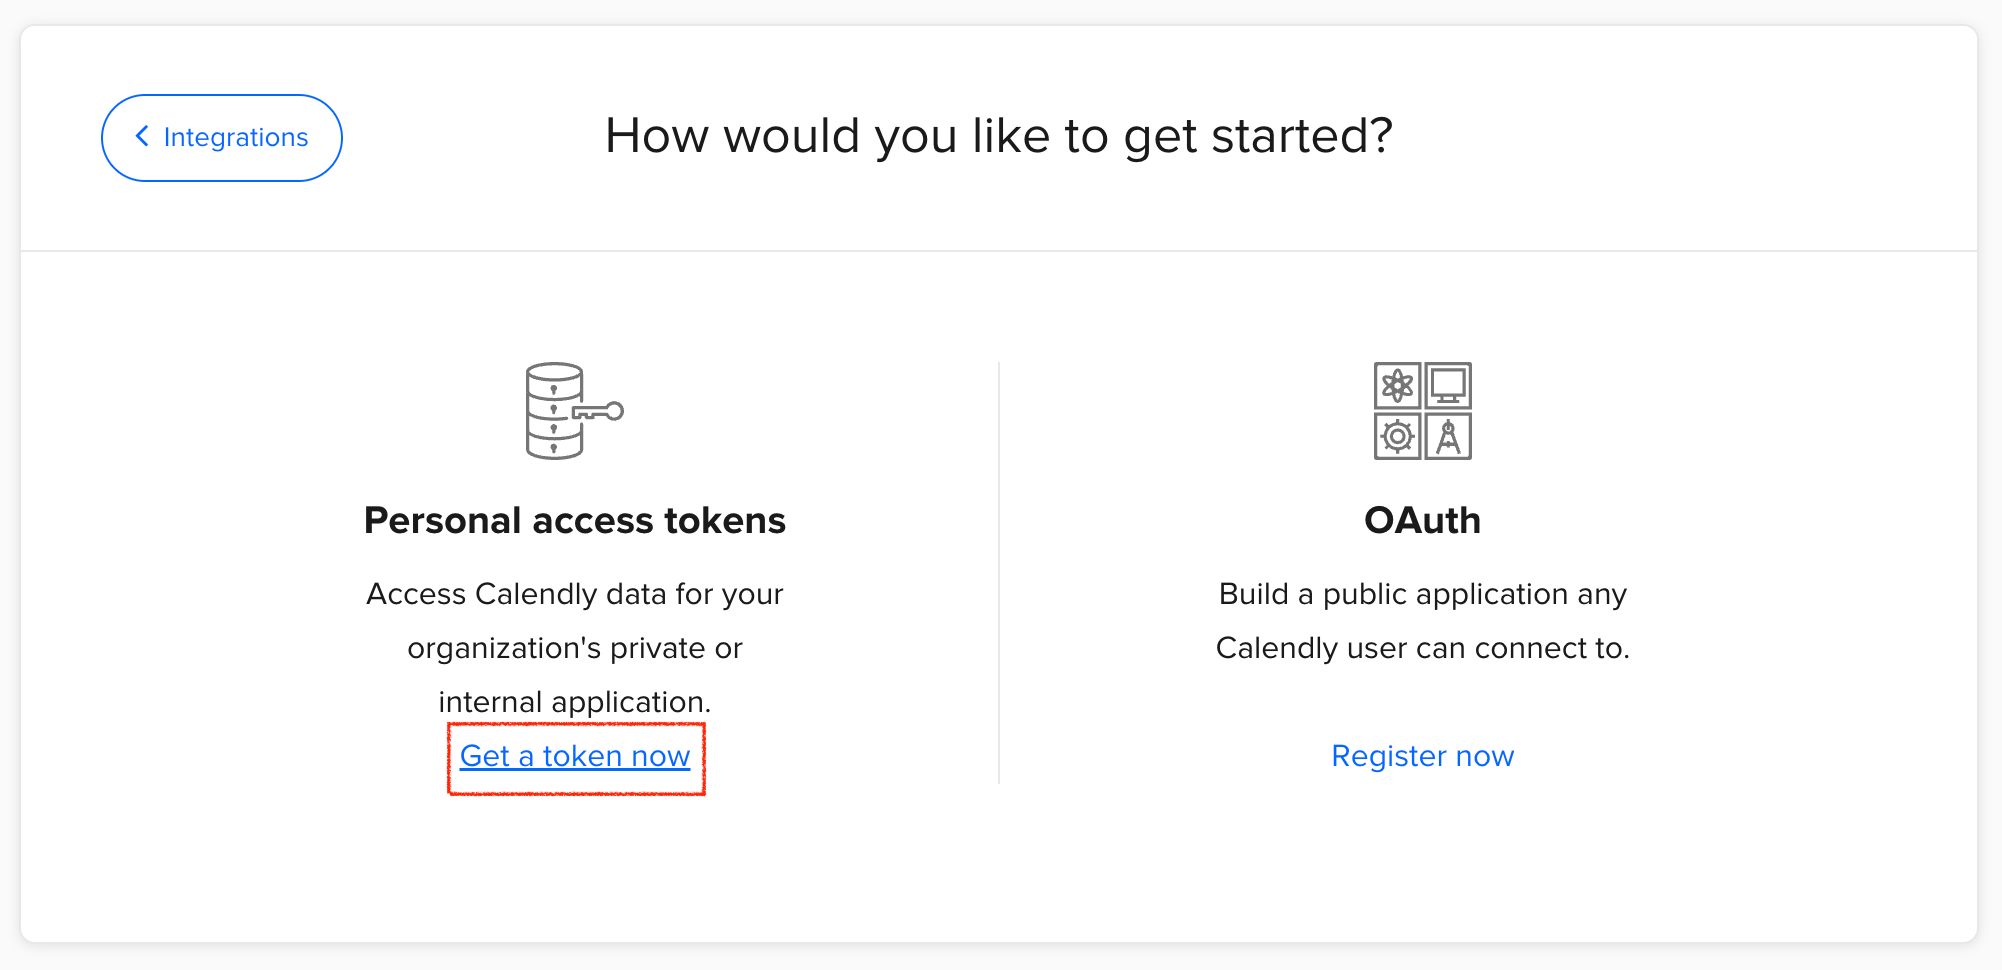
Get Your Access Token
Generating an access token will allow full access to your Calendly account and enable the functionality provided by this plugin. Click on "Get a token now" under Personal access tokens:
Copy this token and paste into your plugin settings area (API key input). Make sure you put the word Bearer and a space before the API key. For example: "Bearer API-TOKEN”
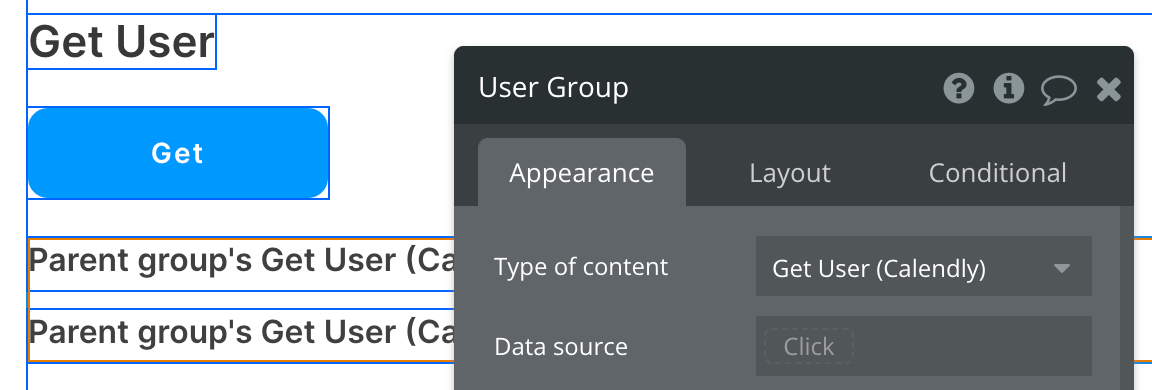
Get User
Calendly documentation: https://developer.calendly.com/api-docs/005832c83aeae-get-current-user
Set up the datasource
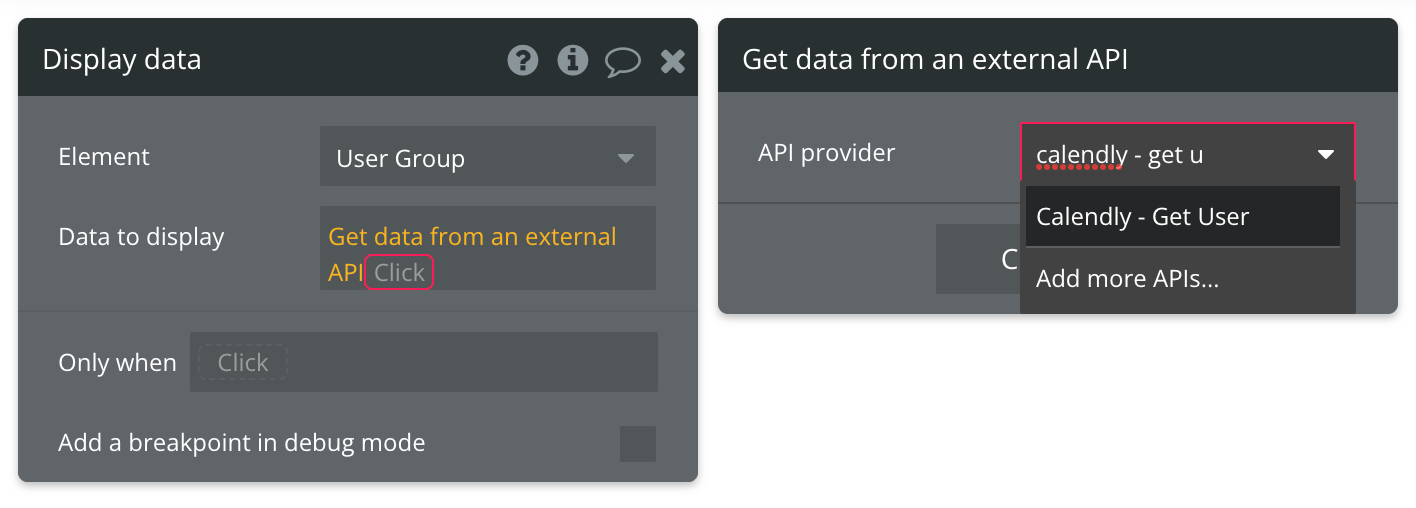
We're using a group in our example. Make sure whatever element you use has the correct type of content set (Get User (Calendly)):
Set up the API call
Using the blue button from the screenshot above, we'll use a Display data in group action to send the results of this API call to the group we've set up.
Important
You'll need the Organization ID for most of the remaining plugin actions. Save the Organization ID someplace you can quickly access it for later. In our demo app, we placed an input at the top of the page that we'll use in the following API call demos.
Plugin Element Properties
Calendly Widget
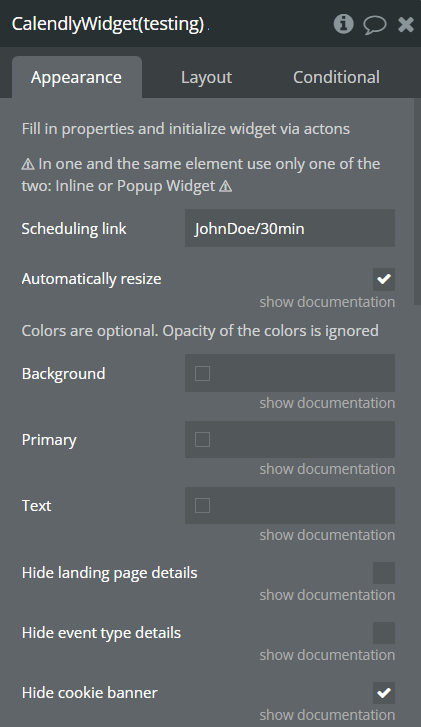
Fields:
Title | Description | Type |
Fill in properties and initialize widget via actions | ||
⚠ In one and the same element use only one of the two: Inline or Popup Widget ⚠ | ||
Scheduling link | Partial or full link to the event.
Example of partial link: johndoe/30min
Example of full link: https://calendly.com/johndoe/30min | Text |
Automatically resize | By default, the inline embed will be a fixed height and will contain a scrollbar within the embed itself. To change this from the default, you can check the field to automatically resize | Checkbox (yes/no) |
Colors are optional. Opacity of the colors is ignored | ||
Background | Background color of the widget | Color (optional) |
Primary | Primary color of the widget. Used for interactive buttons and links | Color (optional) |
Text | Text color | Color (optional) |
Hide landing page details | The details after submit the event | Checkbox (yes/no) |
Hide event type details | Use this setting to hide your profile picture, name, event duration, location, and description when Calendly is embedded. This will help reduce duplicate information that you may already have on your web page | Checkbox (yes/no) |
Hide cookie banner | The cookie banner on the bottom of the left column | Checkbox (yes/no) |
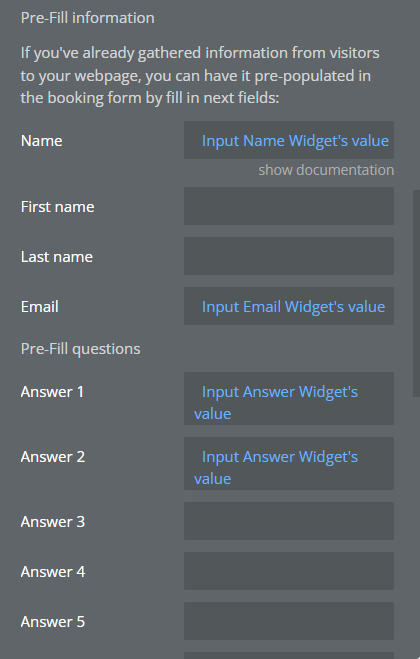
Pre-Fill information | ||
If you’ve already gathered information from visitors to your webpage, you can have it pre-populated in the booking form by fill in next fields: | ||
Name | If your event type takes separate first name and last name fields you can use “First name” and “Last name” fields instead of “Name” field | Text (optional) |
First name | User’s first name if is used separated first name and last name | Text (optional) |
Last name | User’s last name if is used separated first name and last name | Text (optional) |
Email | User’s email | Text (optional) |
Pre-Fill questions | ||
Answer 1 | Answer to the N1 question in the event | Text (optional) |
Answer 2 | Answer to the N2 question in the event | Text (optional) |
Answer 3 | Answer to the N3 question in the event | Text (optional) |
Answer 4 | Answer to the N4 question in the event | Text (optional) |
Answer 5 | Answer to the N5 question in the event | Text (optional) |
Answer 6 | Answer to the N6 question in the event | Text (optional) |
Answer 7 | Answer to the N7 question in the event | Text (optional) |
Answer 8 | Answer to the N8 question in the event | Text (optional) |
Answer 9 | Answer to the N9 question in the event | Text (optional) |
Answer 10 | Answer to the N10 question in the event | Text (optional) |
Element Actions
- Initialize inline - Initialize inline widget
The action renders widget in the element
When run the action and widget already exist on the page, the action re-render the widget
Title | Description | Type |
Force Init | Calendly widget is waiting until the element is visible in the viewport before loading or initializing, this is a behavior designed to optimize performance and loading times of web pages.
However, if you prefer that the widget content loads immediately when the page loads, regardless of whether the widget is in the viewport, you'll need to check this checkbox to override this lazy loading behavior. | Checkbox |
- Close
Close the widget
- Initialize popup
The action renders popup widget
When run the action and widget already exist on the page, the action re-render the widget
- Reset states
Exposed states
Title | Description | Type |
Event ID | ID of the event | Text |
Invitee ID | ID of the invitee | Text |
Element Events
Title | Description |
Event type viewed | Event type page was viewed |
Date and time selected | Invitee selected date and time |
Event scheduled | Invitee successfully booked a meeting |
Popup closed | Triggers when user close popup by click on a close button or an overlay |
List Events
Calendly documentation: https://developer.calendly.com/api-docs/2d5ed9bbd2952-list-events
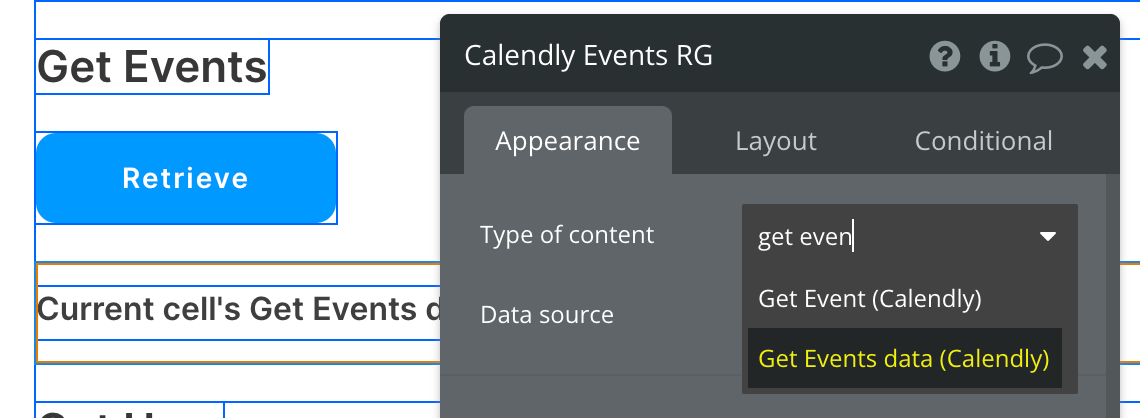
Set up the datasource
We're using a repeating group in our example. Make sure whatever element you use has the correct type of content set (Get Events data (Calendly)):
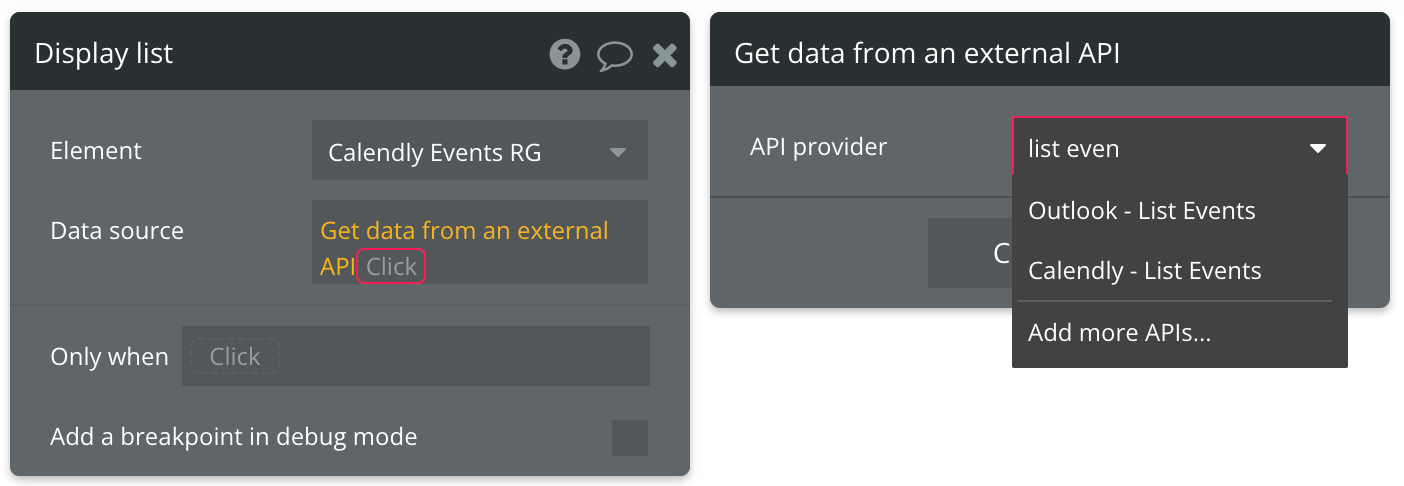
Set up the API call
Using the blue button from the screenshot above, we'll use a Display List action to send the results of this API call to the repeating group we've set up.
Use the Organization ID input we set up earlier for the one required parameter:
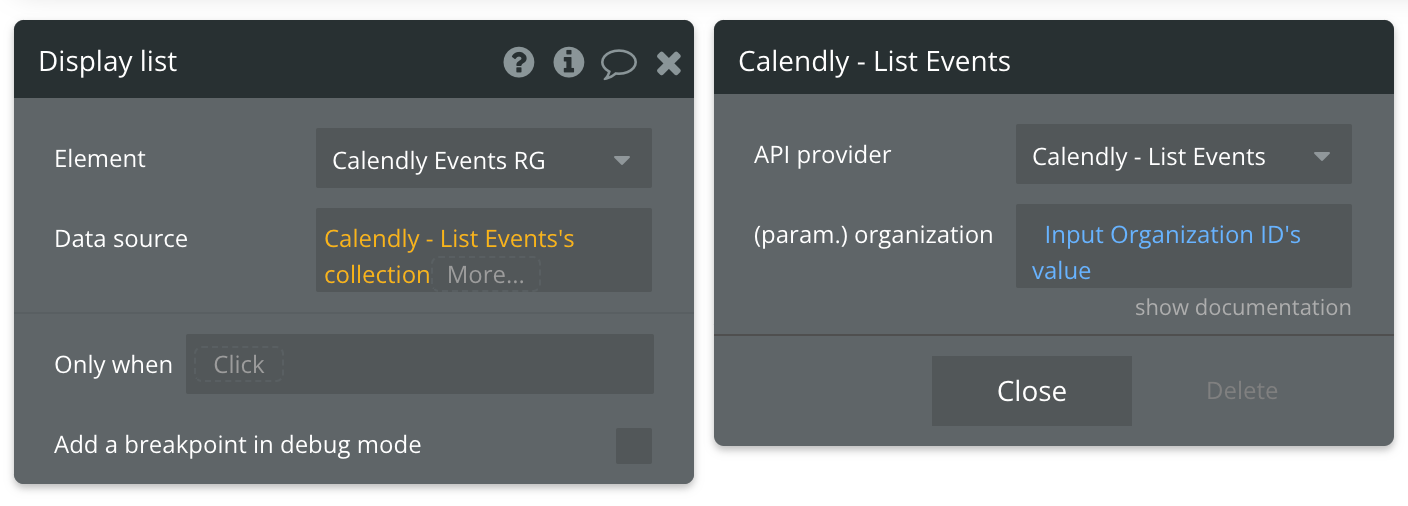
Finish off the expression by selecting ('s collection) from the options.
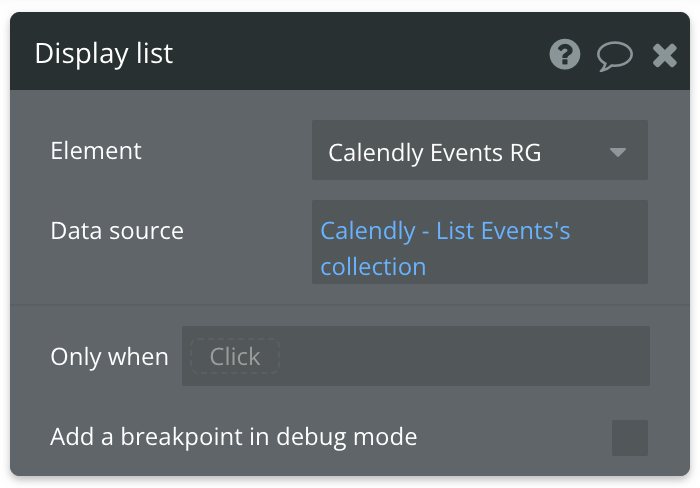
That's it! You can now display all scheduled events from your Calendly account.
Refer to the documentation link at the top of this page to view a list of all attributes that are available for use.
Available Parameter (* indicates a required value)
organization* - The UUID of your Calendly account's organization. This value can be found as a result of the Get User API call.
Get Event
Calendly documentation: https://developer.calendly.com/api-docs/e2f95ebd44914-get-event
Set up the datasource
We're using a group in our example. Make sure whatever element you use has the correct type of content set (Get Event (Calendly)):
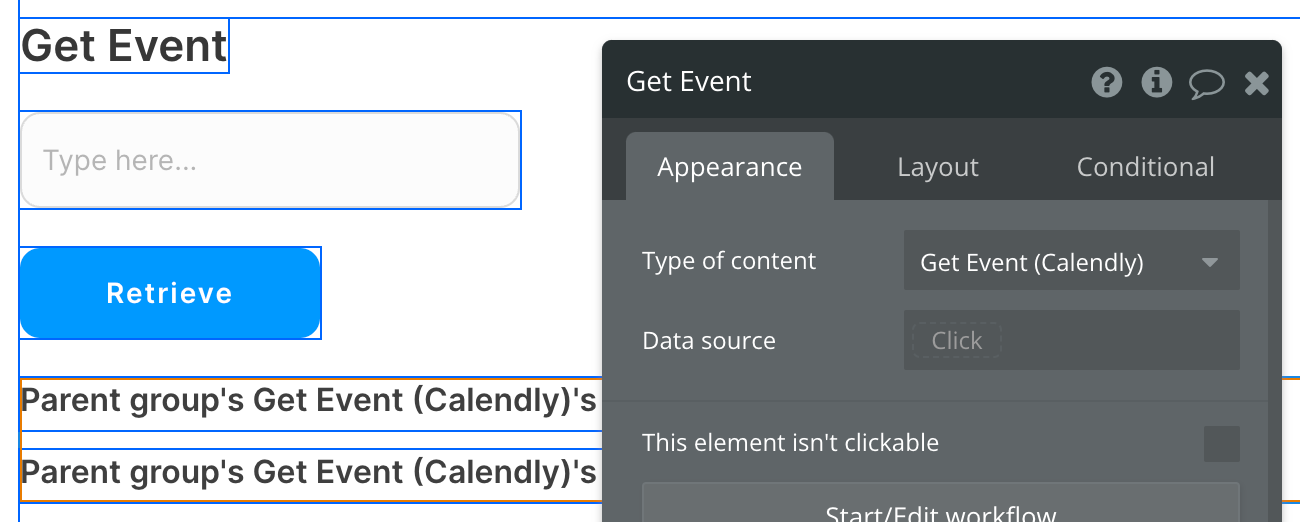
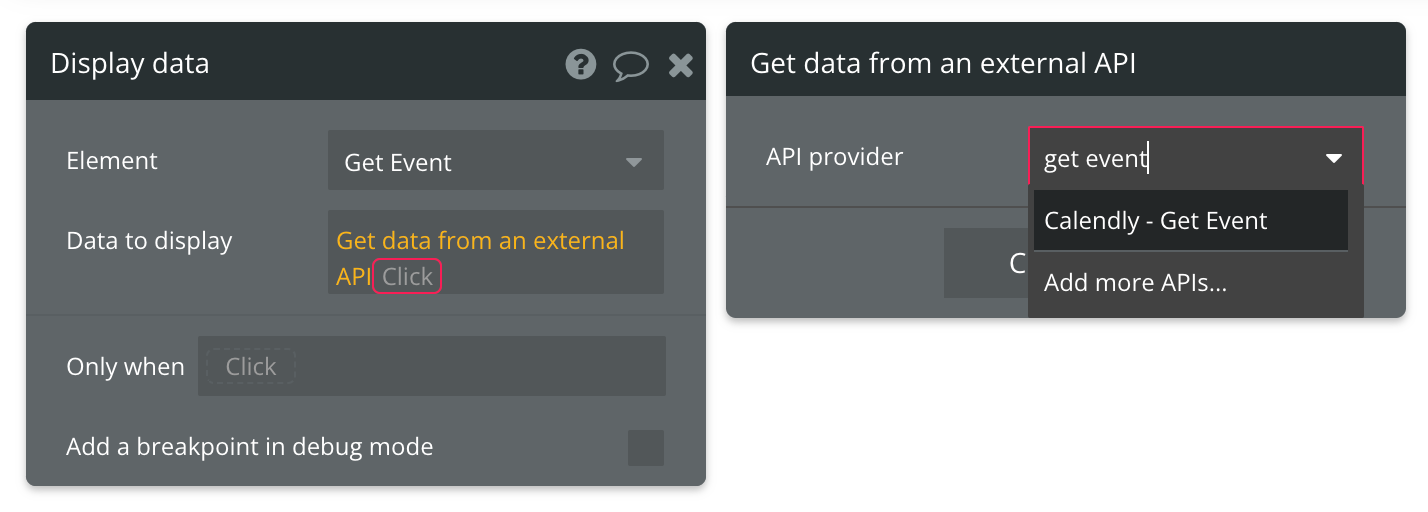
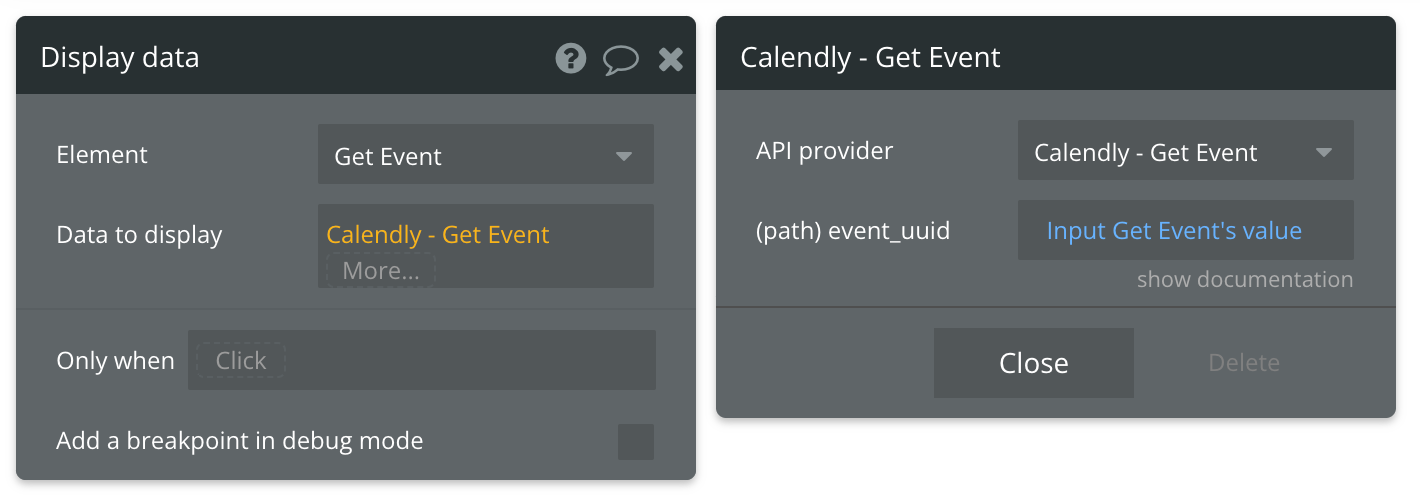
Set up the API call
Using the blue button from the screenshot above, we'll use a Display data in group action to send the results of this API call to the group we've set up.
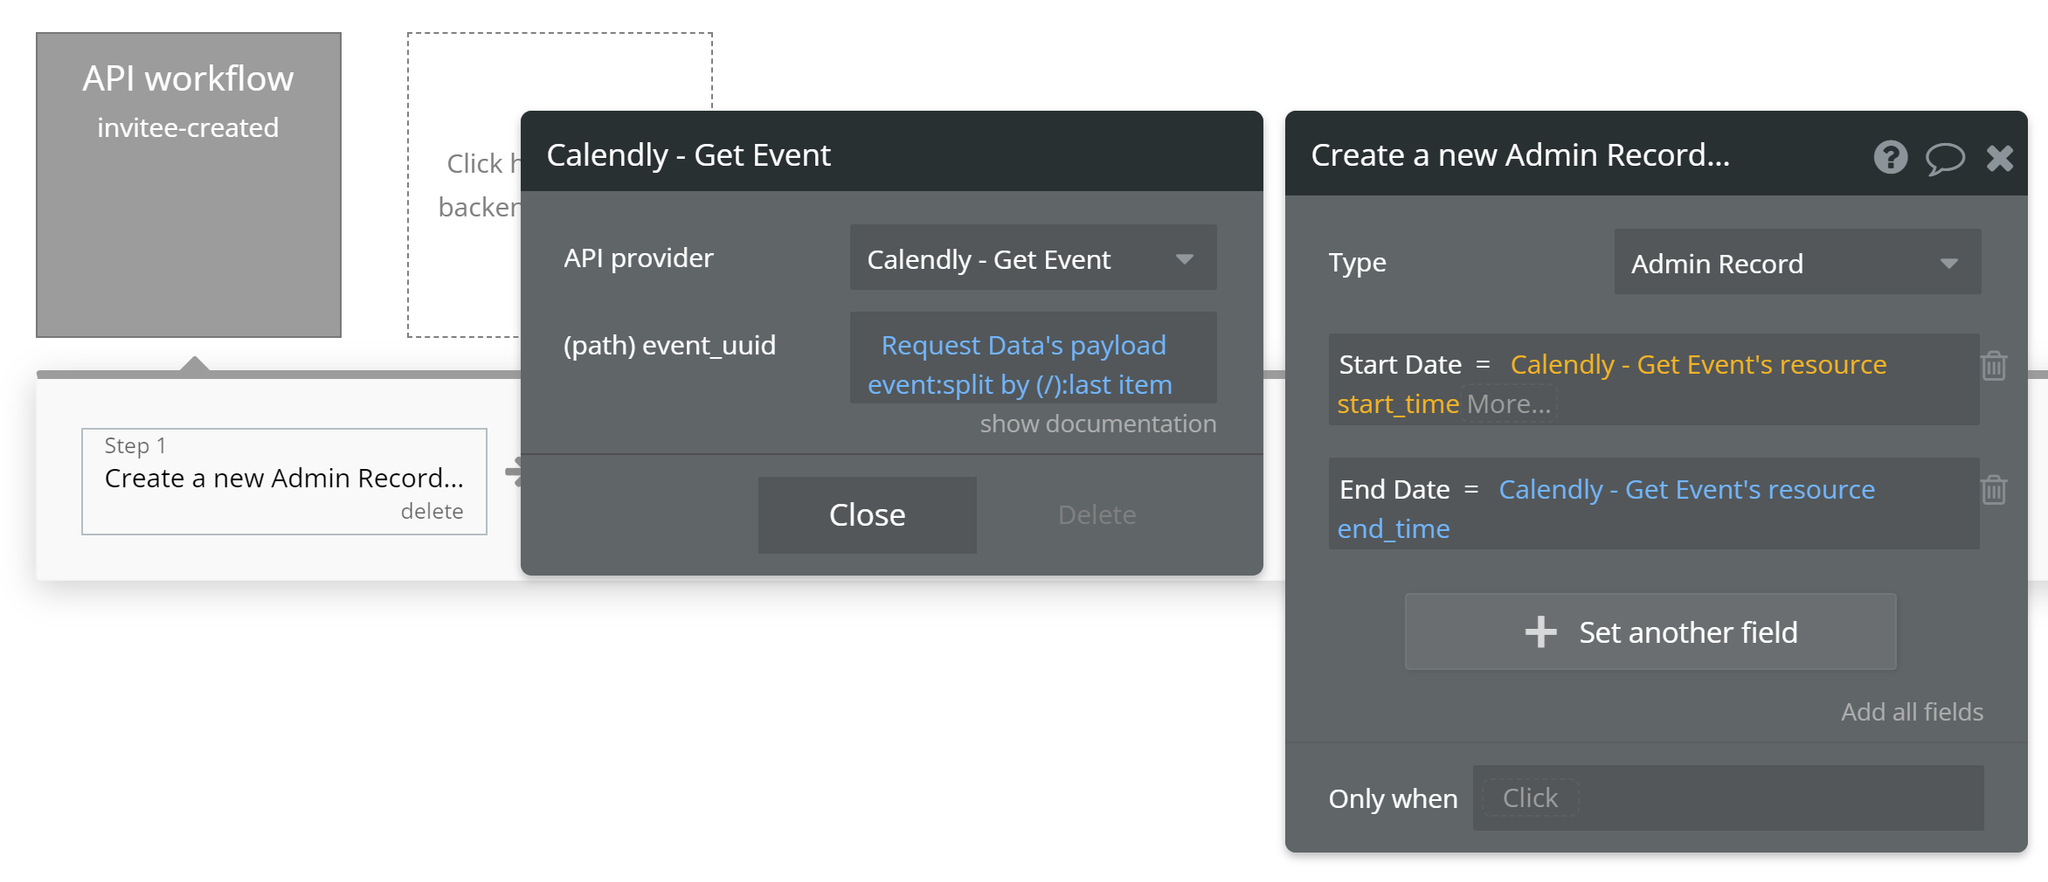
Add in the Event UUID parameter from your input or other datasource of your choice.
Note that this API call is not looking for the entire URL (https://api.calendly.com/scheduled_events/EEC4MOMTJXBSGEE7), only the last portion of the URL (EEC4MOMTJXBSGEE7)
That's it! You can now retrieve any information from a specified Event in your Calendly account.
Refer to the documentation link at the top of this page to view a list of all attributes that are available for use.
Available Path (* indicates a required value)
event_uuid* - The UUID of the Event. This value can be found as a result of the List Events call. This is not the entire URL of the event, only the last string of text after the last forward slash.
Create Webhook - Invitee Created
Calendly documentation: https://developer.calendly.com/api-docs/c1ddc06ce1f1b-create-webhook-subscription
Setup your backend workflow
Create a new API workflow and name it invitee-created:
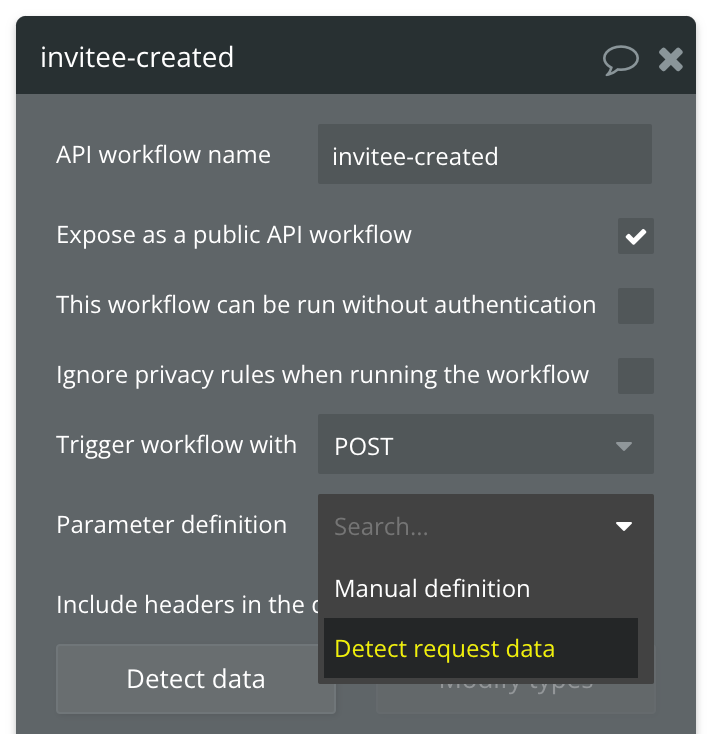
Change the parameter definition to Detect request data.
Once you've updated this, press the Detect data button. You'll see this screen appear:
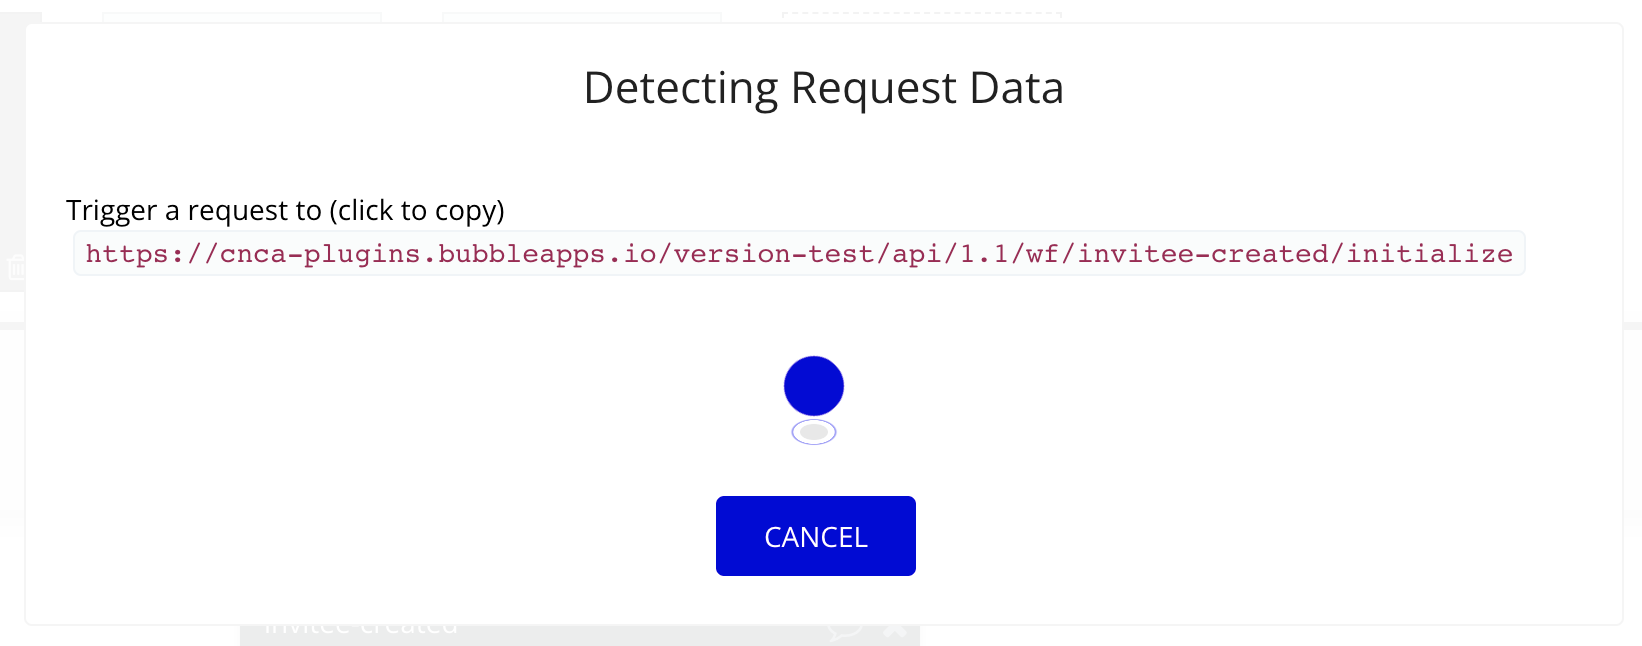
Copy the URL listed in your popup. This will be the URL where you want to receive POST requests for events you are subscribed to. Save this somewhere as it'll be used in the next step and later after we've initialized the backend workflow. Don't close this popup yet.
Create your webhook
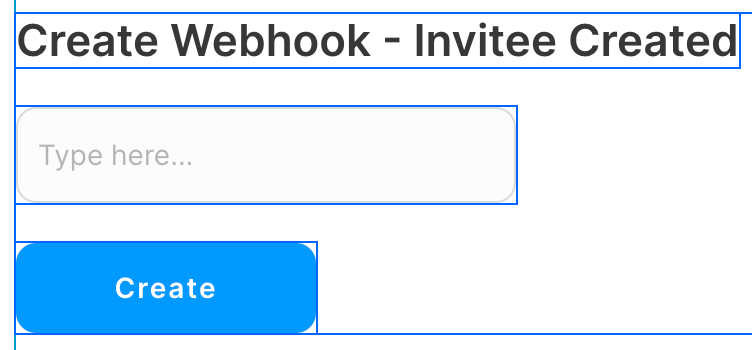
Create a form in your app to create your first webhook. This enables real-time notifications to be sent to your Bubble app whenever an event is created in Calendly. We'll use an input to type in the backend workflow URL from the previous step, and a button to trigger the action:
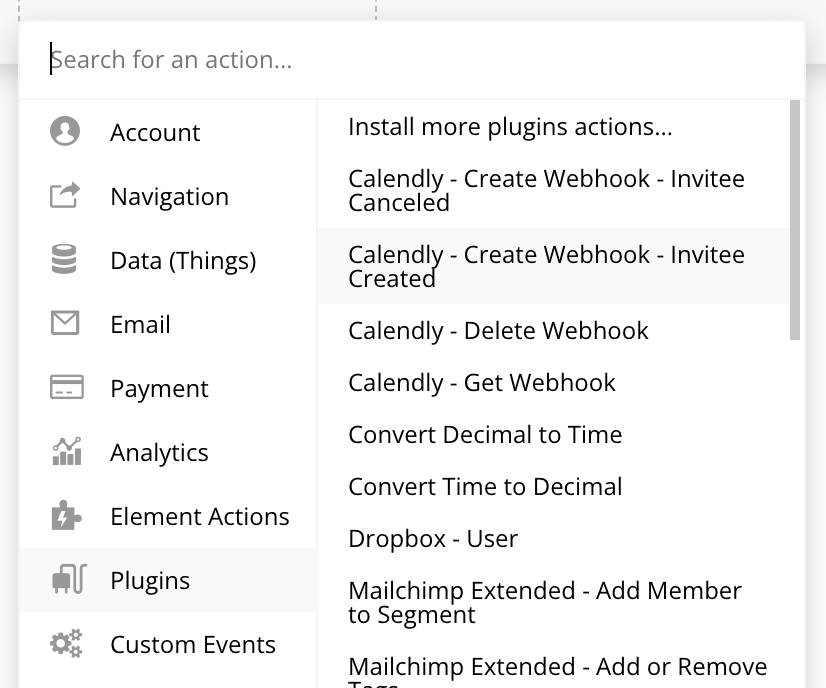
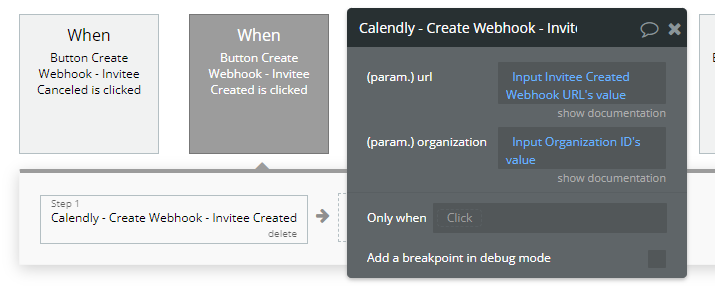
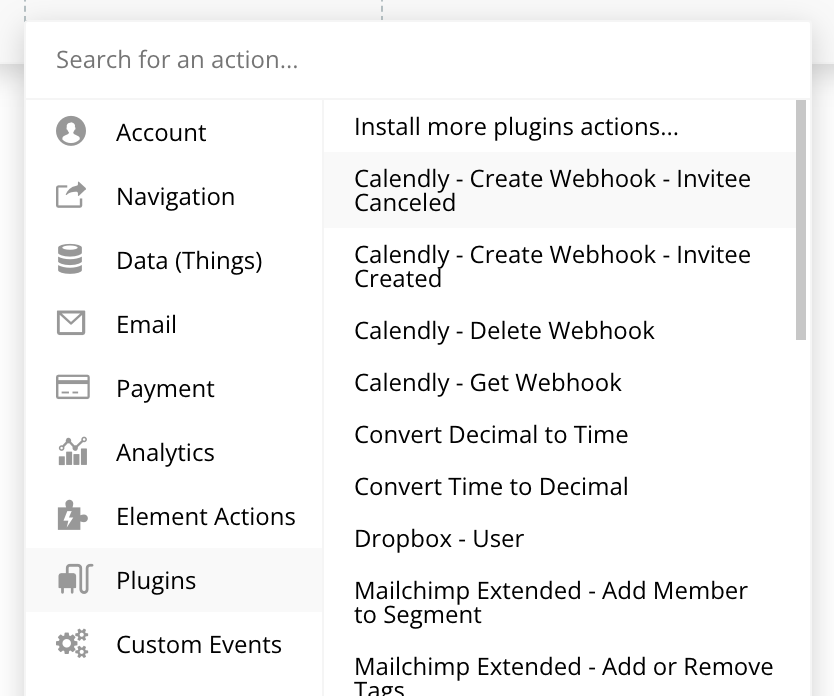
Create a workflow on the button and select the plugin action titled Calendly - Create Webhook - Invitee Created:
Either paste in your backend workflow URL here directly or refer to an input's value for a dynamic backend workflow URL.
Also, insert your organization URL ID here as well.
Now, you can run the page and click the button to create the webhook.
Initialize the backend workflow
Now, you need to create a test Calendly event to trigger this first webhook.
Head over to your Calendly account and create a new scheduled event with an invitee. You can do this in a variety of ways, but we suggest you open up your Calendly link and create a new event manually.
Head back to the backend workflow tab of your Bubble app and check the popup we left open earlier. This should now be updated with the incoming event data, like this:
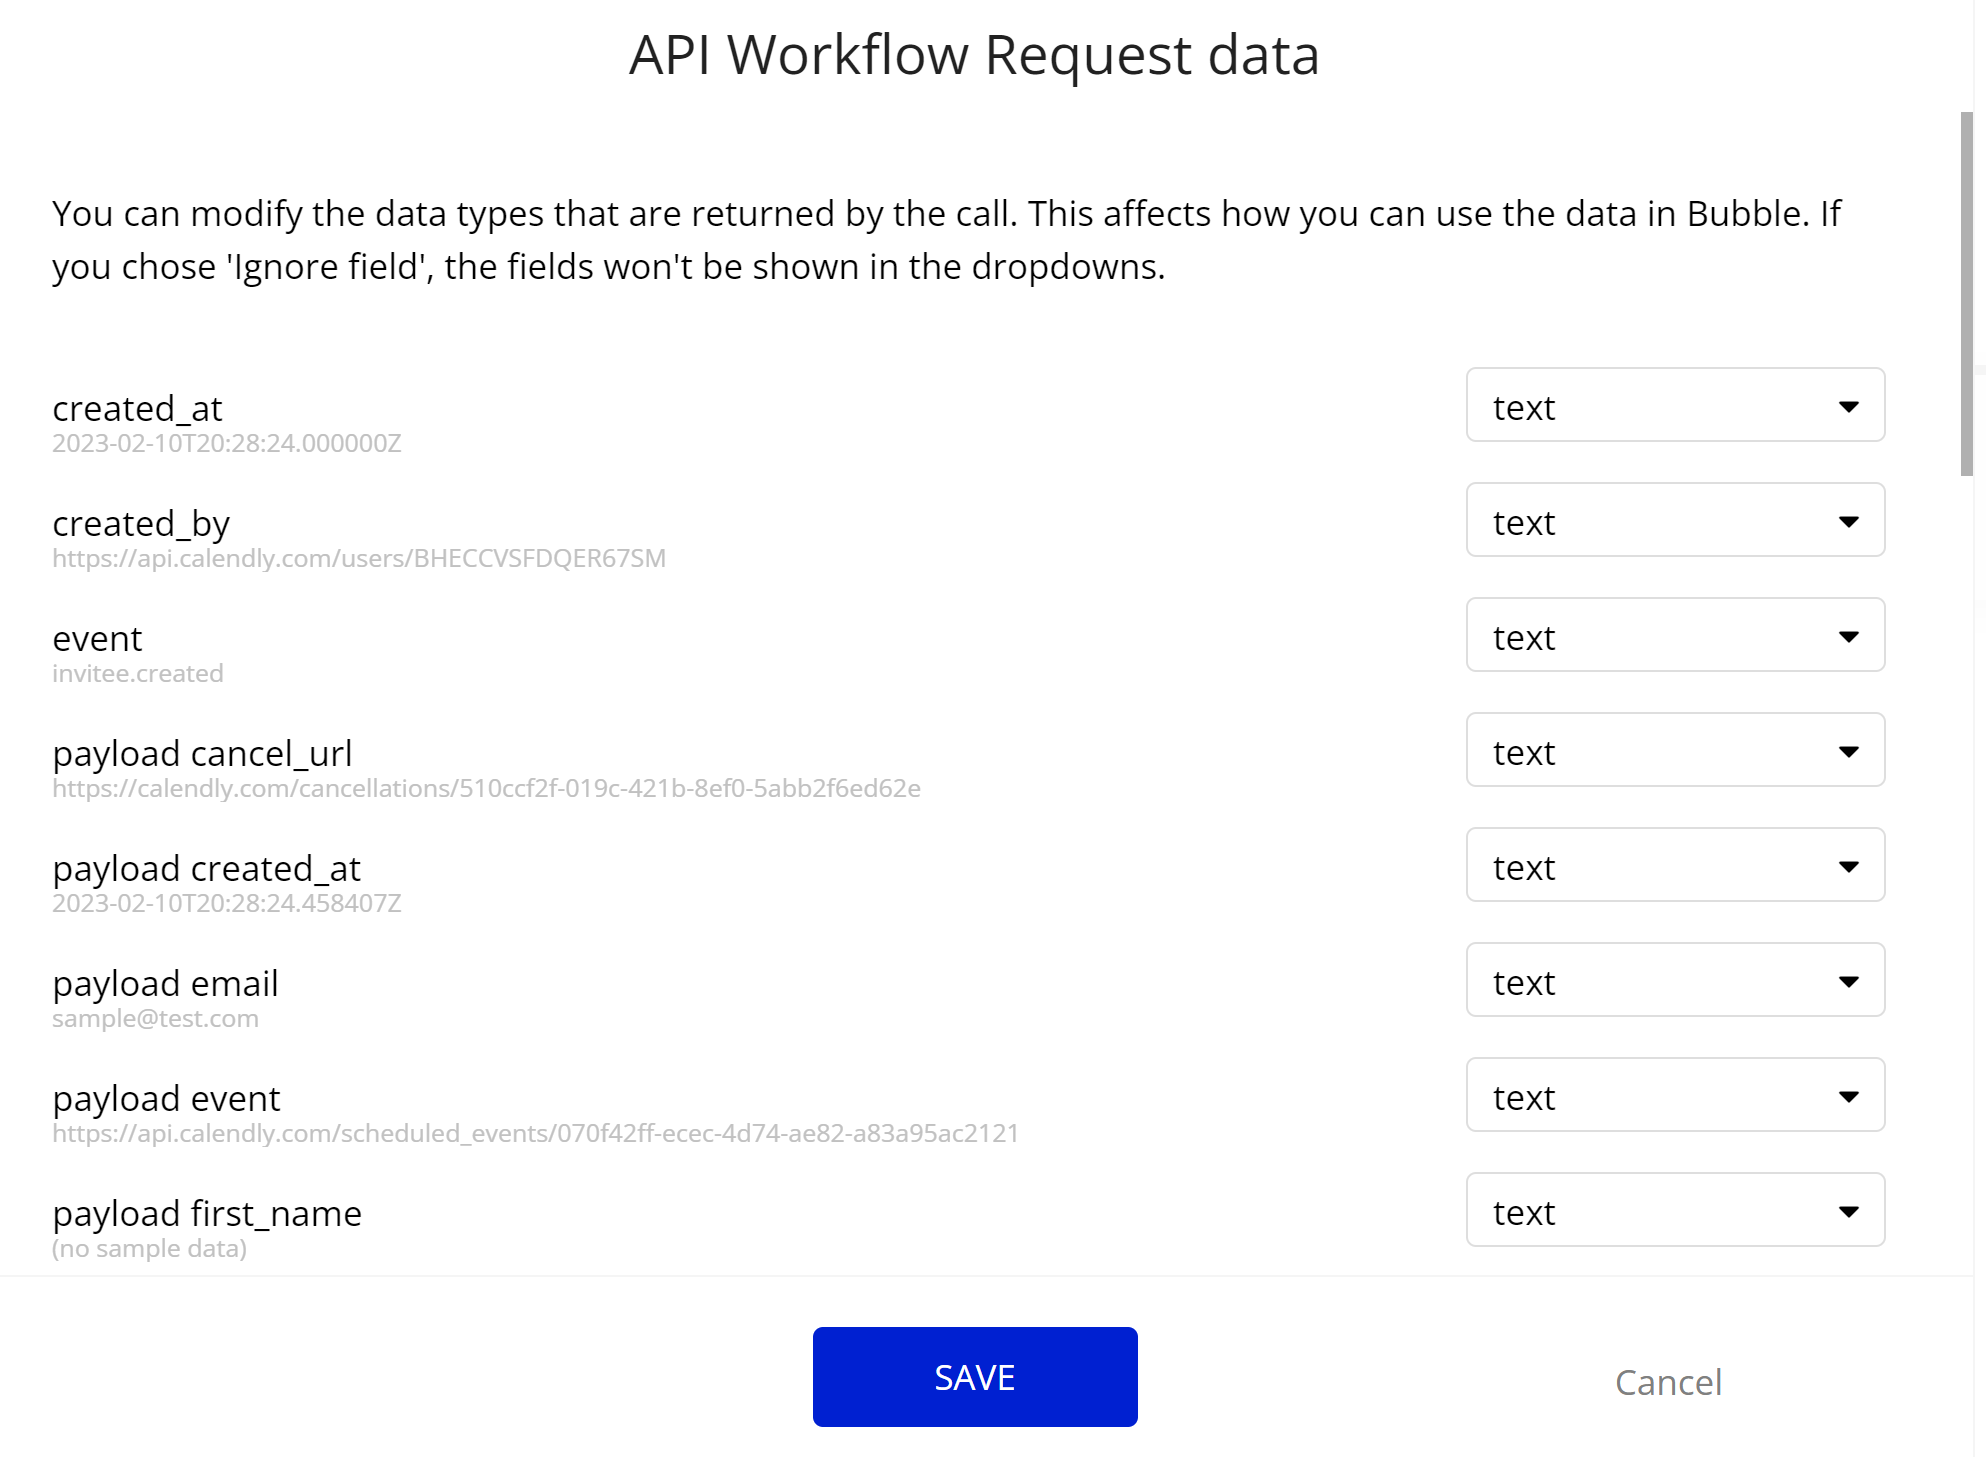
Click "Save" to close the popup. Your backend workflow is now initialized!
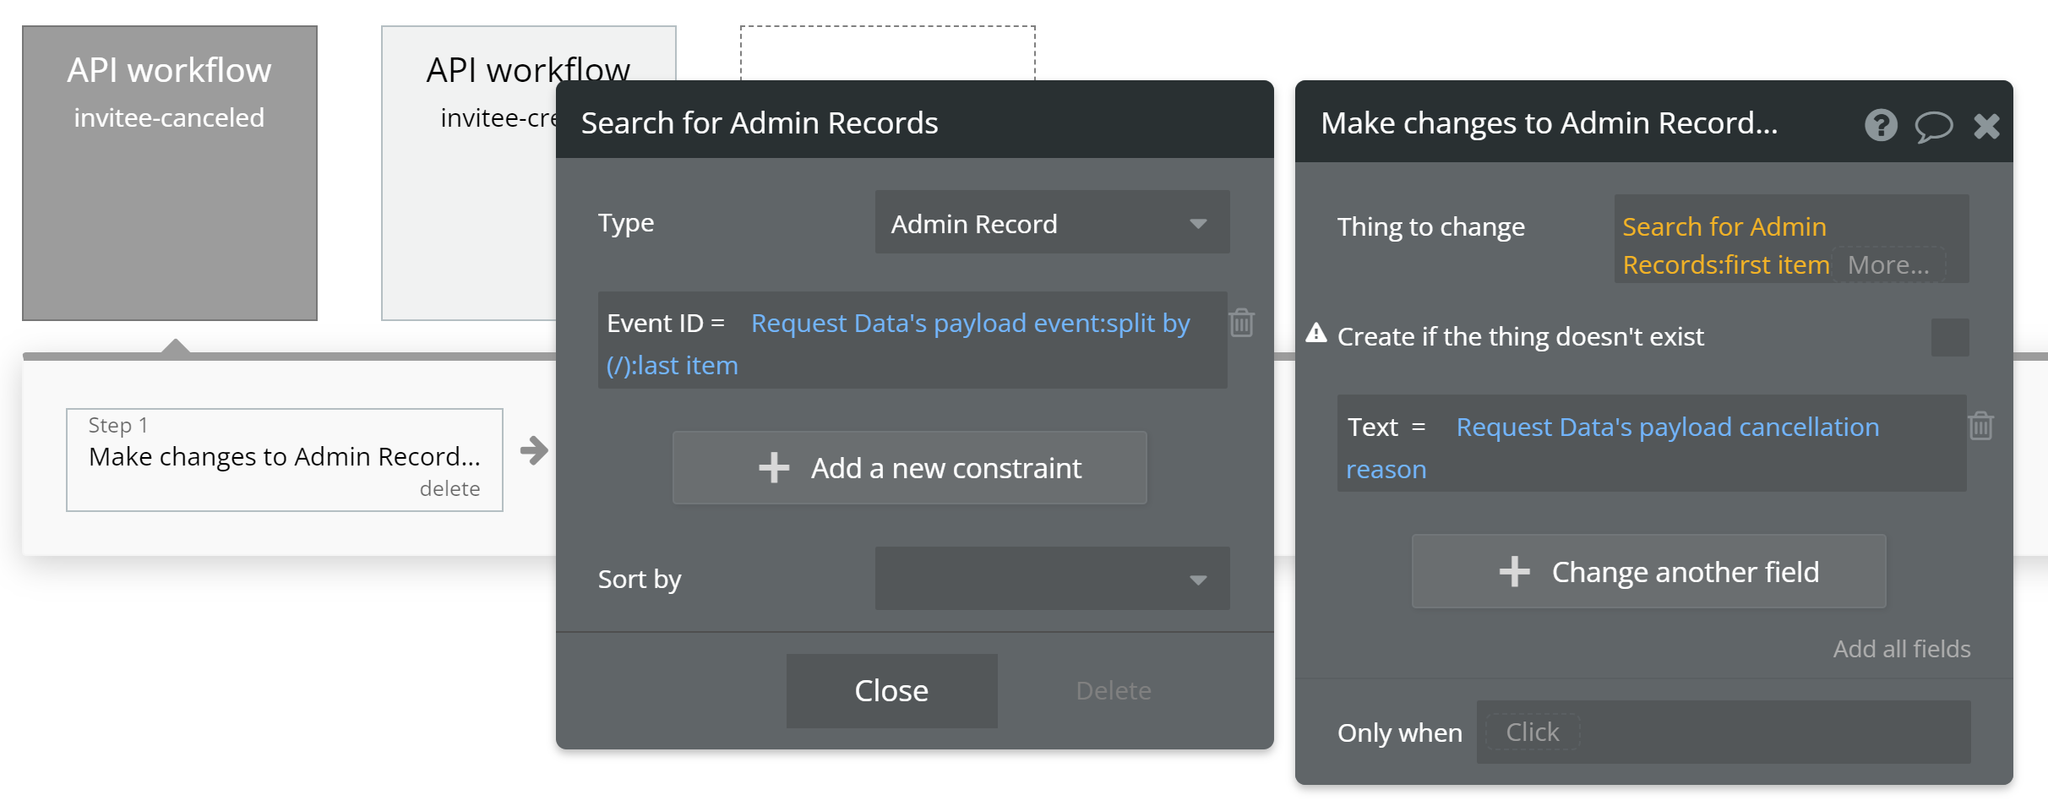
Note that this webhook data includes "payload event," which is a URL to get more event information (start/end times, invitees, etc.). If you extract the ID from the URL, you can insert it in the "Get Event" data source to access all those extra details.
You can extract the ID from "payload event" with the "split by" operator and splitting by the forward slash character. The ID is at the end of the URL, so pointing to the "last item" of the split URL will give you the ID:
Complete your webhook setup Bubble
Using the URL you copied from the API endpoint detect window earlier, grab that value and remove the word "initialize" at the very end. You should be left with something like this: https://app-domain/version-test/api/1.1/wf/invitee-created
Run the "Create Webhook - Invitee Created" call one more time using this shortened URL.
You've now successfully set up a Calendly Webhook. You can now continue adding actions to the backend workflow so you can update whatever you need in your app. This will be triggered each time a new invitee is created.
Note: We recommend deleting the original webhook that contains "initialize" in the URL. You only needed that enabled to complete the backend workflow initialization process. You can do this by using the "List Webhooks" call to find the individual webhook ID and then running the "Delete Webhook" call with that ID.
Create Webhook - Invitee Canceled
Calendly documentation: https://developer.calendly.com/api-docs/c1ddc06ce1f1b-create-webhook-subscription
Setup your backend workflow
Create a new API workflow and name it invitee-canceled:
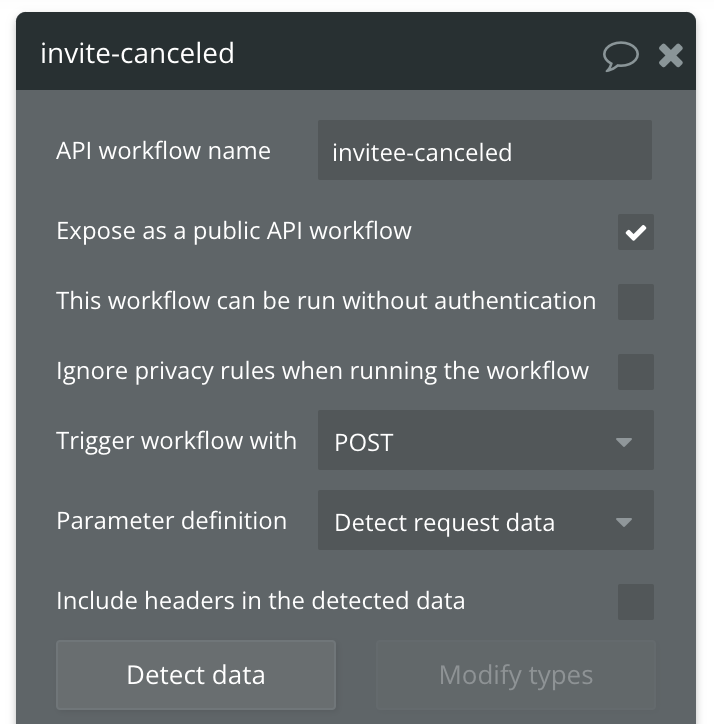
Change the parameter definition to Detect request data.
Once you've updated this, press the Detect data button. You'll see this screen appear:
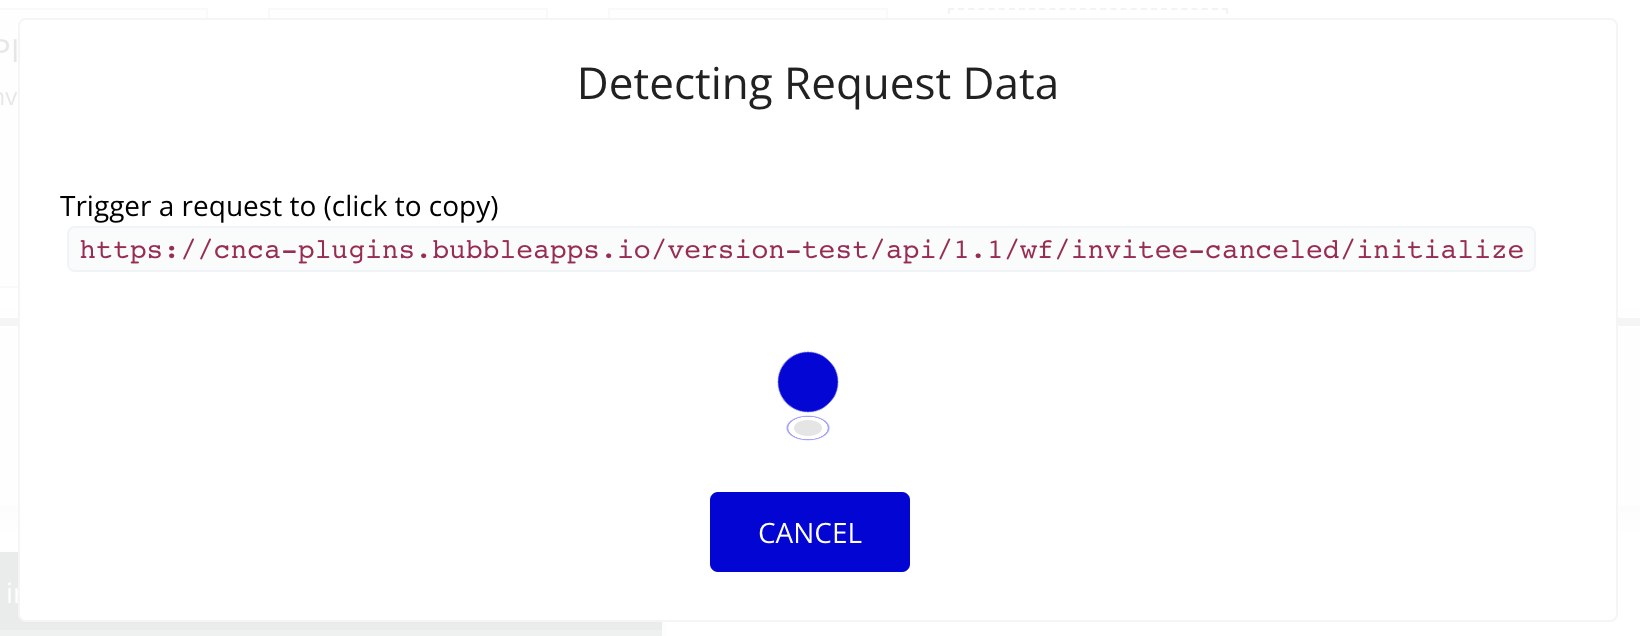
Copy the URL listed in your popup. This will be the URL where you want to receive POST requests for events you are subscribed to. Save this somewhere as it'll be used in the next step and later after we've initialized the backend workflow. Don't close this popup yet.
Initialize your webhook
Create a form in your app to create your first webhook. This enables real-time notifications to be sent to your Bubble app whenever an event is created in Calendly. We'll use an input to type in the backend workflow URL from the previous step, and a button to trigger the action:

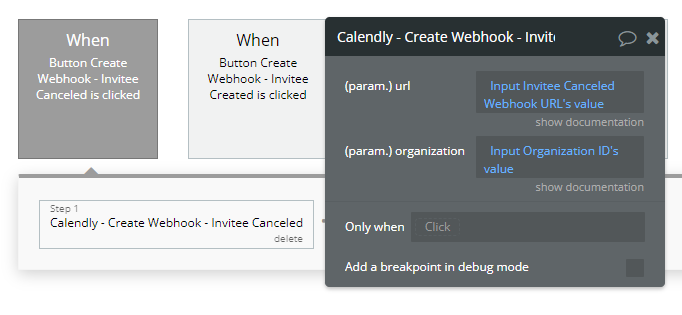
Create a workflow on the button and select the plugin action titled Calendly - Create Webhook - Invitee Canceled:
Either paste in your backend workflow URL here directly or refer to an input's value for a dynamic backend workflow URL.
Also, insert your organization URL ID here as well.
Now, you can run the page and click the button to create the webhook.
Initialize the backend workflow
Now you need to cancel an existing event to trigger this webhook. Head over to your Calendly account and manually cancel a scheduled event.
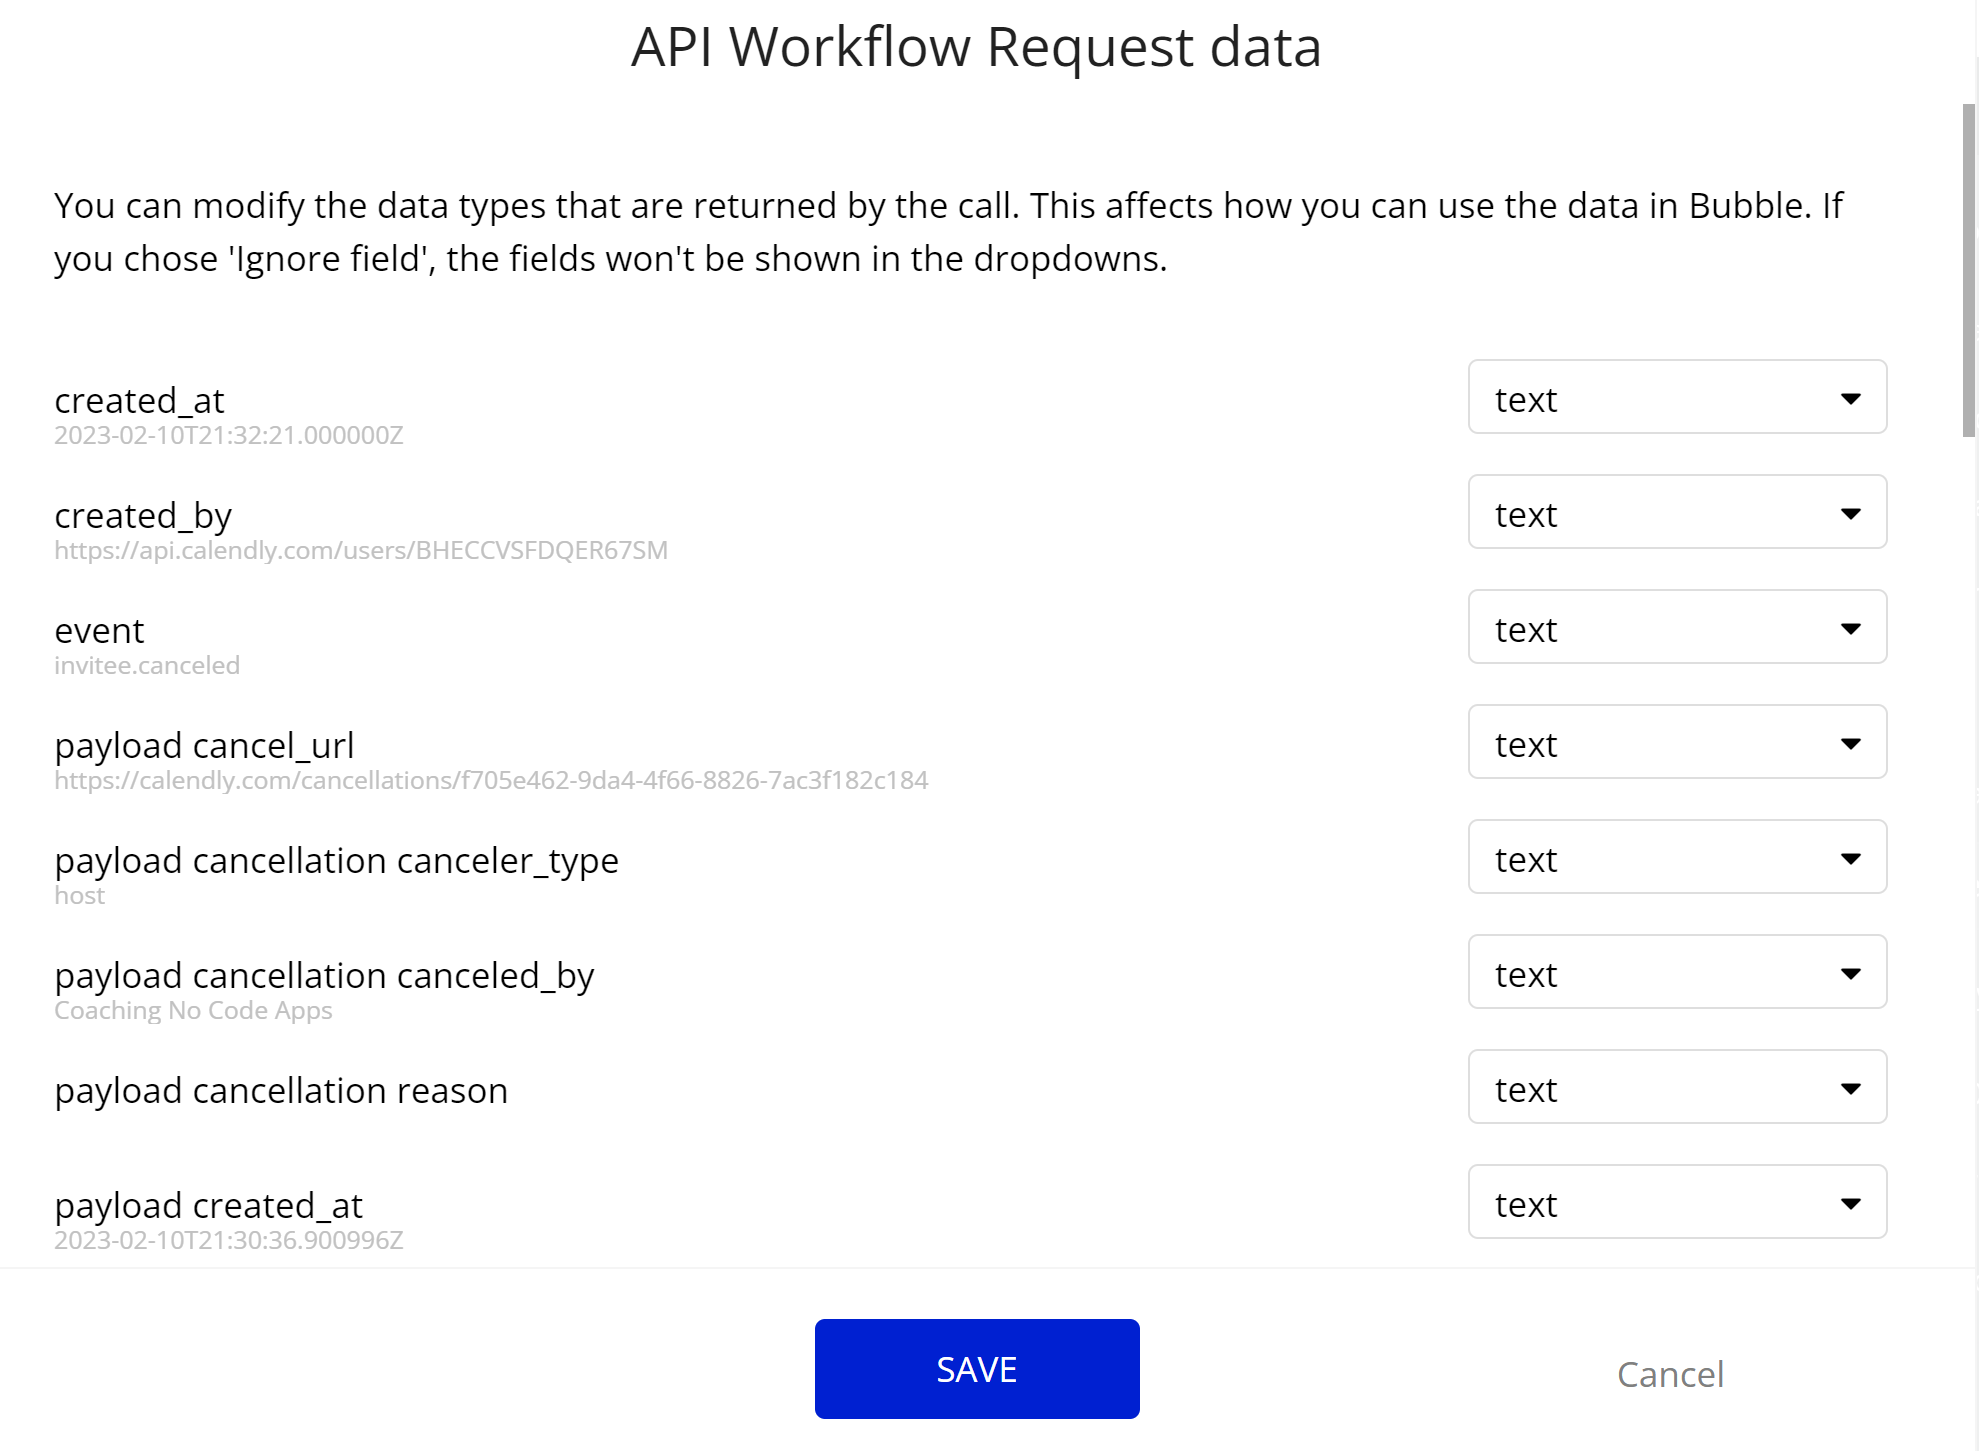
Head back to the backend workflow tab of your Bubble app and check the popup we left open earlier. This should now be updated after the event has been canceled, like this:
Click "Save" to close the popup. Your backend workflow is now initialized!
Note that this webhook data includes "payload event," which is a URL to get more event information (start/end times, cancel reason, etc.). The "invitee created" webhook offers this as well, and we recommend extracting the ID from this URL when the event is created and saving it to your database.
If the event is canceled, you can reference this "payload event" URL again to lookup the record you originally saved the ID to and update whatever you need in your app.
You can extract the ID from "payload event" with the "split by" operator and splitting by the forward slash character. The ID is at the end of the URL, so pointing to the "last item" of the split URL will give you the ID:
Complete your webhook setup Bubble
Using the URL you copied from the API endpoint detect window earlier, grab that value and remove the word "initialize" at the very end. You should be left with something like this: https://app-domain/version-test/api/1.1/wf/invitee-canceled
Run the "Create Webhook - Invitee Canceled" call one more time using this shortened URL.
You've now successfully set up a Calendly Webhook. You can now continue adding actions to the backend workflow so you can update whatever you need in your app. This will be triggered each time a new event is canceled.
Note: We recommend deleting the original webhook that contains "initialize" in the URL. You only needed that enabled to complete the backend workflow initialization process. You can do this by using the "List Webhooks" call to find the individual webhook ID and then running the "Delete Webhook" call with that ID.
List Webhooks
Calendly documentation: https://developer.calendly.com/api-docs/faac832d7c57d-list-webhook-subscriptions
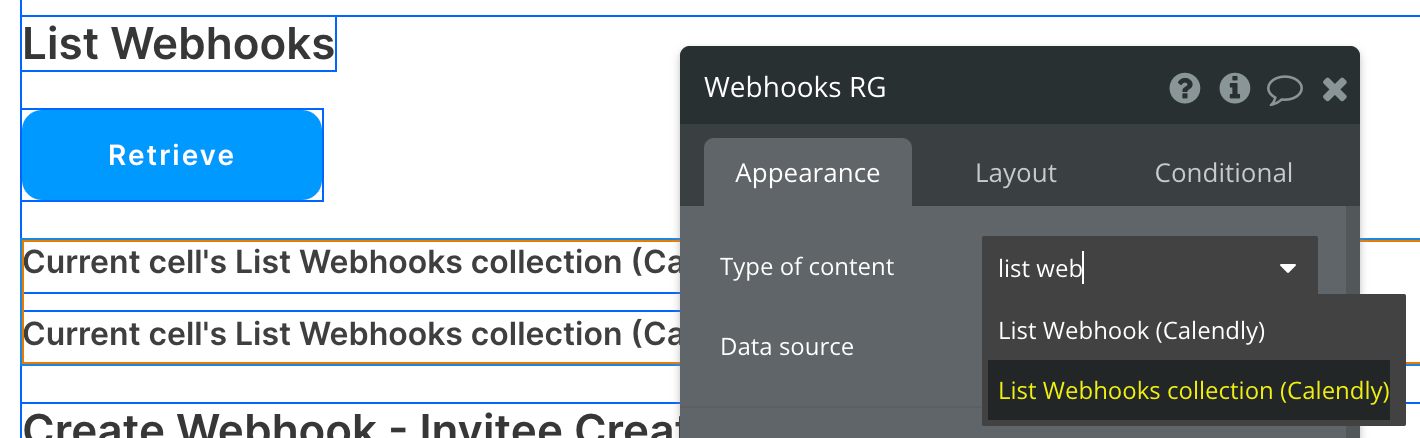
Set up the datasource
We're using a repeating group in our example. Make sure whatever element you use has the correct type of content set (List Webhooks collection (Calendly)):
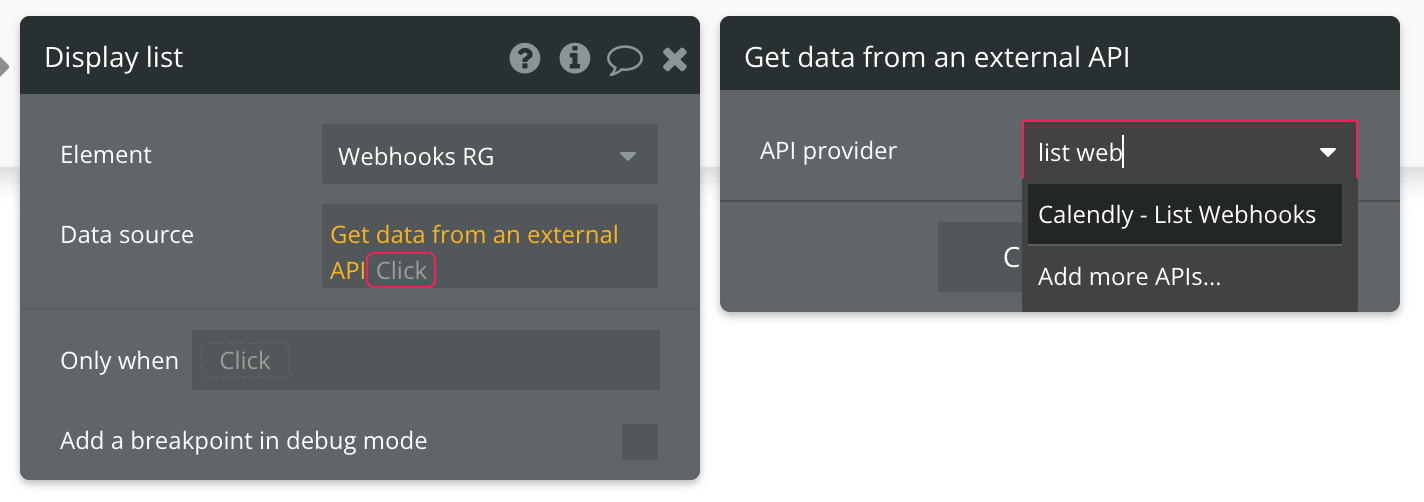
Set up the API call
Using the blue button from the screenshot above, we'll use a Display List action to send the results of this API call to the repeating group we've set up.
Add in your Organization ID, and provide one of the two accepted scope values:
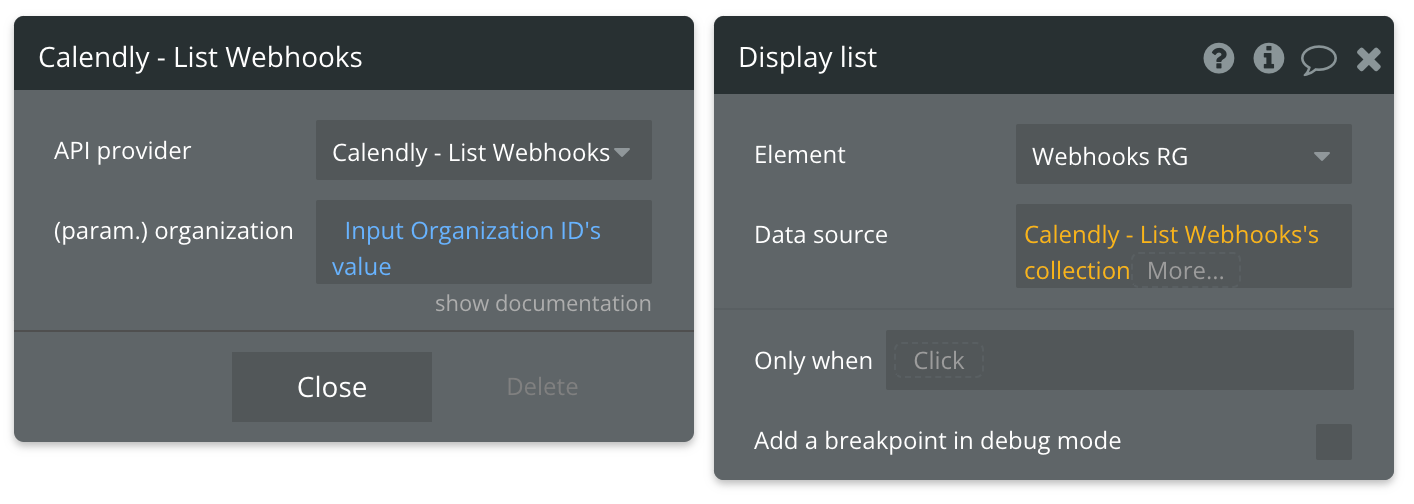
The expression will be red after you complete the above steps. Click on (more...) to open up the options menu to complete this expression and select ('s collection).
The final expression should look like this:

Available Parameter (* indicates a required value)
organization* - The UUID of your Calendly account's organization. This value can be found as a result of the Get User API call.
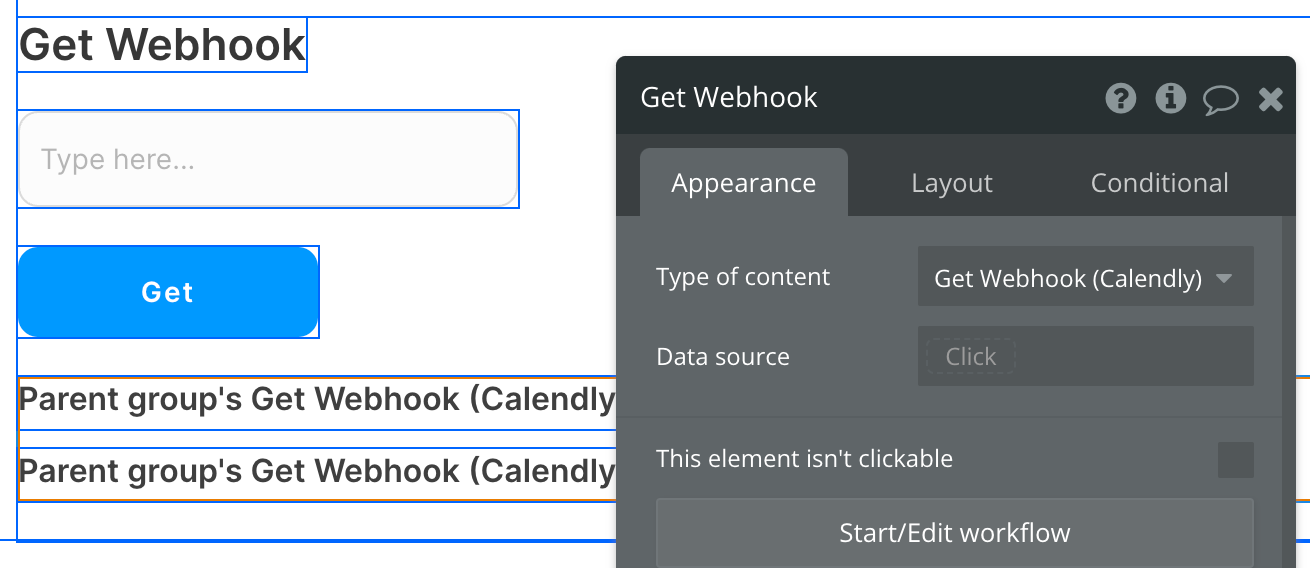
Get Webhook
Calendly documentation: https://developer.calendly.com/api-docs/4d800dc2cb119-get-webhook-subscription
Set up the datasource
We're using a group in our example. Make sure whatever element you use has the correct type of content set (Get Webhook (Calendly)):
Set up the API call
Using the blue button from the screenshot above, we'll use a Display data in group action to send the results of this API call to the group we've set up.
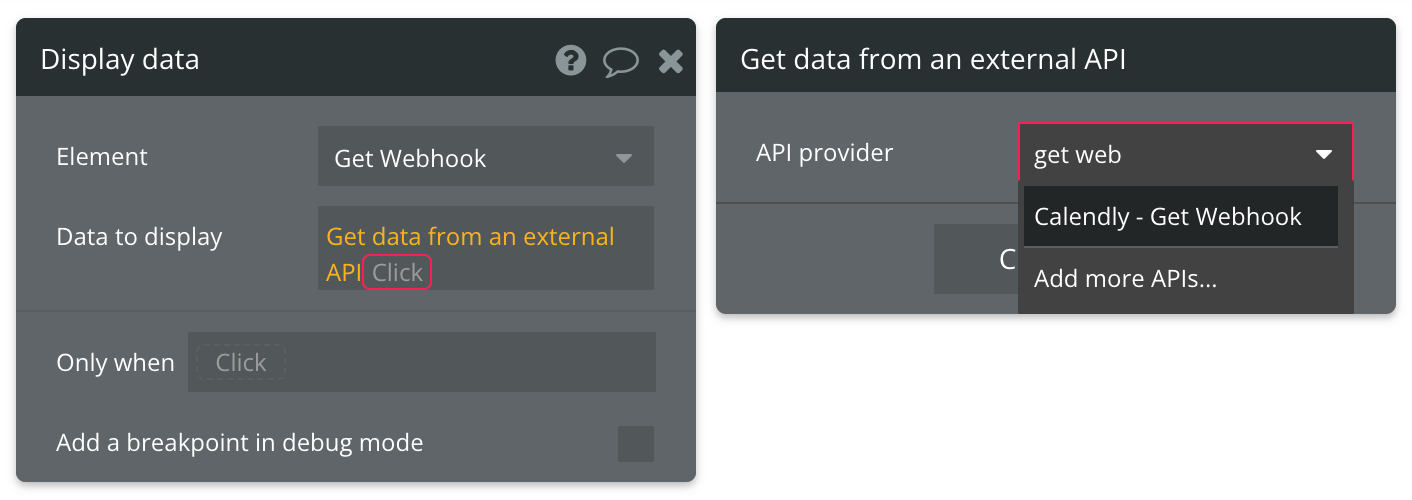
Fill in the required webhook_uuid parameter next:
Note: This API call is not looking for the entire URL (https://api.calendly.com/webhook_subscriptions/85042843-3877-4d23-abf8-af0a389b01ee), only the last portion of the URL (85042843-3877-4d23-abf8-af0a389b01ee).
That's it! You can now retrieve information from this Webhook.
Refer to the documentation link at the top of this page to view a list of all attributes that are available for use.
Available Path (* indicates a required value)
webhook_uuid* - The UUID of the webhook you want to retrieve.
Delete Webhook
Calendly documentation: https://developer.calendly.com/api-docs/565b97f62dafe-delete-webhook-subscription
Set up the API call
Find the plugin action titled "Calendly - Delete Webhook" and create a new workflow action with it. Fill in the UUID of the Webhook you wish to delete:
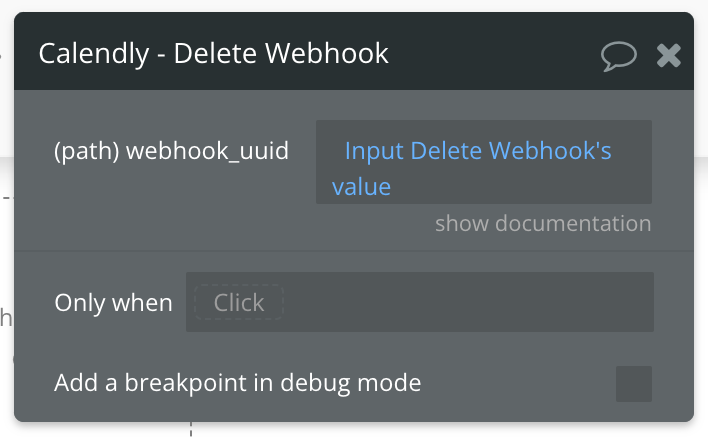
Note: This API call is not looking for the entire URL (https://api.calendly.com/webhook_subscriptions/85042843-3877-4d23-abf8-af0a389b01ee), only the last portion of the URL (85042843-3877-4d23-abf8-af0a389b01ee).
Available Path (* indicates a required value)
webhook_uuid* - The UUID of the webhook you want to delete.
Get Event Invitee
Calendly documentation: https://developer.calendly.com/api-docs/8305c0ccfac70-get-event-invitee
Set up the API call
Find the plugin action titled "Calendly - Get Event Invitee" and create a new workflow action with it. Fill in the Event ID and Invitee:
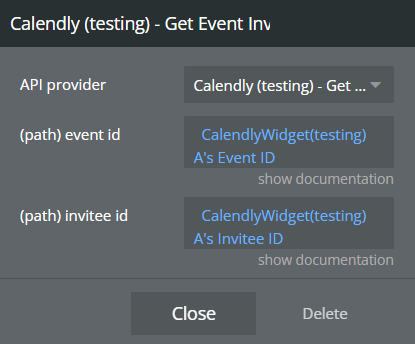
Available Path (* indicates a required value)
event id* - The event's unique identifier. Use value from Calendly Widget element's "Event ID" field
invitee id* - The invitee's unique identifier. Use value from Calendly Widget element's "Event ID" field