✅
Demo to preview the settings
✅
Introduction
Use a variety of Mailchimp API calls to view Campaigns, view/update Lists, manage Subscribers, and more all with our plugin.
Prerequisites
- You must have the Mailchimp account.
How to set up
Getting your API keys
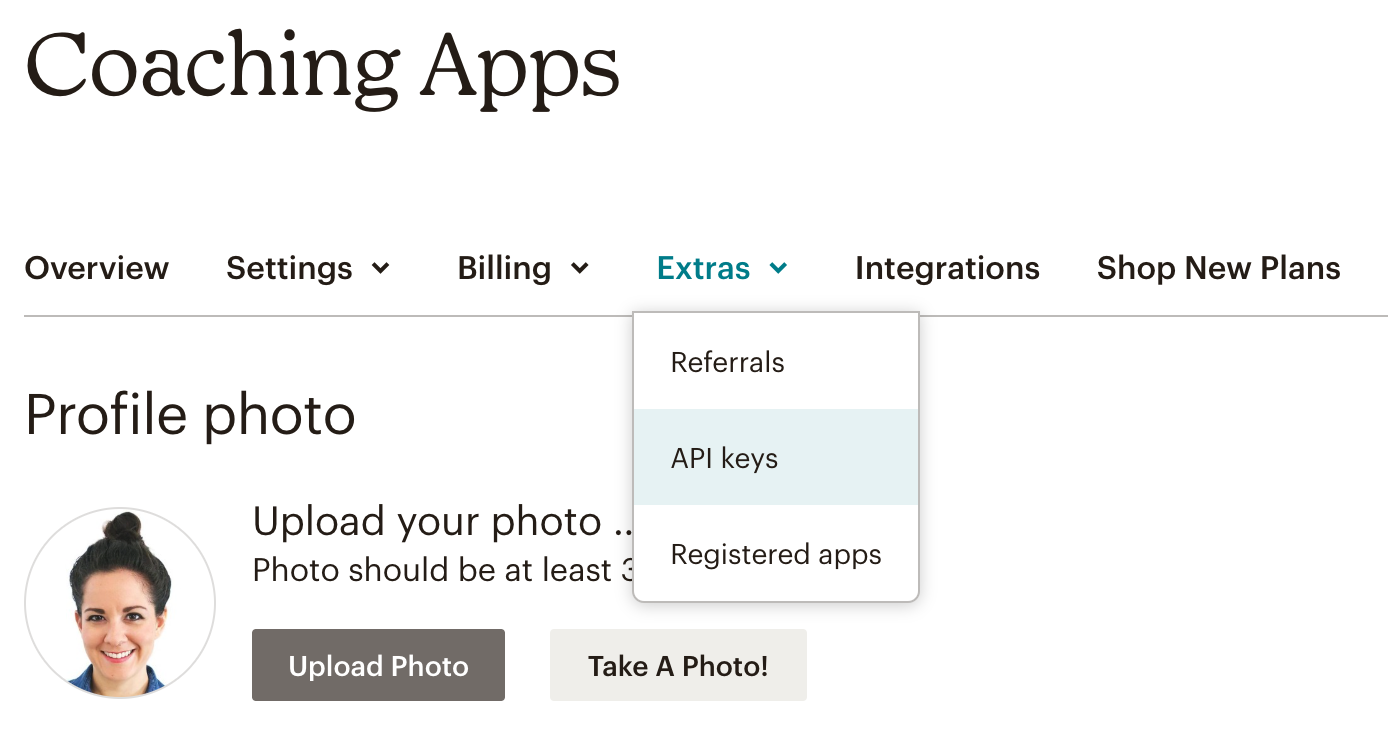
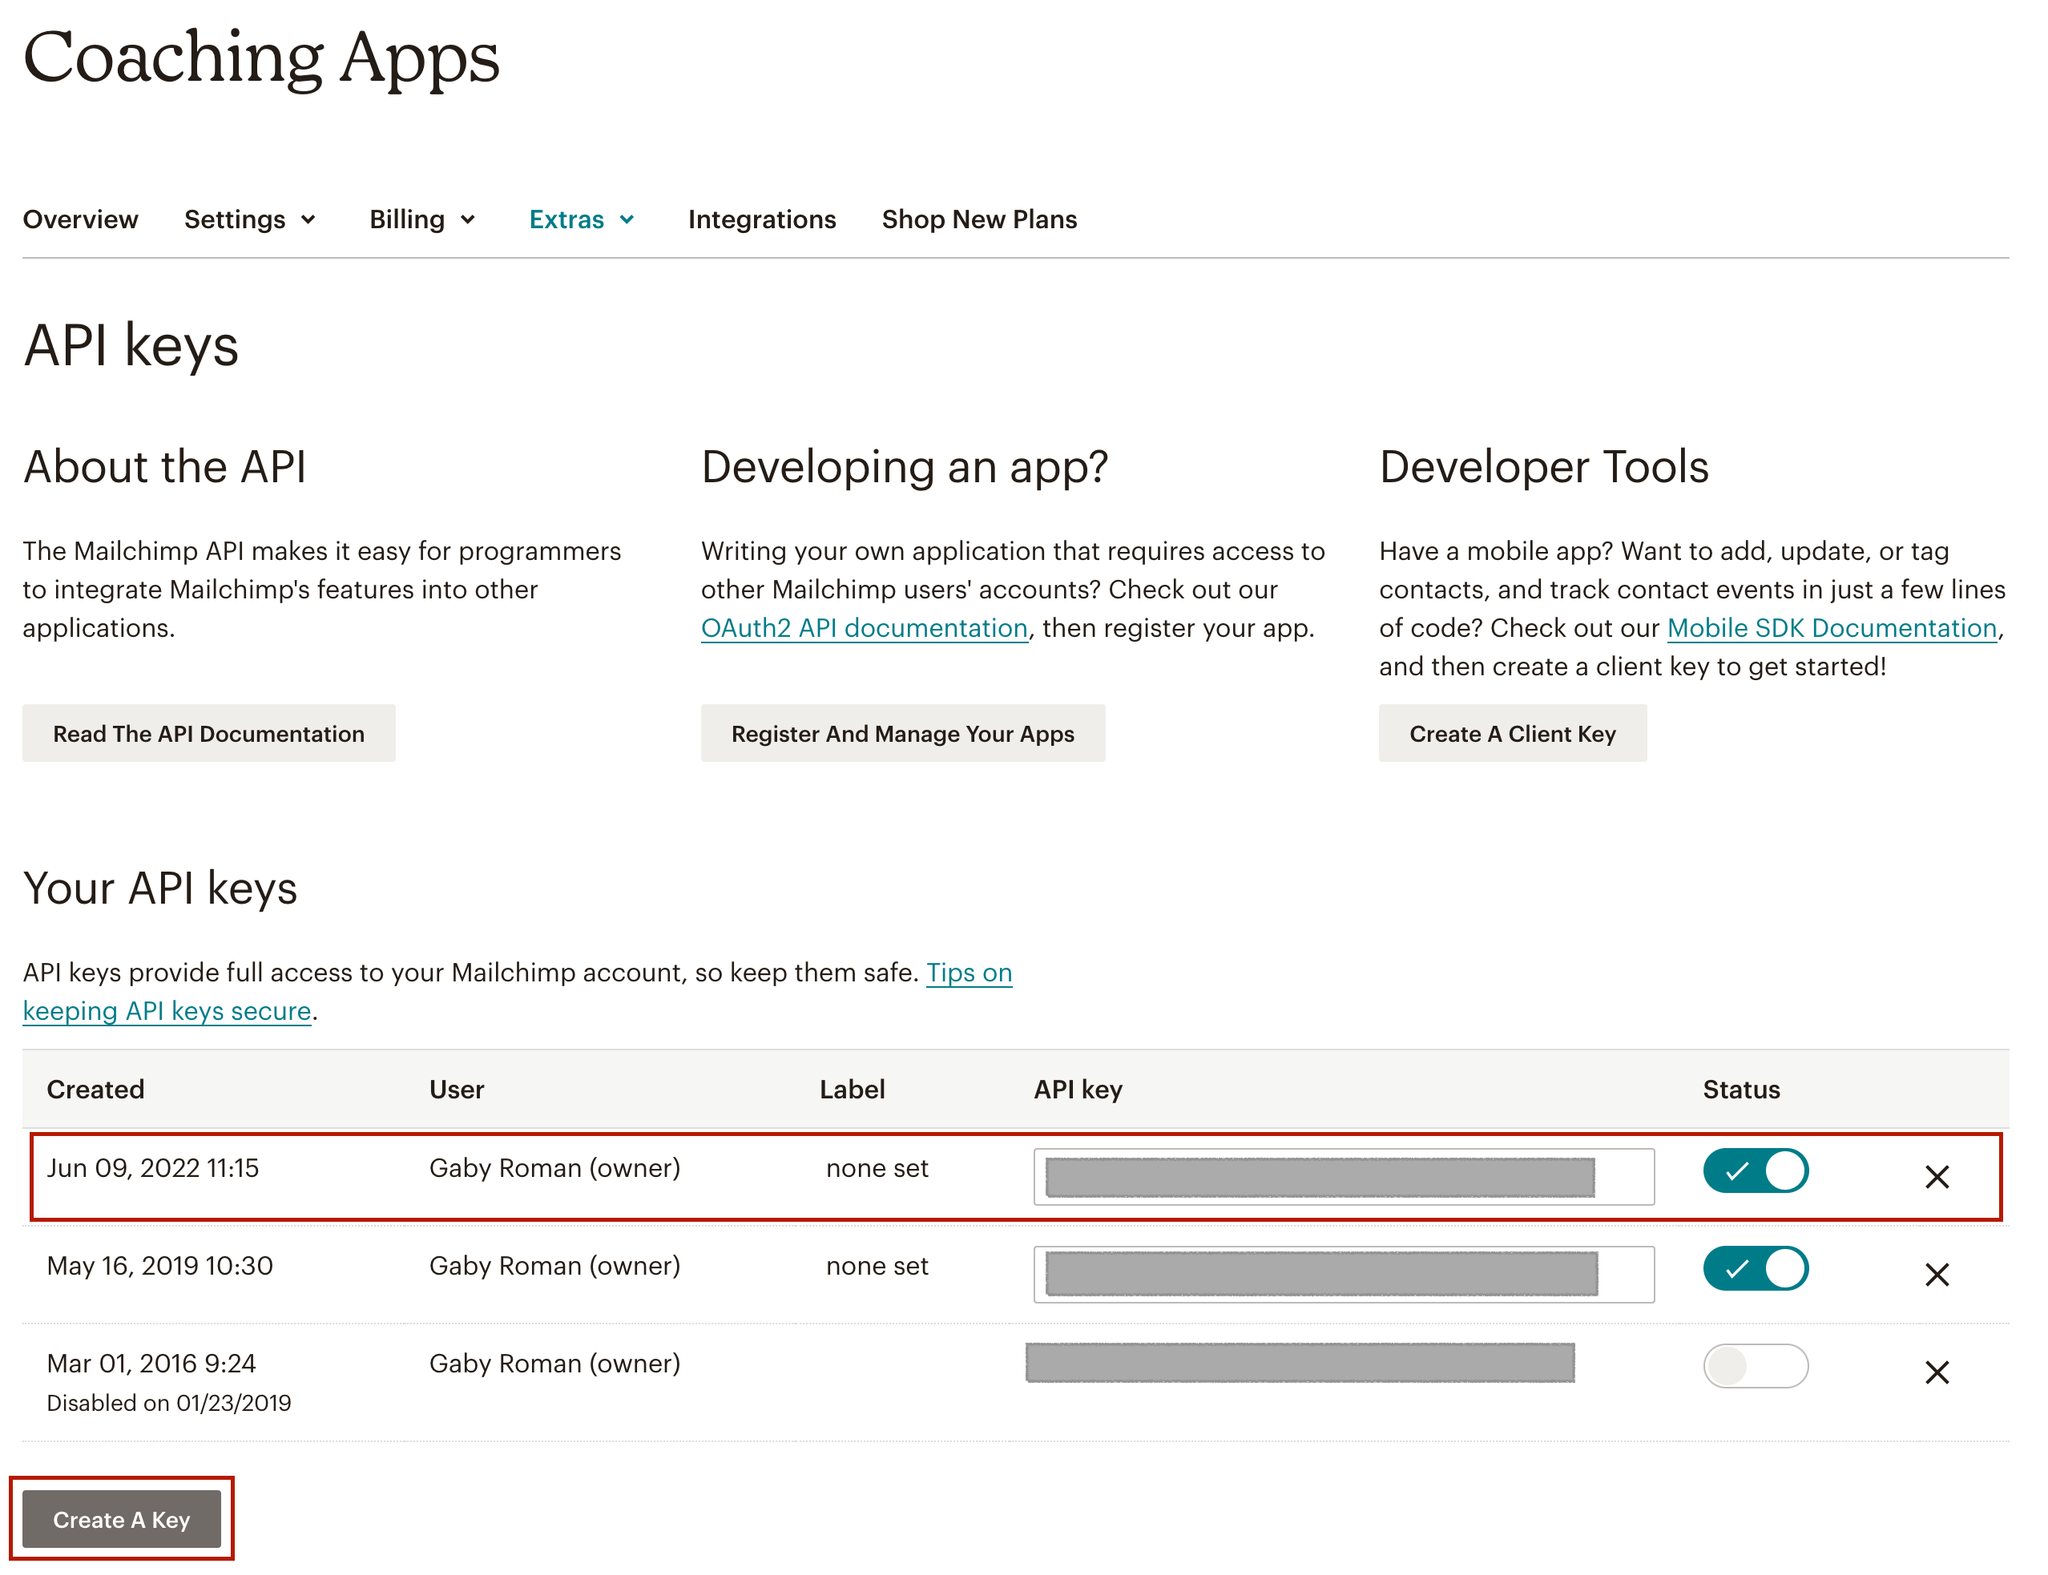
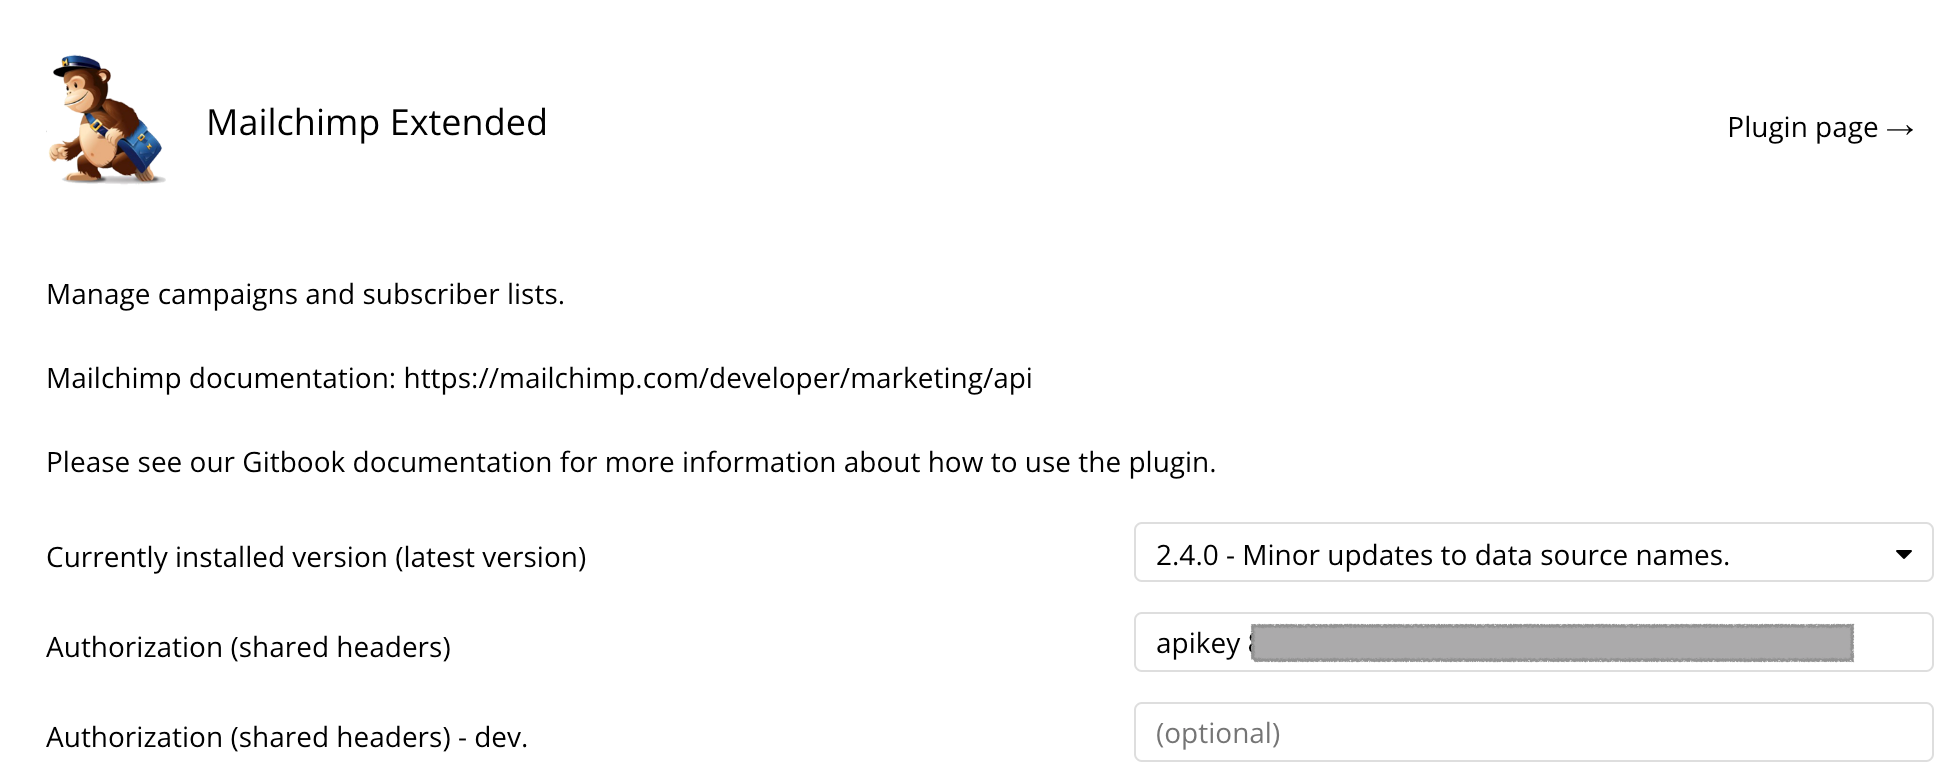
Head over to your Mailchimp profile area, then find API keys under the Extras dropdown.
Creating Subscriber Hash
Several of the calls in this guide require a subscriber hash, which can be quickly generated from the email address of the user. Take the value from your input, and apply a :formatted as expression:
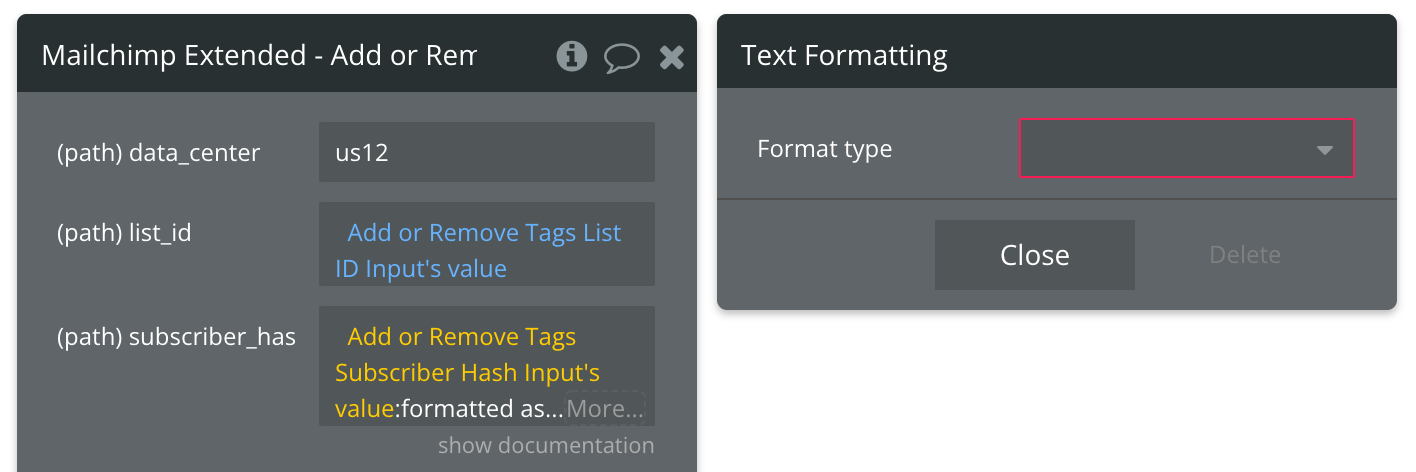
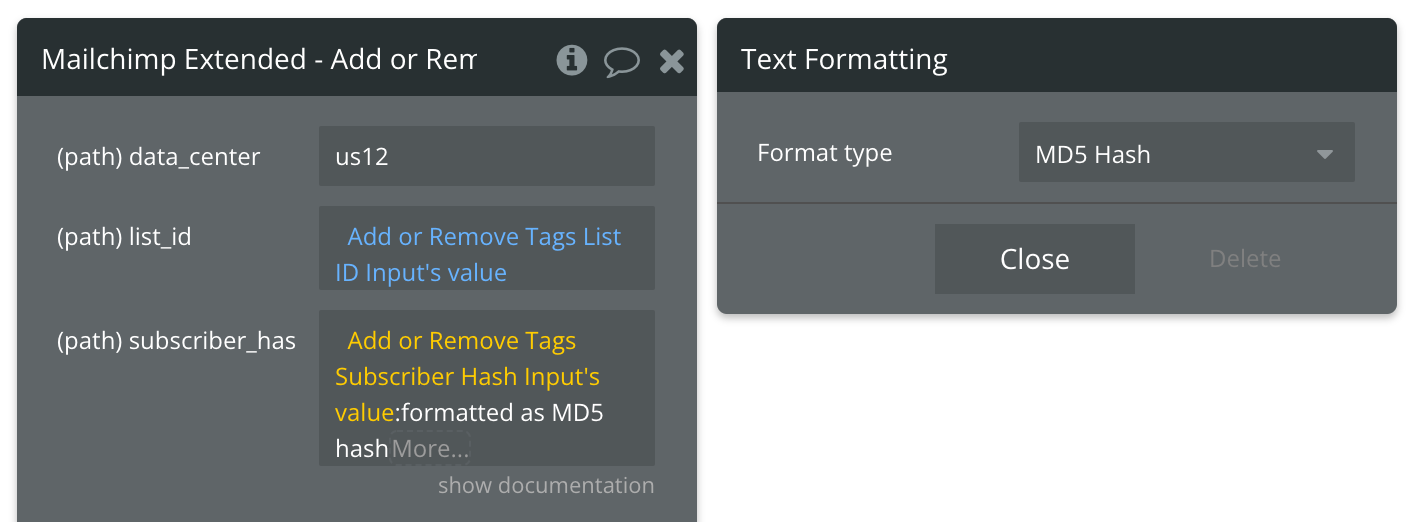
That's it! Remember to use this expression anytime you're using a call that requires the Subscriber Hash.
Get All Campaigns - Data Call
🔗
Mailchimp documentation: https://mailchimp.com/developer/marketing/api/campaign-folders/
Set up your data source
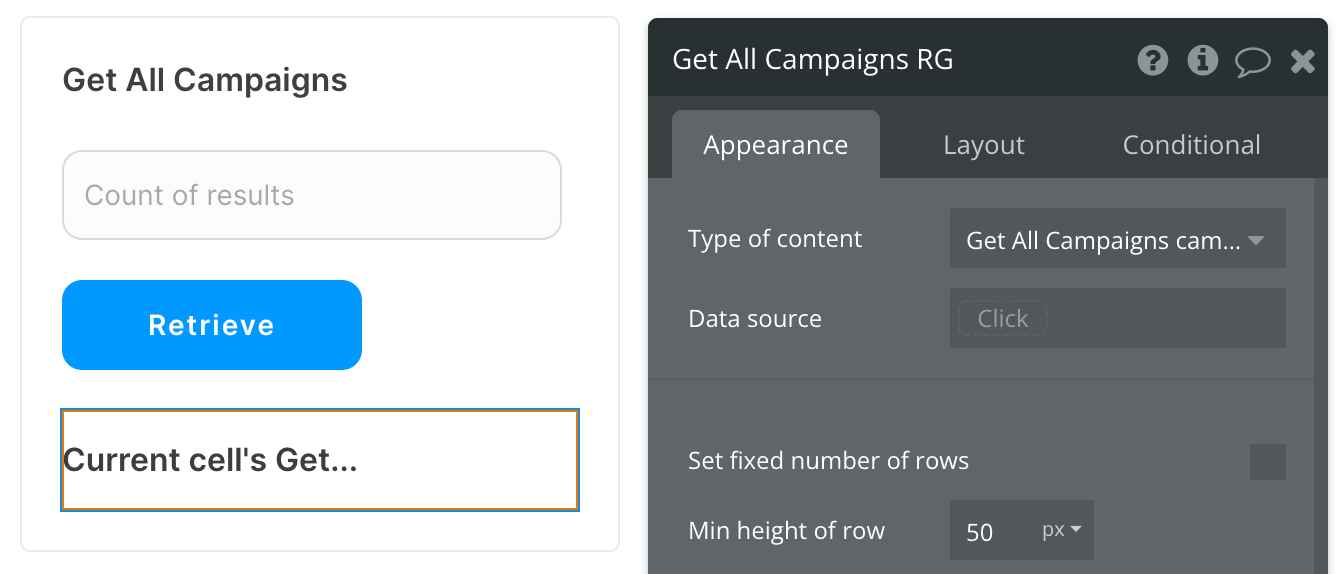
In this example, we'll use a repeating group to display our data. Since we're using buttons to trigger our API calls, we'll leave the data source blank and use a Display list in RG action to send the results to the repeating group.
- Type of content = Get All Campaigns campaign (Mailchimp Extended)
- Data source = leave blank
Set up the API call
Now that your repeating group is set up properly, let's configure the workflow action to retrieve all Campaigns from Mailchimp and display the results. In this demo, we're using the blue "Retrieve" button to do this.
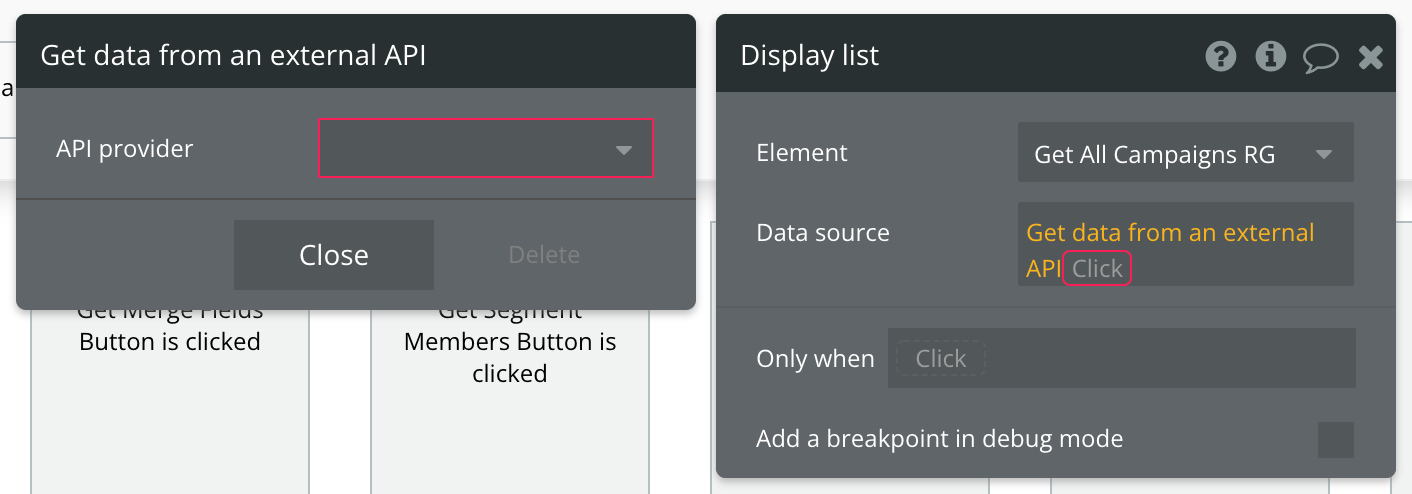
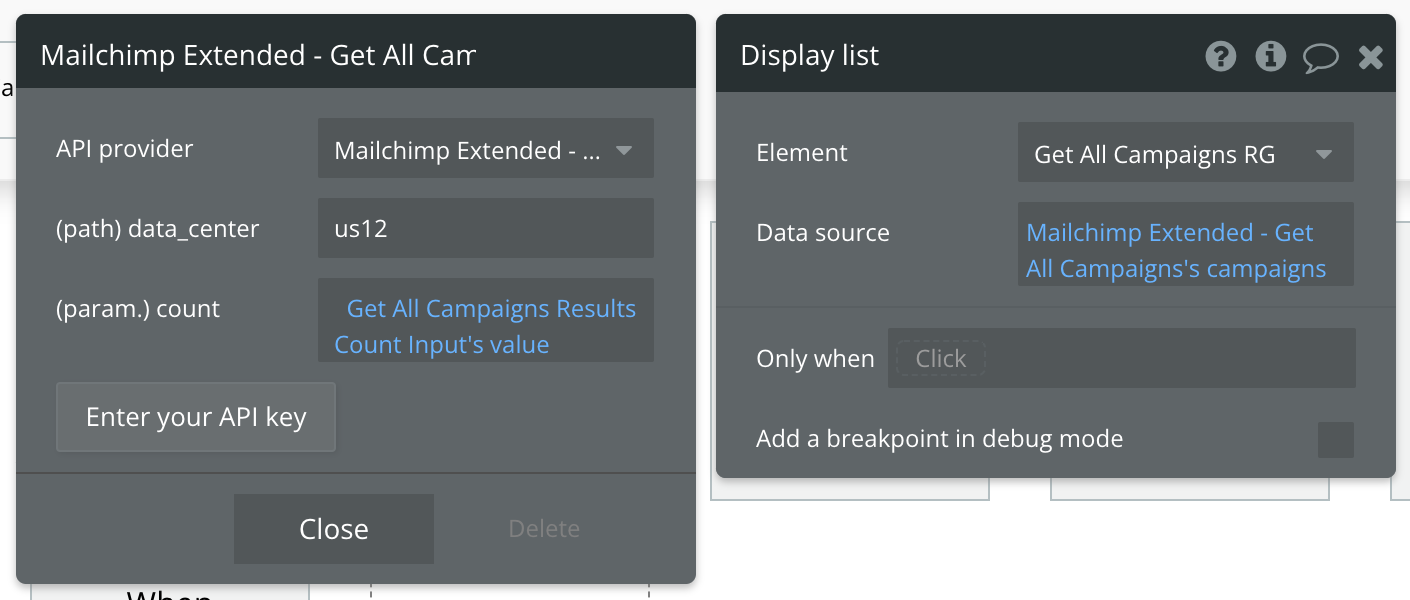
Review the items below to understand what values are optional or required to complete the API call.
Available Path (* indicates a required value)
data_center* - Example value: us12. Replace this with whatever value you need to target your data center.
Available Parameter (* indicates a required value)
count - The number of records to return. The default value is 10. The maximum value is 1000
That's it! You're ready to run your API call and retrieve all Campaigns in your Mailchimp account.
Get All Lists - Data Call
🔗
Mailchimp documentation: https://mailchimp.com/developer/marketing/api/lists/
Set up your data source
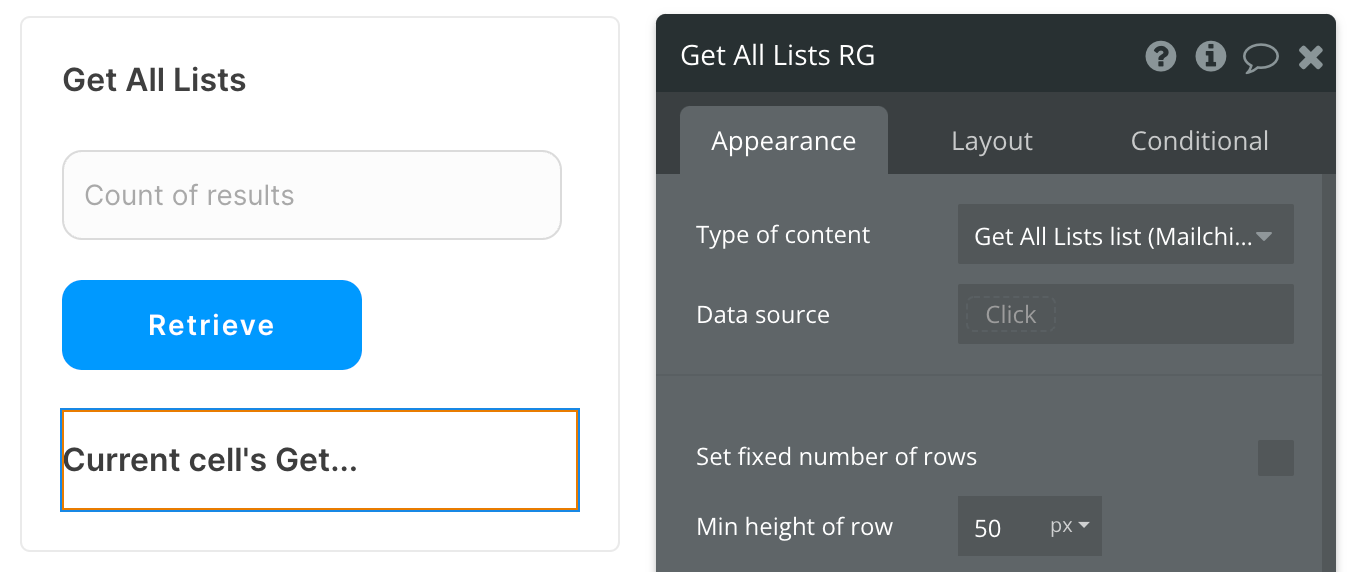
In this example, we'll use a repeating group to display our data. Since we're using buttons to trigger our API calls, we'll leave the data source blank and use a Display list in RG action to send the results to the repeating group.
- Type of content = Get All Lists list (Mailchimp Extended)
- Data source = leave blank
Set up the API call
Now that your repeating group is set up properly, let's configure the workflow action to retrieve all Lists from Mailchimp and display the results. In this demo, we're using the blue "Retrieve" button to do this.
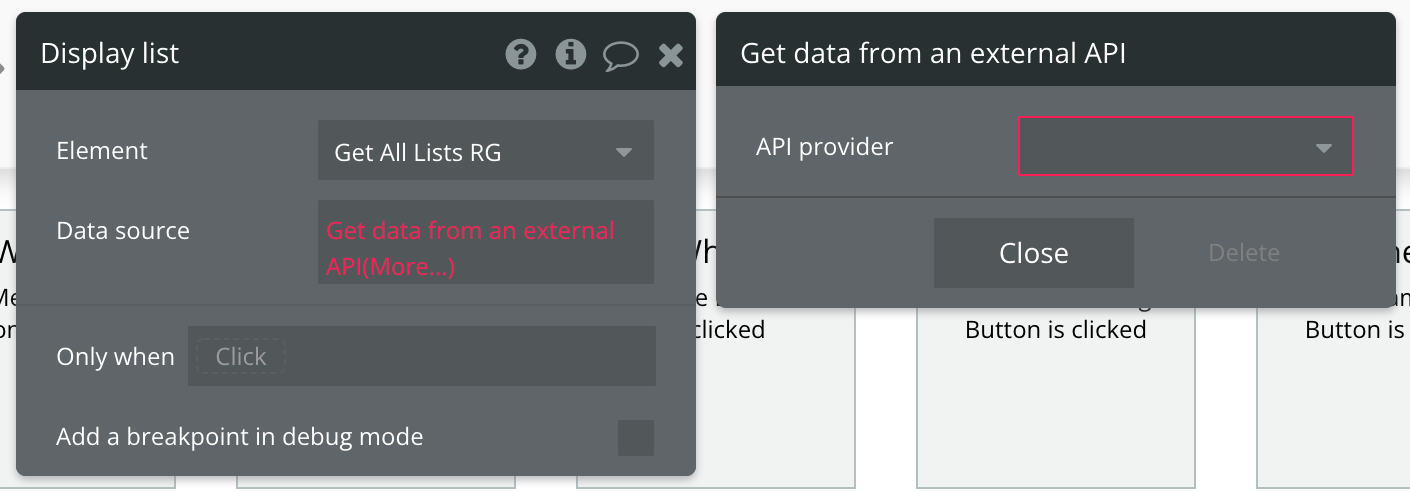
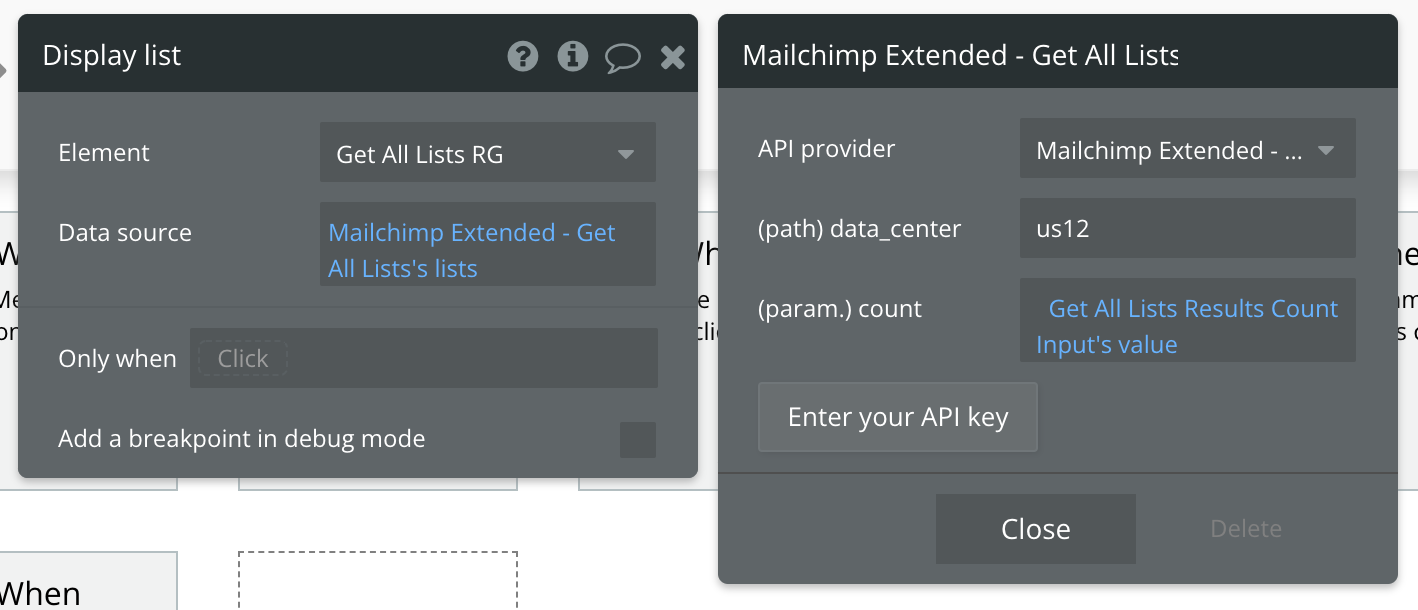
Review the items below to understand what values are optional or required to complete the API call.
Available Path (* indicates a required value)
data_center* - Example value: us12. Replace this with whatever value you need to target your data center.
Available Parameter (* indicates a required value)
count* - The number of records to return. The default value is 10. The maximum value is 1000
That's it! You're ready to run your API call and retrieve all Lists in your Mailchimp account.
Get Single List - Data Call
🔗
Mailchimp documentation: https://mailchimp.com/developer/marketing/api/lists/get-list-info/
Set up your data source
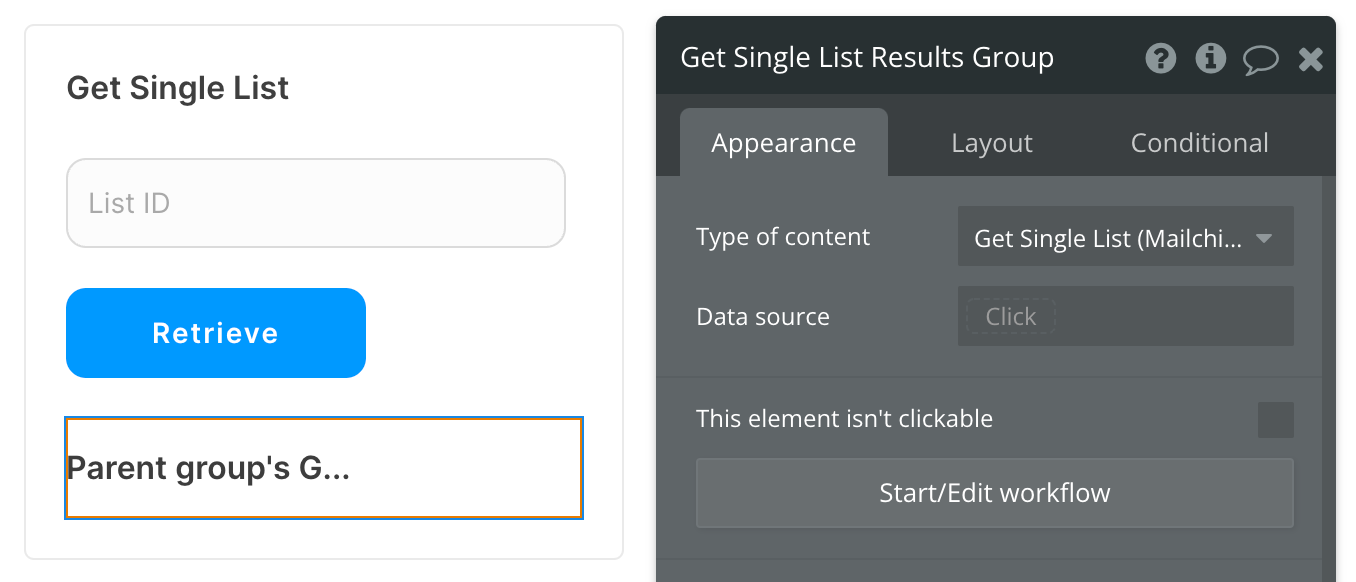
In this example, we'll use a group to display our data. Since this data call is reliant upon a List ID value, we'll use the Display data in group action to send the results of the API call to the group.
- Type of content = Get Single List (Mailchimp Extended)
- Data source = leave blank
Set up the API call
Now that your group is set up properly, let's configure the workflow action to retrieve the selected List from Mailchimp and display the results. In this demo, we're using the blue "Retrieve" button to do this.
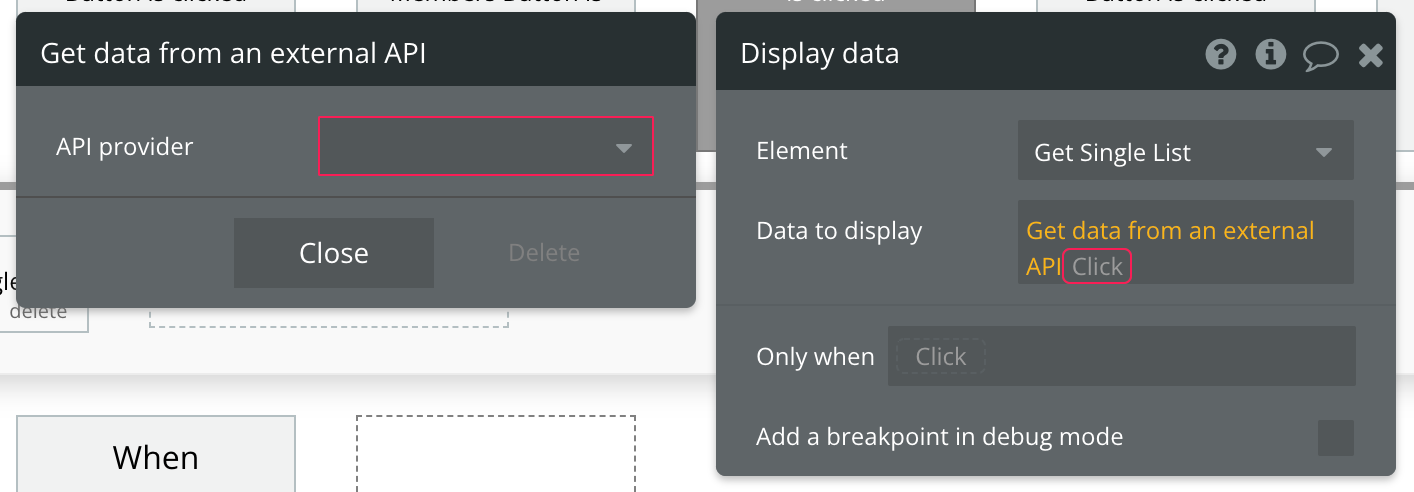
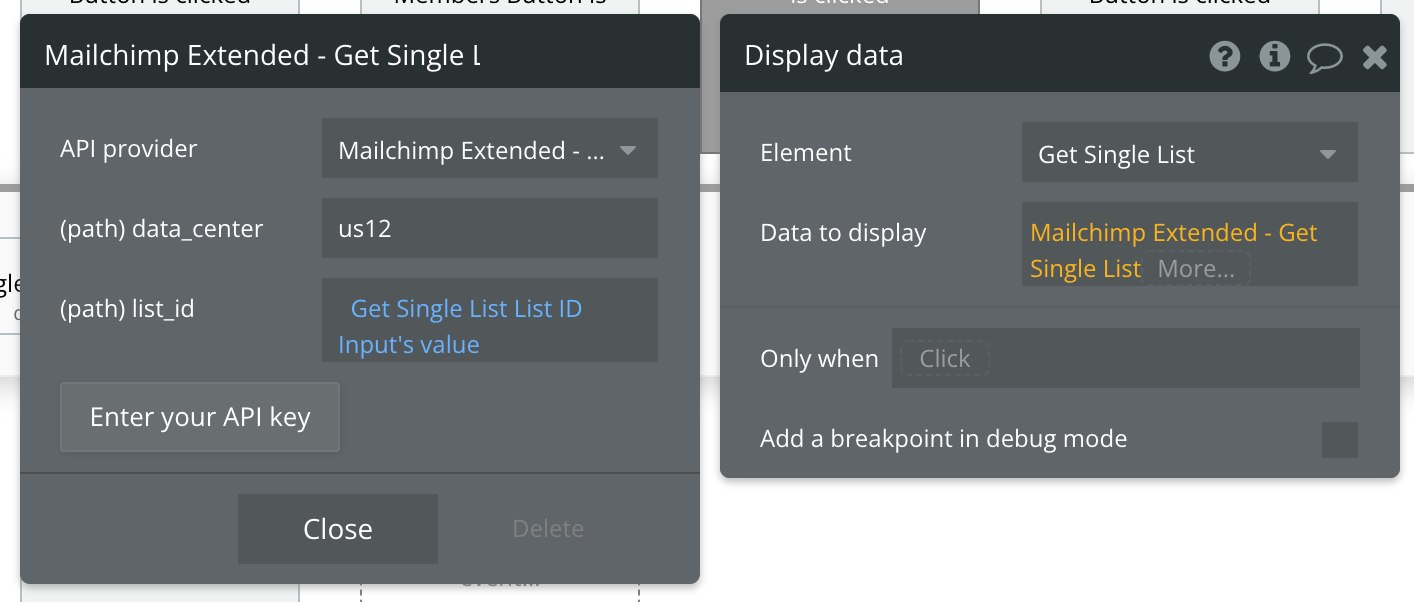
Review the items below to understand what values are optional or required to complete the API call.
☝
Note: Not sure where to find your List ID? Use the Get All Lists API call to find the ID of the List you're working with.
Available Paths (* indicates a required value)
data_center* - Example value: us12. Replace this with whatever value you need to target your data center.
list_id* - Enter the ID of the List you're searching for.
That's it! You're ready to run your API call and retrieve the targeted List from your Mailchimp account.
Get List Members - Data Call
🔗
Mailchimp documentation: https://mailchimp.com/developer/marketing/api/list-members/list-members-info/
Set up your data source
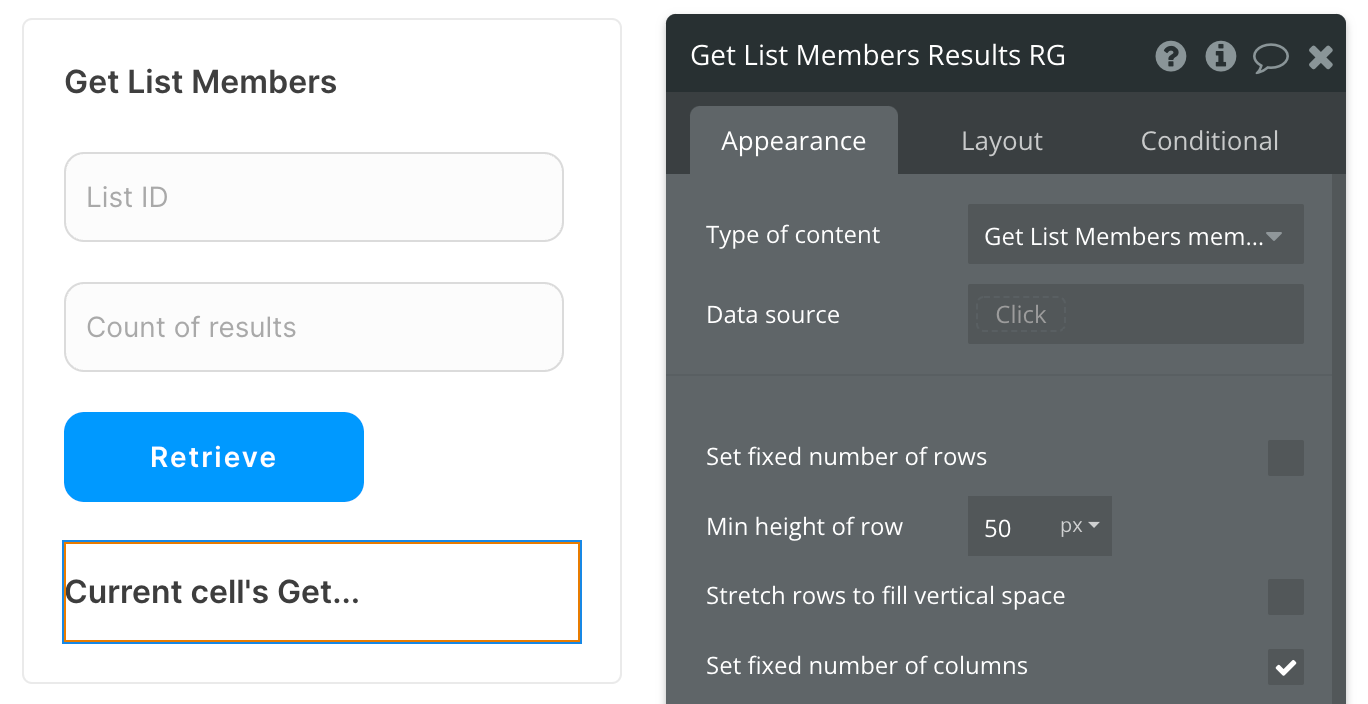
In this example, we'll use a repeating group to display our data. Since we're using buttons to trigger our API calls, we'll leave the data source blank and use a Display list in RG action to send the results to the repeating group.
- Type of content = Get List Members member (Mailchimp Extended)
- Data source = leave blank
Set up the API call
Now that your repeating group is set up properly, let's configure the workflow action to retrieve all List Members from Mailchimp and display the results. In this demo, we're using the blue "Retrieve" button to do this.
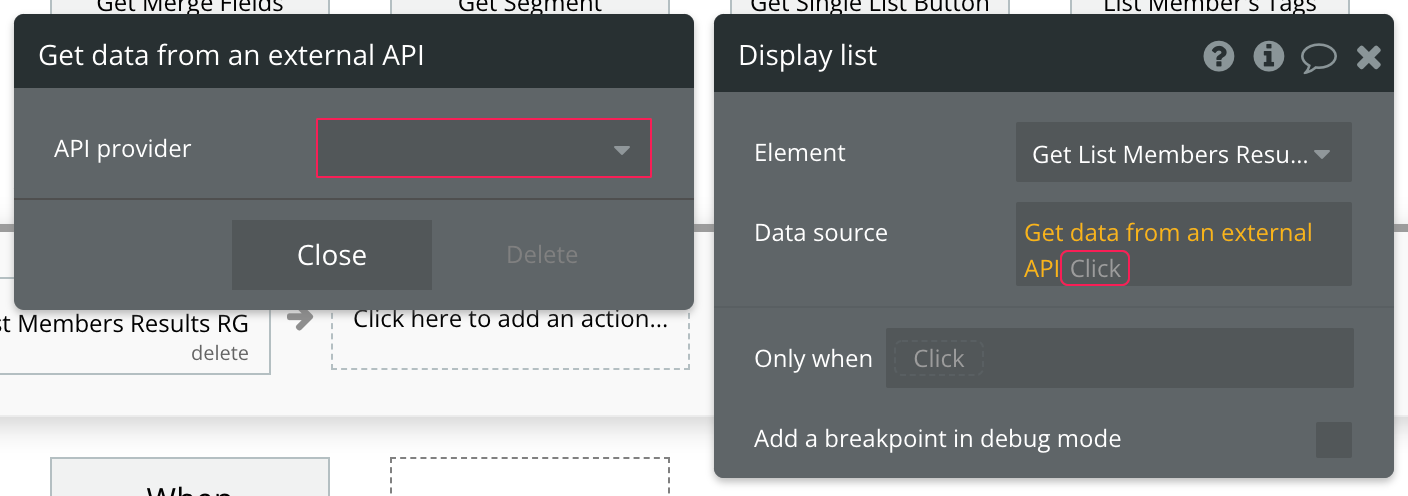
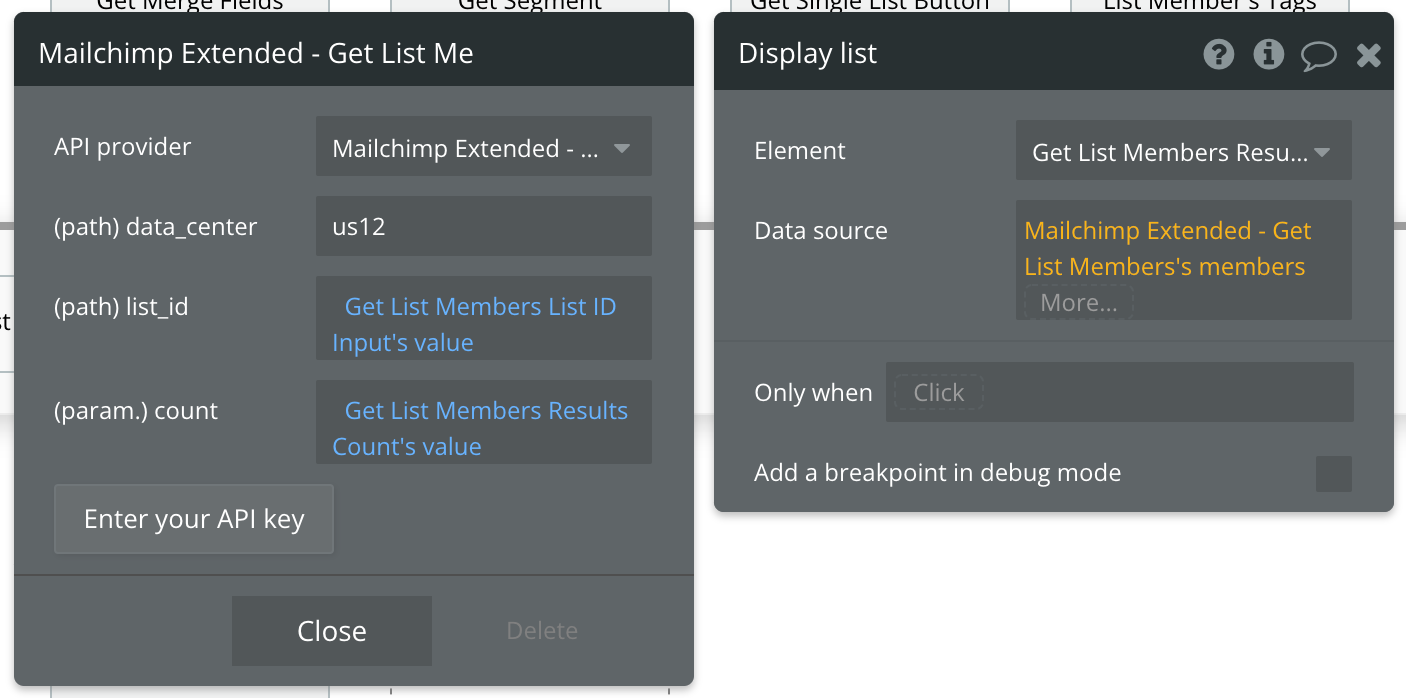
Review the items below to understand what values are optional or required to complete the API call.
☝
Note: Not sure where to find your List ID? Use the Get All Lists API call to find the ID of the List you're working with.
Available Paths (* indicates a required value)
data_center* - Example value: us12. Replace this with whatever value you need to target your data center.
list_id* - Enter the ID of the List you're searching for.
Available Parameter (* indicates a required value)
count* - The number of records to return. The default value is 10. The maximum value is 1000
That's it! You're ready to run your API call and retrieve all List Members from the selected List in your Mailchimp account.
Get All Segments - Data Call
🔗
Mailchimp documentation: https://mailchimp.com/developer/marketing/api/list-segments/list-segments/
Set up your data source
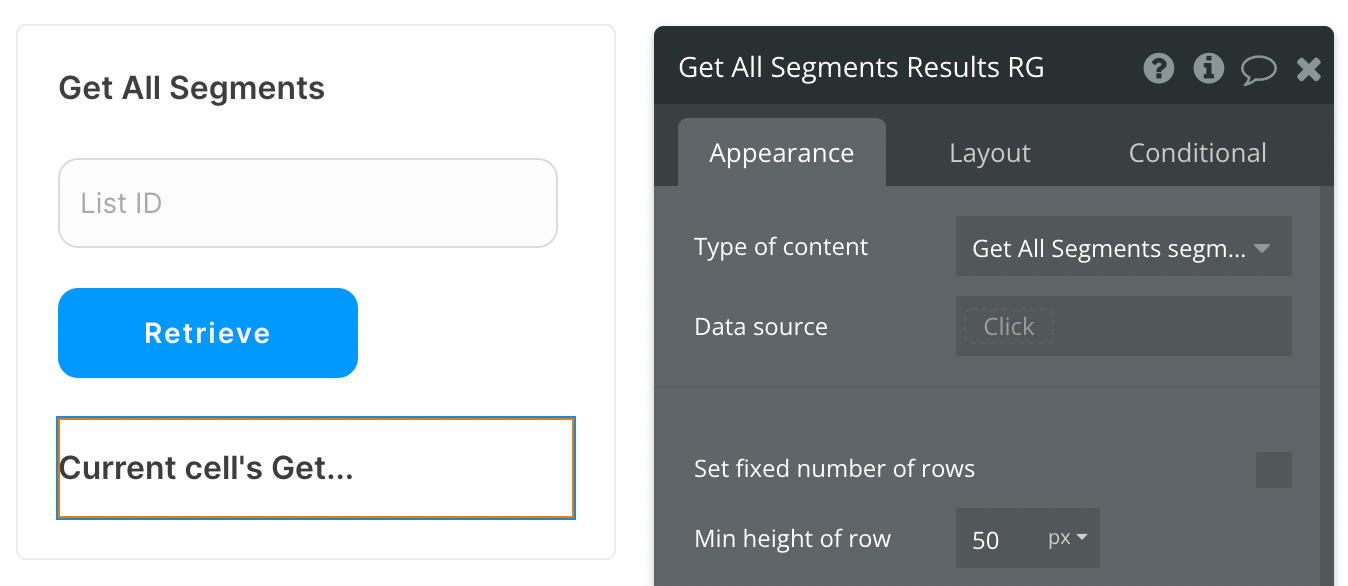
In this example, we'll use a repeating group to display our data. Since we're using buttons to trigger our API calls, we'll leave the data source blank and use a Display list in RG action to send the results to the repeating group.
- Type of content = Get All Segments segment (Mailchimp Extended)
- Data source = leave blank
Set up the API call
Now that your repeating group is set up properly, let's configure the workflow action to retrieve all All Segments from Mailchimp and display the results. In this demo, we're using the blue "Retrieve" button to do this.
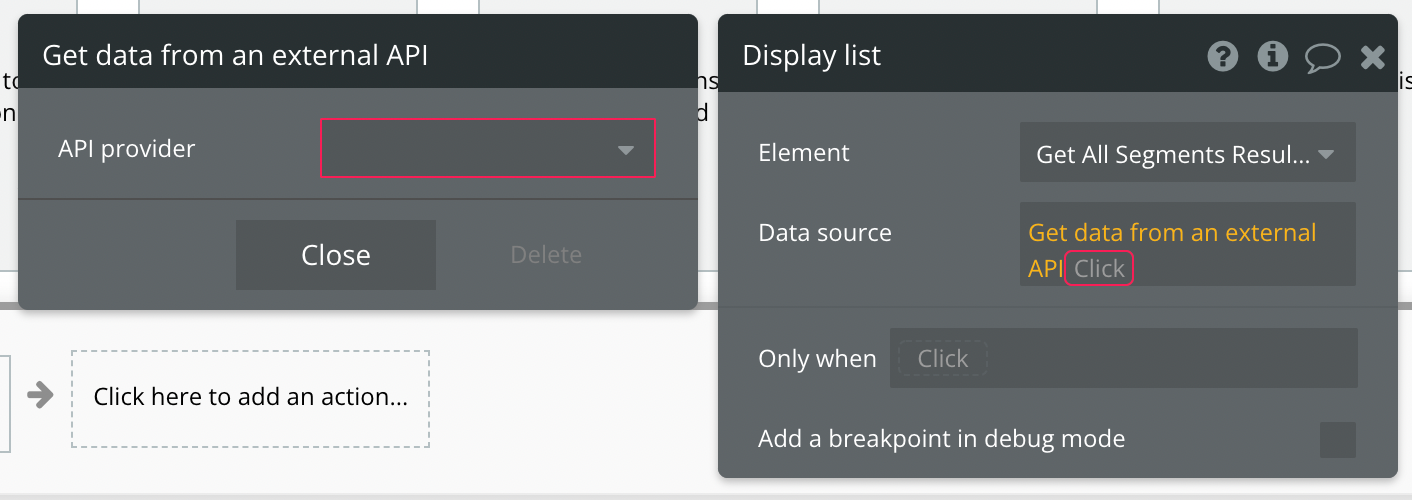
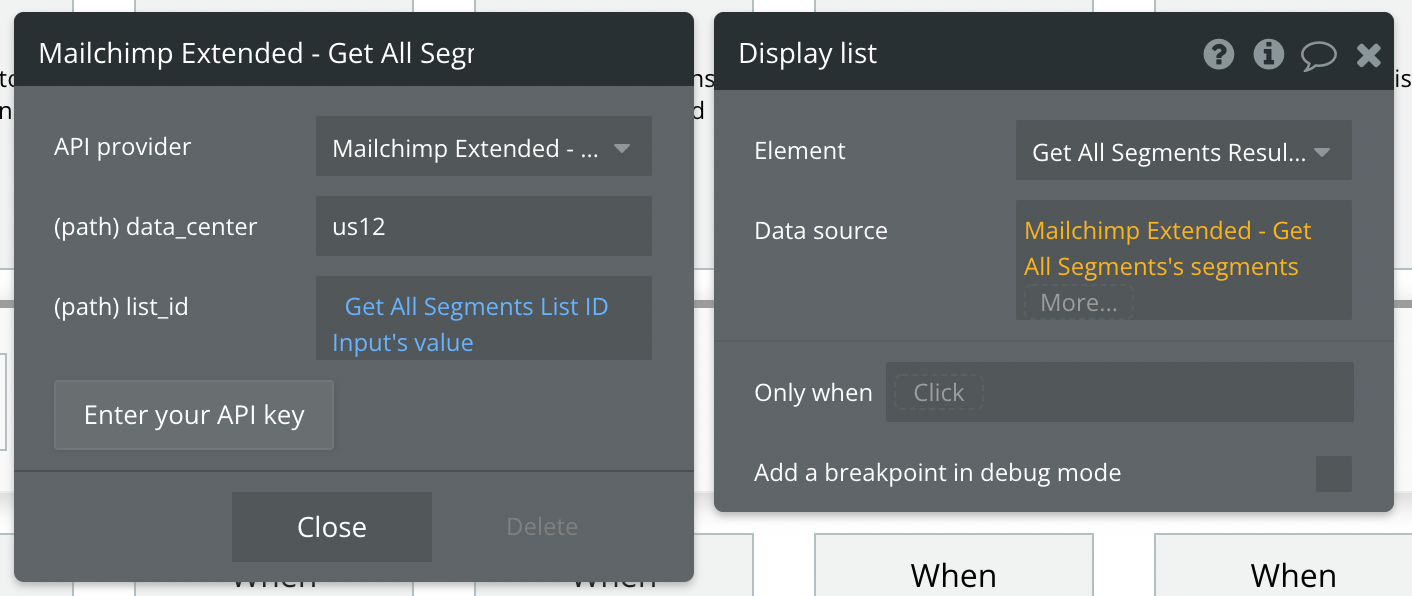
Review the items below to understand what values are optional or required to complete the API call.
☝
Note: Not sure where to find your List ID? Use the Get All Lists API call to find the ID of the List you're working with.
Available Paths (* indicates a required value)
data_center* - Example value: us12. Replace this with whatever value you need to target your data center.
list_id* - Enter the ID of the List you're searching for.
That's it! You're ready to run your API call and retrieve all Segments in your Mailchimp account.
Get Segment Members - Data Call
🔗
Mailchimp documentation: https://mailchimp.com/developer/marketing/api/list-segment-members/list-members-in-segment/
Set up your data source
In this example, we'll use a repeating group to display our data. Since we're using buttons to trigger our API calls, we'll leave the data source blank and use a Display list in RG action to send the results to the repeating group.
- Type of content = Get All Segments segment (Mailchimp Extended)
- Data source = leave blank
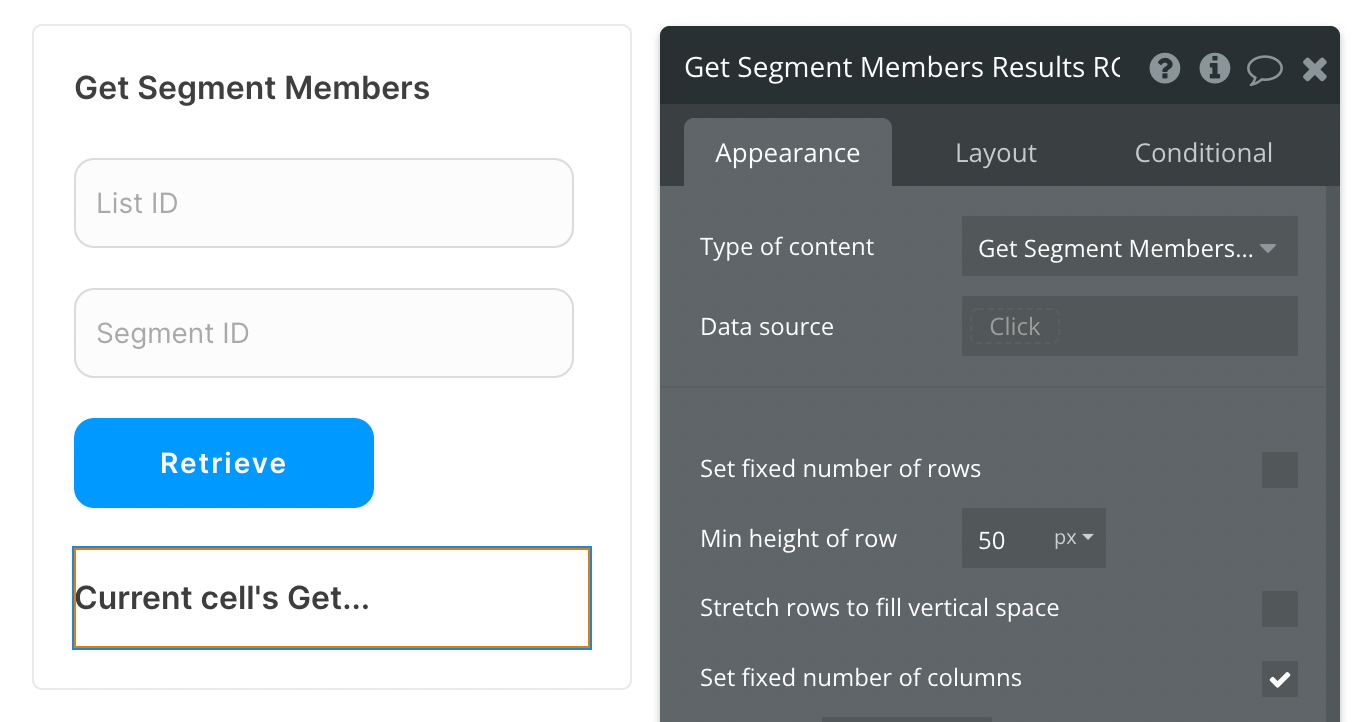
Set up the API call
Now that your repeating group is set up properly, let's configure the workflow action to retrieve all All Segments from Mailchimp and display the results. In this demo, we're using the blue "Retrieve" button to do this.
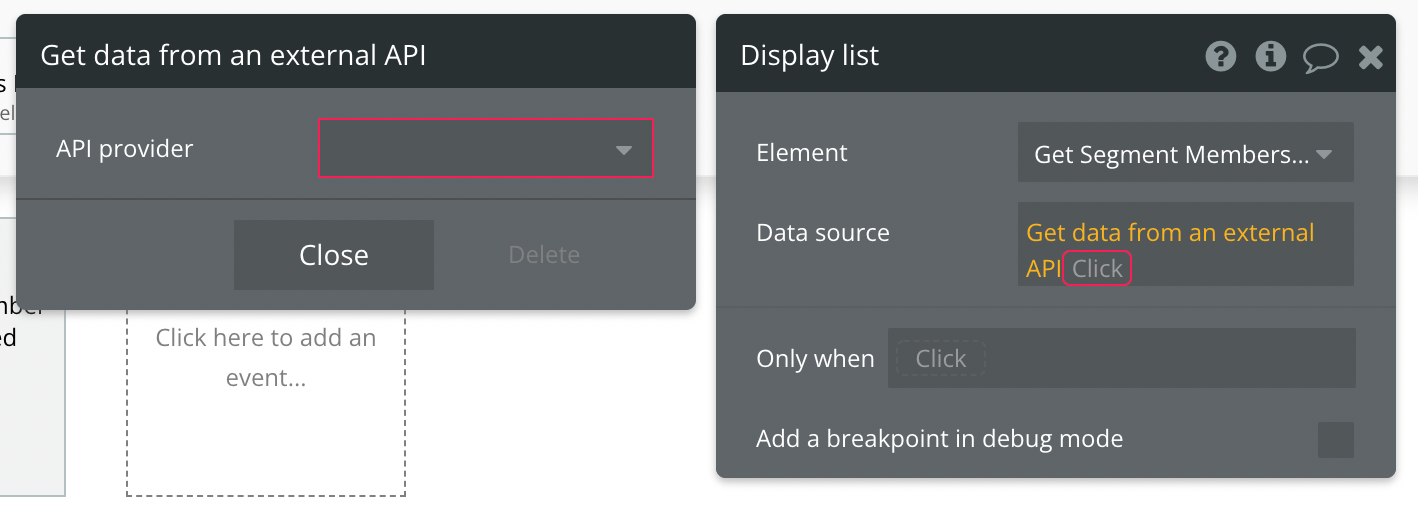
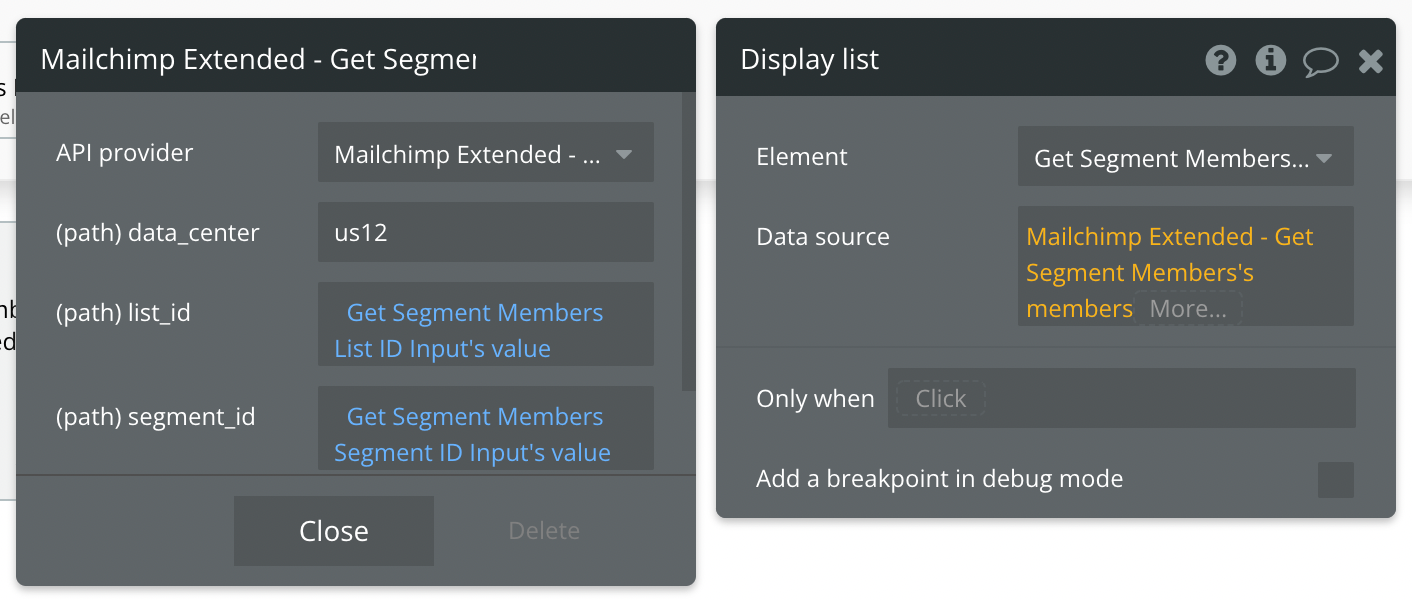
Review the items below to understand what values are optional or required to complete the API call.
☝
Note: Not sure where to find your List ID? Use the Get All Lists API call to find the ID of the List you're working with. Review this page to find your Segment ID.
Available Paths (* indicates a required value)
data_center* - Example value: us12. Replace this with whatever value you need to target your data center.
list_id* - Enter the ID of the List you're searching for.
segment_id* - Enter the ID of the Segment you're searching for.
That's it! You're ready to run your API call and retrieve all Segment Members in your Mailchimp account.
Get All Interest Categories - Data Call
🔗
Mailchimp documentation: https://mailchimp.com/developer/marketing/api/interests/
Set up your data source
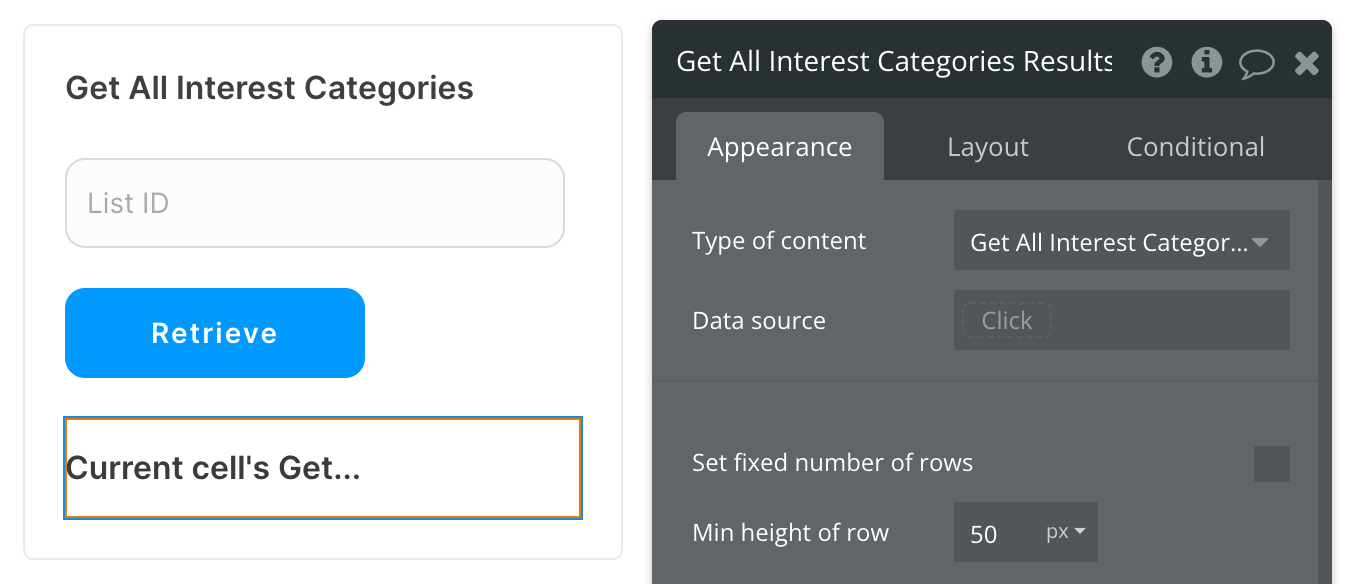
In this example, we'll use a repeating group to display our data. Since we're using buttons to trigger our API calls, we'll leave the data source blank and use a Display list in RG action to send the results to the repeating group.
- Type of content = Get All Interest Categories (Mailchimp Extended)
- Data source = leave blank
Set up the API call
Now that your repeating group is set up properly, let's configure the workflow action to retrieve all Interest Categories from Mailchimp and display the results. In this demo, we're using the blue "Retrieve" button to do this.
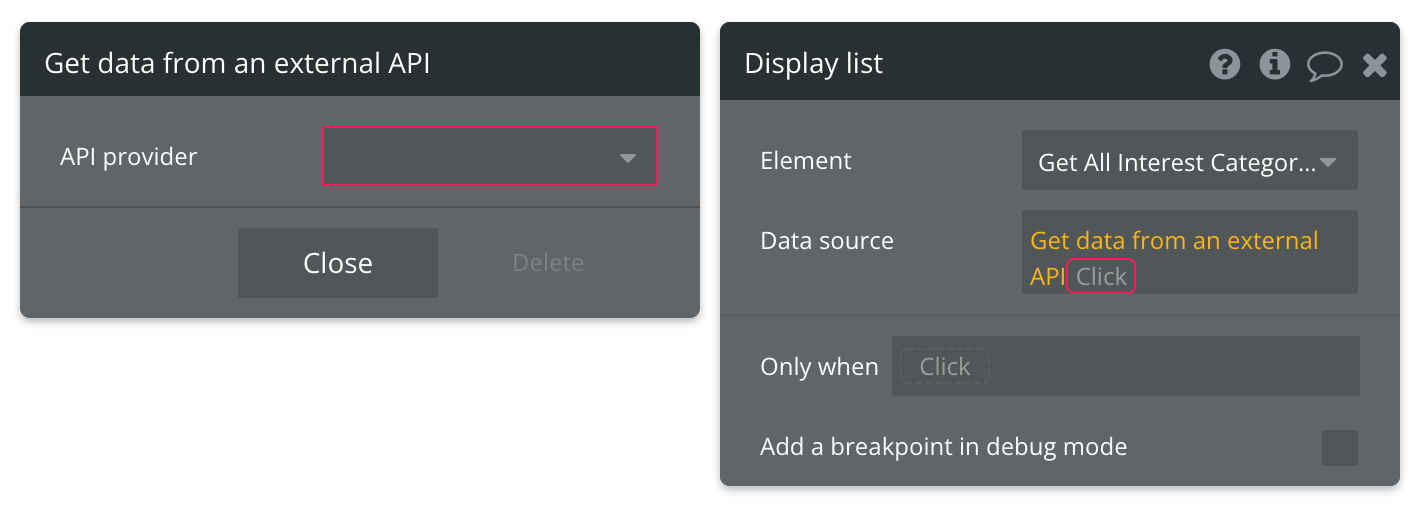
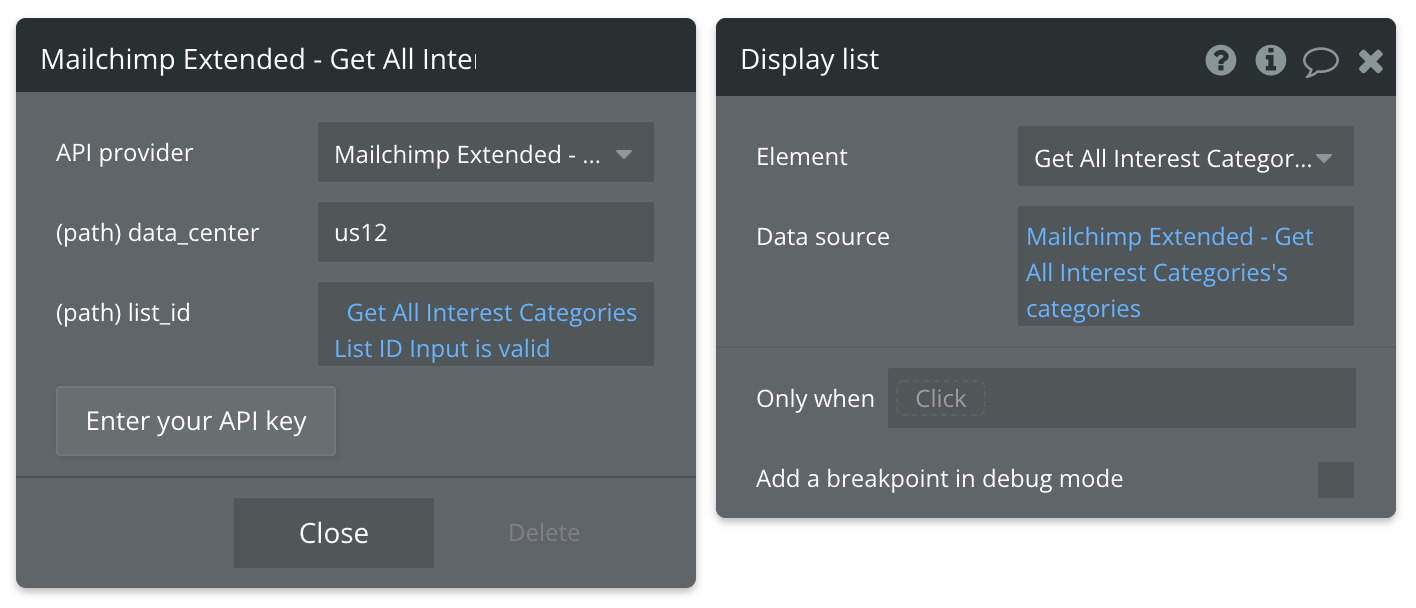
Review the items below to understand what values are optional or required to complete the API call.
☝
Available Paths (* indicates a required value)
data_center* - Example value: us12. Replace this with whatever value you need to target your data center.
list_id* - Enter the ID of the List you're searching for.
That's it! You're ready to run your API call and retrieve all Interest Categories in your Mailchimp account.
☝
Note: Not sure where to find your List ID? Use the Get All Lists API call to find the ID of the List you're working with.
Get All Interests in Category- Data Call
⚠️
Not sure if the documentation link below is the correct call. It looks right, up until the very last path of the URL. Also, is the term "Group" used by Mailchimp anymore?
🔗
Mailchimp documentation: https://mailchimp.com/developer/marketing/api/interests/list-interests-in-category/
Set up your data source
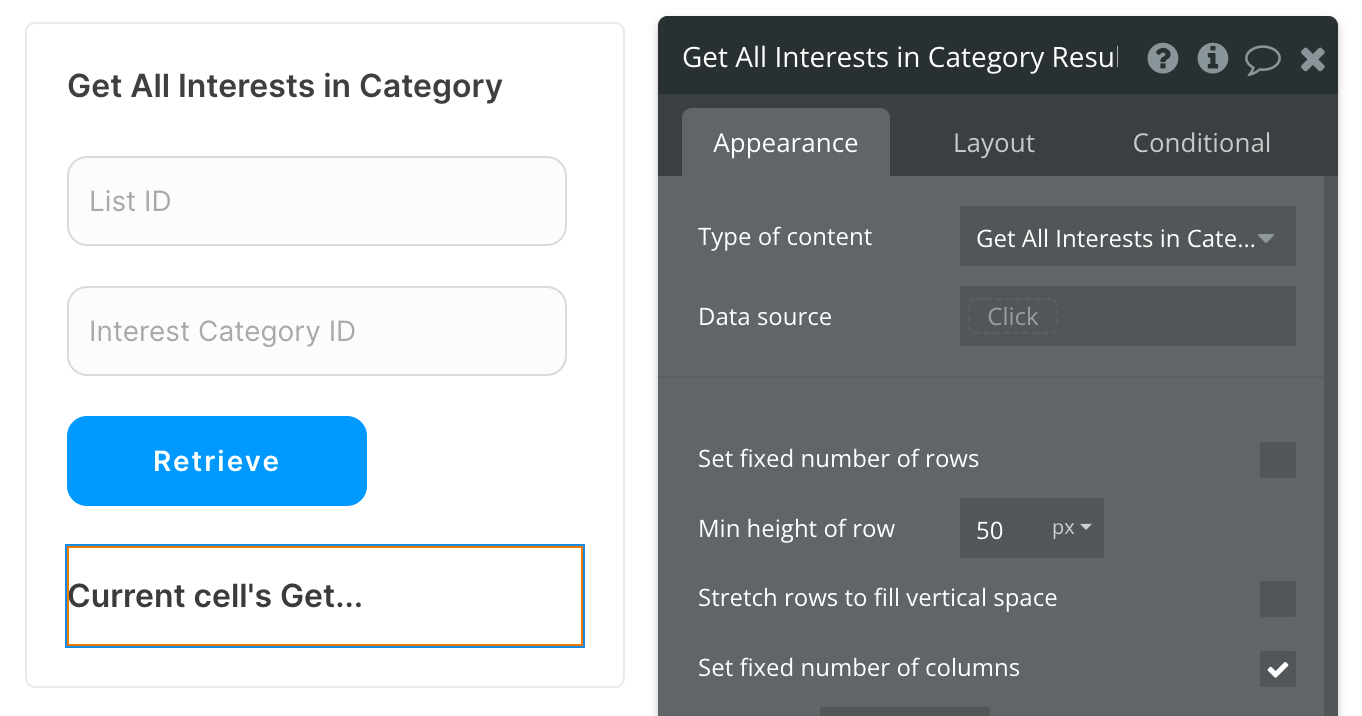
In this example, we'll use a repeating group to display our data. Since we're using buttons to trigger our API calls, we'll leave the data source blank and use a Display list in RG action to send the results to the repeating group.
- Type of content = Get All Interests in Category interest (Mailchimp Extended)
- Data source = leave blank
Set up the API call
Now that your repeating group is set up properly, let's configure the workflow action to retrieve all Interests in a Category from Mailchimp and display the results. In this demo, we're using the blue "Retrieve" button to do this.
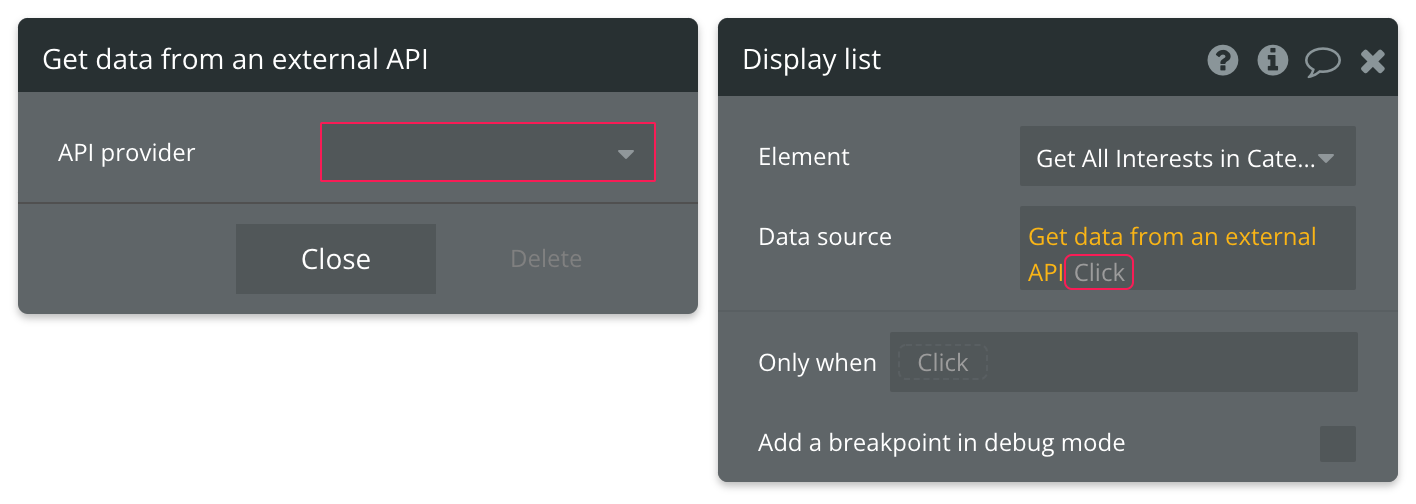
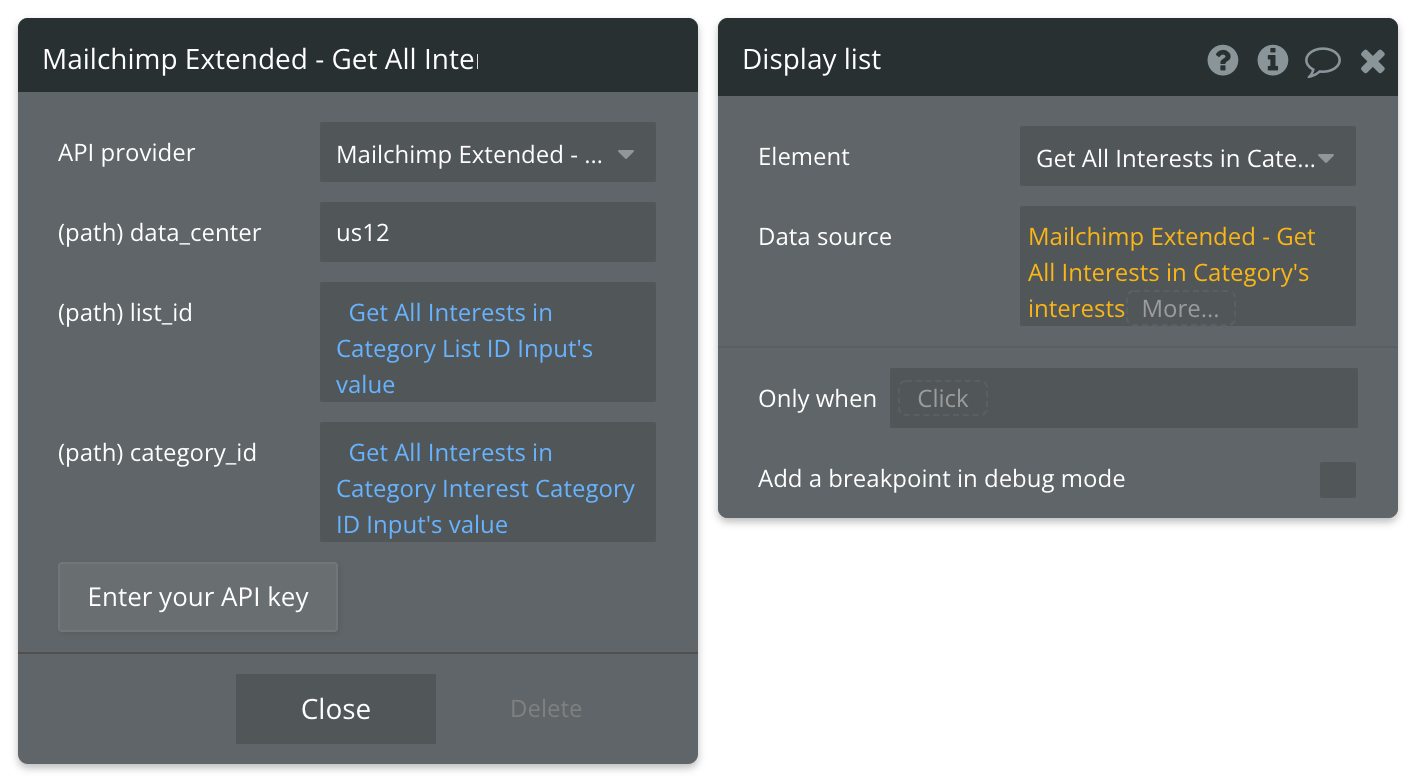
Review the items below to understand what values are optional or required to complete the API call.
☝
Note: Not sure where to find your List ID? Use the Get All Lists API call to find the ID of the List you're working with. Review this page to find your Interest Category ID.
Available Path (* indicates a required value)
data_center* - Example value: us12. Replace this with whatever value you need to target your data center.
list_id* - Enter the ID of the List you're searching for.
category_id* - Enter the ID of the Category you're searching for.
That's it! You're ready to run your API call and retrieve all Interests in a Category in your Mailchimp account.
Get Merge Fields - Data Call
🔗
Mailchimp documentation: https://mailchimp.com/developer/marketing/api/list-merges/list-merge-fields/
Set up your data source
In this example, we'll use a repeating group to display our data. Since we're using buttons to trigger our API calls, we'll leave the data source blank and use a Display list in RG action to send the results to the repeating group.
- Type of content = Get Merge Fields merge_field (Mailchimp Extended)
- Data source = leave blank
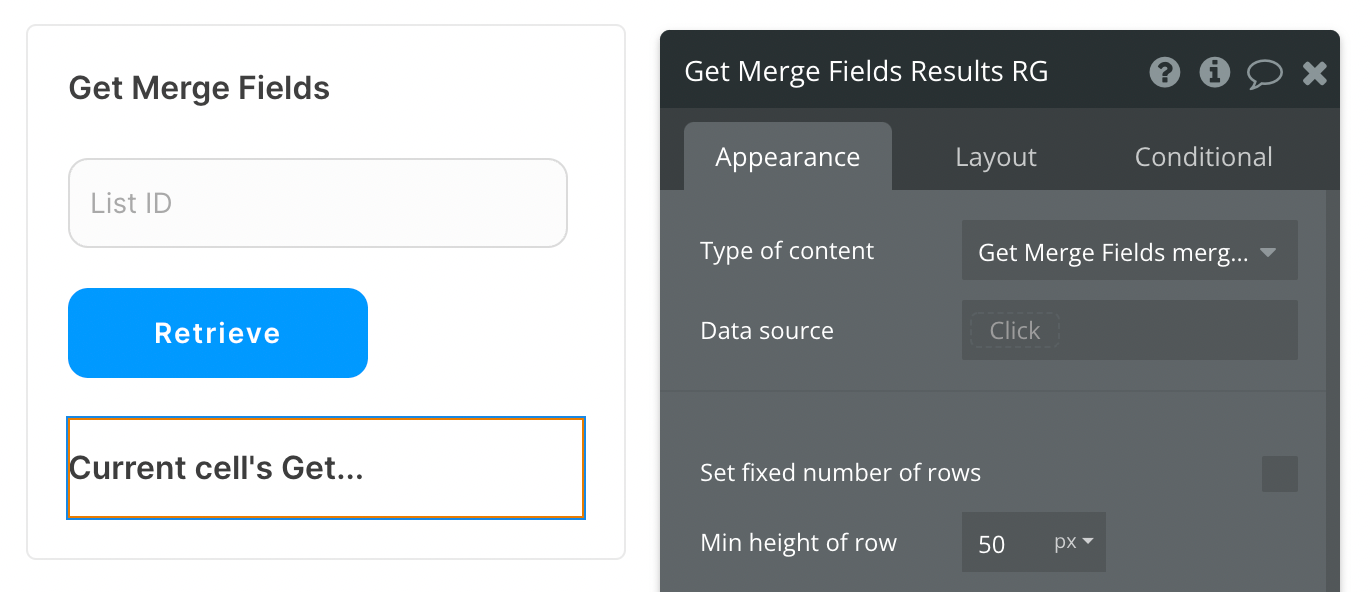
Set up the API call
Now that your repeating group is set up properly, let's configure the workflow action to retrieve all Merge Fields from Mailchimp and display the results. In this demo, we're using the blue "Retrieve" button to do this.
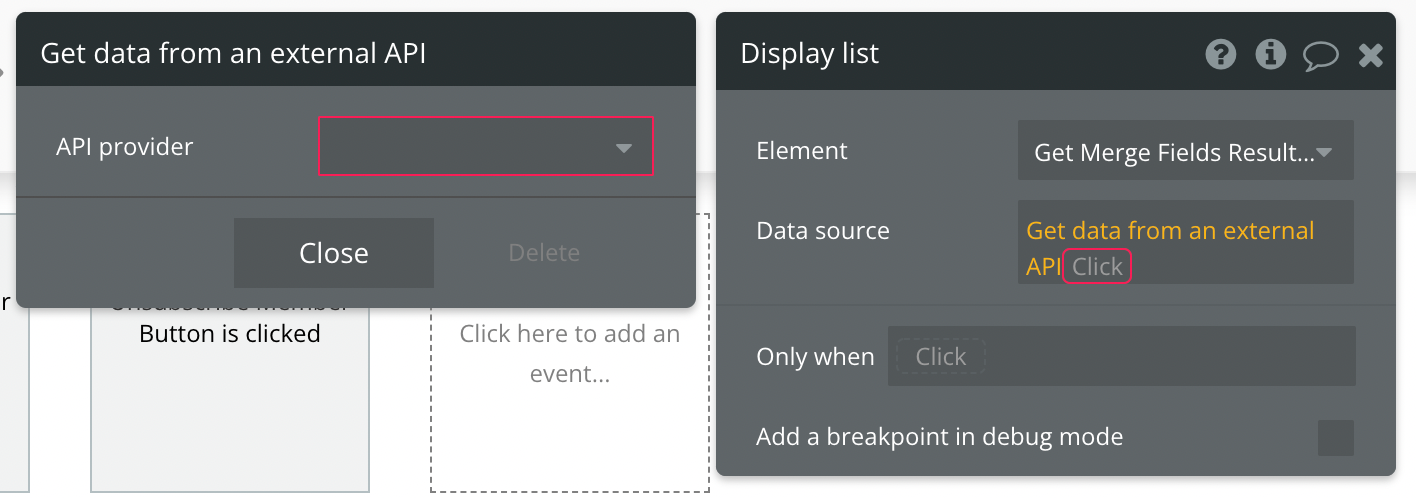
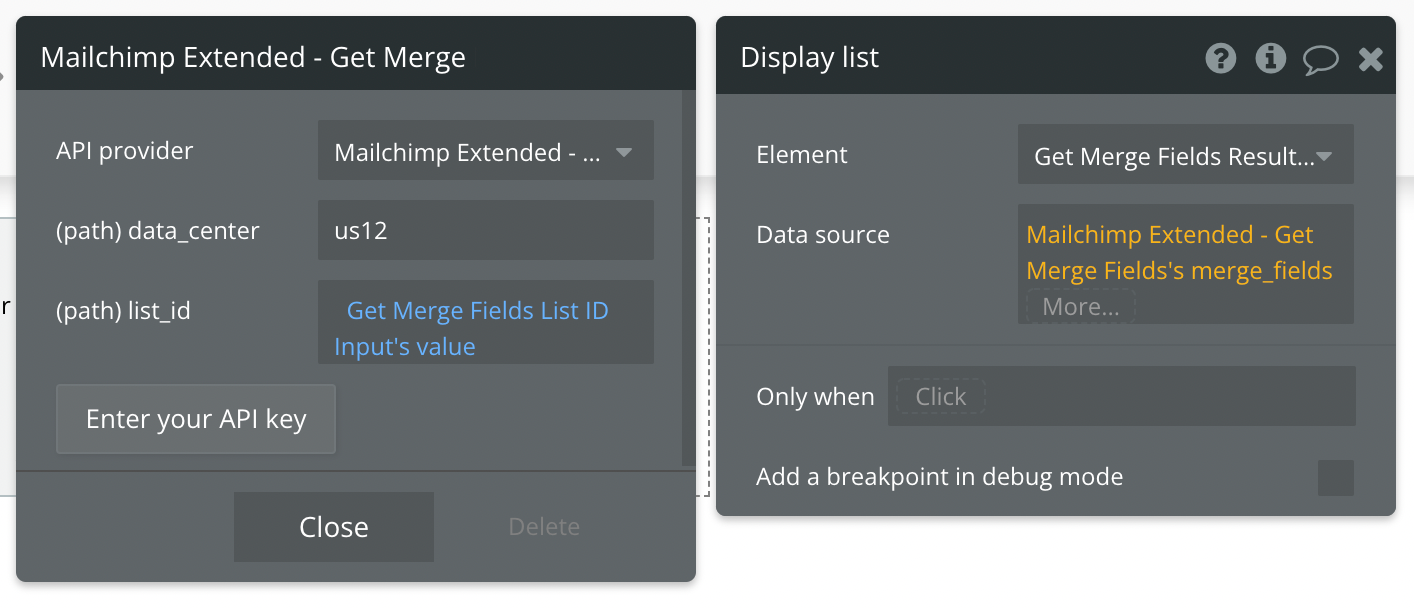
Review the items below to understand what values are optional or required to complete the API call.
☝
Note: Not sure where to find your List ID? Use the Get All Lists API call to find the ID of the List you're working with.
Available Path (* indicates a required value)
data_center - Example value: us12. Replace this with whatever value you need to target your data center.
list_id - Enter the ID of the List you're searching for.
That's it! You're ready to run your API call and retrieve all Merge Fields in your Mailchimp account.
List Member's Tags - Data Call
🔗
Mailchimp documentation: https://mailchimp.com/developer/marketing/api/list-member-tags/list-member-tags/
Set up your data source
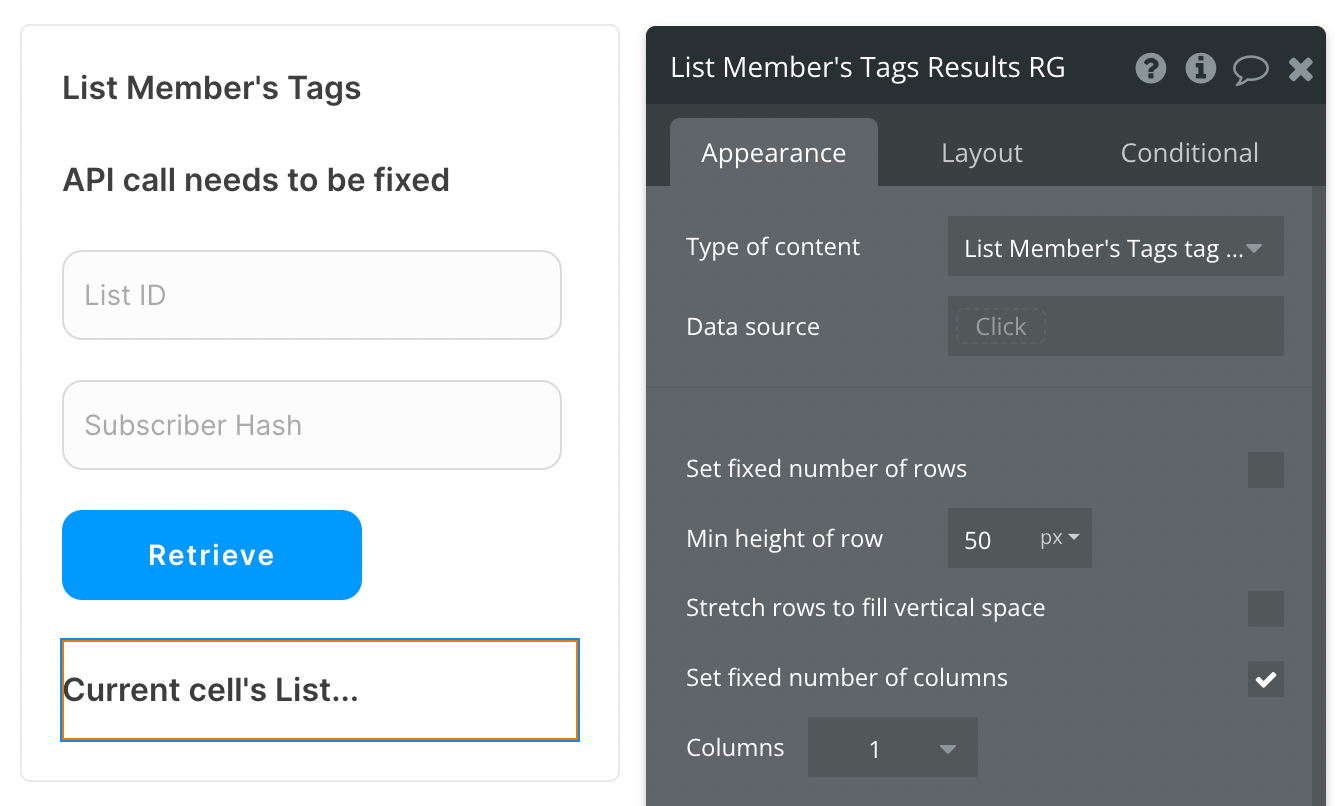
In this example, we'll use a repeating group to display our data. Since we're using buttons to trigger our API calls, we'll leave the data source blank and use a Display list in RG action to send the results to the repeating group.
- Type of content = List Members's Tags tag (Mailchimp Extended)
- Data source = leave blank
☝
Note: Not sure where to find your List ID? Use the Get All Lists API call to find the ID of the List you're working with.
Set up the API call
Now that your repeating group is set up properly, let's configure the workflow action to retrieve all Member's Tags from a List from Mailchimp and display the results. In this demo, we're using the blue "Retrieve" button to do this.
Available Path (* indicates a required value)
data_center* - Example value: us12. Replace this with whatever value you need to target your data center.
list_id* - Enter the ID of the List you're searching for.
subscriber_hash* - The MD5 hash of the lowercase version of the list Member's email address.
That's it! You're ready to run your API call and retrieve all Member's Tags in your Mailchimp account.
Subscribe Member - Action
🔗
Mailchimp documentation: https://mailchimp.com/developer/marketing/api/list-members/add-member-to-list/
Set up your API call
In this example, we'll be making on quick API call to Mailchimp to subscribe a Member. Like our other demos, we'll use a blue "Subscribe" button to do this.
Start by adding a workflow trigger to this button.
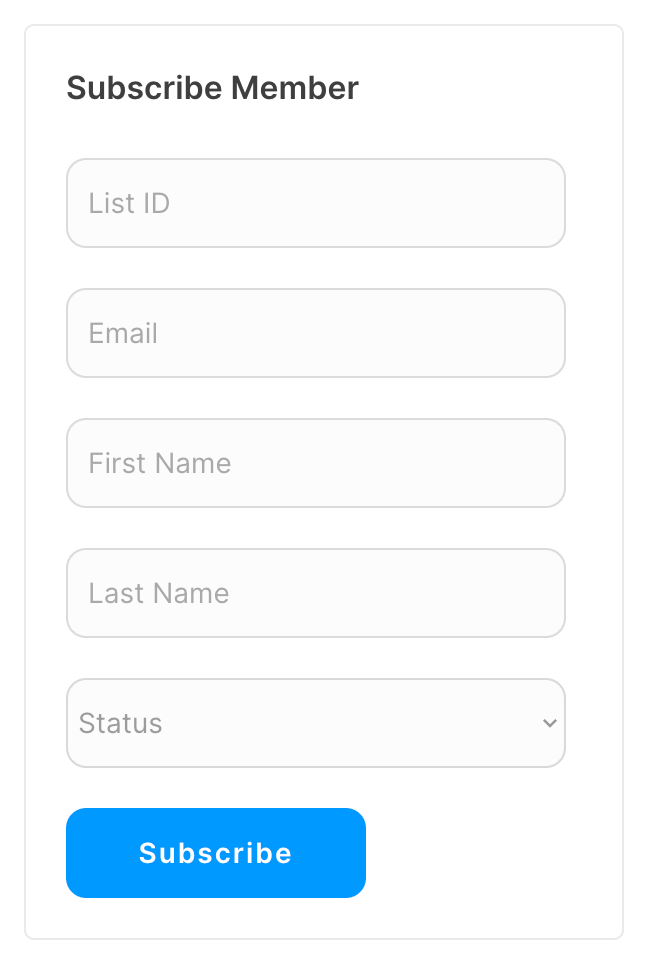
Now map the inputs to their corresponding parameters and paths. More information on which paths and/or parameters are required is covered at the end of this article.
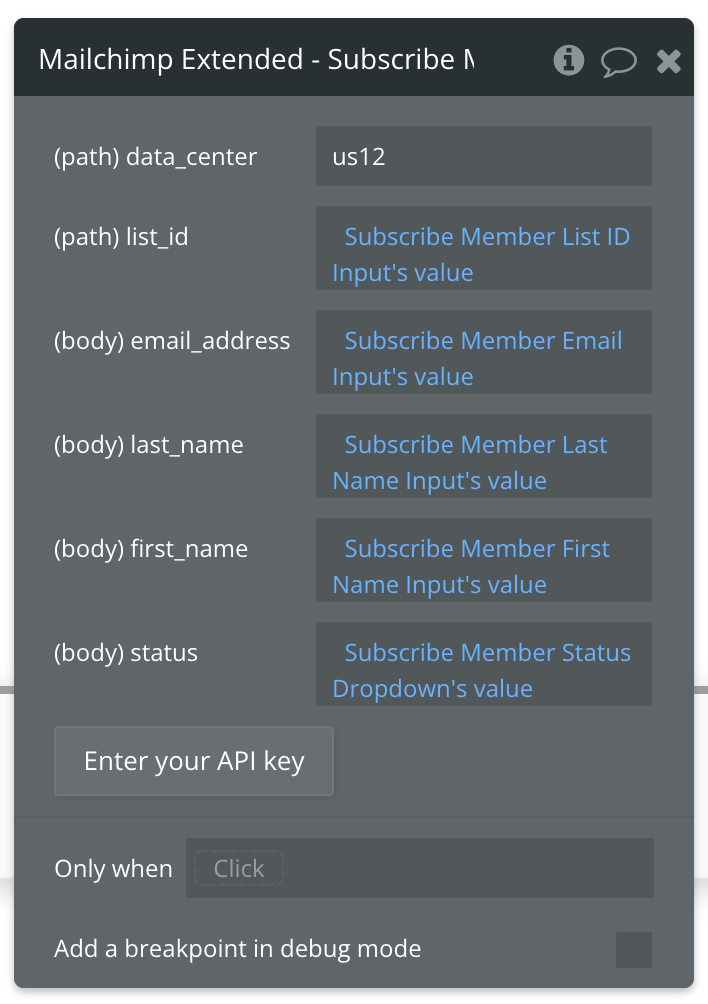
Review the items below to understand what values are optional or required to complete the API call.
☝
Note: Not sure where to find your List ID? Use the Get All Lists API call to find the ID of the List you're working with.
Available Path (* indicates a required value)
data_center* - Example value: us12. Replace this with whatever value you need to target your data center.
list_id* - Enter the ID of the List you're searching for.
Available Body Parameters (* indicates a required value)
email_address - Email address of the Member you're wanting to subscribe.
first_name - First name of the Member.
last_name - Last name of the Member.
status* - Status of the Member. Example value: subscribed
That's it! You're ready to run your API call and Subscribe a Member in your Mailchimp account.
Add Member to Segment - Action
🔗
Mailchimp documentation: https://mailchimp.com/developer/marketing/api/list-segments/
Set up your API call
In this example, we'll be making on quick API call to Mailchimp to add a Member to a Segment. Like our other demos, we'll use a blue "Add" button to do this.
Start by creating a form to collect the necessary parameters.
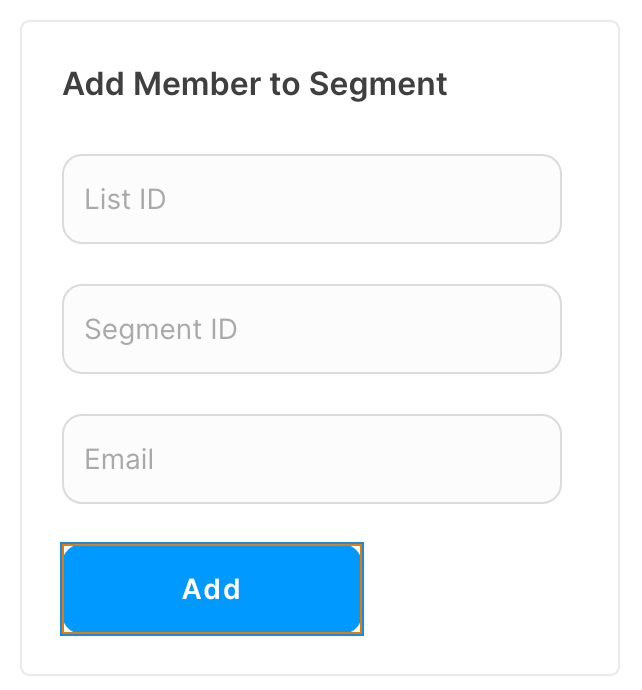
Now map the inputs to their corresponding parameters and paths. More information on which paths and/or parameters are required is covered at the end of this article.
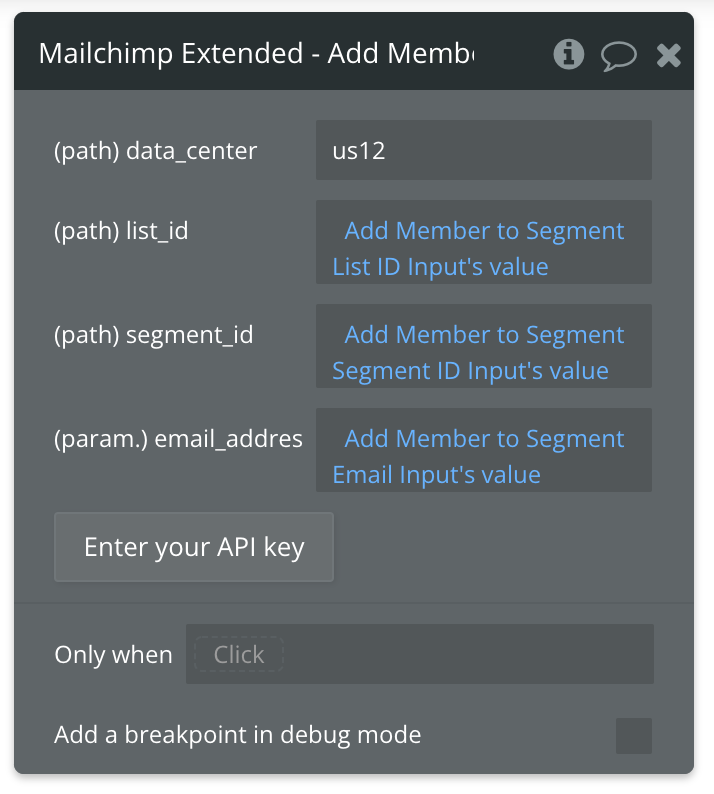
Review the items below to understand what values are optional or required to complete the API call.
☝
Note: Not sure where to find your List ID? Use the Get All Lists API call to find the ID of the List you're working with. Review this page to find your Segment ID.
Available Path (* indicates a required value)
data_center* - Example value: us12. Replace this with whatever value you need to target your data center.
list_id* - Enter the ID of the List you're searching for.
segment_id* - Enter the Id of the Segment you want to add this Member to.
Available Parameters (* indicates a required value)
email_address* - Email address of the Member you're wanting to subscribe.
That's it! You're ready to run your API call and add a Member to a Segment in your Mailchimp account.
Unsubscribe Member - Action
🔗
Mailchimp documentation: https://mailchimp.com/developer/marketing/api/list-member-tags/
Set up your API call
In this example, we'll be making on quick API call to Mailchimp to unsubscribe a Member. Like our other demos, we'll use a blue "Unsubscribe" button to do this.
Start by creating a form to collect the necessary parameters.
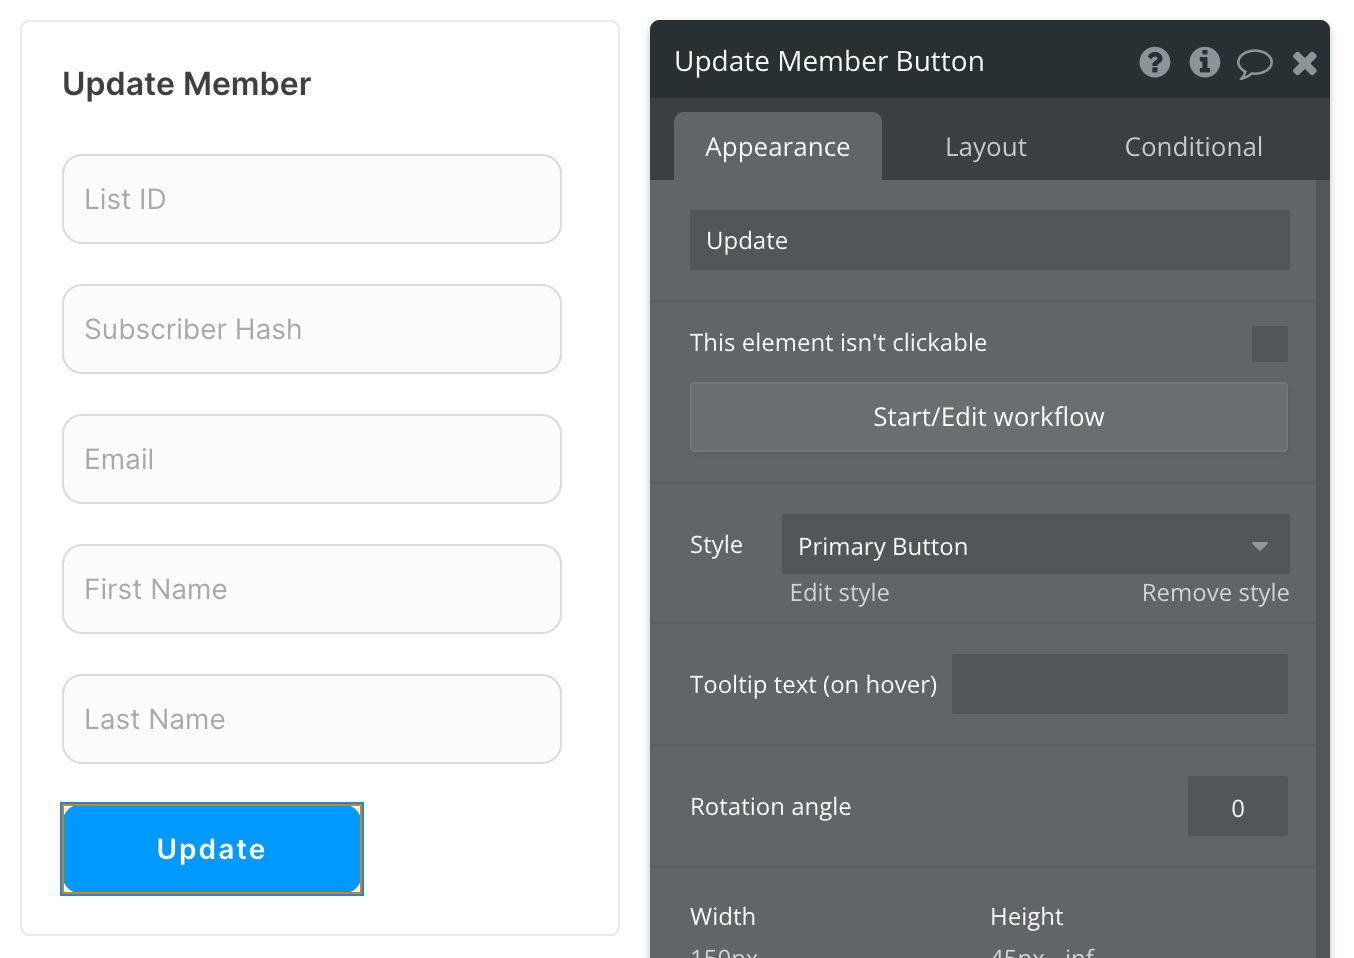
Now map the inputs to their corresponding parameters and paths. More information on which paths and/or parameters are required is covered at the end of this article.
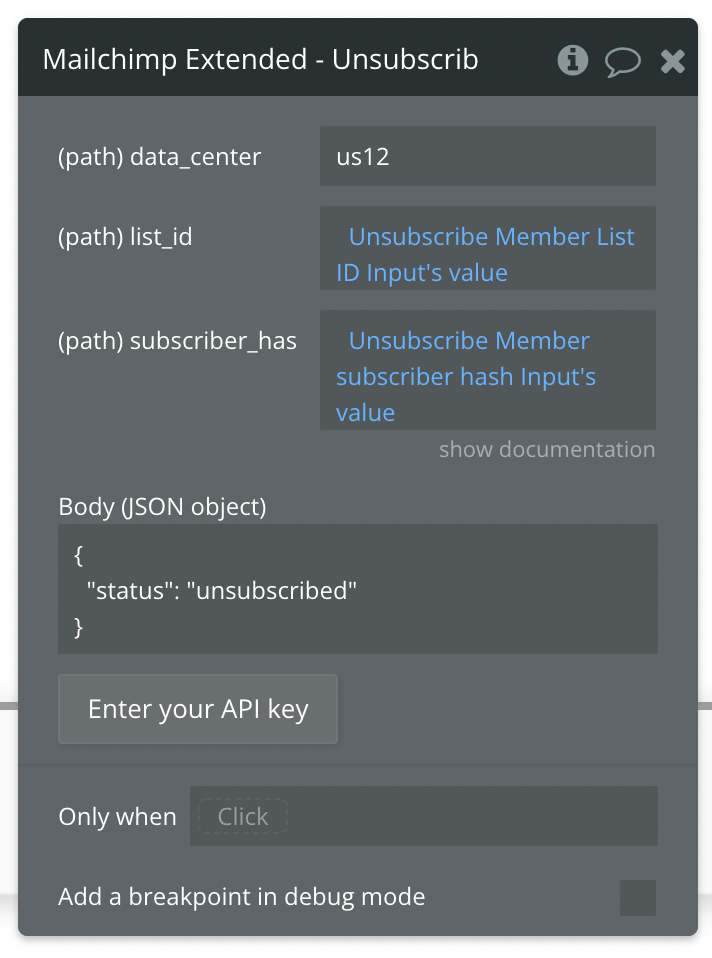
Review the items below to understand what values are optional or required to complete the API call.
🔗
Mailchimp documentation: Not sure where to find your List ID? Use the Get All Lists API call to find the ID of the List you're working with.
Available Path (* indicates a required value)
data_center* - Example value: us12. Replace this with whatever value you need to target your data center.
list_id* - Enter the ID of the List you're searching for.
subscriber_hash* - The MD5 hash of the lowercase version of the list Member's email address.
That's it! You're ready to run your API call and Unsubscribe a Member in your Mailchimp account.
Update Member - Action
🔗
Mailchimp documentation: https://mailchimp.com/developer/marketing/api/list-merges/
Set up your API call
In this example, we'll be making on quick API call to Mailchimp to Update a Member. Like our other demos, we'll use a blue "Update" button to do this.
Start by creating a form to collect the necessary parameters.
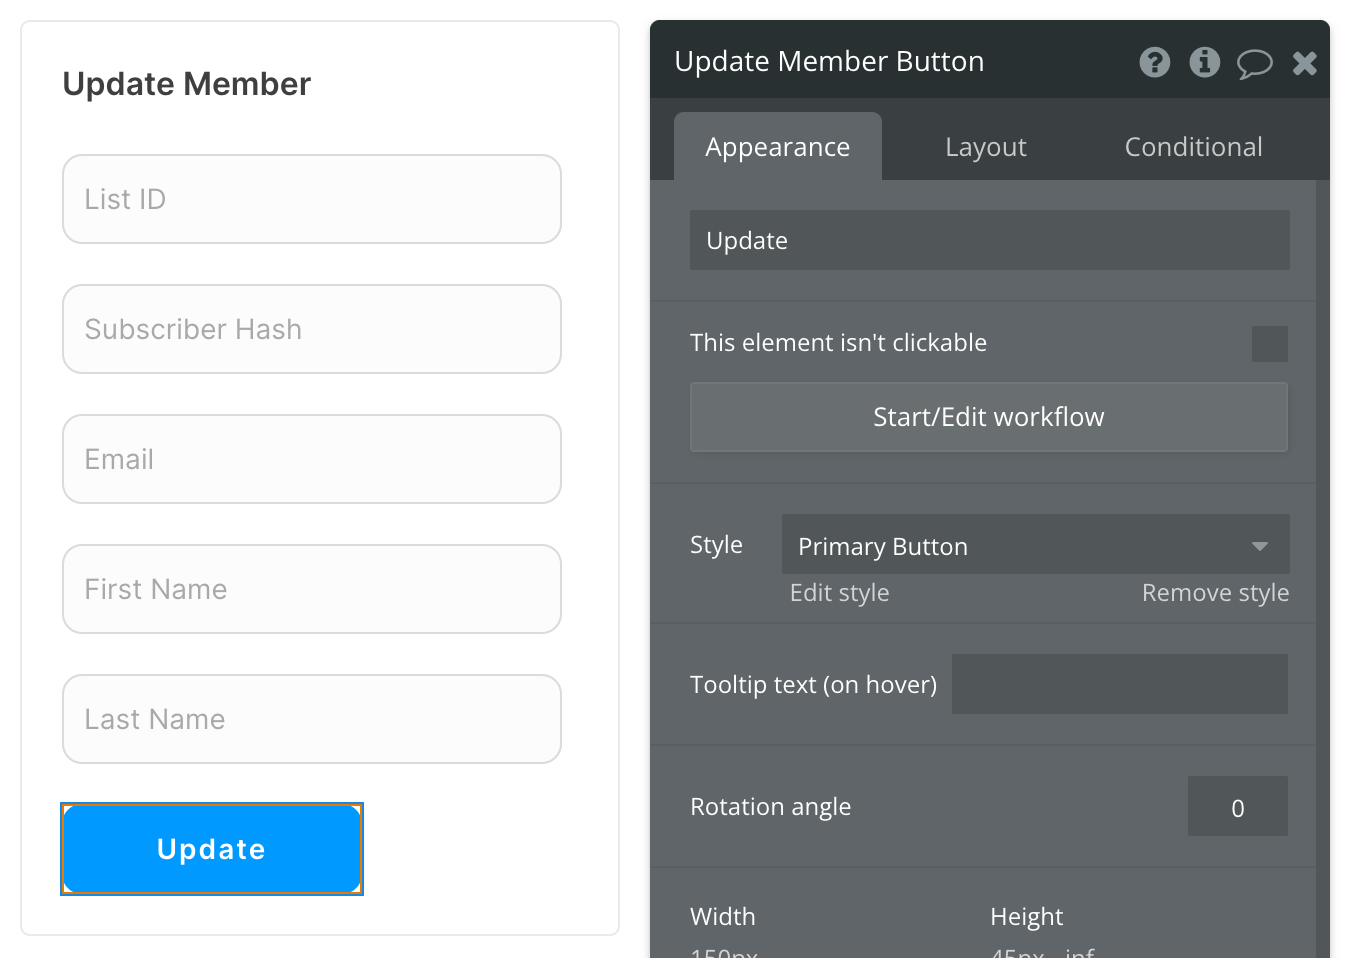
Now map the inputs to their corresponding parameters and paths. More information on which paths and/or parameters are required is covered at the end of this article.
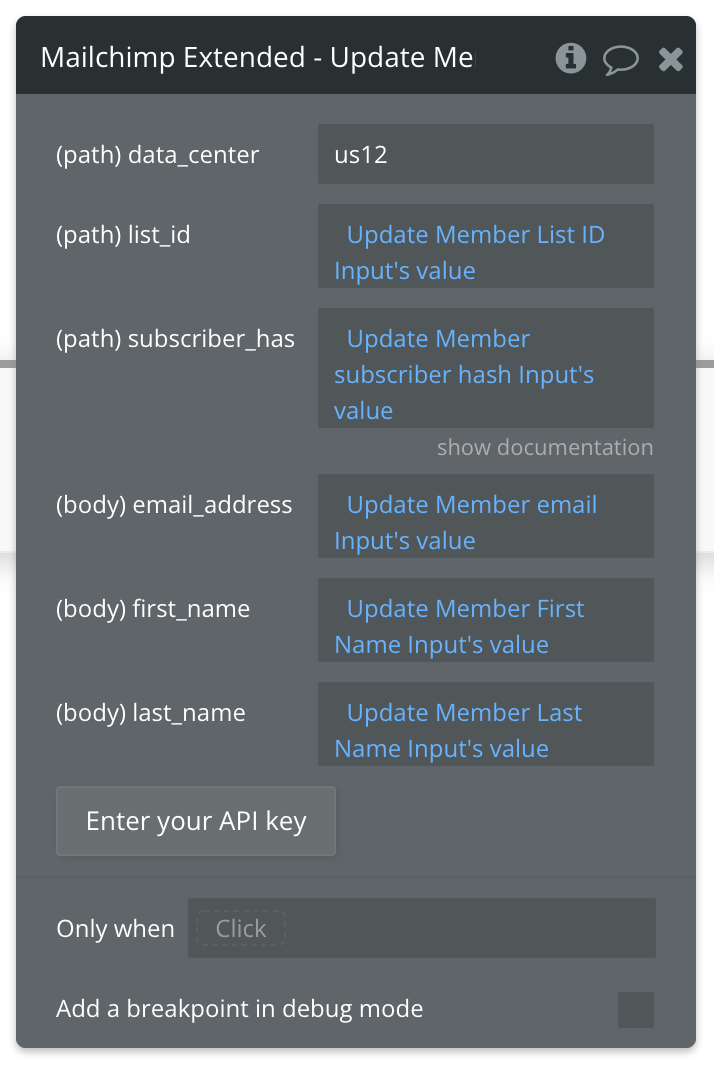
Review the items below to understand what values are optional or required to complete the API call.
☝
Note: Not sure where to find your List ID? Use the Get All Lists API call to find the ID of the List you're working with.
Available Paths (* indicates a required value)
data_center* - Example value: us12. Replace this with whatever value you need to target your data center.
list_id* - Enter the ID of the List you're searching for.
subscriber_hash* - The MD5 hash of the lowercase version of the list member's email address.
Available Parameters (* indicates a required value)
email_address - Email address of the Member you're wanting to subscribe.
first_name - First name of the Member.
last_name - Last name of the Member.
That's it! You're ready to run your API call and Update a Member in your Mailchimp account.
Include or Exclude Member From Interest - Action
🔗
Mailchimp documentation: https://mailchimp.com/developer/marketing/api/list-merges/
Set up your API call
In this example, we'll be making on quick API call to Mailchimp to Include or Exclude a Member from an Interest. Like our other demos, we'll use a blue "Update" button to do this.
Start by creating a form to collect the necessary parameters.
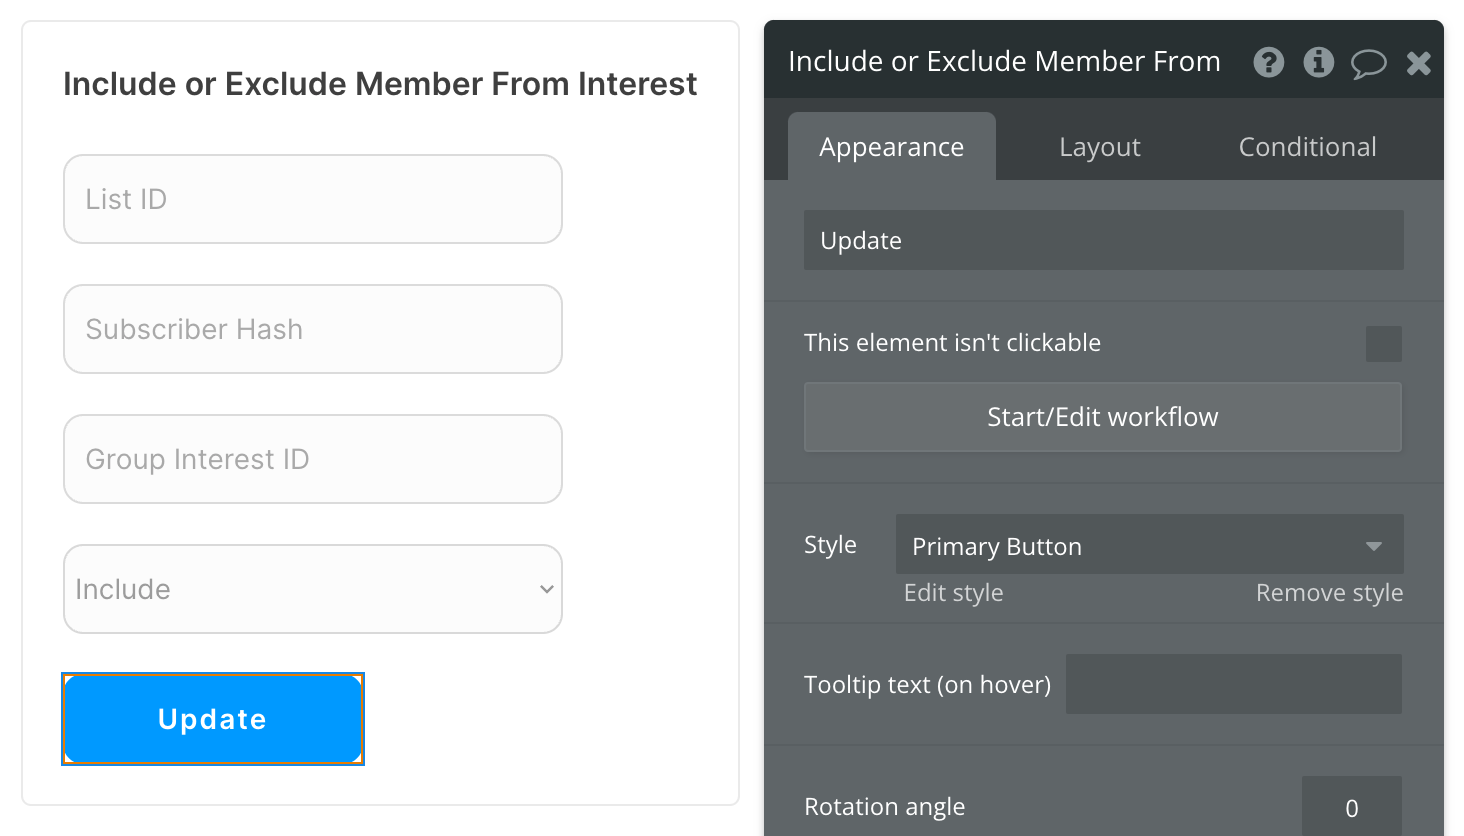
Now map the inputs to their corresponding parameters and paths. More information on which paths and/or parameters are required is covered at the end of this article.
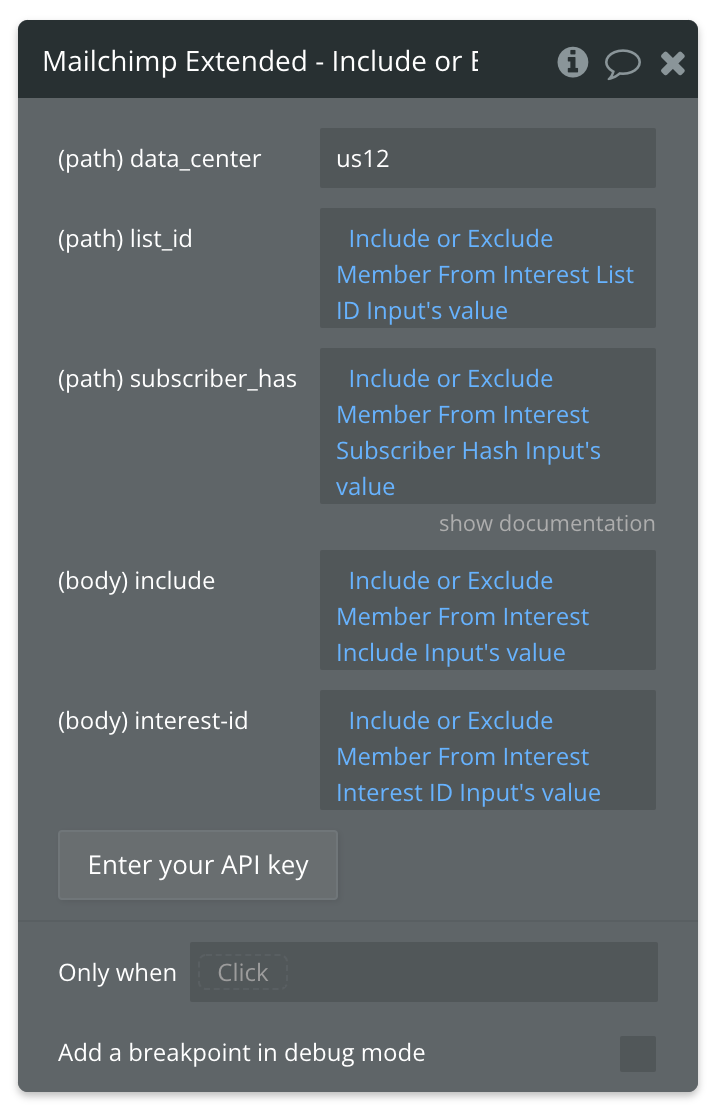
Review the items below to understand what values are optional or required to complete the API call.
☝
Note: Not sure where to find your List ID? Use the Get All Lists API call to find the ID of the List you're working with. Review this page to find your Interest ID.
Available Path (* indicates a required value)
data_center* - Example value: us12. Replace this with whatever value you need to target your data center.
list_id* - Enter the ID of the List you're searching for.
subscriber_hash* - The MD5 hash of the lowercase version of the list member's email address.
Available Parameters (* indicates a required value)
interest_id* - Enter the ID of the Interest you want to include/exclude this Member from.
include* - Must be true or false.
That's it! You're ready to run your API call and Include or Exclude a Member from an Interest in your Mailchimp account.
Create List - Action
🔗
Mailchimp documentation: https://mailchimp.com/developer/marketing/api/lists/add-list/
Set up your API call
In this example, we'll be making on quick API call to Mailchimp to Create a List. Like our other demos, we'll use a blue "Create" button to do this.
Start by creating a form to collect the necessary parameters.
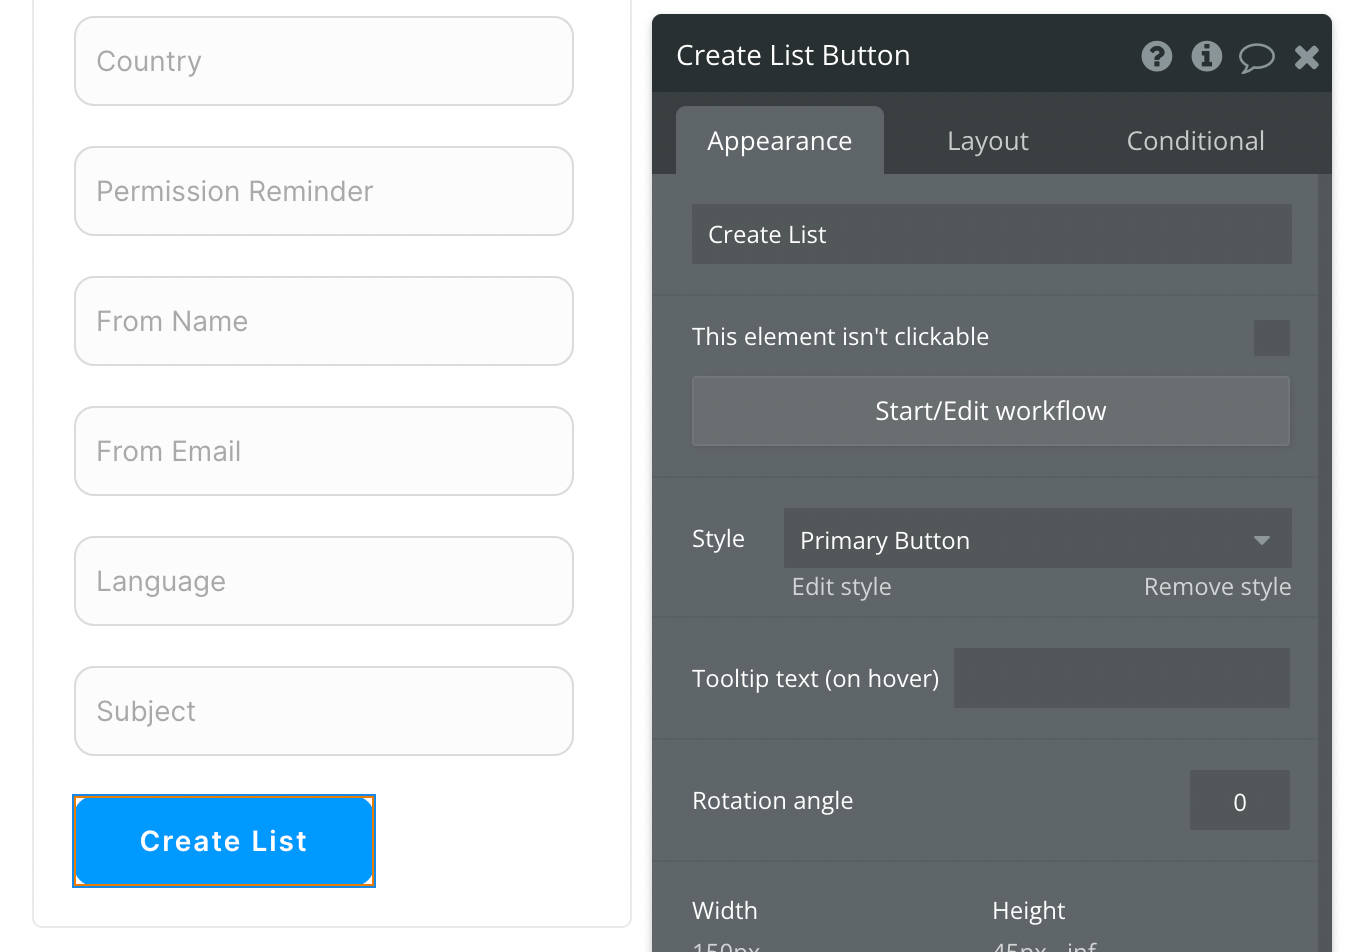
Now map the inputs to their corresponding parameters and paths. More information on which paths and/or parameters are required is covered at the end of this article.
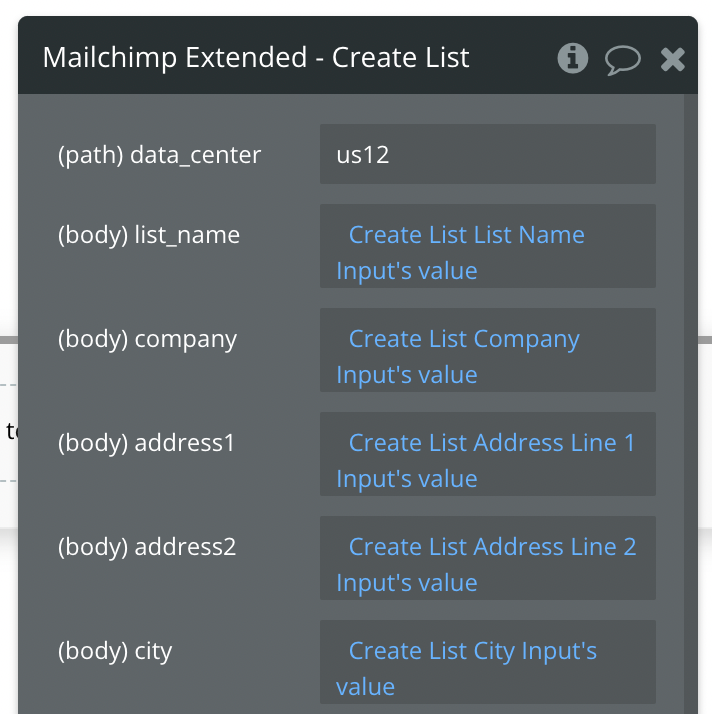
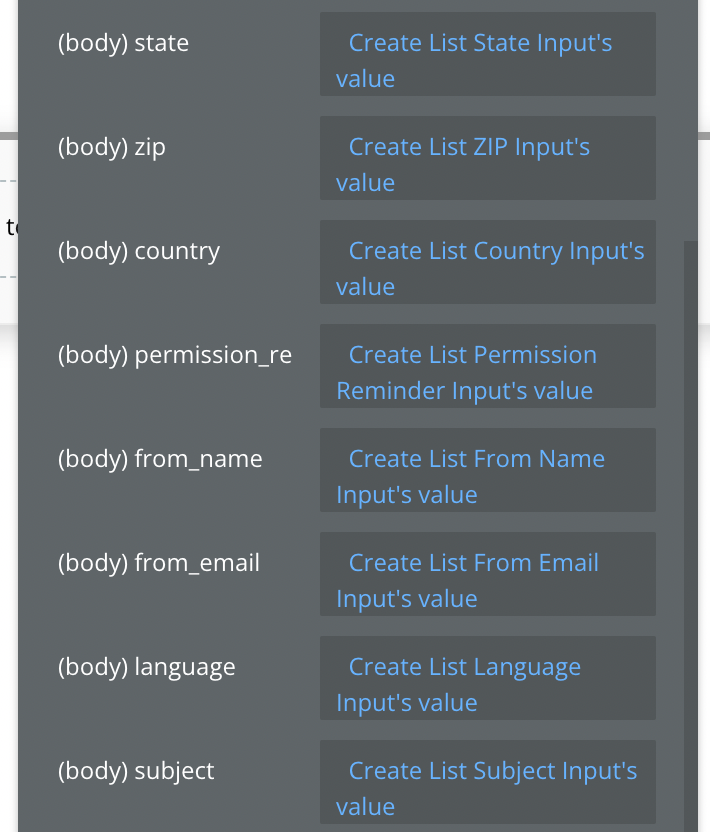
Review the items below to understand what values are optional or required to complete the API call.
Available Path (* indicates a required value)
data_center* - Example value: us12. Replace this with whatever value you need to target your data center.
Available Parameters (* indicates a required value)
list_name* - Name of this List.
company* - Company Name.
address1* - Address line one.
address2* - Address line two.
city* - City. Example: Los Angeles
state* - State. Example:
zip* - Zip code.
country* - Country.
permission_reminder* - Example: "You signed up for updates on our website."
from_name* - Specify a From Name for this List.
from_email* - Specify a From Email for this List.
language* - Specify a language for this List. Example: en, de, fr.
subject* - Subject.
That's it! You're ready to run your API call and Create a List in your Mailchimp account.
Send Campaign - Action
🔗
Mailchimp documentation: https://mailchimp.com/developer/marketing/api/campaigns/send-campaign/
Set up your API call
In this example, we'll be making on quick API call to Mailchimp to Send a Campaign. Like our other demos, we'll use a blue "Send" button to do this.
Start by creating a form to collect the necessary parameters.
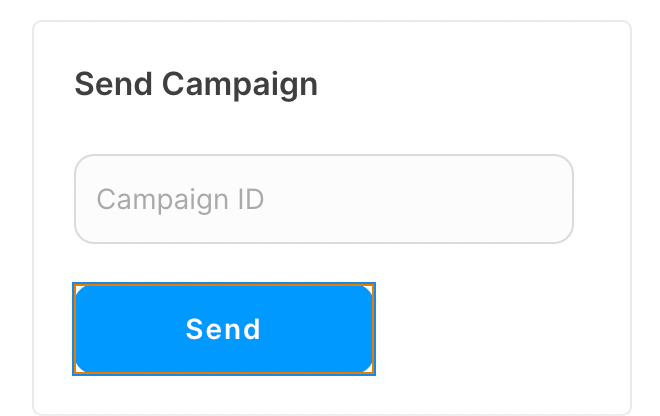
Now map the input to its corresponding path. More information on the required path is covered at the end of this article.
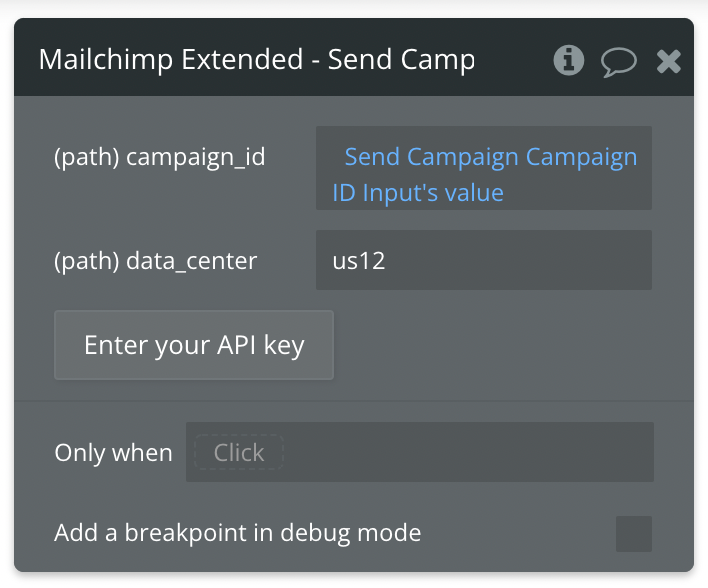
Review the items below to understand what values are optional or required to complete the API call.
☝
Note: Not sure where to find your Campaign ID? Use the Get All Campaigns API call to find the ID of the campaign you're working with.
Available Path (* indicates a required value)
data_center* - Example value: us12. Replace this with whatever value you need to target your data center.
campaign_id* - Enter the ID of the Campaign you wish to send.
That's it! You're ready to run your API call and Send a Campaign from your Mailchimp account.
Add or Remove Tags - Action
🔗
Mailchimp documentation: https://mailchimp.com/developer/marketing/api/list-members/
Set up your API call
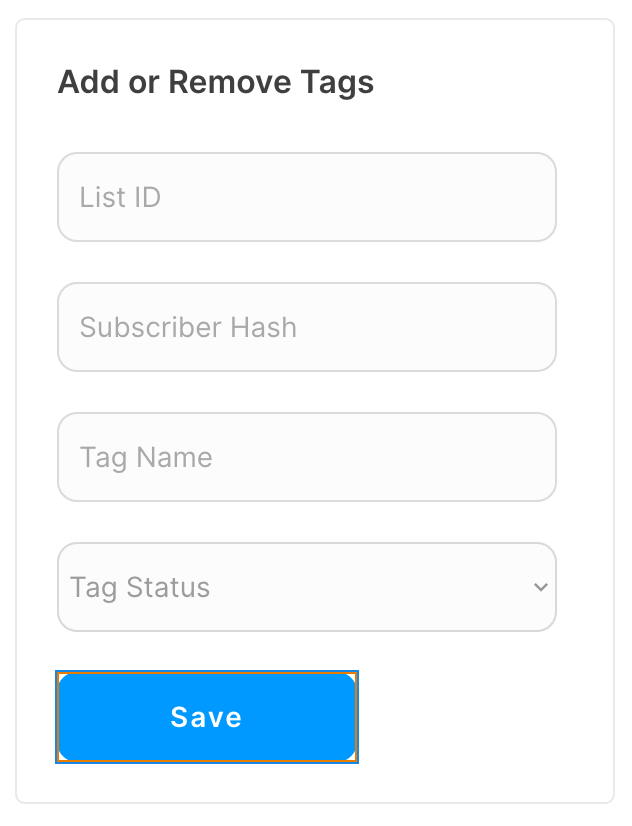
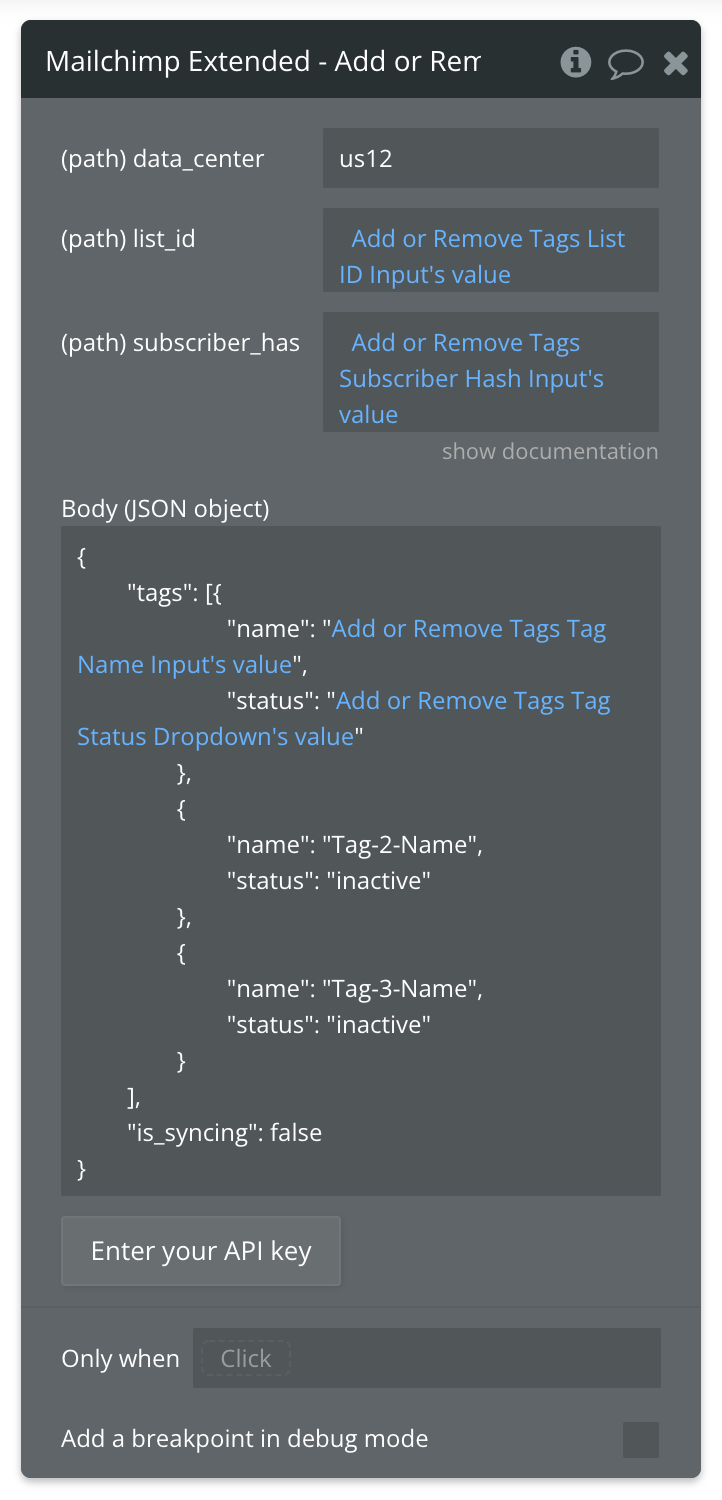
In this example, we'll be making on quick API call to Mailchimp to Add or Remove Tags. Like our other demos, we'll use a blue "Save" button to do this.
Start by creating a form to collect the necessary parameters.
☝
Note: Not sure where to find your List ID? Use the Get All Lists API call to find the ID of the List you're working with.
Available Path (* indicates a required value)
data_center* - Example value: us12. Replace this with whatever value you need to target your data center.
list_id* - Enter the ID of the List you're searching for.
subscriber_hash* - The MD5 hash of the lowercase version of the list member's email address.
That's it! You're ready to run your API call and Add or Remove Tags in your Mailchimp account.

Changelogs
Update 12.11.24 - Version 2.17.0
- Minor update (Marketing update).
Update 15.09.24 - Version 2.16.0
- Minor update (Marketing update).
Update 23.07.24 - Version 2.15.0
- Minor update.
Update 13.06.24 - Version 2.14.0
- Updated demo/service links.
Update 05.01.24 - Version 2.13.0
- Included error messages in API call's response.
Update 22.11.23 - Version 2.12.0
- updated description.
Update 19.10.23 - Version 2.11.0
- Updated description.
Update 06.10.23 - Version 2.10.0
- Added error handling feature for "Unsubscribe Member" action.
Update 18.09.23 - Version 2.9.0
- updated description.
Update 13.09.23 - Version 2.8.0
- minor updates.
Update 04.09.23 - Version 2.7.0
- updated description.
Update 12.07.23 - Version 2.6.0
- updated description.
Update 26.06.23 - Version 2.5.0
- updated description.
Update 09.06.22 - Version 2.4.0
- Minor updates to data source names..
Update 09.06.22 - Version 2.3.0
- Updated documentation and names to match Mailchimp's latest API..
Update 20.05.21 - Version 2.2.1
- Removed placeholder values for Subscribe and Update Member actions so that demo data isn't sent if left blank..
Update 04.12.20 - Version 2.2.0
- Changed wording of "Merge Tag" to "Merge Field". Added "List Member Tags" data call and "Add/Remove Tags" action..
Update 16.05.19 - Version 2.1.0
- “Add Member to Group Interests” is now “Include or Exclude Member from Group Interest” - set the “include” field to “true” or “false” to either include or exclude the member from a group interest.
Update 27.04.18 - Version 2.0.0
- “Subscribe or Update with Custom Tags” now replaces “Subscribe with Custom Tags” - Please see plugin detail page for additional instructions. This action is non-backward compatible. If you are currently using Subscribe with Custom tags, you’ll need to update the action settings.
Update 30.03.18 - Version 1.10.0
- Bug fix on custom subscribe action.
Update 19.03.18 - Version 1.9.0
- Exposed the subscriber status field so that you can subscribe members as “pending” for double opt-in flows. Keep in mind that Mailchimp does not show you pending subscribers. They will appear in your list as “subscribed” after they’ve confirmed their email address through the double opt-in process.
Update 08.01.18 - Version 1.8.0
- Added a new subscribe member action with ability to use custom merge tags. Also added a call to retrieve your Merge tags..
Update 05.12.17 - Version 1.7.0
- Unsubscribe Member now changes status to unsubscribed instead of deleting the member completely..
Update 27.07.17 - Version 1.6.2
- Minor bug fix v2.
Update 27.07.17 - Version 1.6.1
- Minor bug fix.
Update 27.07.17 - Version 1.6.0
- Create lists and send campaigns.
Update 20.06.17 - Version 1.5.0
- Interest Group Fix.
Update 23.05.17 - Version 1.4.0
- Fix.
Update 23.05.17 - Version 1.3.0
- You can now work with groups! Retrieve Group Categories and Group Interests. Plus, Add Members to Group Interests. Use Categories to see all your Group Interests. Use Group Interests to see all Interests within a Category..
Update 20.05.17 - Version 1.2.0
- You can now UPDATE list members' email address and names. You'll need to convert the member's lowercase email address to MD5 hash. Use :formatted as after the email address value from an input or database field to achieve this. .
Update 07.02.17 - Version 1.1.0
- Plugin actions.
Update 06.02.17 - Version 1.0.0
- List, Subscription, and Segment Calls.
