
✅
Link to the plugin page: https://zeroqode.com/plugin/aws-file-uploader-native-mobile-1781096948490x456716549868328600
Demo to preview the plugin:
Introduction
This plugin provides a robust solution for uploading images and files directly to an AWS S3 bucket from a Bubble.io application. It features a modern, mobile-optimized style interface with horizontal scrolling and real-time progress tracking for each file.
Prerequisites
This plugin is designed specifically for the mobile version of the Bubble editor. To test the plugin on your mobile device, use the TestFlight app available at: https://testflight.apple.com/join/j73hHPR6
⚠️
Please note that the testing app is currently available for iOS only.

How to setup
To run this plugin you need the following to set it up on the AWS side:
Step 1 – AWS account
You can create the AWS account for free, just by visiting the following link: https://aws.amazon.com/console/
❕
Please note that the AWS Free Tier has limitations like the number of free GET/POST requests per 12 months:
https://aws.amazon.com/s3/pricing/
https://aws.amazon.com/free/?nc1=h_ls&all-free-tier.sort-by=item.additionalFields.SortRank&all-free-tier.sort-order=asc
2. Create your first S3 bucket
- In the AWS services search bar at the top, type "S3" and click on "S3" in the dropdown to navigate to the S3 Dashboard or open this link
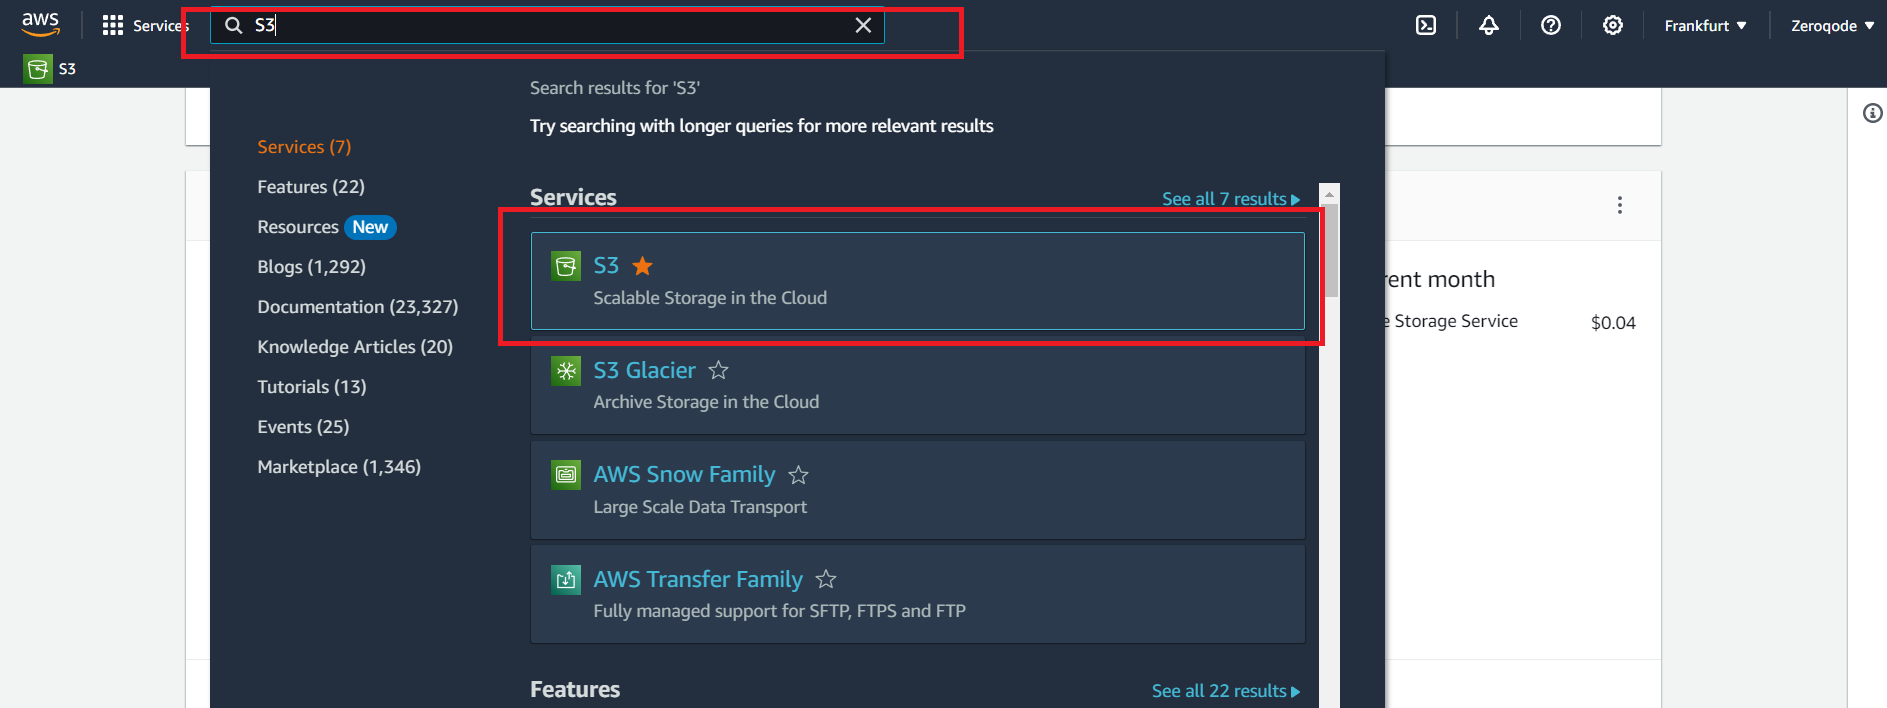
- Choose to Create bucket. The Create bucket page opens:

The bucket name must be created with the next conditions:
- The name should be between 3 and 63 characters long.
- Consist only of lowercase letters, numbers, dots (.), and hyphens (-). For best compatibility, we recommend that you avoid using dots (.) in bucket names, except for buckets that are used only for static website hosting.
- The name should begin and end with a letter or number.
After you create the bucket, you cannot change its name. For more information about naming buckets, see Bucket naming rules.
❗
IMPORTANT! Avoid including sensitive information, such as account numbers, in the bucket name. The bucket name is visible in the URLs that point to the objects in the bucket.
- For Region, choose the AWS Region where you want the bucket to reside. To minimize latency and costs and address regulatory requirements, choose a Region close to you. Objects stored in a Region never leave that Region unless you explicitly transfer them to another Region.
- For a list of Amazon S3 AWS Regions, see AWS service endpoints in the Amazon Web Services General Reference.
- Under Object Ownership, to disable or enable ACLs and control ownership of objects uploaded in your bucket, choose one of the following settings:
ACLs disabled
- Bucket owner enforced – ACLs are disabled, and the bucket owner automatically owns and has full control over every object in the bucket. ACLs no longer affect access permissions to data in the S3 bucket. The bucket uses policies to define access control.
To require that all new buckets are created with ACLs disabled by using AWS Identity and Access Management (IAM) or AWS Organizations policies, see Disabling ACLs for all new buckets (bucket owner enforced).
ACLs enabled
- Bucket owner preferred – The bucket owner owns and has full control over new objects that other accounts write to the bucket with the
bucket-owner-full-controlcanned ACL.
If you apply the bucket owner preferred setting, to require all Amazon S3 uploads to include the
bucket-owner-full-control canned ACL, you can add a bucket policy that allows only object uploads that use this ACL.- Object writer – The AWS account that uploads an object owns the object, has full control over it and can grant other users access to it through ACLs.
- Under Block Public Access settings for this bucket, choose the Block Public Access settings that you want to apply to the bucket. We recommend that you keep all settings enabled unless you know that you need to turn off one or more of them for your use case, such as to host a public website. The Block Public Access settings that you enable for the bucket are also enabled for all access points that you create on the bucket. For more information about blocking public access, see Blocking public access to your Amazon S3 storage.
- (Optional) Under Bucket Versioning, you can choose if you wish to keep variants of objects in your bucket. For more information about versioning, see Using Versioning in S3 buckets. To disable or enable versioning on your bucket, choose either Disable or Enable.
- (Optional) Under Tags, you can choose to add tags to your bucket. Tags are key-value pairs used to categorize storage. To add a bucket tag, enter a Key and optionally a Value and choose to Add Tag.
- Under Default encryption, choose Edit.
- To configure default encryption, under the Encryption key type, choose one of the following
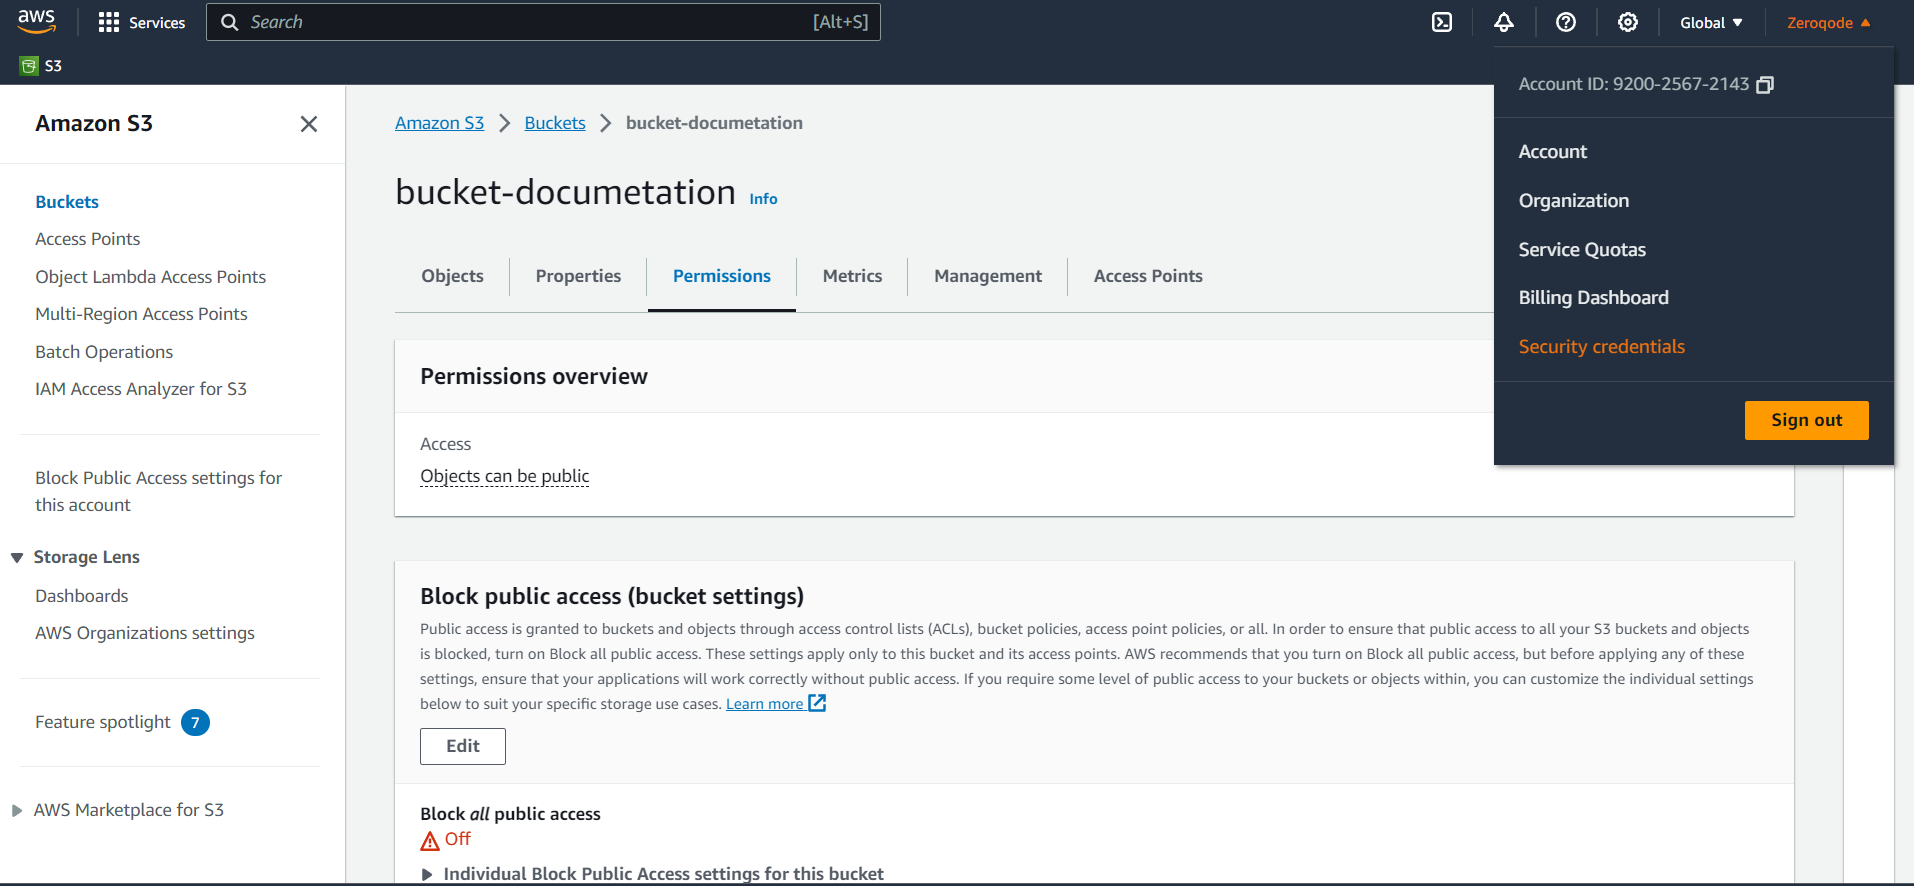
Step 2 – Get credentials
- Navigate to Your Account: At the top-right corner of the AWS Management Console, you'll see your account name or number. Click on it to open the dropdown menu.
- From the dropdown, select the "Security Credentials" option.
- Access Keys Section: Once on the Security Credentials page, expand the "Access keys (access key ID and secret access key)" section.
- Create New Access Key:
-If you already have existing access keys, you'll see them listed here.
-To create a new access key, click the "Create New Access Key" button.

- Download Credentials: After creating a new access key, you'll have the option to download it as a
.csvfile. Save this file securely, as AWS will not show these credentials again for security reasons.
☝
The policy we present in the documentation is just a template. Each client can set their own rules. The plugin works with pre-signed URLs and can operate with any policy.
Step 3 – Setting Cross-origin and Politics.
CROSS Configuration is required for the case when your resources should not to be accessed by external resources.
For example, you set domain "https://your-domain/" in cross, this means that only apps with the domain "https://your-domain/" will be able to access AWS Bucket.
Add security to your AWS bucket by configuring policies on the 'Permissions' tab:

In the next steps, we'll show you how to set Access Control, Bucket Policy, and CORS policy to get started with basic security restrictions.
1. In the 'Block public access' area unlock public access to all for time being.

2. In the 'Bucket Policy' area you can configure the rules for security and privacy via Bucket Policy. Take a look at the "Action", "Resource" and "Condition" fields where we grant access to reading the objects from our bucket.
In this case, we are granting read file access only to users from our application domain, so if a user gets an image URL and tries to open it in a new tab or a new window, the bucket policy will block this request because we stated in the privacy rules that the link can be opened only from our domain:

Here's a code example (JSON):
javascript{
    "Version": "2012-10-17",
    "Statement": [
        {
            "Sid": "AddPerm",
            "Effect": "Allow",
            "Principal": "*",
            "Action": "s3:GetObject",
            "Resource": "arn:aws:s3:::YOUR-BUCKET-NAME/*",
            "Condition": {
                "StringLike": {
                    "aws:Referer": "https://zeroqode-demo-02.bubbleapps.io/*"
                }
            }
        },
        {
            "Sid": "AddPerm2",
            "Effect": "Allow",
            "Principal": "*",
            "Action": "*",
            "Resource": "arn:aws:s3:::YOUR-BUCKET-NAME/*"
        }
    ]
}
YOUR-BUCKET-NAME - should be your S3 bucket name (ex: zeroqodedemo02).
You can find more Bucket Policy examples here. Feel free to try out other rules in order to improve your bucket security, since this documentation presents only our example of the settings.
3. In the Access control list (ACL) area make sure that all the options look like the image below to match our configuration:

Setting Cross-Origin Resource Sharing (CORS) Restrictions
- In the Permissions section, open CORS configuration.
- Add the following CORS configuration
javascript[
    {
        "AllowedHeaders": ["*"],
        "AllowedMethods": ["GET", "PUT"],
        "AllowedOrigins": ["https://your-website.com"],
        "ExposeHeaders": [],
        "MaxAgeSeconds": 3000
    }
]
3.Click Save changes.
☝
Setting the CORS policy like this will allow everyone to change anything in your bucket, but you can definitely go deeper and set it up more securely.
For example, you can use the following JSON for CORS policy to allow access from your domain only (change the allowed origin to the URL of your app starting with https://)
⚠️
Note: We use CORS Configuration and Bucket Policy for informative purposes only for the test case.
For Access Permissions (CORS, Bucket Policy, Access Control List, etc.) please follow Amazon AWS's Setup Documentation to better understand your personal requirements.
❕https://docs.aws.amazon.com/AmazonS3/latest/dev/cors.html
❕https://docs.aws.amazon.com/AmazonS3/latest/user-guide/add-cors-configuration.html
❕https://docs.aws.amazon.com/AmazonS3/latest/dev/example-bucket-policies.html
Step 4 – Configure AWS Settings
- Open the Design tab in your Bubble editor.
- Search for the AWS S3 File & Image Uploader element in the Elements panel.
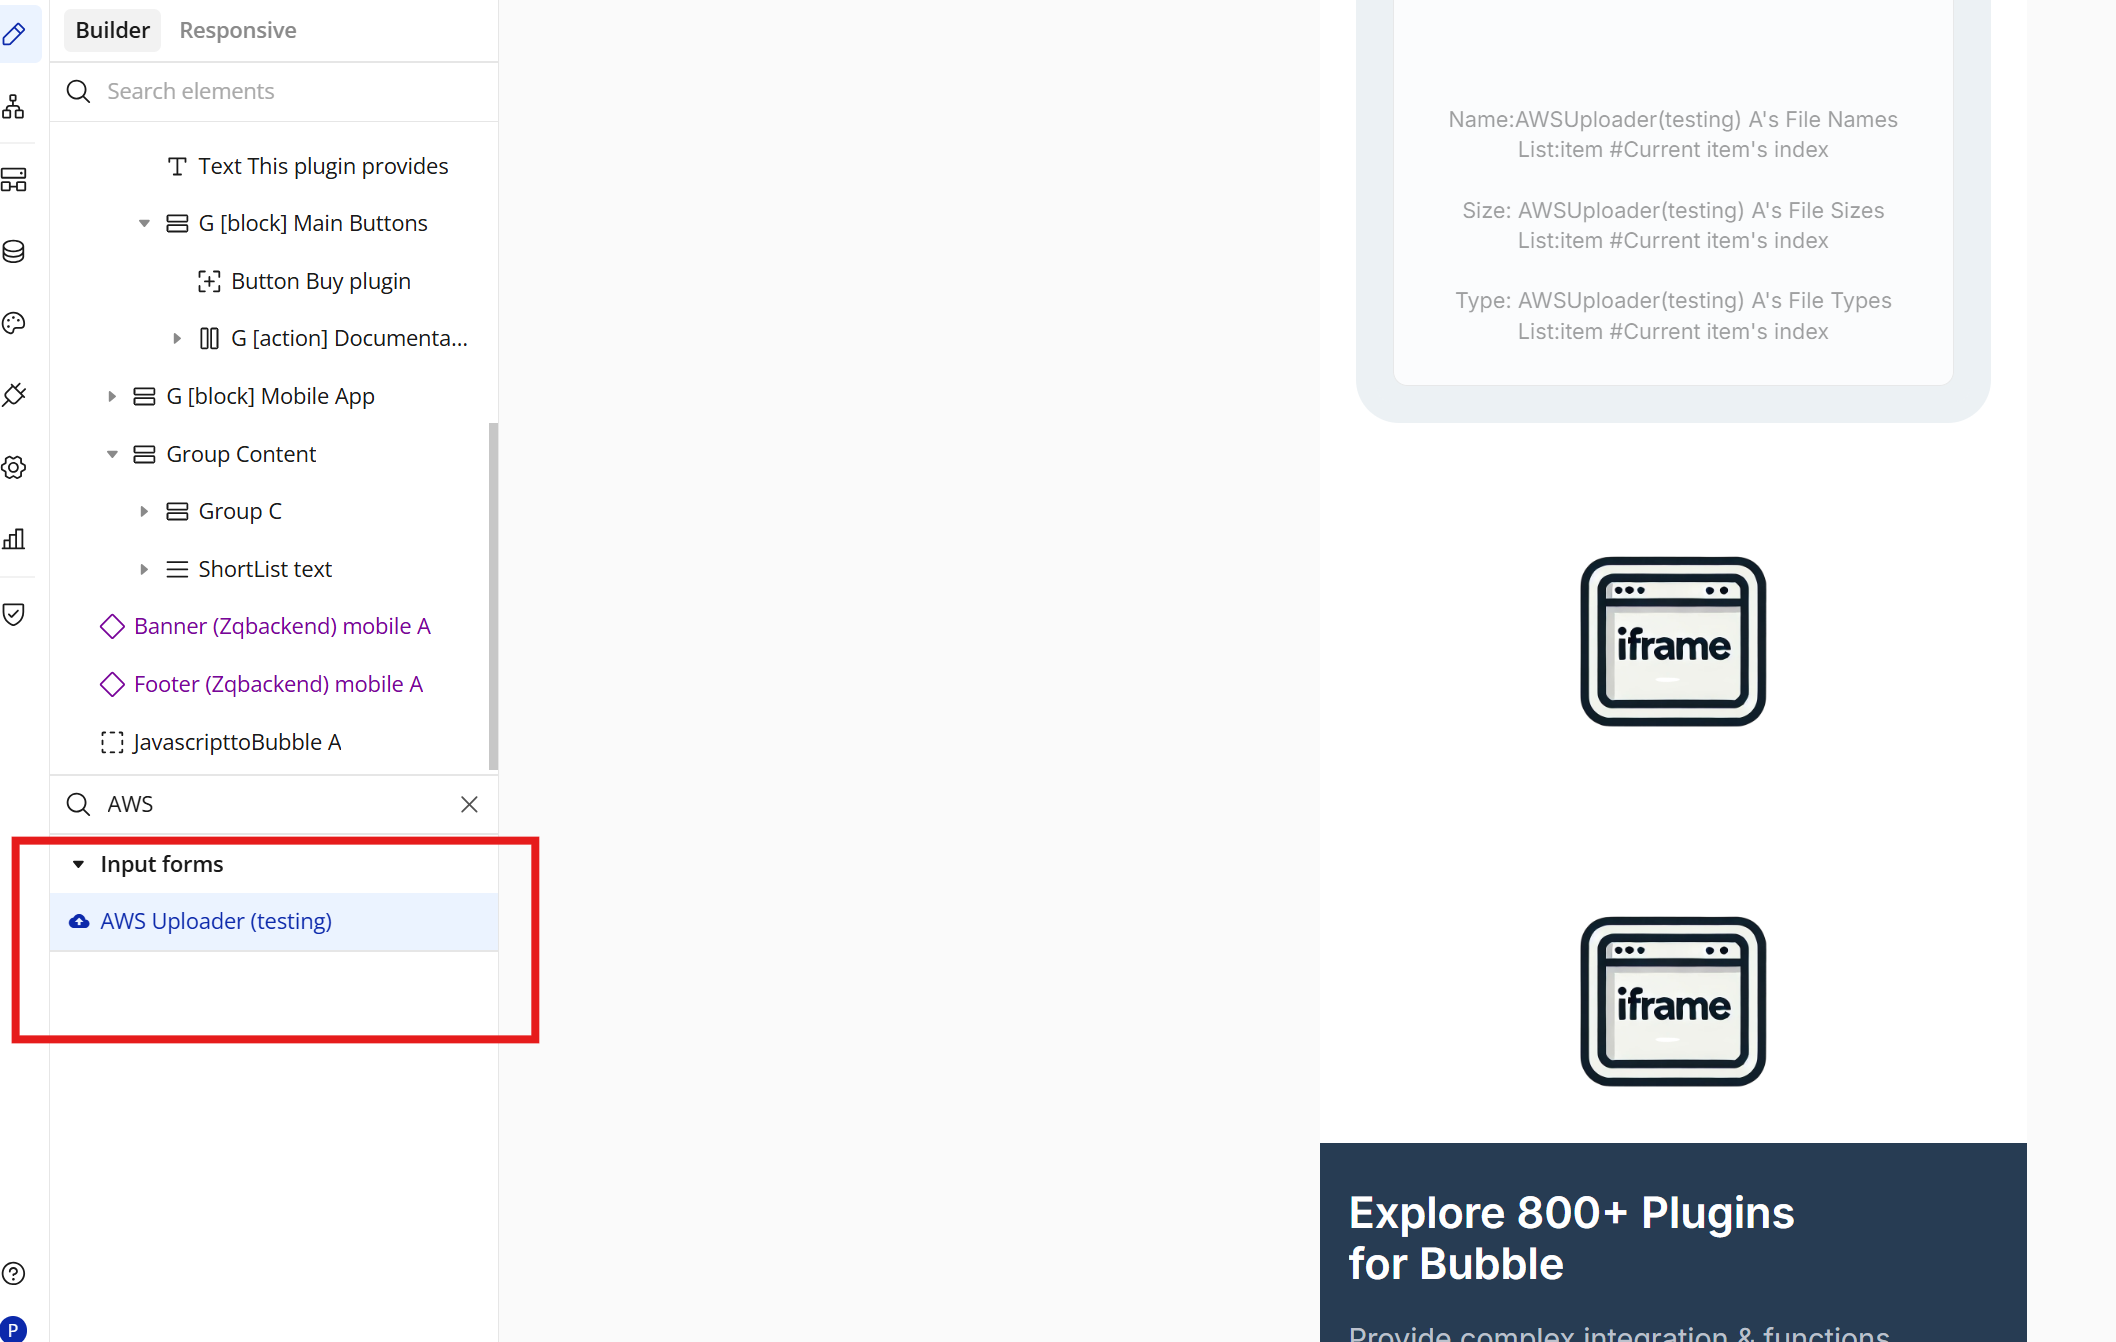
- Drag and drop the element onto your page.
Step 5 – Configure Properties
Generate and Set the Token (Required)
Before using the AWS S3 Native File Uploader, you must generate a token using the plugin action Get Token and assign it to the uploader element.
⚠️ Important:
The uploader element does not generate the token automatically.
You must call the Get Token action manually from a workflow and pass the required keys.
How to configure the token
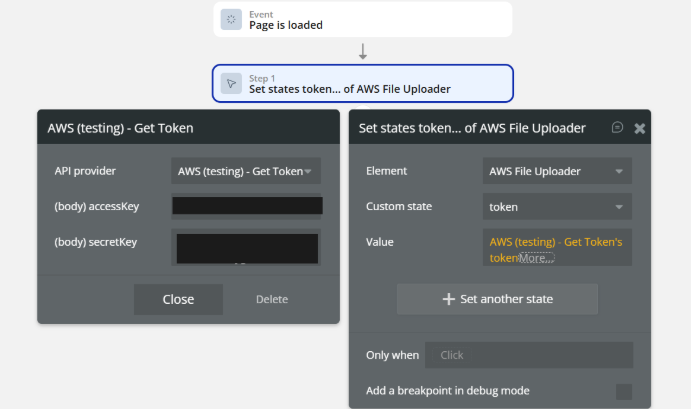
1. Call the plugin action Get Token
In a workflow (recommended: When page is loaded), add the action:
Action:
AWS (testing) – Get Token➡️ At this action, you must provide the required keys, exactly as shown in the screenshot:
- Access Key
- Secret Key
- (any other required credentials returned by your setup)
These keys are sent to the backend to generate a valid token.
📌 The keys are entered directly in the action fields, not in the element.

Setting Token in Element
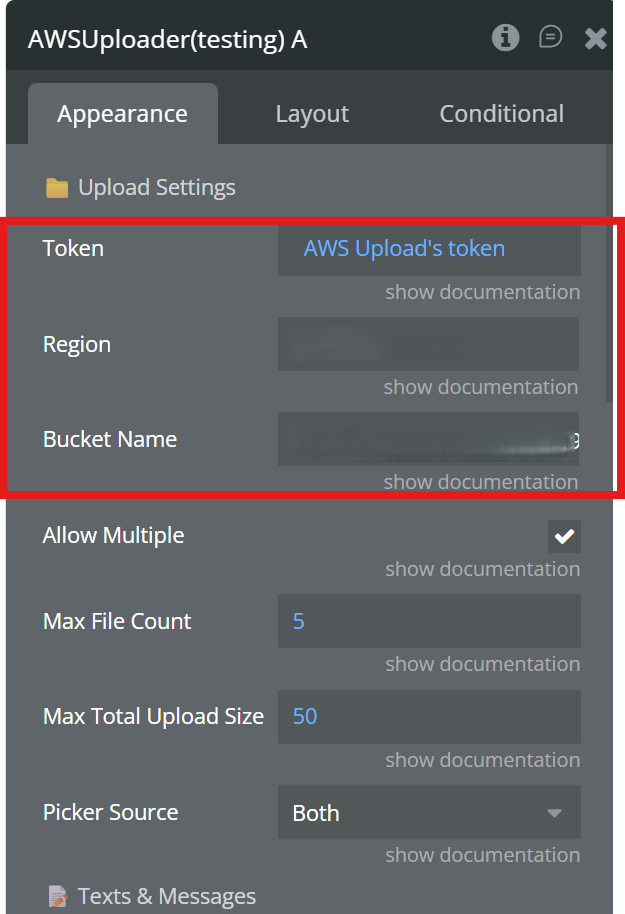
Required Element Configuration
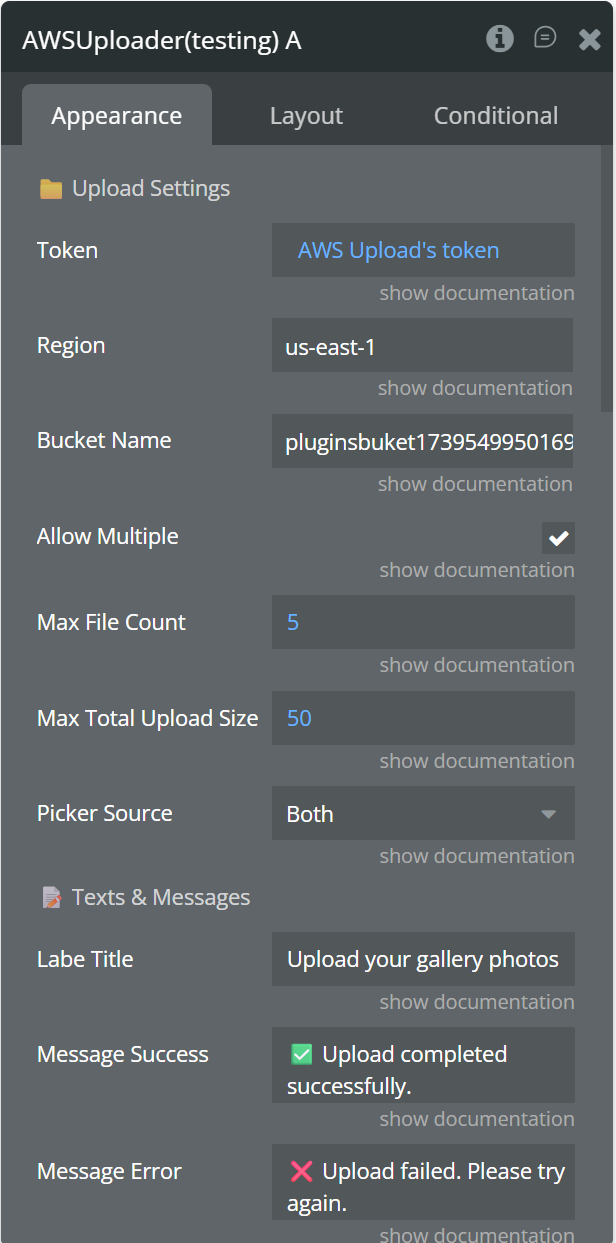
In the AWS S3 Native File Uploader element, you must set only the following three fields:
- Token
Set the token that was previously generated and saved in the element’s state.
- Region
Enter the AWS region where your S3 bucket is located.
- Bucket Name
Enter the name of your S3 bucket.
These fields are mandatory.
If any of them is missing or incorrect, the upload will not work.
Plugin Element - AWS S3 Native File Uploader
The AWS S3 Native File Uploader is a Bubble Native (React Native) plugin element that allows users to upload files directly from mobile apps (iOS & Android) to an AWS S3 bucket using pre‑signed URLs.
The element includes a modern, customizable UI, supports multiple file uploads, gallery & file manager selection, progress tracking, file deletion, and exposes rich Bubble states & events for full workflow control.
Uploads are performed securely, without exposing AWS credentials on the client.
Fields
Field Name | Description | Type |
Token | Security token sent to backend | Text |
Region | AWS region (ex: us-east-1) | Text |
Bucket Name | Target S3 bucket name | Text |
Allow Multiple Files | Allow selecting multiple files | Yes / No |
Max File Count | Maximum number of files allowed | Number |
Max Total Upload Size (MB) | Maximum total upload size | Number |
Picker Source | Default source (Gallery / File Manager) | Dropdown |
Label Title | Title text shown at the top of the UI (e.g. “Upload your gallery photos”) | Text |
Message Success | Message displayed on successful upload | Text |
Message Error | The generic error message displayed if an image fails to upload to the server. | Text |
Message Title Uploading | The main status text shown during the upload process. Use the {count} variable to show the number of files. | Text |
Message Deleting | A short notice shown while the file is being removed from the AWS server. | Text |
Message No Valid Files | Error displayed if the selected files are corrupted or invalid. | Text |
Message Permission Denied | Shown when media permission is denied | Text |
Message Limit Exceeded | Message shown when max file count is exceeded | Text |
Message Size Exceeded | Message shown when max total size is exceeded | Text |
Message Selection Canceled | The internal status text published to Bubble when the selection process is interrupted. | Text |
Modal Title Label | Picker modal title text | Text |
Gallery Label | Label for gallery option | Text |
File Manager Label | Label for file manager option | Text |
Cancel Button Text | Cancel button label | Text |
Border Color | Upload container border color | Color |
Border Radius | Upload container corner radius | Number |
Background Color | Upload area background color | Color |
Font Color | Main text color | Color |
Font Size | Main text size | Number |
Button Background Color | Icon button background color | Color |
Icon Color | Upload icon color | Color |
Exposed States
Name | Description | Type |
Uploaded URLs List | A list containing the URLs of all successfully uploaded files. | Text (list) |
File Names List | A list of the original names of the uploaded files. | Text (list) |
File Sizes List | A list containing the sizes (in bytes) for each uploaded file. | Number (list) |
Deleted File URL | Returns the specific URL of a file when it is removed from the list/storage. | Text |
File Types List | A list of the MIME types (ex: image/png) of the uploaded files. | Text (list) |
Upload Status Text | A status message indicating the current state of the upload process. | Text |
Element Events
Event Name | Triggered When |
Upload Finished | All files are uploaded successfully |
Upload Failed | Upload process fails |
Image Removed | A file is removed by the user |
Upload Started | All files upload has started |
Upload limit exceeded | The upload limit is exceeded |
Plugin Data/Action Calls
AWS - Get Token
This action is designed to securely retrieve an authentication token from server. It requires the user to provide valid credentials (accessKey and secretKey) to establish a secure connection. Once the call is successfully executed, the generated token is typically stored in a custom state to be used for subsequent file upload operations within the AWS File Uploader element.
Fields:
Name | Description | Type |
accessKey | The access key ID provided by AWS for authentication. | Text |
secretKey | The secret access key provided by AWS for authentication. | Text |
Return values:
Name | Description | Type |
token | The authentication token generated by AWS, used to authorize file uploads. | Text |
Workflow example
Generate a token, save it in the uploader state, configure the required element fields, and allow users to upload files to AWS S3.
Upload Files to AWS S3 (Bubble Native)
Step 1 – Generate and Save the Token
Event:
When Page is LoadedActions:
- AWS (testing) – Get Token
- Provide the required keys (Access Key, Secret Key)
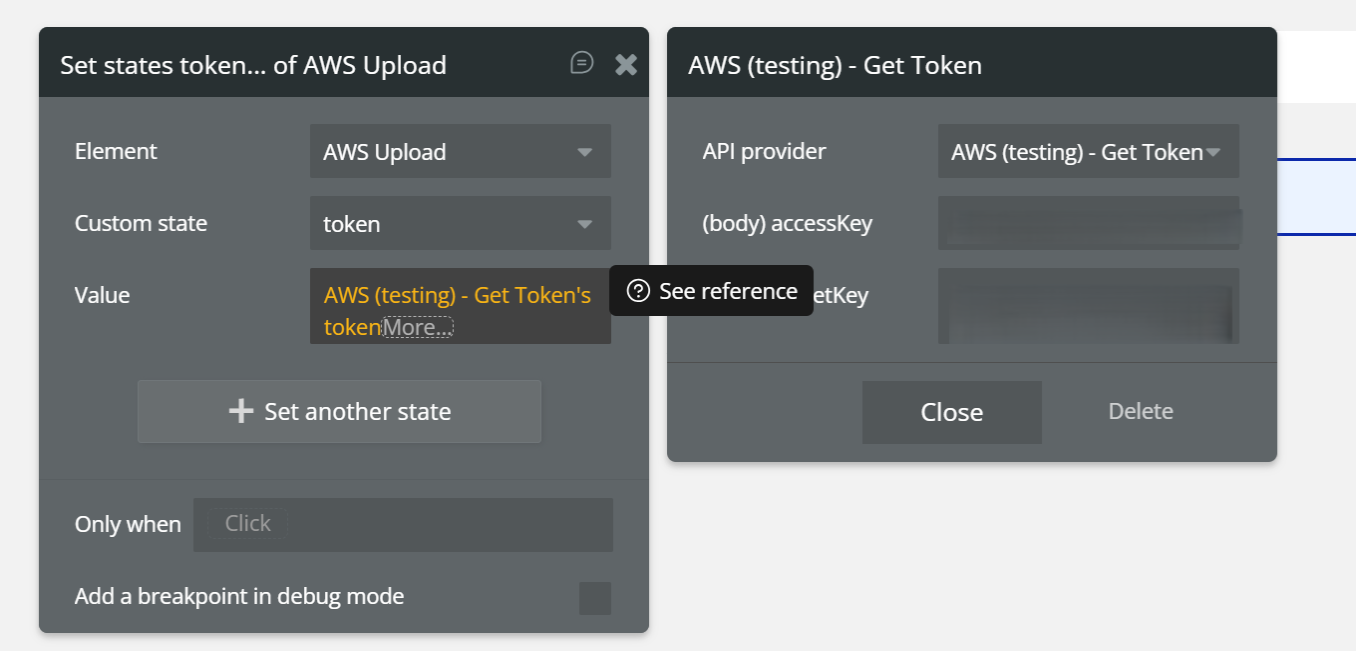
- Set state of an element
- Element:
AWS Upload - Custom state:
token - Value:
AWS (testing) – Get Token's token
✅ Result:
The token is generated and stored in the uploader element.
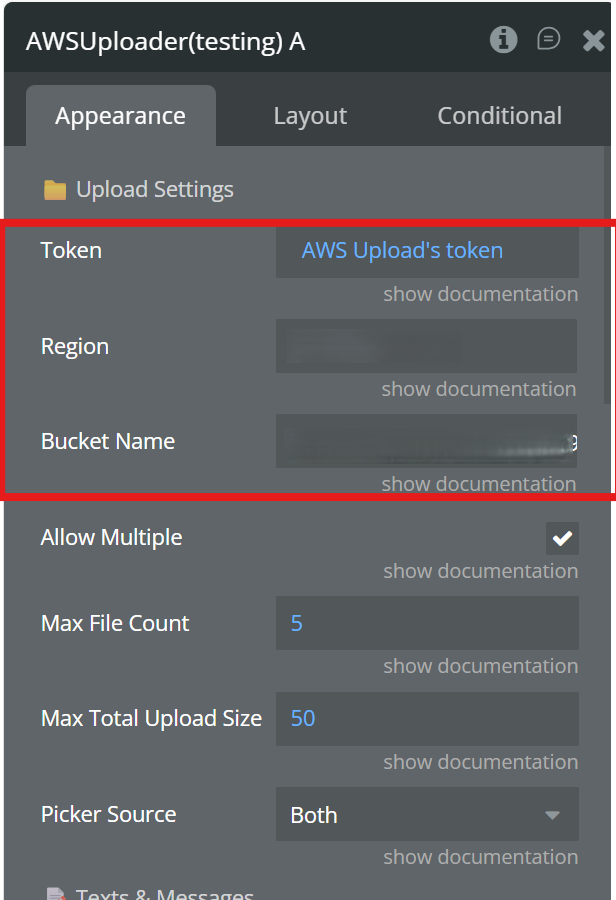
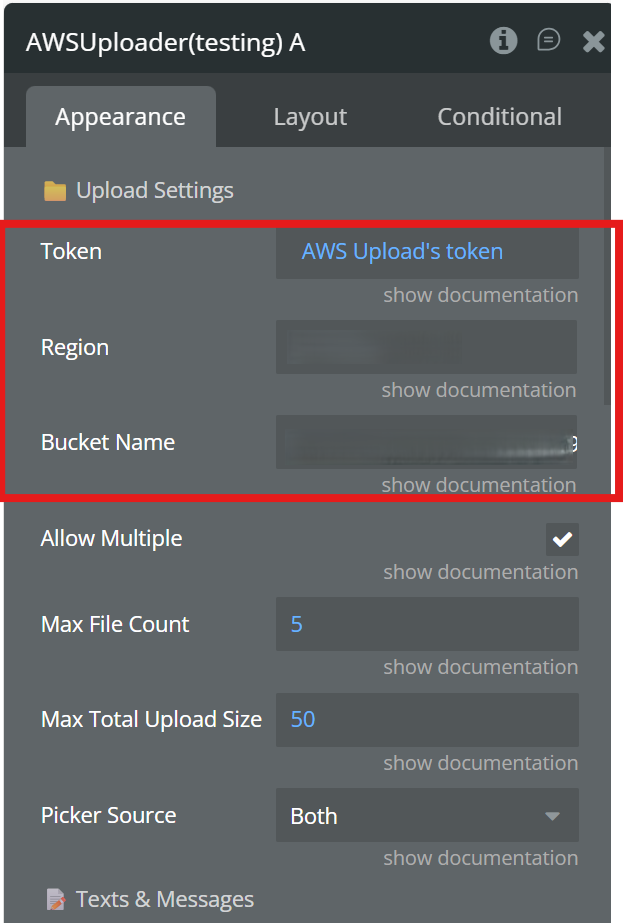
Step 2 – Configure the Uploader Element (Appearance Tab)
In the AWS S3 Native File Uploader element, set:
- Token:
AWS Upload's token(dynamic)
- Region: your S3 bucket region (e.g.
us-east-1)
- Bucket Name: your S3 bucket name
⚠️ These three fields are mandatory.
Step 3 – Upload Files
User Action:
User selects files using the uploader element.
What happens automatically:
- The uploader uses the saved token
- Requests pre-signed URLs
- Uploads files directly to AWS S3
✅ Final Result
- Token is generated once
- Element is correctly configured
- Files are uploaded securely to AWS S3
- No AWS credentials are exposed to the client

Changelogs
Update 29.06.26 - Version 1.1.0
- Bubble Plugin Page Update (Description).
Update 05.06.26 - Version 1.0.0
- Initial Plugin Release.