Link to plugin page: https://zeroqode.com/plugin/zq-oauth-10-connector-1546872680117x252339893950218240
Demo to preview the settings
Introduction
This no-code plugin allows you to connect your app to APIs that utilize the rare OAuth 1.0 method.
Prerequisites
You must have a developer account on the service that offers OAuth 1.0. For example, Twitter.
Note: Read the documentation for used service!
How to setup
I. Getting the plugin keys (Twitter example)
For getting plugin keys, read the documentation on how to create an app on wished service with OAuth 1.0 authorization.
- Go to https://developer.twitter.com/en and sign in to Twitter. You will be redirected to Twitter.
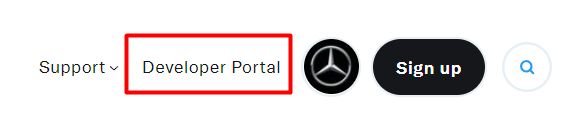
- After signing in, go to https://developer.twitter.com/en and press Developer Portal.
- Pass the questionnaire to be admitted to the application creation. It is for the first entry only.
- Go to Projects & Apps → Overview and scroll down.
- Press Create App button.
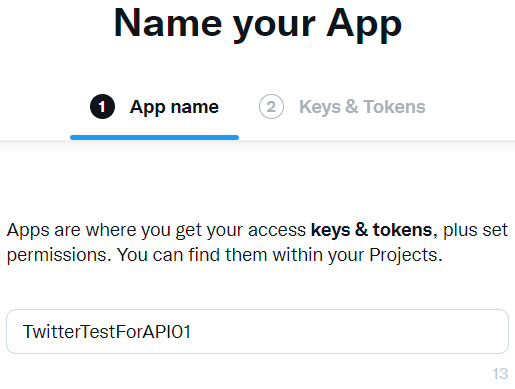
- Set the name for the app and press Next.
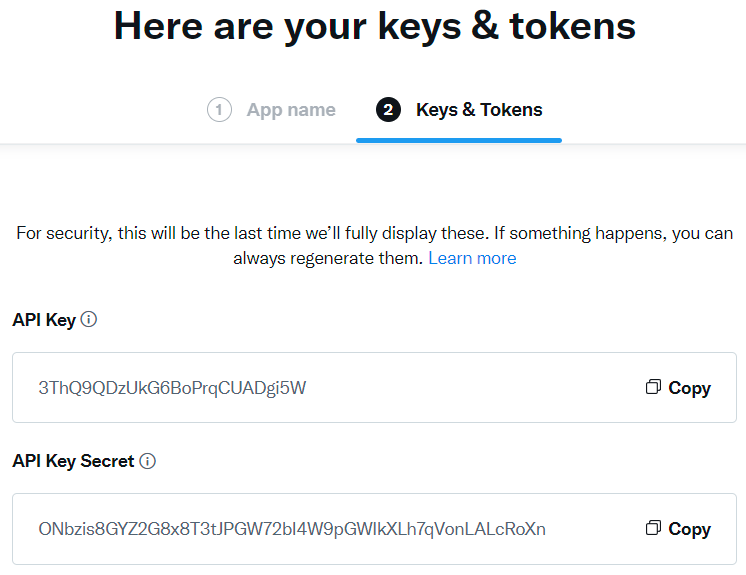
- Copy and save API Key and API Key Secret in a safe place. Then press App settings.
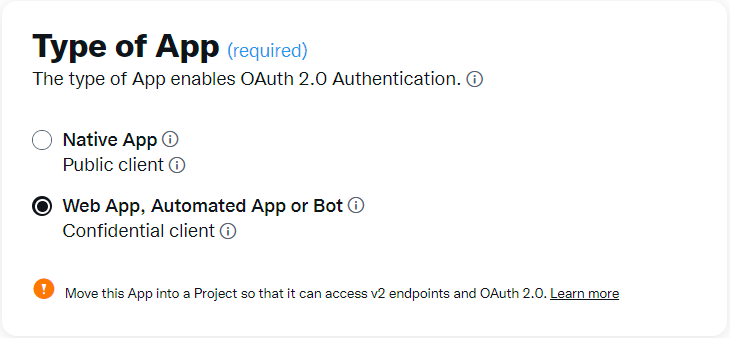
- On the Settings page, press the Set up button for User authentification settings.

- Set up the following permissions.

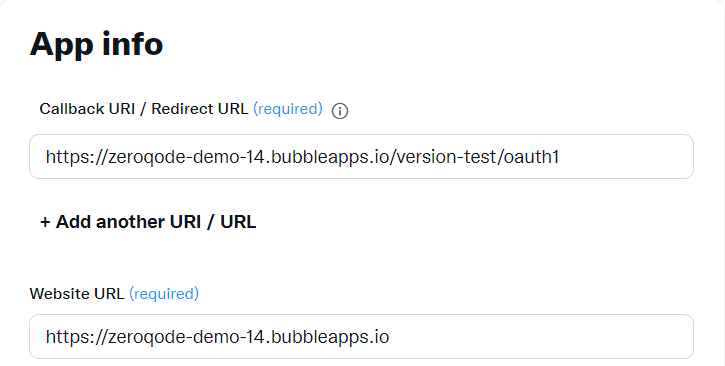
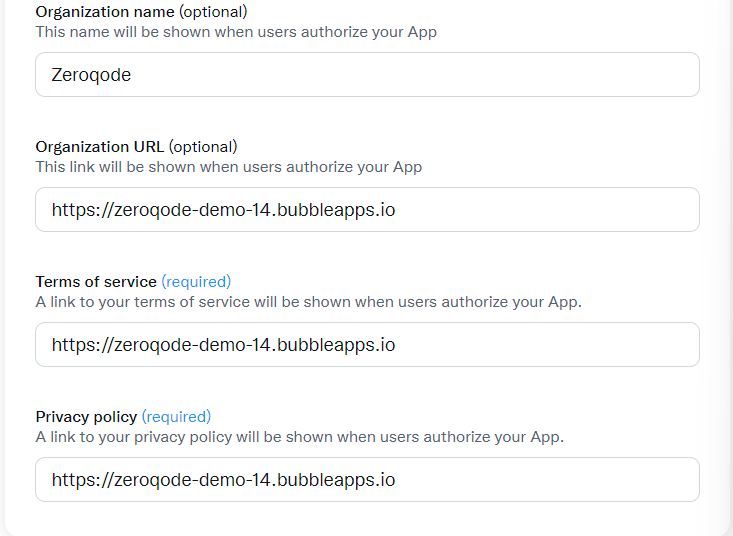
- Complete all required inputs from App info and press Save button.
II. Setting up on the Bubble side with keys
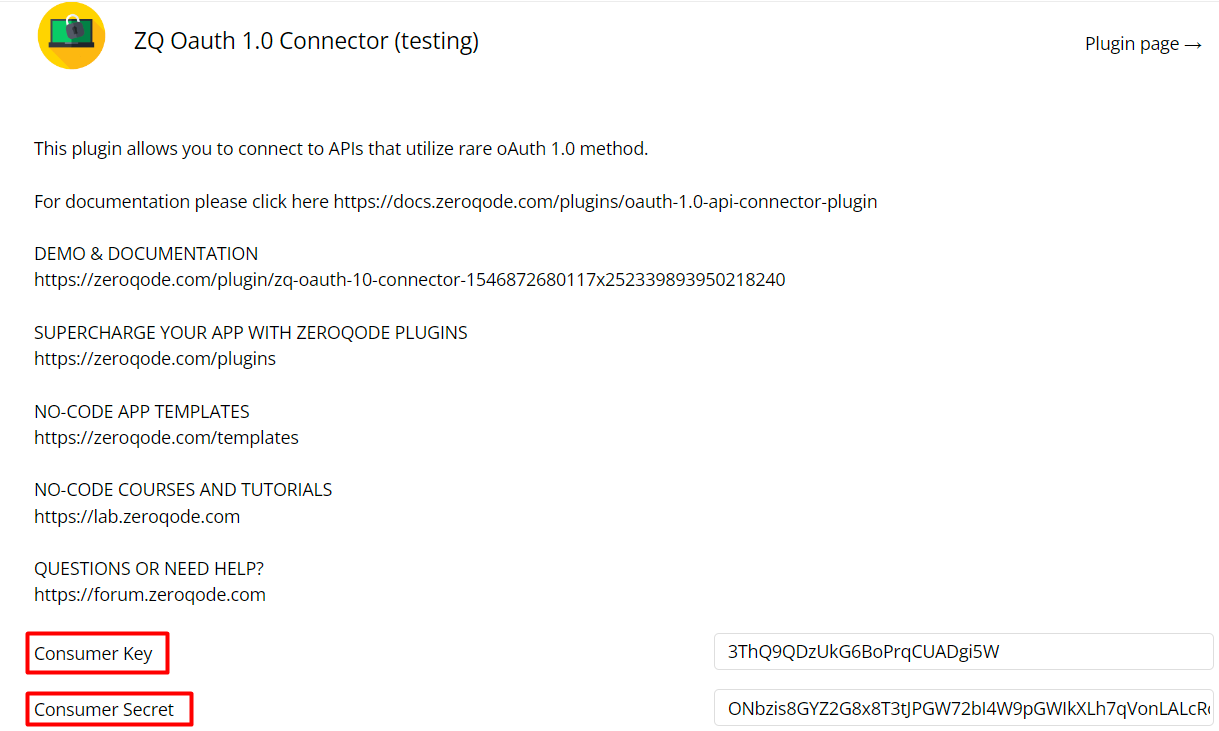
- Paste copied keys on plugin settings. API Key = Consumer Key, API Key Secret = Consumer Secret.
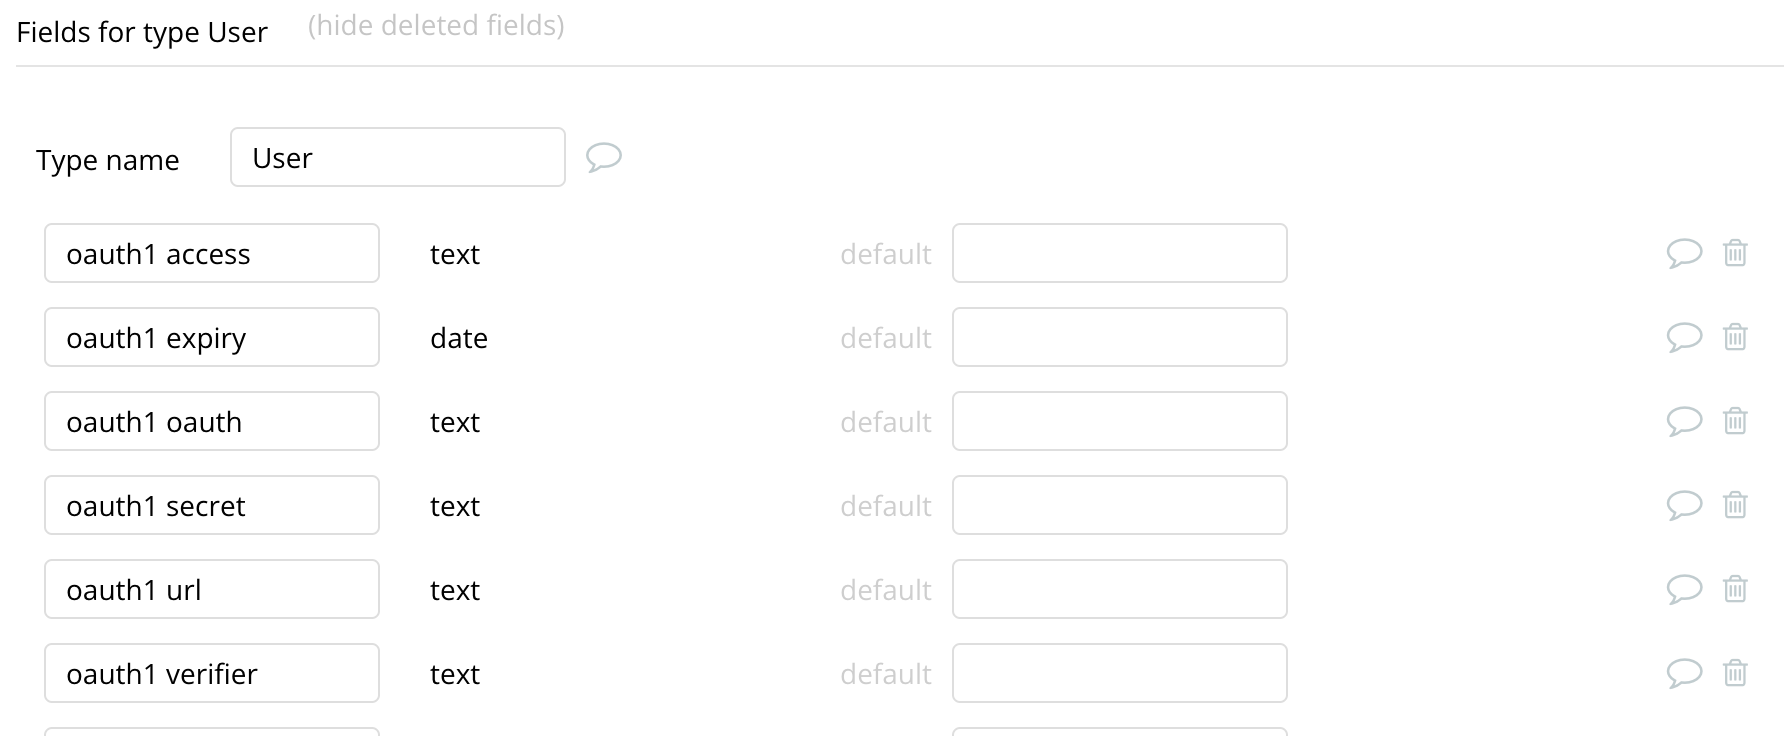
- In your Bubble app, select the Data tab and find User type.
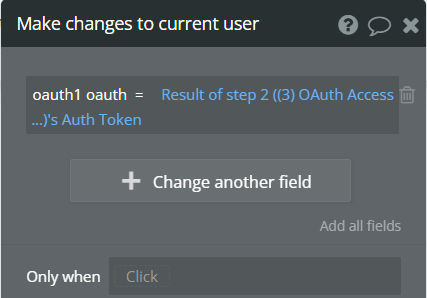
- Create the following new fields for this User type, oauth1 access, oauth1 expiry, oauth1 oauth, oauth1 secret, oauth1 url, and oauth1 verifier. It will do the authorization process easier to manage.
The fields are case-sensitive and need to be created exactly as shown below including the type of field.
User authentification
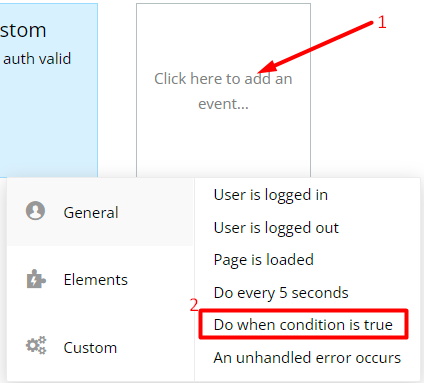
- Go to the Workflow tab of your Bubble app.
- For the authorization between your user and the service you connecting, create a workflow with the following actions…

The steps of the above flow are as follows,
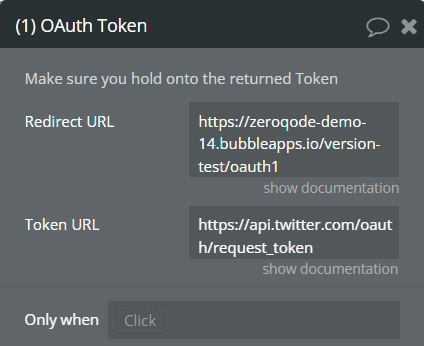
Redirect URL - it is the URL present in the Callback URI / Redirect URL list from App Info from the developer account
Token URL - it is a URL created by your service. Please read the service documentation to know how to set this URL.
Authorize URL - it is a URL created by your service. Please read the service documentation to know how to set this URL.
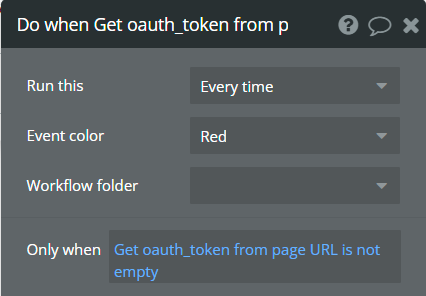
- Create a new workflow Do when condition is true.
- Set the following condition for created workflow
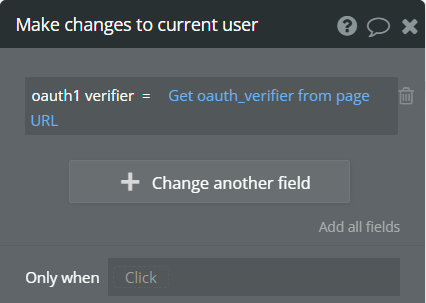
- Set up the following actions for created workflow

The steps of the above flow are as follows,
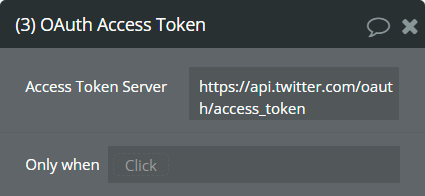
Access Token Server - This is the URL. It is created by your service. Please read the service documentation to know how to set this URL.
You will notice the oauth_token and oauth_verifier parameters will still be in the address bar, if you prefer you can use the Remove OAuth URL Parameters action to clear these.
Create a new API Call
Now you can set up your calls.
- Make sure your app is exposing a Backend Workflow.
- If your app exposes a Backend Workflow, create a new Frontend workflow with a New API Call action.
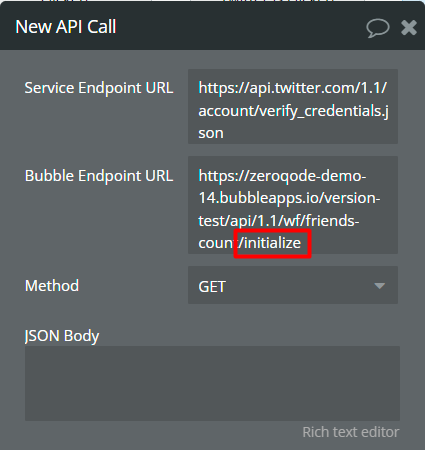
- For New API Calls, set up the options
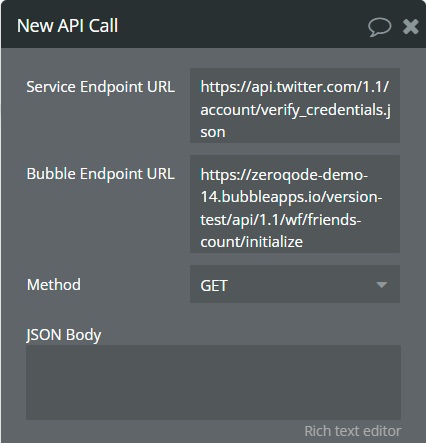
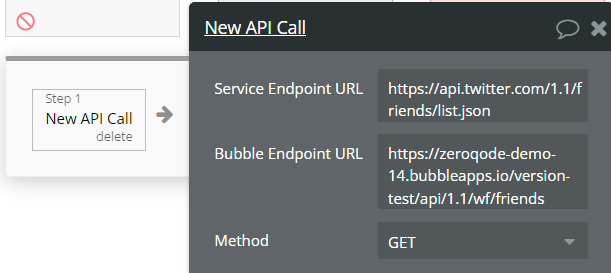
Service Endpoint URL - it is a URL created by your service. Please read the service documentation to know how to set this URL.
Bubble Endpoint URL - it is a URL created by yourself on the backend workflow. See the following steps…
Method - it is a method for Service Endpoint URL. Please read the service documentation to know how to select the method.
Your Bubble Endpoint URL should look similar to this pattern: https://yourapp.bubbleapps.io/version-test/api/1.1/wf/ + “YOUR_ENDPOINT_NAME” or when initializing: https://yourapp.bubbleapps.io/version-test/api/1.1/wf/ + “YOUR_ENDPOINT_NAME” + /initialize
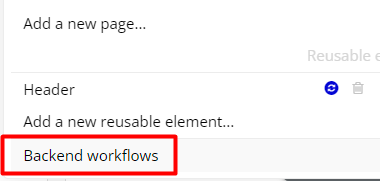
- Go to Backend workflow
- Select Current Page
- From the opened pop-up, select Backend workflows
- Create new workflow

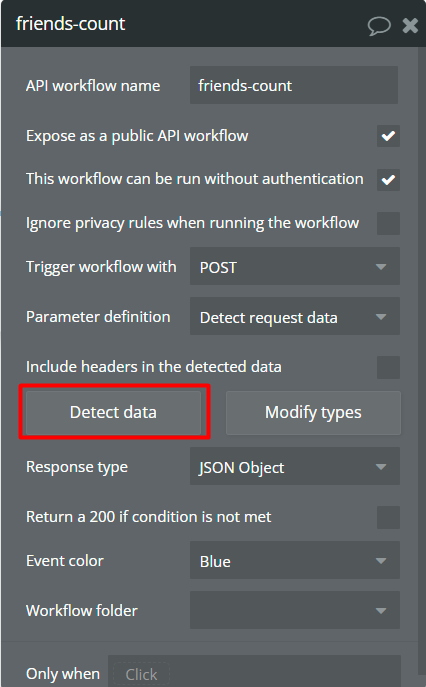
- Set up the following options for created workflow
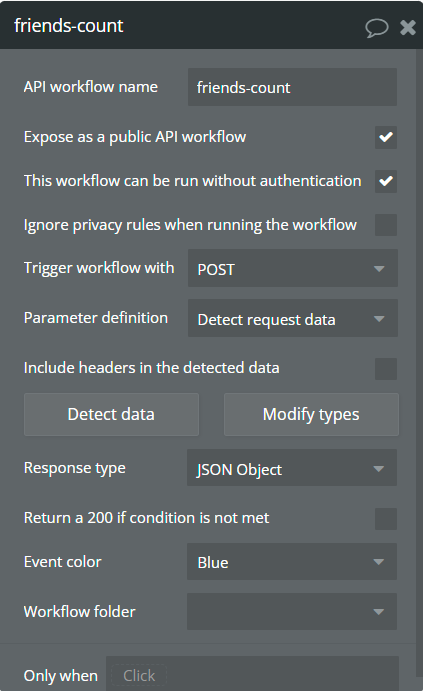
API workflow name should match with the name from Bubble Endpoint URL from step 3, https://zeroqode-demo-14.bubbleapps.io/version-test/api/1.1/wf/friends-count/initialize.
- Press Detect data button.
- Leave this window open and go to your Bubble app on Frontend.
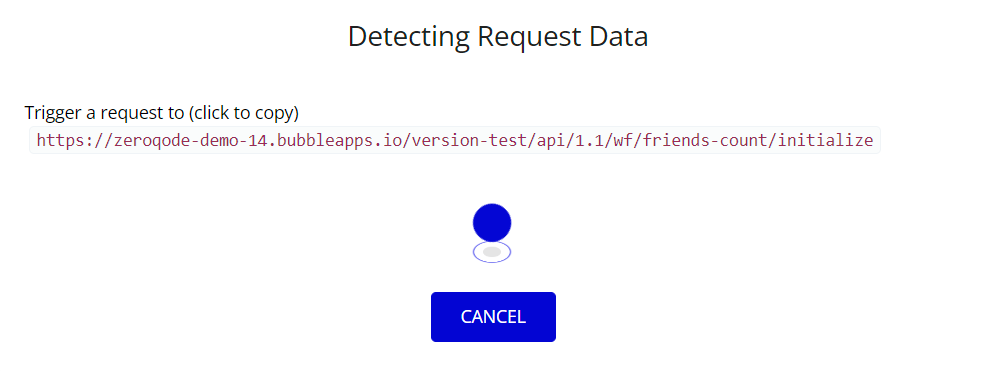
- Go to your app preview and trigger created Frontend workflow with the New API Call action. It should initialize the endpoint for the first request.

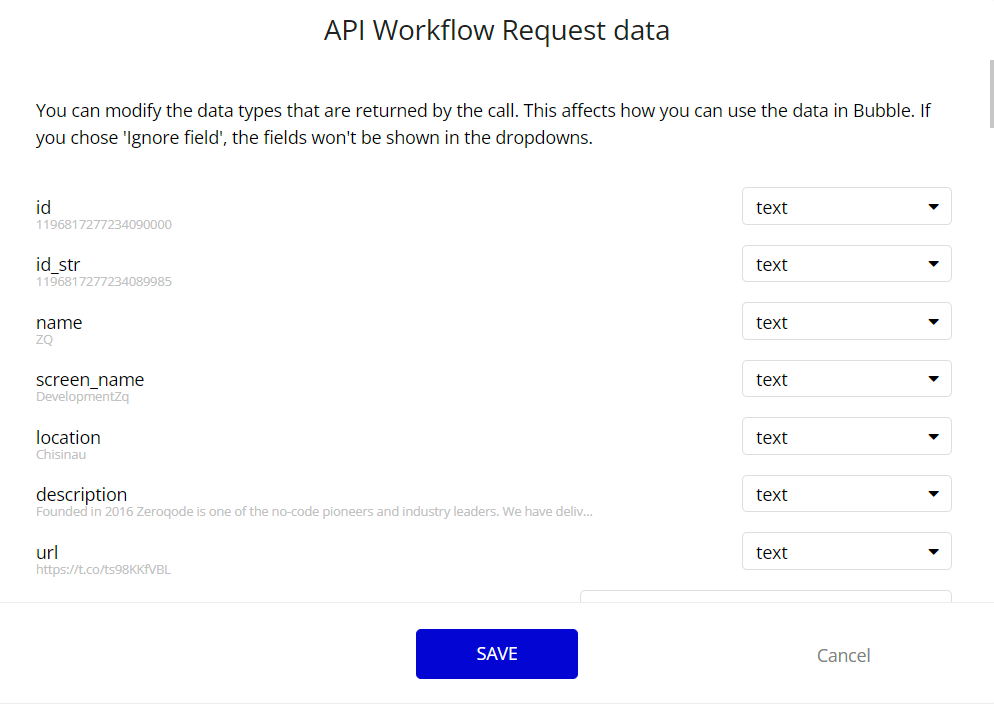
- Go to the window that had left open and press Save. Endpoint received the template of requested data. Request data to the endpoint is the response from Twitter.
- Go to Frontend workflow
- Remove “/initialize” from created New API Call action. This is used just to initialize the endpoint.
- Go to Backend workflow.
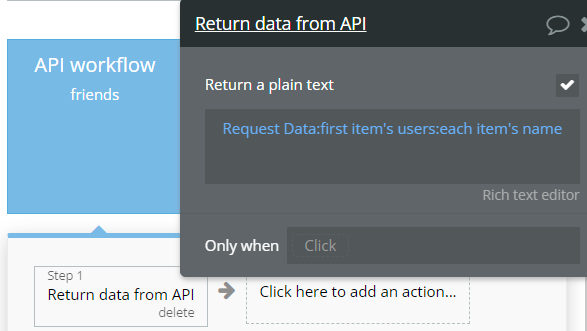
- For created endpoint, add Return data from the API action.
- Check Return a plain text.

- Customize your response
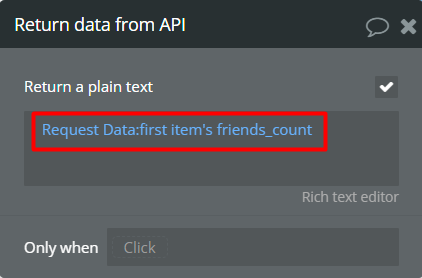
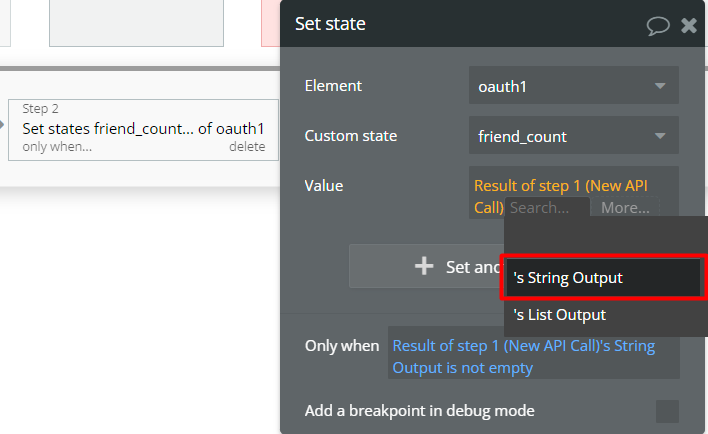
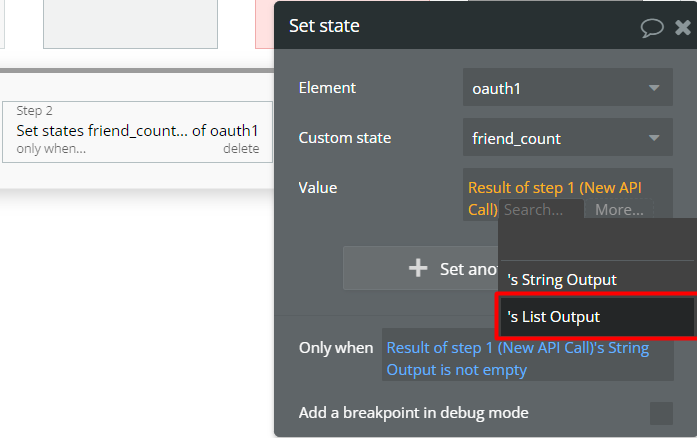
- Now you can use the returned value(s) from your New API Call.
- If your Bubble endpoint returns just one value, it is recommended to select String Output.
- If your Bubble endpoint returns a list, it is recommended to select List Output.
To provide some insight into what we are doing imagine that when you make a call to your service for data using the 'New API Call' flow, the requested data is now going to be packaged up and sent to your Bubble endpoint. On your endpoint, you can customize what data should go to your page.
Plugin Actions List
- (1) OAuth Token
- (2) Authorize OAuth Client
- (3) OAuth Access Token
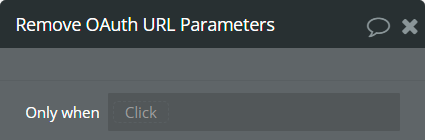
- Remove OAuth URL Parameters
- New API Call
PLUGIN ACTIONS DETAILED
Actions
- (1) OAuth Token - This action should be used to get request tokens from the service. It is the first step for OAuth 1.0 authentification.
Redirect URL: The value that will be used as the URL a user is redirected to should they approve your application’s access to their account.
Token URL: This URL is created by your service. It is used to get request tokens.
Fields:
Title | Description | Type |
Info | Important info for user | Information |
Redirect URL | Your Bubble app URL | string |
Token URL | Token request URL from your service | string |
Returned Values:
Title | Description | Type |
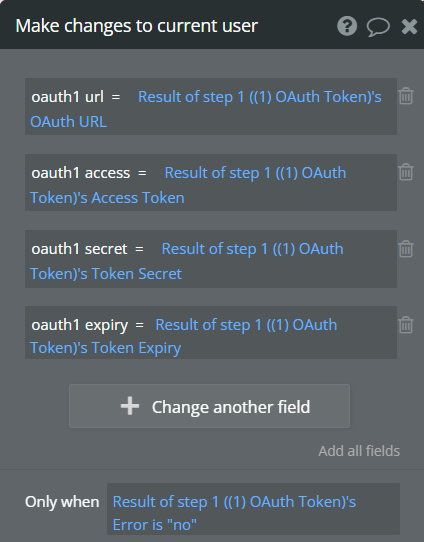
Access Token | Access token gived from service after first step | string |
OAuth URL | URL gived from service after first step | string |
Token Secret | Secret token is given from the service after the first step | string |
Token Expiry | The expiry date of the token | date |
Error | ‘yes’ in case of error, ‘no’ in case of success | yes/no |
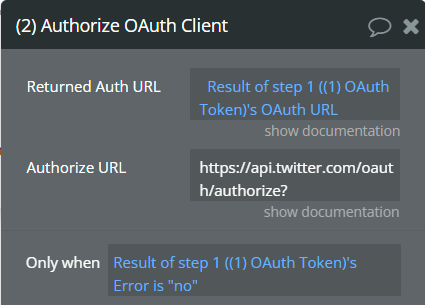
- (2) Authorize OAuth Client - This action should be used to get an authorization token for the user. It is the second step for OAuth 1.0 authentification.
Returned Auth URL: This URL must be the same as the OAuth URL returned from (1) OAuth Token action.
Authorize URL: This URL is created by your service. It is used to get an authorization token.
Fields:
Title | Description | Type |
Returned Auth URL | OAuth URL from (1) OAuth Token | string |
Authorize URL | Authorize request URL from your service | string |
- (3) OAuth Access Token - This action should be used to convert the authorization token into a usable access token. It is the third step for OAuth 1.0 authentification.
Access Token Server: This is the URL. It is created by your service. It is used to convert an authorization token into an access token.
Fields:
Title | Description | Type |
Access Token Server | Access request URL from your service | string |
Returned Values:
Title | Description | Type |
Auth Token | Access token gived from service after the third step | string |
You can read about Obtaining Access Tokens using 3-legged OAuth flow
- Remove OAuth URL Parameters - This action should be used to remove parameters from the URL. After getting access token service will redirect the user to your app. In URL will be present oauth_token and oauth_verifier parameters.
- New API Call - This action should be used to make a request to the service endpoint.
Service Endpoint URL: This URL is created by your service. It is used to make requests.
Bubble Endpoint URL: This URL is created by yourself in the backend workflow.
Method: Method used for Service Endpoint request.
JSON Body: Body which will be sent with the Service Endpoint request.
Fields:
Title | Description | Type |
Service Endpoint URL | URL for request from your service | string |
Bubble Endpoint URL | Your Bubble endpoint URL | string |
Method | GET, POST, PUT, PATCH, DELETE | Dropdown |
JSON Body | Values that should be sent to Service Endpoint in JSON format | string (optional) |
Returned Values:
Title | Description | Type |
String Output | This is used for return single value | string |
List Output | This is used for return listed values | string |
Workflow example
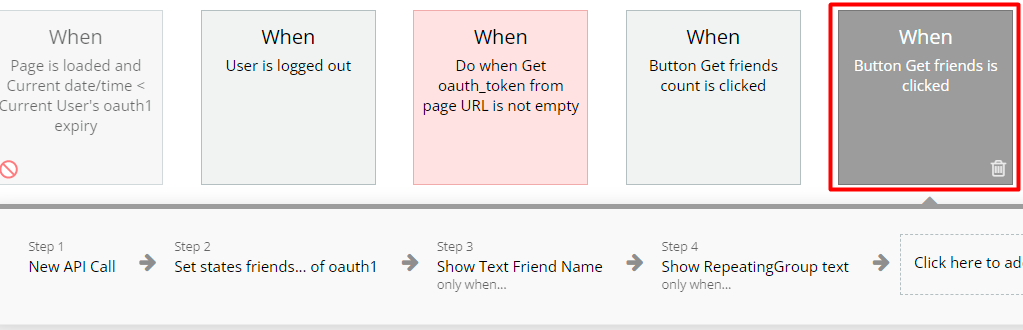
Get friends count
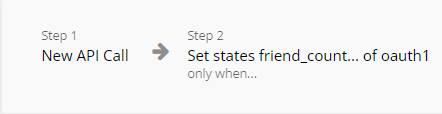
In this workflow, it is represented how to get a friend count from Twitter using New API Call action and String Output.
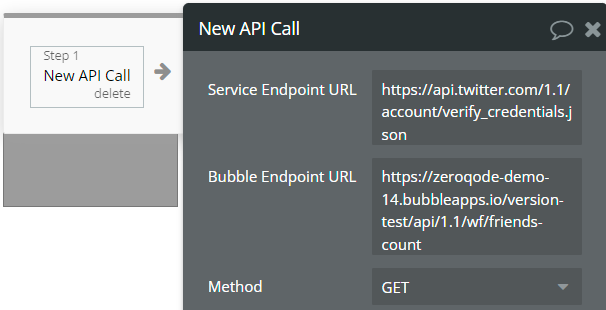
- Workflow is created like in the image below. When Get friends count button is clicked.
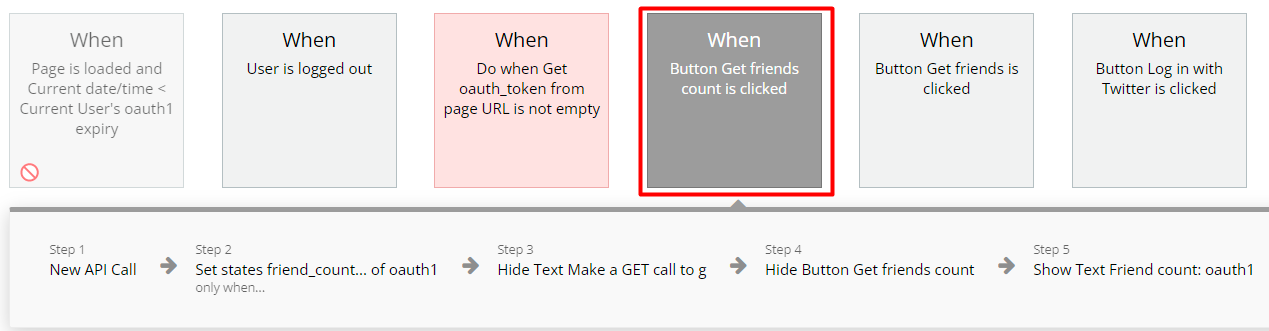
- For New API Call, set Service Endpoint, Bubble Endpoint, and Method.
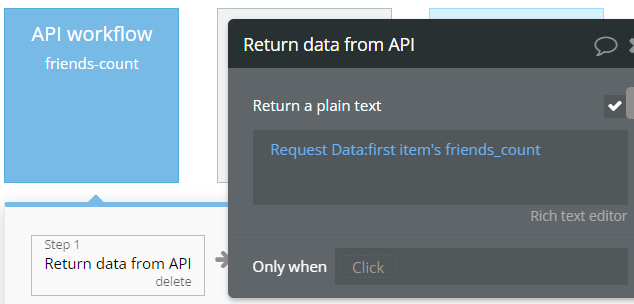
- From the backend is returned friends count.
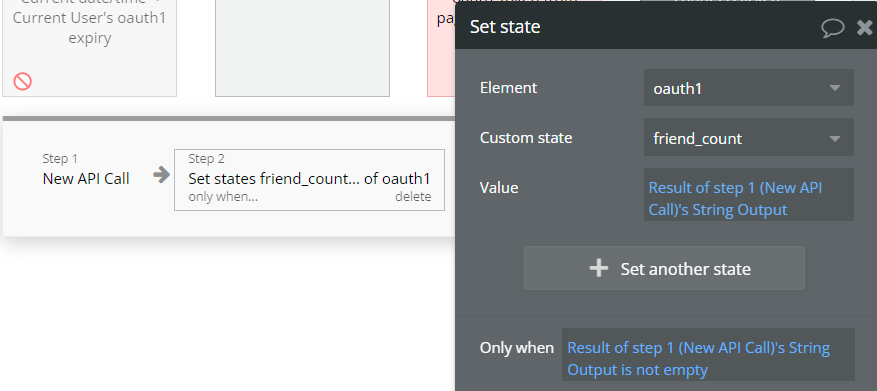
- Returned value is set on friend_count custom state.
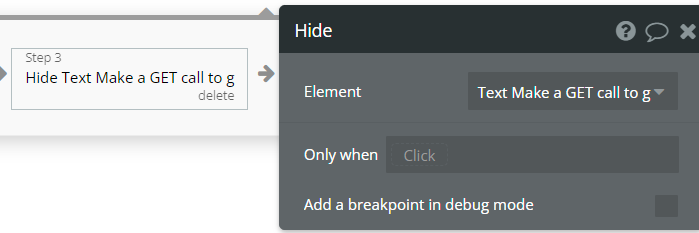
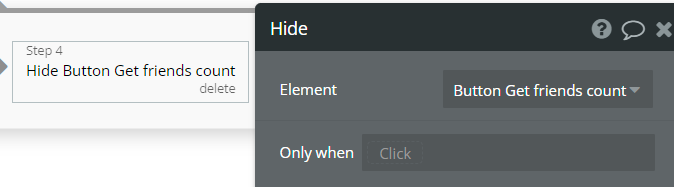
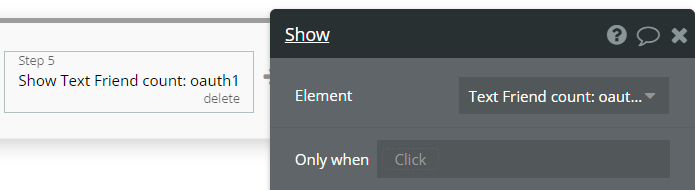
- The following steps show or hide actions for some elements on the page.
How it looks on the page
- Elements before request call

- Elements after request call

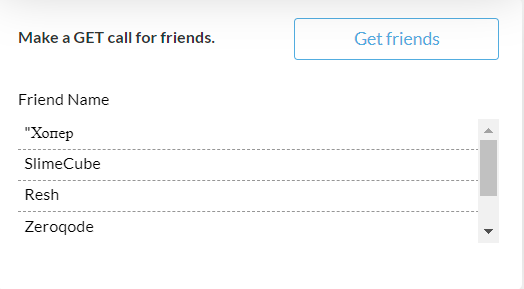
Get friends
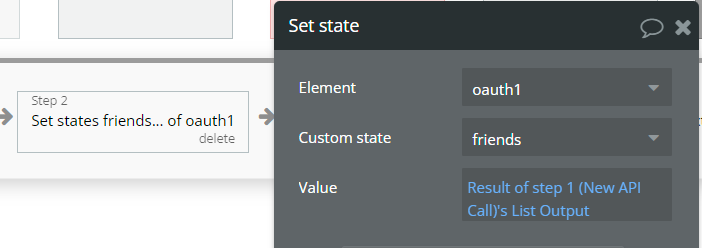
In this workflow, it is represented how to get a friends list from Twitter using New API Call action and List Output.
- Workflow is created like in the image below. When Get friends button is clicked.
- For New API Call, set Service Endpoint, Bubble Endpoint, and Method.
- From the backend is returned list of friends.
- Returned value is set on the friends custom state.
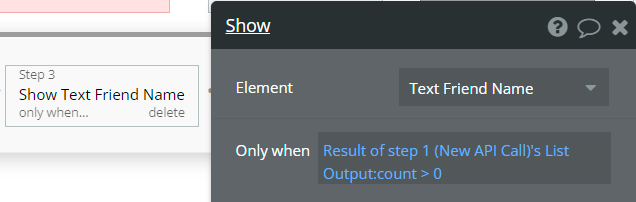
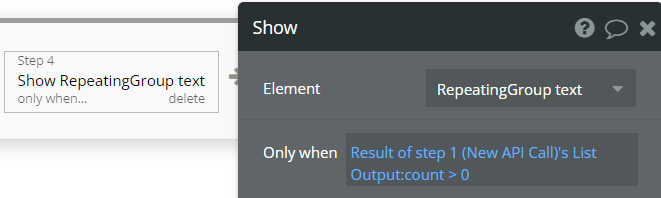
- The following steps are showing actions for some elements on the page.
How it looks on the page
- Elements before request call

- Elements after request call