
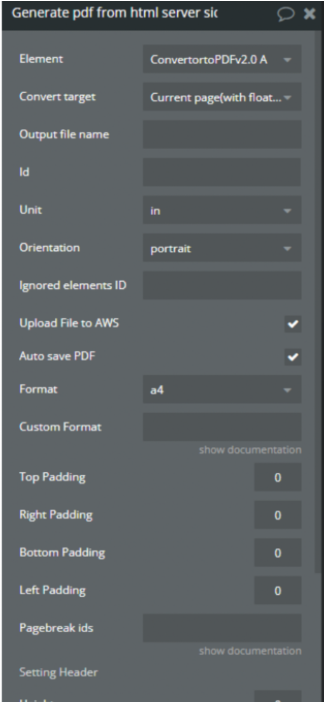
- Element - is a default setting to link your plugin to the action. You can pace multiple PDF converters on the page and then connect one of them using this field.
- Convert target - you can choose to export or the whole page, or just an element with a specific ID.
- Output file name - custom resulting PDF filename.
- ID - if in the Convert Target drop-down you set the value 'single element' - enter here this element's ID.
- Unit - the field is working with the customs form parameter, which means the units of measure for the PDF page.
- Orientation - defines the PDF page orientation (landscape or portrait).
- Ignored elements ID - PDF plugin takes into consideration all Elements, that hold any of the ID listed here (separated by comma), and ignore these when generating the PDF.
- Upload Files to AWS - if you check this field the file will be saved in the File Manager in Bubble.
- Autosave PDF - when it is checked it saves the PDF file on the device.
- Format- the size of the generated page. You can choose any of the normalized formats or 'custom format' if you want one personalization.
- Top\Bottom\Left\Right Padding - set these fields to the desired spaces.
- Rotation (degrees) - you can rotate the document if needed, setting the clockwise direction in degrees.
- Compress - you can compress the final PDF file, to make it lighter.
- Pagebreak IDs - if you want to print items on different pages, then give them all an ID, and put the IDs in this field. For example, I have three groups that I want to put on different pages. I need to assign the ID parameter to each and then indicate those group IDs into the Pagebreak IDs field. Note: use the correct format, as shown in the example below:

- Custom Format (Custom page size)- this field is used only if you previously selected the "Custom Format", In any other case, it will be ignored. Set the width and height by separating them with a comma (1300, 840).
Important: the plugin may not be able to work with other plugins that have media files. This problem is caused by the CORS browser policy (https://developer.mozilla.org/en-US/docs/Web/HTTP/CORS).
As per the fact, the plugin is not an integrated part of the Bubble, it does not have the right to access other plugin's media files. If you encounter this problem with the group you want to convert to PDF, try using only Bubble components or exclude from the group component of other plugins, to find out which exact element is not giving you the access.
Please note, this plugin does not convert the page/element, which is placed on another page. It works only with the content, currently loaded on the page.
Example of application setup
The following link will show how we have settled the example of using repeating groups, headers, and footers:
https://bubble.is/page?type=page&name=pdf_generator&id=zeroqode-demo-01&tab=tabs-2
The example has the main repeating group, which has the exact dimension of the PDF page in A4 format, and inside it another repeating group that holds reports divided into these pages.
Setting up data
We have prepared two data tables where one data table is the leading table, that holds exampled promotional content, that you may want to print into the PDF file, to keep your promotions visible. In the second data table, we have some example report, that actually needs to be delivered to your clients.

These four elements play a critical role to make it work. First, we need to set custom input. (You can use states or any other method. We used to input in the example, to make it more accessible/visible).
As we want to display only those pages that hold reports and avoid generating empty pages, we use this input to calculate how many rows will have our master repeating group following the next rule:
Search for pdf_demo_datas:count / 10:ceilingThen we settled the master repeating group, so it shows the only number of rows as specified in the previous input, following the next rule:
Search for pdf_demos:items until #Input pages's value:items until #Input pages's valueEach of these rows will display our promo materials (images, text and so), but it also contains referral input deciding the current page in PDF editor and also the starting item to display in the inner repeating group:
Current cell's index * 10 - 9The final report will display only rows 10 rows from report data, starting from the value decided by previous input.
Search for pdf_demo_datas:items from #Input with index's value:items until #10Workflow example
Here we present an example of how to correctly set up the workflow action on Button click:
- Set the event for a Button element in click
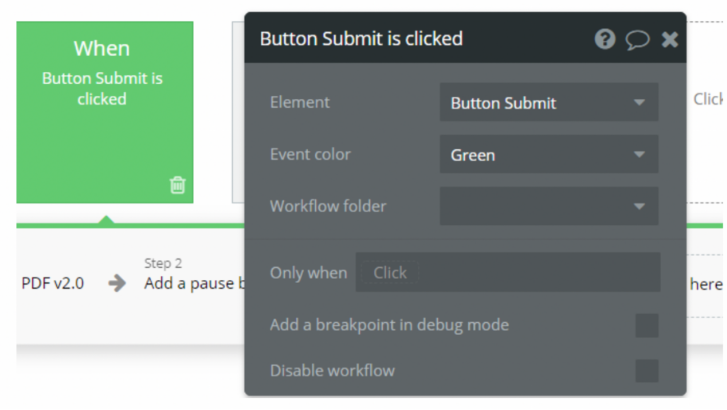
2. Add in Step 1, action Convert to PDF v2.
Please be sure to set your custom target page dimension properly for the best result. (i.e: Unit, Orientation, Format, Padding, etc.)
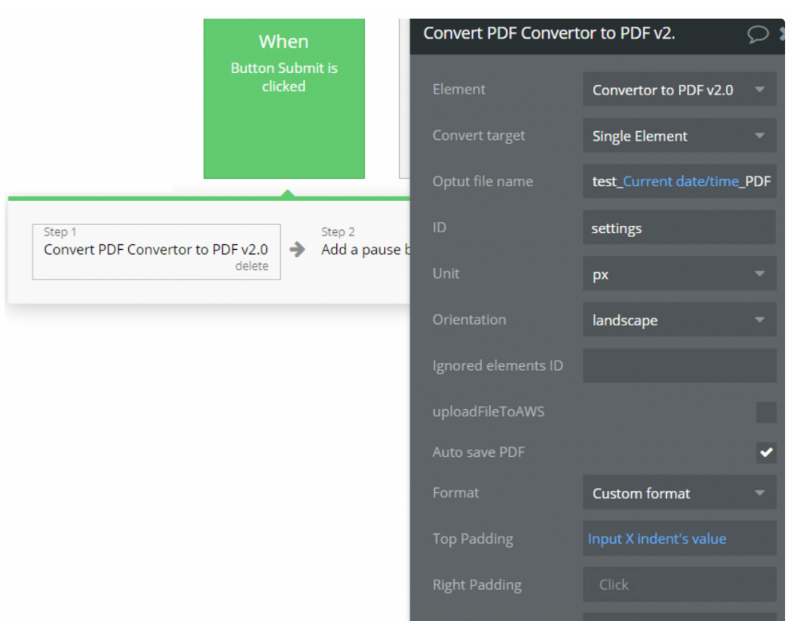
3. For Step 2, choose action to add a pause (t=1s)
4. For the last step use Reset Inputs to reset any value for these types of elements.